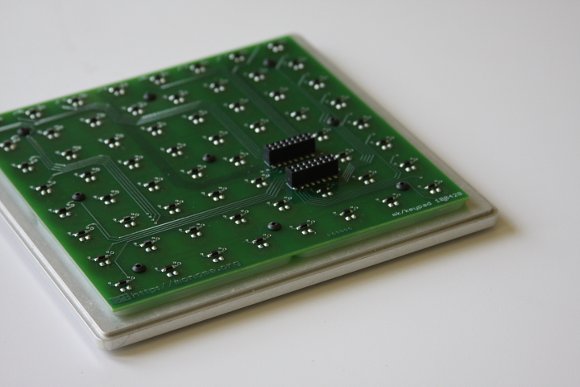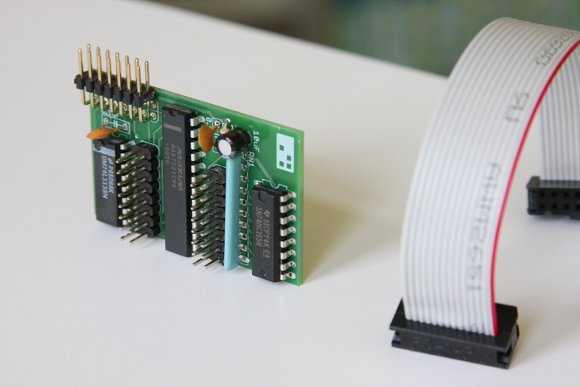
Open hardware means the ability to create exactly what you want. But it doesn’t have to intimidate the newcomer – not so long as you’re up for a project and a little creativity. The monome grid controller, long a sensation with digital musicians, finally sees a major update in its kit version. The “kit” isn’t built from scratch; instead, it includes the major components largely pre-assembled. A US$60 logic board contains the brain and USB port, with all surface-mount soldering done for you. (You don’t even have to upload firmware to make it run). A $40 driver operates the grid. $120 buys you the main guts – just add LEDs yourself (allowing you to pick a color) – and put the grid and pads into a housing.
Specs on the new version from the monome folks:
- USB bus powered
- supports up to four 8×8 keypad grids, for a total of 16×16
- auxiliary ports for additional digital or analog i/o, such as knobs, joysticks, accelerometers, rotary encoders, switches, LEDs
- boot loader for easy firmware updates and customization, no external programmer needed
- open source firmware and schematics
we’ve designed a modular system which allows scalability and customization. the individual parts are:
- logic: hub which communicates with the computer and other connected modules. easy user firmware updates allow extended functionality.
- driver: helper electronics which light up the grid and collect keypad data. connects to the logic section with a single ribbon cable.
- grid: 8×8 keypad surface, connects to the driver board directly. customizable LED color (not included).
- one driver is needed per grid. for a full 8×8, you’d need 1 logic 1 driver 1 grid. a full 8×16 would require 1 logic 2 driver 2 grid. etc.
Why use the kit? With those additional ins, you could add controls like accelerometers or even the knobs the monome is missing. You can add your own custom enclosure, made from whatever materials you like, so that you have a one-of-a-kind, unique creation no one else has. And you can change the colors of the LEDs, too. Just decide your favorite color. (“Red … no, blue! Aaaaaaa…..”)
I asked co-creator Brian Crabtree to offer some insight into the new kit.
CDM: How is the mk different from the previous kit?
– expanded capabilities while remaining bus powered: up to four 8×8 grids, auxiliary analog and digital i/o
– boot loader for easy firmware upgrades
– more elegant design– single ribbon connector, low profile
– cheaper

Why make those changes?
fundamentally it’s a response to user requests and observing what users are trying to accomplish. numerous people have built 16×16 devices from kits, which not only end up being expensive due to technology redundancy but rather unwieldy due to needing four USB ports (many people embed a powered USB hub). luckily our router software is very capable of combining smaller grids into a large grid, so functionally these mega-devices work great.
most users require some form of analog control (in the form of a knob or slider box) to compliment their button mashing. while the old kit had some minimal facilities to collect analog input, this new revision has a wide, customizable auxiliary section: up to 8 analog inputs (potentiometers, etc) or 8 rotary encoders, and numerous additional switches or programmable LEDs. we’re hoping the kit can facilitate users building highly-tailored devices that match a unique performance style.
the introduction of a boot loader seems like a boring technical matter, but i feel this is one of the more opportune moments for both customization and community building. a boot loader basically allows the firmware of the device to be updated remotely without using a hardware programmer or opening up the device. paired with the fact that everything that went into this kit will be released open-source, i’m expecting variations of the standard kit functionality will appear on the forum and wiki. these will be easily accessible to all kit users, not just those adventurous enough to buy a programmer.
and what might these variations be? two ideas, one trivial, one less so. a very often requested feature is to change the startup animation– very easy now. an often used method host-side could be moved to hardware-side: view offsetting. add four auxiliary keys to an 8×8 grid, each key could used to change which quadrant is viewed within a larger 16×16… like virtual pages, but not virtual.
the design has been refined to be lower-profile, no longer using an FTDI breakout board as the logic section is fully surface mount and pre-assembled. fewer ribbons cables are necessary with the application of board-to-board connectors. the keypad grid has been redesigned using a fancy multi-layer board to enable perfect tiling.
lastly, it’s cheaper. very substantially if you’re building a grid larger than 8×8. these are all still assembled, tested, and packed by kelli and myself up here in the catskills.
How would you direct people to begin on the enclosures? What sorts of creative solutions have people found?
i’d suggest avoiding the impulse to purchase a pre-fab monome case simply to get started using it right away. enclosing the kit is a great opportunity to explore design and appreciate the building process.
See our separate story with some enclosure ideas to stimulate your imagination. -PK
Okay, anticipating a likely question from readers and monome fans: “I’ve never done an enclosure before, but I want to learn. Where do I start?”
i’d start by first using your imagination, then perhaps looking at what others have done. hundreds of people have posted photos and build logs of their kits on the monome forums.
We’d talked a bit privately about why you’d do serial-over-USB (that is, using drivers for the monome’s FTDI chip). What’s the logic behind this choice?
USB *is* serial. we use a transceiver that has a widely supported driver which creates a virtual serial port. the major reason we’ve chosen this method is that it exposes the lowest level of communication directly to the user in a manner that’s easily accessible to essentially every programming language and environment. it’s incredibly efficient and fast.
packets and protocol can be formulated to allow optimal communication– for example, there’s a message to update a full 8×8 frame of pixels, packed into 9 bytes. if we were to update 64 LEDs with 3-byte MIDI (assuming a traditional note-to-keypad relationship) it’d be 189 bytes, not to mention that conforming non-traditional data to a MIDI-centric topology is often unintuitive.
we feel the hardware should have a proportionally light burden involving communication so that the chip can be freed up for its intended purpose– updating displays, collecting data, as fast as possible for low latency. we’ve certainly accomplished this– monome latency is insanely small. the host computer can handle the more complicated communication– in our case we suggest our router which translates serial to OSC, making a readable, dynamic communication layer available to other apps.
Ed.: Note that this driver is now often included in the Linux kernel – making a netbook + monome performance rig, for instance, a tasty choice. More on that soon. -PK

Several years on, what still makes the monome kit stand apart from other grid controllers and DIY options? (No need to mention those by name — what’s special about the monome?)
the decoupled grid controller originated with the monome. the monome community has amassed an amazing collection of contributed applications over the years, most following our preference to keep sources open.
simply put, these applications work best and most easily with monome devices. the community is terrifically active and supportive which is encouraging for newcomers and prospective builders.
this may sound like i’m shaking my own hand, but i’ve been thinking about and refining this device constantly for almost ten years. i hope we’re starting to figure it out.
Readers: want to see more of the monome kit? Need a little more handholding for building one? Let us know, and we’ll hook you up. -PK