
The KORG nanoSERIES has a rabid following among many Ableton Live users, and with good reason. The nanoPAD and nanoKONTROL street for about US$60, provide basic knobs + faders + transport (KONTROL) and pads and X/Y control (PAD), plus a fully-featured, cross-platform editor, but still fit in a backpack. They’re small enough to use in coach on an airplane.
Having to open Live templates, however, just to get the mappings you want is a big pain. So, instead I’ve created a basic set of MIDI Remote Scripts and Kontrol Editor templates for Mac and Windows, Live 6.x and later, and wanted to share them with you.
If you’re Windows-based and a big fan of the nano, I will say that I recommend you use something else altogether – the brilliant nativeKontrol. It’s a hell of a lot more sophisticated, gives you more control, and still requires no template:
nanoLive
Of course, there are some advantages to my (otherwise inferior) humble solution. It’s free, it works on Mac, it’s completely editable, and much of the idea was to provide an easy way of learning about MIDI Remote Scripting. (Check out the tutorial below.) Now, knowing CDM readers, I imagine someone out there can improve what I’ve done, so feel free to modify it and please send us a copy of what you’ve created!
korgnano_live.zip [Cross-platform archive; will update with a fancier release later on once I’ve gotten some feedback]
Ableton Live MIDI Remote Scripting How To: Custom Korg nanoSERIES Control
And, of course, read all the instructions…
Install instructions:
1. For full control, upload the templates to your Korg nanoSeries using the Kontrol Editor, via the Communication menu. (See your manual for more.)
2. Place the proper folder(s) in your User Remote Scripts folder, inside your user preferences folder (NOT the Live program folder). That’s something like (Windows Vista/7):
[Windows boot drive] > Users > [username[ > AppData > Roaming > Ableton > Live [version] > Preferences > User Remote Scripts
or (Mac OS)
[boot drive] > [Library folder] > Preferences > Ableton > Live [version] > User Remote Scripts
3. Start Ableton Live 6.x or later (restart if it was already running)
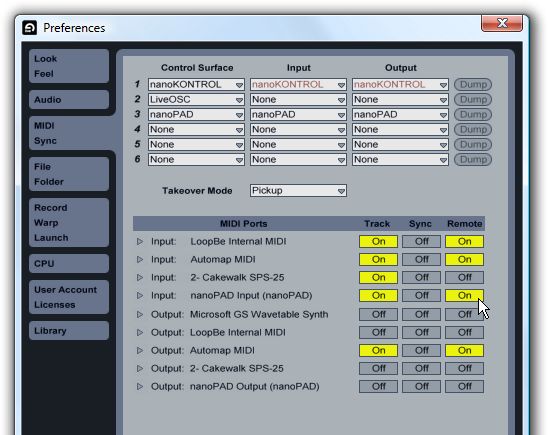
4. Select the device. Choose Preferences > MIDI/Sync, select Control Surface in the first column (nanoPAD or nanoKONTROL), and then its Input and Output ports. Finally, enable the Control Surface Input for Track and Remote. Note that you can have more than one control surface, so if you’ve got both nano’s plugged into a hub, set them both up!
Usage instructions
nanoKONTROL Scene 1 is for device control. The buttons act as triggers for pads in drum devices, and the faders control the eight Macro encoders in any selected Rack. You’re free to assign the scene 1 knobs to whatever you like.
Scenes 2-3 control tracks: the top button record arms tracks, leaving the button button free for whatever you like (mute, enable/disable). The faders control level on tracks 1-8, and knobs control the first send for each track.
Scene 4 is basically unassigned and ready for custom assignments.
Across all scenes, fader 9 is the master level. Transport buttons are automatically mapped and will work as expected.
Because there are so many controls free, I’ve created a sample template that pre-maps some parameters. In case you prefer to work that way, that template can get you started.
nanoPAD: The nano is much simpler, but I’ve set up the X/Y pad to dynamically trigger the first two parameters in a rack, making this much more fun to use with a Drum Rack. I like having access to all 8 Macros, so I’ve spread them across the four scenes. The pads will dynamically map to the first 16 pads, with 1-12 on scene 1 and 13-16 on the top of scene 2. There was some trickery to allow you to map these pads more or less as you see them in the software, beyond those first 16. I’ve provided alternative versions that allow easier continuous melodic control or keep CC 1 + 2 consistent across all four scenes.
(I didn’t say that very well, so if anyone’s feeling really motivated and wants to do a quick post or video of this or even modify them and make them better, feel free!)
To avoid accidentally triggering parameters with the X/Y pad, you can either turn flam/roll mode on all the time, or make sure instruments you want to play are added to racks first.
For more detailed instructions on Live setup and how MIDI Remote Scripts work, please see the separate tutorial!

Scripts for KORG nanoSERIES and Ableton Live by Create Digital Music is licensed under a Creative Commons Attribution-Share Alike 3.0 Unported License.
Want to help motivate me to do more stuff like this? (I and others on Planet CDM really will — open to non-KORG, non-Ableton requests!)