For all of you who are considering participating in this weekend’s Circuit Bending Challenge, I thought I’d offer a few tips on getting started and some creative/low-budget ideas.
Finding that special device
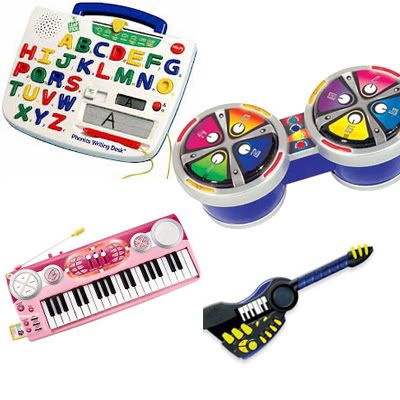
What makes a device bendable? Two words: cheap construction. Most toy musical instruments are made very cheaply and operate on somewhat simple principles of synthesis/sampling. So what are the telltale signs of a bendable device?
1. Does it make a neat/terrible sound? Keep in mind- this object makes sounds, which you are going hear a whole lot as you modify. It helps if you enjoy the sounds to begin with, or conversely that you absolutely hate them and want to change them completely.
2. Look at the size of the case- once you open it up, will there be enough room inside to kludge around and put more things in? Most toys do, but any micro- or keychain-sized devices do not.
3. Play around with it, if possible before buying. Keep some AAA and AA batteries in your pocket, and a small screwdriver in case the battery compartment is bolted on. There’s nothing worse than taking a potentially fun device home and discovering that it’s completely dead.
4. Does it have a funny or awesome name? Chances are, yes. Who comes up with these names stamped in plastic, I do not know. But often, they are weird and hilarious.
One word to the wise:
WARNING: UNLESS YOU ABSOLUTELY KNOW WHAT YOU’RE DOING, ONLY BEND DEVICES THAT OPERATE ON BATTERIES
I’m serious.
What kind of bends can you expect?
There are generally two kinds of toy instruments out there:
1. Synthesizing devices, which generate sound through actual (cheap) oscillators, filters, etc. Some cheap keyboards work this way,and I’ve found a few electronic drum kits that do. Speak and Spells fall in this category also. These can be bent in numerous ways to distort, short circuit, and self-oscillate. What does this translate to sonically? Anything from squidgy bleeps, to analog synth-sounding waveforms, to escalating (siren-like) tones to white noise. These are the easiest to bend, because pretty much all the circuitry is dedicated to audio generation.
2. Sampling/sampled devices, which play back a pre-recorded sound from a memory chip. These can be a little more complex, or less inviting to the casual bender. These can be modified by changing the sample rate of the chip (often with a variable resistor) for wild pitch bends and glitchy, digital blurps, or by shorting out the chip and triggering “partials” of the recorded sound. Sometimes, a contact point can be found that causes the sounds to loop indefinitely.
How to go about finding a bend point:
First, get out your screwdriver and remove the back of the device’s housing. At this point, you have several options. Trigger a sound, then:
1. Lick two fingers and touch them to various points on the circuit board.
2. Use your screwdriver to bridge two points
3. Use a wire that’s been stripped at both ends to bridge two points
4. if you want to be more analytical, use a bit of wire with alligator clips at both ends. Anchor it to one point, then touch the other point around the board while triggering sounds.
The most likely points will be all the numerous solder points surrounding any ICs (chips) on the board. Also- try to avoid the contact points that connect to the battery. Not all parts of the circuit can handle a full battery voltage.
Add-ons
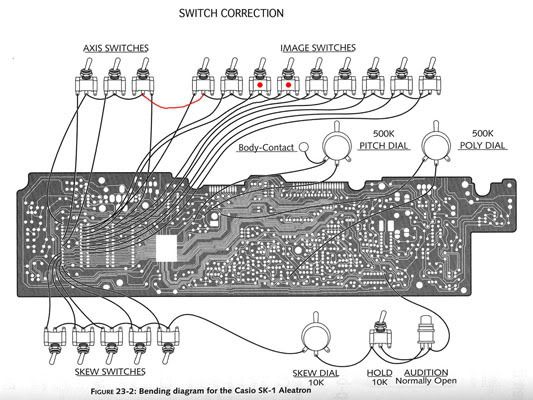
Once you find that bridging two points makes a cool sound, mark them with a sharpie. At this point, you can consider doing a more elaborate modification to the device that starts with attaching a wire to each of the points.
The easiest and simplest solution from here is to leave the wires like that, and touch them together when you want to bend that point. However, this isn’t very ergonomic and you’ll have pokey wires going everywere.
If you were to run those wires to some flat metal objects (like pennies or other copper coins), you could use your fingers to touch the coins and bridge the contacts. This is called a “body contact,” because it uses your skin’s conductivity to bridge the connection.
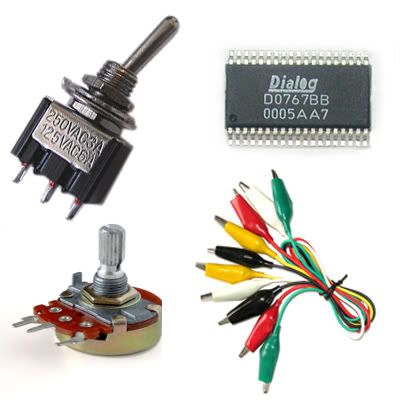
One of the most common techniques is to then put a switch between the wires that can be turned on/off. From here, it can get complicated. Some people build elaborate patch bays to contain all the interesting points. Others prefer covering the surface of the device in all kinds of switches.
Another technique that can create different sounds is to put a variable resistor (potentiometer) connecting the two wires. As resistance is increased/decreased across that connection, the sound will change.
More advanced benders will add in other pre-built circuits like oscillators, filters, etc., which can quickly beef up a simple device into formidable synthesis engines.
Tools you will find useful:

Here’s my recommended shortlist of tools that you’ll find helpful:
Soldering iron + solder
Hot glue gun (for securing your soldered points or holding on knobs)
Alligator clips (with wire connecting two of them, preferably)
Needlenose pliers
A smallish screwdriver
A few quick recommendations
Quick, cheap and dirty works. Especially for your first couple of times. Don’t worry about aesthetics, usablility, etc- just have fun and make crazy sounds. The rest will come over time.
Look around your house for junk to use. Wooden pegs for knobs, paper clips, whatever. If it conducts electricity or you can glue it, it’s fair game.
Now get out there and bend!
[Ed.: Again, the definitive printed-on-trees reference to this stuff is the following book — highly recommended! We don’t do product endorsements too often, but this one is well worth it. -PK]