There’s obviously something about big. In the 1988 film Big, the iconic scene featured Tom Hanks and Robert Loggia tapping their way across FAO Schwartz’s oversized piano. Now, it’s the drum machine’s turn.
David Crowder*Band drummer Bwack made the oversized stage version of an MPC-style set of drum pads, seen below and on CDM in 2008. That model featured a rack for a computer, making it a real workstation.
This week, to celebrate the launch of their new releases of Reason and Record, Swedish music developer Propellerhead had their own entry. It features not only pads big enough to dance on, Big-style, but massive architectural projections on one of the biggest buildings in Sweden.
But it wasn’t enough just to see a few minutes of this thing in action. I wanted to make sure we could find out how the team that built it put this project together.
Perhaps all of this will mark the beginning of Brobdingnag-scaled musical instruments. (That’ll be the opposite of Lilliput. It’s the one with the giants.)
Propellerhead’s Ryan Harlin talks to CDM about all the little details that made up this giant creation.
CDM: Can you describe the physical device? How big is it?
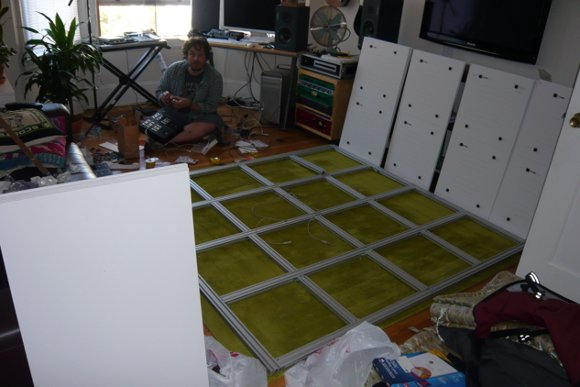
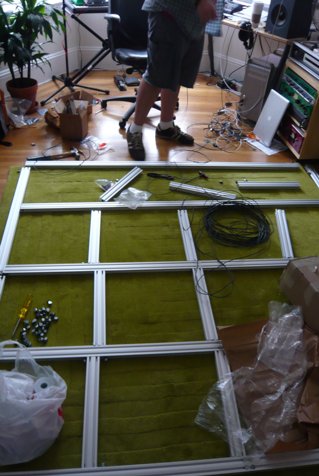
The physical controller surface measures 74.5 inches square (that’s 190cm for the metric folks). Each pad is 16 inches square and it’s all housed in a 1X2 inch aluminum modular frame that provides the sidewalls in which the pad buttons rest. In keeping with the Swedish company… it was like a piece of Ikea furniture on steroids – right down to the little hex bolts. We wanted to build a device that was massive but we didn’t want to lose site of its ultimate utility. It had to be danceable. If you make each pad too big then the ability to play adjacent pads becomes too difficult. Too small and it’s… well… too small! I actually started experimenting with size and choreography by dancing on my kitchen floor tiles.
The pads themselves are 1″ thick clear acrylic (plexiglas). They were sanded down with an orbital sander on both sides to give them the necessary diffusion and frosting effect. The pads were easily the heaviest part of the unit but their weight helped give a very responsive tactile feel to the controller. When you stomp on something with the full force of your legs you want to hit something that feels solid, and they certainly did!
We also had strips of LED lighting running under each pad. We set up a dual color system that kept the pads glowing blue when the button was in the off state and it turned white and twice as bright in the on state (twice as many LEDs).
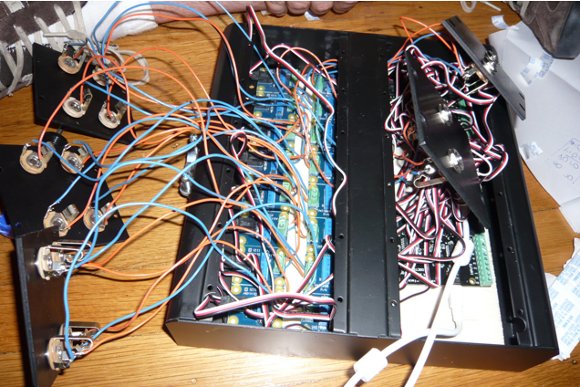
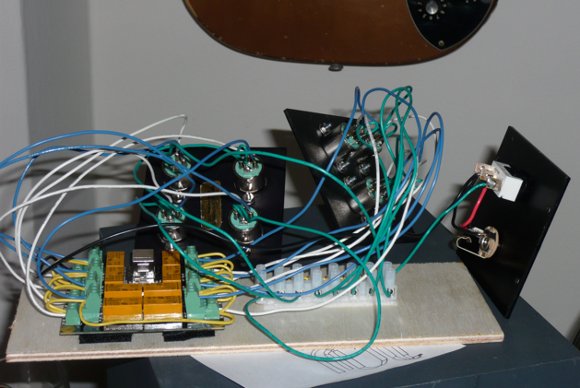
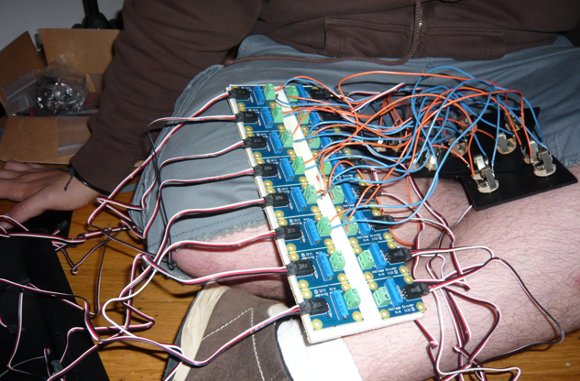
From the underneath side of the dance floor we ran all our cabling to two different USB micro-controller brains. One brain handled the sensor data, while the other one powered and controlled the LED lighting via high-amperage relay switches. These two units sat beside the controller on the sidewalk. They connected to a USB hub and then into our laptop which was running Reason 5 and the new Kong Drum Designer device inside Reason – which this “Kongstrocity” (as we’re calling it around the office) was obviously mimicking in terms of the pad layout.
How did you go about assembling the drum machine itself?
The assembly presented a few serious design challenges. First of all we had just two weeks to build it from the time we had the idea to the day we scheduled for the performance. Designing a drum machine of this size in that time required a very “leap of faith” design philosophy. We had to research our methodology and then implement it based on the blind, perhaps naive, confidence that our design would work. There would be no time in the schedule for revision. Our proof of concept had to be our final unit also and we were just fortunate that the decisions we made payed off and worked exactly as we expected.
The other major design challenge was that I was designing and building this unit in San Francisco and it needed to get to Sweden on August 16th. That meant it had to be built in such a way that I could bring it with me as checked luggage! That means it had to be somewhat modular in its design and all components had to be packed down to luggage sized parcels. Sure, I had to check 9 pieces of luggage on my flight but we pulled it off.
Once it was in Sweden we finished the final solder joints and attached the sensor bases and frame to a wooden plywood base which locked it all together as a single unit instead of a luggage-friendly modular unit.
What does it use to sense foot triggers? Were there any challenges to getting this calibrated properly and working effectively?
Under each pad is something called a “force sensitive resistor.” We considered using piezo transducers, which are popular on many DIY electronic drum tutorials. However, piezo sensors suffer from too much ambient noise that would come from adjacent pads. They measure sound energy just like a microphone. Therefore, nearby pad stomps could create false positives from a sensor-perspective. I discovered a video online of a kid who made “drum shoes” and in his description he mentioned that he used force sensitive resistors because they work better than piezos. He was right. By measuring the direct downward pressure on the sensor, we were able to create very reliable readings of when a pad was being triggered or not.
As far as calibrating and working with the sensors, it was as “plug-and-play” as anyone could hope a DIY project of this scope to be. We used a system of USB interfaces by a company called Phidgets. Phidgets are sorta like Arduino without the learning curve. They allow you to hook up a variety of analog or digital sensors to a USB interface unit and then use a variety of programming platforms to work with that data and communicate back out to the interface. Our setup used a Phidget 8/8/8 Interface connected to the computer, a force sensor under the pad, and a Phidget Voltage divider in between the two so we could scale the force readings and calibrate them so all 16 sensors behaved the same way. I can’t say enough great things about Phidgets. They were the thing that shaved our testing and learning curve down to something so small that I didn’t have to worry about it and I could rather dedicate myself to tedious tasks like 800+ solder joints and CAD drawings of frame components.
It seems in the video people responded well! What did you find, as people tried playing with their feet?
We learned a few very interesting things in the process. The first and most glaring user response we realized was that if you’re a musician, you were very quickly making beats on it. If you weren’t a musician, you tended to walk around on it making arrhythmic “sound art.” We wrongly assumed everyone would know how to make a basic beat on a controller. Boom boom crack… boom boom crack. Or just a “four on the floor” kick beat. Boom Boom Boom Boom… and then repeat. But musicians got it right away, whether they were drummers or not. As you can see in the video, some people didn’t catch on as quickly. Similarly, young people raised on Guitar Hero or Dance Dance Revolution were also likely to catch on quickly.
The other thing we learned was that our design was surprisingly versatile. We didn’t rest our big acrylic pads directly on the sensors because the weight of them meant that downward force was always being applied to the sensor, making it difficult to get a good reading between on/off. We ended up floating the pads on springs above the sensors. This accomplished a few fortunate goals. It gave the sensors an idle reading of 0, making it easy to determine when force was being applied (when someone was stomping on it). It also had the side benefit of give some spring to our buttons and making them feel like bouncy pads. However, the third thing it accomplished was that we were able to set our trigger thresholds so low that children could dance on the pads as easily as grown adults and the controller responded just the same. We didn’t know it would work so well for that until a 6 year old tried it out and it performed perfectly for him.
How did you connect the device to Reason? Any Reason-specific tweaks to set up a huge set of drum pads like this?
The Phidget interfaces allow you to program in Max/MSP [multimedia visual programming tool]. So we used Max and some Phidget objects from their website to read in the sensor data, convert it to note data, send it back to the LED lights as digital on/off messages, and communicate with Reason by setting up our Max runtime application as a controller in Reason’s preferences.
On the Reason side, it behaved just like we had plugged a keyboard into our computer. No tweaks were necessary.
Were you familiar with Bwack’s previous large-scale physical drum machine when you made this? (Now I have to get the dimensions on that to work out which really is the “biggest” in the world, though if we count the projection, I know who wins!)
I actually hadn’t seen that until I arrived in Sweden with the controller and someone in the office showed it to me. I think the world can’t have enough large-scale controllers. Playing on it reminds me of childhood visits to the “Please Touch Museum” in Philadelphia.
Who worked on this project?
The “Who” of this project is somewhat long and I’m bound to leave people out so apologies in advance. As far as the research, design, wiring, and testing… it was done largely by myself in San Francisco prior to arriving in Sweden but I had some of the brightest minds to rely on, of course. Our engineers were eager to help and help they did. When I got to Sweden I even enlisted a small soldering army to help me finish the last part of the wiring. In San Francisco, I had a lengthy meeting with Matt Ganucheau to talk about sensors and strategy. Matt helped me focus my design ideas and let me confirm that I was on the right track. I got a crash course in Max programming from a interactive media friend of mine based out of Bristol, named Duncan Speakman and he helped me wire up Phidgets to convert the sensor data to MIDI data.
Once the controller was in Sweden it became a group effort by everyone to finish wiring it, mount it, test it, and move it from location to location. As is often said, “It takes a village to raise a Kongstrocity.”
More on Reason and Record:
http://www.propellerheads.se/
Drum machines may have no soul. But if they’re big enough, they can also crush you like a monster truck, so careful what you say about them.