Like to cut up and sample video? Sick of all that time-consuming scrubbing, slicing and rearranging in Vegas or Premiere? Well I’ve figured out a workflow using a collection of After Effects scripts which turns lots of tedious editing into a very quick process to output a series of video clips for your VJing pleasure.
This technique uses the following After Effects scripts:
AEScripts‘ “Magnum – the Edit Detector”
Reverse Selected Layer Order
Precomp to Layer Duration
Redefinery’s RenderLayers
and ScriptLauncher, to speed things up even further.
My first test run for this technique was on The Arctic Monkeys – Brainstorm:
As you can see, this clip has an extremely choppy edit. My plan was to remove all of the band shots and leave just the dancing girls and UVA‘s LED wall animations. With cuts coming at a rate of several per second, this would have been extremely time-consuming using a traditional, manual editing workflow. With the following technique I managed to cut out everything I didn’t want and reassemble the remains into a series of performance-friendly video clips in about 15 minutes.
The Workflow
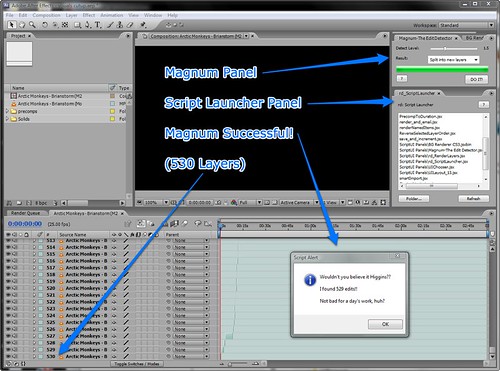
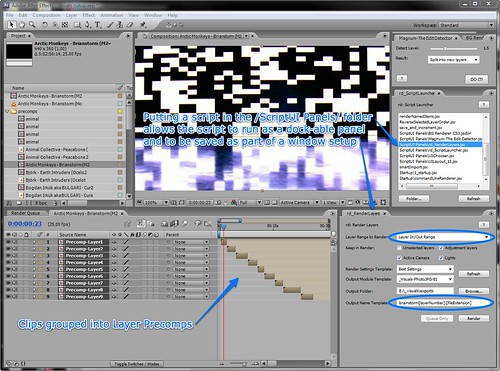
Install your scripts: ReverseSelectedLayerOrder and Precomp to Layer Duration go to the folder “After Effects/Support Files/Scripts/”. Magnum, RenderLayers and ScriptLauncher go to “After Effects/Support Files/Scripts/ScriptUI Panels” (you may have to make this folder manually if it’s not already there). Restart After Effects, and choose Menu: Window > rd_ScriptLauncher.jsx to get the handy Script Launcher panel up, and Menu: Window > Magnum-The Edit Detector.jsx to get your Magnum panel.
Now run Magnum – TheEditDetector on your source clip (choose sensitivity, click the layer, then click “DO IT!”). This took about a minute to run through Brainstorm, and at the default sensitivity level it found 529 edits! You may have to experiment with this level depending on your source, and of course it’s designed to find cuts, not fades, so this won’t work for all videos.
After Magnum is finished, you’ll have a series of layers. Select all of them, then use the ReverseSelectedLayerOrder script to, yes, reverse the layer order. This will be useful later when we come to render individual layers.
Now comes the time consuming bit – go along the timeline and delete any chunks you don’t want. Don’t bother about shuffling layers around to remove gaps though, because when you’re done deleting…
Select all the layers [Ctrl/CMD + A] and go Menu: Animation > Keyframe Assistant > Sequence Layers. Make sure “Overlap” is unchecked, unless you want your re-edit to include fades. Hit “Ok” and all of the gaps will be removed.
From here you can go directly to rendering (next step) if you want lots of very short clips, or combine them further into more manageable loops. To combine all of these small chunks into larger clips, select the layers you’d like combined, and use the Precomp-ToLayerDuration script to give you a more manageable number of layers.
Finally, use RenderLayers (either as a UI panel or launched from the ScriptLauncher) to batch-render each layer to an individual clip. Settings here are important. RenderLayers is highly configurable, and if you leave it to the default render setting (Render: Work Area) it will render the entire work area out for each layer. Changing “Layer Range to Render” to “Layer In/Out Range” will render each selected layer to a separate clip.
Choose your Render Settings Template and Output Module, select an Output Folder, and then edit the Output Name Template. You can use properties such as [layerName] and [layerNumber] to ensure that your exported videos have unique filenames. For Brainstorm I used “brainstorm-[layerNumber]” – This is the reason for the ReverseSelectedLayerOrder step, as layers are numbered from the top, and the final clips would be numbered in reverse otherwise.
You’ll notice that when you change “Layer Range to Render” to “Layer In/Out Range” the “Queue Only” option becomes grayed out. This is because the RenderLayers script has to take control of After Effects to render each layer in turn, and you won’t be able to do anything until it’s finished. So when you’re ready, select the layers you want turned into clips, and then click “Render”.
The script will run a render for each layer in turn, and you won’t be able to do much (apart from canceling the renders, if something’s wrong) until it’s finished.
If everything has gone right, you should now have a whole lot of clips, and plenty of time free to get loads more done before that gig tonight!
For more After Effect scripting:
AEScripts
Redefinery
AEnhancers
Xscriptorium
Have any favorite scripts or workflow tips? Perhaps a similar method for Vegas or Premiere? Please share in the comments, or if it’s post-worthy, email us.

