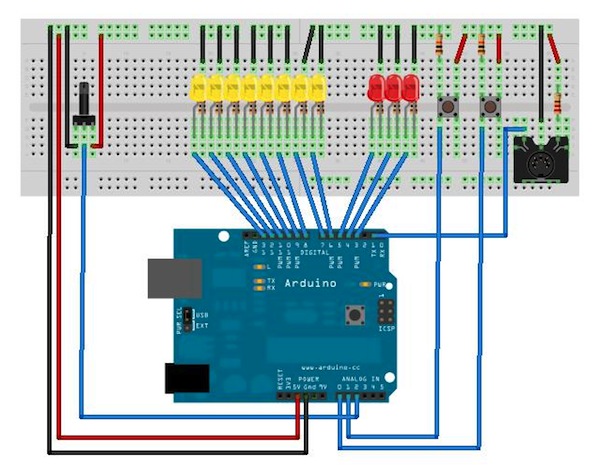
In our monster MeeBlip round-up the other day, I mentioned the stunning enclosure Michael Roebbeling made for his DIY synth kit. But that’s not all Michael has built. He’s also created a lovely, simple step sequencer with Arduino. It’s a beautiful combination of all open-source hardware, MeeBlip and Arduino. Surprisingly, it’s his first try at all of this:
After my first successful experience in electronics, building the MeeBlip, I was hooked. So I decided to buy an Arduino and dive a bit deeper. My first project was a rudimentary sequencer to work together with my MeeBlip. It took me 3 days to figure out the schematiks and code the program.
With projects like Arduino taking out some of the headaches of getting started, this is further proof that understanding computation allows you to do anything, from hardware to software, on any platform.
Michael’s project represents a simple, afternoon project, but the Arduino can also become the basis of more sophisticated gear – and some more complex groove-making. I’ll look at some of those options here, like Steve Cooley’s beatseqr, here making some grooves with an iPad running Korg’s iMS-20 soft synth and Reason running on the MacBook Pro.
There are plenty of Arduino step sequencer projects – it’s a nice project to try – but what I especially like is that Michael’s design is really minimal, meaning it could be a good starting point for your own project. He provides full code and (via a terrific prototyping tool called Fritzing), easy-to-read, colorful schematics.
If you’ve never done this before, some basic knowledge of how to read the parts, an Arduino, and some copy-and-paste skill is all you need to get going. I’m going to set aside some time to build one myself.
SimplenZAR [Blog post documentation at Carvin’ Calamari]

But while we’re on the topic – and since having step sequencers around is a terrific tool for making musical patterns with all your music gear – let’s take a quick look at what else is out there.
littlescale is a must-read for musical Arduino makings, so a good first stop. He’s got his full list of projects, including a microtonal step sequencer, seen below.
http://arduino.milkcrate.com.au/
Johan Larsby has a terrific project, complete with screen, with loads of details and source. You can build the whole thing for under $50 in parts, and his page is also a useful set of references to working with MIDI, physical controls, and the display.
Arduino Step Sequencer… ASS. Fine. Funny enough. But you lose out on bonus points for not making it a recursive acronym.
Mr Speaker goes through the process of how to construct MIDI step sequencers on Arduino in a blog post, as well.
That’s not a complete list, but now onto some fancier projects…
Steve Cooley’s beatseqr, created with Derek Scott, evolves from simple hardware “sketch” into full-blown, feature-packed sequencer, but it’s still got an Arduino (Mega) at its heart. Accordingly, Steve talks through the behind-the-scenes tech details on the Arduino forum.
And, oh yeah, it goes great with Reason. (That in turn means this and an older laptop could be a nice little groove station set up in a studio, to keep your machines out of the closet of retirement.)
Beatseqr v3 — arduino mega based step sequencer [Arduino Forum]
Official site: http://www.beatseqr.com/
And I would be remiss if I didn’t mention the awesome MiniCommand by Ruin & Wesen. It doesn’t in fact have an Arduino board inside, but it does use the Arduino development environment for a custom MIDI firmware framework called MIDI-CTRL. Say wha? Basically, you can use Arduino-style syntax to reprogram this little box to perform whatever MIDI magic you wish. It’s utterly insane, and perhaps a little overlooked because it’s generally associated with the Machinedrum. I’m not going to say any more now, as I know Wesen is getting some time off to work on it, and I hope to talk more about this project over the coming months.
Result: Euclid pattern generators. (I’m working on some code that does something similar, with visualization; stay tuned while I … um, finish it, in fact.)
So there you go. If it seems overwhelming, just remember, take it one step at a time – and start with the first step. (Sorry, couldn’t resist.)
As I said, the place to begin is doing something like what Michael did – and you can hook up his project in a few minutes.
If you give this a try, let us know! Sounds like a fun weekend project.