Amidst all the interest in vintage synths, it’s not often you get your hands on a 1974 MiniKorg-700. Francis Preve, who worked on design for the new KORG plug-in, is our guide to making sounds for its unique architecture.
It’s not that you can’t explore the MiniKorg-700 on your own, or with its presets. It’s that it’s a unique pleasure to get all the tips and tricks from someone who was deep in sound design for this instrument. We’ve gotten to do that in the past with Fran, on the Roland SYSTEM-8 (plug-in/hardware), KORG modwave (hardware), and Xfer Serum (plug-in, obviously). But this is special – it’s a rare and esoteric moment in synth history, now easily available to anyone with a computer.
The MiniKorg-700 (as the miniKORG 700S plug-in) arrived recently as part of the KORG Collection 3. (Full bundle is US$399, but you can opt for just the MiniKorg for $149 and upgrade pricing is available if you owned a previous bundle.)
This year KORG added the miniKORG 700S, Prophecy, and Triton Extreme to the bundle, on top of the TRITON, ARP Odyssey, MS-20, Polysix, Mono/Poly, M1, WAVESTATION, and MDE-X, so they’ve now rounded out their history. And it’s pay-to-own – in contrast to Roland Cloud’s subscription model – depending on which you prefer. [Ed. Correction: forgot that Splice for one offers Korg Collection as a subscription, so you’re free to choose. Team KORG / Team Roland, anyone?]
But to us, it’s really the MiniKorg that has us excited. (Apologies to KORG, but since Francis refers back regularly to the original, I’ll keep the style as MiniKorg-700 as released, rather than KORG’s updated miniKORG 700/700S in keeping with their current branding.) This year started with KORG reissuing the miniKORG 700FS as hardware, which is fun to fantasize about, but impractical for most of us to own. Getting this as a plug-in that you can actually use is great news.
And there’s a lot here – authentic recreations of all the historical functions and controls, but with the addition of polyphonic operation and thickened unison mode, stereo spread, a virtual patch bay, and an array of stompbox-style effects. (Oh yeah, and presets – which is where Francis comes in.)
So let’s let Francis help us squeeze all that sound potential out of it. -PK
A moment in history, between organs and synths
In the earliest days of synthesizers, the Minimoog and ARP Odyssey were just two possible architectures for creating sound. Granted, they were the most popular, but until Sequential’s Prophet 5 formalized the Minimoog structure — two oscillators, noise generator, lowpass filter, dual envelopes, and an LFO* — a dazzling range of architectures competed for keyboardists’ cash.
[*Yes, the Minimoog had three oscillators, but if you wanted to apply an LFO, you had to use the third oscillator as the modulation source, meaning those patches were reduced to two-oscillator tones.]
And a lot of those architectures were very unlike what we now think of as a synth. The Yamaha SY-1, Roland SH-1000, Hammond 102200, and Davoli Davolisint were strange hybrids of preset transistor organ technology fused with emerging synthesizer concepts. So they each looked largely like compact organs, just with bits and pieces equivalent to what you’d find on the Mini and ARP — filtering, vibrato, and/or primitive envelopes. Innovative ideas like those in Buchla or EMS synths were far from mass-market devices. [Ed.: On a separate note, it’s worth considering that change – Buchla-inspired synths are now widely available, inexpensive, and popular in a way that was wholly unexpected.]
Over the next few years, the Mini/Odyssey architecture and workflow were adopted by the majority of manufacturers, becoming the familiar oscillator-filter-amp-modulation combo we now take for granted, but for the first half of the 70s, the synthesizer industry was basically a wilderness for pioneers, exploring unusual synthesis configurations and cryptic interfaces because there were no “rules”. Frankly, I miss that era of bold designs, with manufacturers doubling down on originality, experimentation, and taking chances on limited or specialized feature sets. [Ed.: Clones aside, I’d argue those days have returned – at least we’ll celebrate those designs around here!]

The MiniKorg-700 came from that era, with an architecture that combines elements of home organ technology with unique tone-shaping tech like ring modulation and dual simultaneous filters. Granted, these filters were called “Travelers” — a term that didn’t catch on. But before you laugh, it’s worth pointing out that even today we have three terms for resonance, including emphasis or Q depending on the manufacturer, to the confusion of newcomers everywhere.
When Korg asked me to design for the MiniKorg-700 earlier this year, I immediately said yes, despite never having used one. The thrill of a new interface and actually using my ears to discern what the engine was doing was like catnip for me.
Spoiler alert: If you’re a fan of the Zen practice of Shoshin—or “beginner’s mind”—stop reading now. One of the true joys of programming the MiniKorg is not knowing what some of the cryptically named parameters actually do. That said, having lived with this synth long enough to design a chunk of the factory bank, I’m going to demystify the experience for musicians who want more control over their results. Let’s go.
Navigating the UI

For starters, you’ll want to switch the front panel from the super cool skeuomorphic 3D mode to the flat 2D mode. This delivers a more familiar softsynth experience. From there, it’s easier to understand the layout… somewhat.
At its core, the MiniKorg is a two-oscillator analog synth with a ring modulator baked into the architecture in a way that makes ring mod far more musical than a simple effect in an effects chain. Why? Because the oscillator in 700’s ring mod can track the keyboard, allowing for pre-FM metallic and clangorous sounds that were seriously ahead of their time. While there have been a few other mainstream synths that include this method of musical ring mod—notably the ARP Odyssey and much later, the D-50—the MiniKorg-700’s implementation simplifies that workflow considerably, which is why it’s so noteworthy. [Ed.: Yep, have to check my 70s history, but I think Francis is right here. So there was not a simple way of tracking ring mod on for instance the Yamaha CS series, making its ring mod – while delicious – more unruly.]
What makes the MiniKorg experience so compelling is the fact that its oscillator configurations were hardwired and controlled by a dedicated “Effect” knob that governs the behavior and routing of VCO 2. However, this can be confusing due to the fact that the knob does absolutely nothing unless the “Effect” switch is ON. Once you’ve got that sorted, exploration is far more rewarding.

At that point, getting around the synth becomes a matter of translating the various knobs, sliders, and switches into more familiar terms and behaviors. Like the Effect switch, some of these parameters are interdependent, which means they’ll do nothing unless a seemingly unrelated switch is toggled. If you like puzzles, you’ll be delighted. But if you’re fairly new to synths, it can be frustrating. The manual does a good job of explaining the basics, but for those who want to go deeper, here’s the full set of cheat codes for navigating this bit of vintage heaven.
Oscillators and Ring Modulation
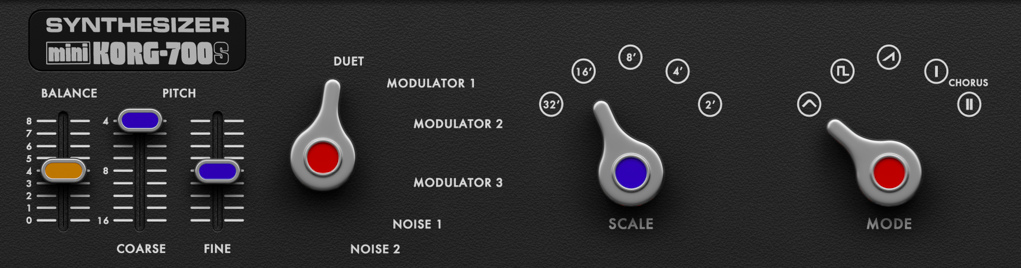
With the Effect switch on, you’re ready to dive into the deceptively deep waters of the MiniKorg’s engine. As you survey the front panel, take note of the color-coding of the parameters, which is a very smart UI decision that more manufacturers should consider. Here, blue represents pitch controls, red correlates with tone/harmonic shaping, and orange covers volume. We’ll revisit this UI detail as we explore.
The large Scale and Mode knobs on the top of the interface control Osc 1, which is the “core” oscillator. That is, there’s no fine-tuning control for this oscillator, and the “effect” processes are applied to—or combined with—its signal.
The blue Scale parameter controls the octave range, while the red Mode knob is a waveform selector that includes the holy trinity of triangle, square (called Rect here), and sawtooth. The last two modes are labeled Chorus I and II, which is a clever nod to the fact that they’re actually pulse-width modulation at two different rates. The PWM types really fill out the sound for pads and thick leads.
On the far left are the Balance and tuning controls for the second oscillator. While it’s not labeled as such, the bottom and top of the Balance fader correspond to Osc 1 and Osc 2, respectively.
Second oscillator configurations
The red Effect Knob is what sets the Minikorg’s architecture apart from other synths of its era, as each of its options determines the behavior of the second oscillator. Here’s a summary of each function and how to use it.
Duet: This is the classic two-oscillator analog configuration, with Osc 2 hardwired for sawtooth waves only.
Modulator 1: Here’s where the action is, with Osc 2 providing key-tracked ring modulation. Haphazard experimentation will yield lots of dissonant bell sounds reminiscent of techno/FM. However, if you want to use it as a harmonic sculpting tool, try setting the Coarse fader to 3.87, 5.51. 7.01, 9.69, or 12 (the octave above).
[Pro Tip: Use the alt/option key for setting precise values on the software Minikorg-700.]
Modulator 2: This mode also delivers ring modulation with keyboard tracking, but here the ring mod oscillator is an octave lower. (My ears tell me that the waveform or some other circuit process may be slightly different since the result is not identical to re-pitching Modulator 1 an octave lower.)
Modulator 3: Here, we get traditional ring modulation with no keyboard tracking, so Osc 2’s tuning controls simply set the modulator oscillator frequency in a static fashion.
Noise 1: This is another of the MiniKorg’s special tricks. Noise 1 creates tuned noise that tracks the keyboard pitch in a truly unique way. Since the secondary tuning sliders affect this mode’s pitch, I strongly suspect that this is actually the ring modulator circuit with noise as the modulator and the second oscillator (sawtooth) as the carrier. To test this hypothesis on another synth, I used the Kilohearts’ Phase Plant ring mod—which includes noise as a modulator option—on its sawtooth oscillator and the result was nearly identical. Hats off to Korg’s innovation here, since using the pre-existing sawtooth oscillator as the carrier makes this option quite powerful for techno and experimental tracks, as you can blend this strange and aggressive sound with the more familiar tones of Osc 1.
[Pro Tip: Noise 1 sounds quite dense and rich with Osc 1 in one of the Chorus/PWM modes.]
Noise 2: This is the classic noise generator that we all know and love, so you can blend.
Filter and modulation

The lower half of the panel includes the filters and modulation found on the original hardware, including a twist you might not expect – all of the fader values are inverted. That is, pulling down increases the value while moving to the top of the fader is zero. Why? Because that’s how organ drawbars function—and the MiniKorg 700 was launched in the liminal time when synthesis was suspended between modular (Moog, ARP, Buchla) and the organ and string machine technology of Korg/Univox, Roland/Ace Tone, and Yamaha. The 700’s fader and switch behavior reflect that era.
Travelers: It’s such an odd name for filters, but the horizontal positioning is visually intuitive. The top slider is the low-pass filter, with the right-most position being fully open The bottom slider is a high-pass filter, with the leftmost position being “off” (no effect). If you squint, this design choice makes sense in that adjusting their values graphically reflects a band of frequencies being passed.
Attack and Perc: These orange sliders control the amplifier envelope, with longer attack values at the bottom of the fader, hence “Slow”. The Perc fader is particularly interesting, as it controls both the decay and sustain level for the envelope. When set at the bottom (“Singing”) you’ll get full sustain for leads and pads. Set it slightly higher and you’ll get a long decay with a lower sustain. By the mid-point, the sustain goes away and it’s strictly a decay slider. I was a bit startled by this decision, as I’ve been using this exact approach for the Envelope macro on dozens of my Xfer Serum patches because it’s so elegant and flexible. Seeing it here was frankly validating.
Arpeggiator: While the original hardware had a simple Repeat function, the software version includes an arpeggiator that offers all the usual functions, with Alt 1 and Alt 2 providing two variations on Up+Down. Just keep in mind that the yellow arpeggiator rate control is also inverted (up is slower).
Vibrato: Another pair of upside-down sliders govern the speed and depth of the triangle/sine wave LFO. It’s important to note that moving these blue sliders will have no effect unless the bottom row of switches is also configured correctly. More on these below.
Switch it up

The row of switches at the bottom of the panel can be especially confusing, even for experienced artists, since some of their behaviors are dependent on the position of other switches. What’s more, the labels are vintage, so they don’t always include more standardized terms. Fortunately, with everything on the front panel color-coded, it’s easy to determine their general function. Again, red affects tone/filtering, orange affects volume/envelope, and blue is tied to the LFO/pitch.
Since there are several interdependencies among the switches, we’ll group them by their interactions (instead of left to right).
Effect: As mentioned above, this toggles the VCO 2, ring mod, and noise controls on/off. Since the Balance slider always controls the volume of the “Effect” it’s easiest to leave this in the “on” position (down).
Expand: This toggles the envelope modulation for both traveler-filters. The depth is hardwired and adds a useful but not too extreme amount of env mod to both the LPF and HPF. Note that the effect can be quite subtle unless the filters are reduced from a fully open state.
Bright: This switch adds a preset amount of resonance/Q to both the LPF and HPF Travelers. To my ears, it’s extremely tasteful: Not too squechly but definitely audible. Depending on the low-pass cutoff value, you can still get 303-style effects, but not the tweeter-shredding stuff.
Sustain: This toggles the release segment of the envelope, which is tied to the Perc (decay) parameter, thus short decays will also have short releases. When off, the release time is immediate, like a gate.
Sustain Long: Over on the left side of the panel, there’s a plain beige switch labeled Sustain Long. This decouples the release time from the Perc decay and extends the duration dramatically.
Bender: This switch adds a slight pitch slide for every attack, a bit like a touch of glide. I grew up in the 80s/90s, so it reminds me of the lead from Kate Bush’s classic “Running Up That Hill”. Since this pitch slide is preset, you won’t hear it if you extend the attack parameter beyond the length of the ramp.
Vibrato: Turns on triangle/sine wave vibrato, thus the vibrato sliders will have no effect if this switch is off. Interestingly, the vibrato is only applied to VCO 1—the main oscillator. While some musicians may not dig this implementation, I think it adds a lot of personality to the synth.
Delay Vibrato: This one’s tricky, as it requires that the previous Vibrato switch be off or it will have no effect. With Vibrato off and Delay Vibrato on, the switch adds a slight fade-in for the vibrato, which is fantastic for vintage theremin leads and classic 70s funk riffs (especially with the Bright and Expand switches on).
Travel Vibrato: Back over on the left side, there’s another beige switch called Travel Vibrato. This applies the LFO to the both of the filter cutoffs—at a preset amount—for wah-wah effects.
Porta: In conjunction with the green slider, this switch toggles glide on/off. Note that this is a non-standard use of the term portamento, so it always glides between notes. Nowadays, the two terms have been relatively well-defined as “glide” being always on, while “portamento” requires legato performances to activate the effect. That is, by holding the previous key while pressing a new one.
At this point, we’ve thoroughly covered the arcane and exotic aspects of the original Minikorg-700s interface and architecture. The rest of this softsynth is much more familiar to those who currently work with plug-ins, so here’s a brief summary of the more standard elements.
Effects

Here we have a wonderfully visualized set of effects pedals that are hardwired in series as follows: Distortion > EQ > Chorus/Flange > Phaser > Delay > Reverb.
The individual effect controls should be familiar to most producers by now—and you can toggle effects on and off as needed with the pedal switches.
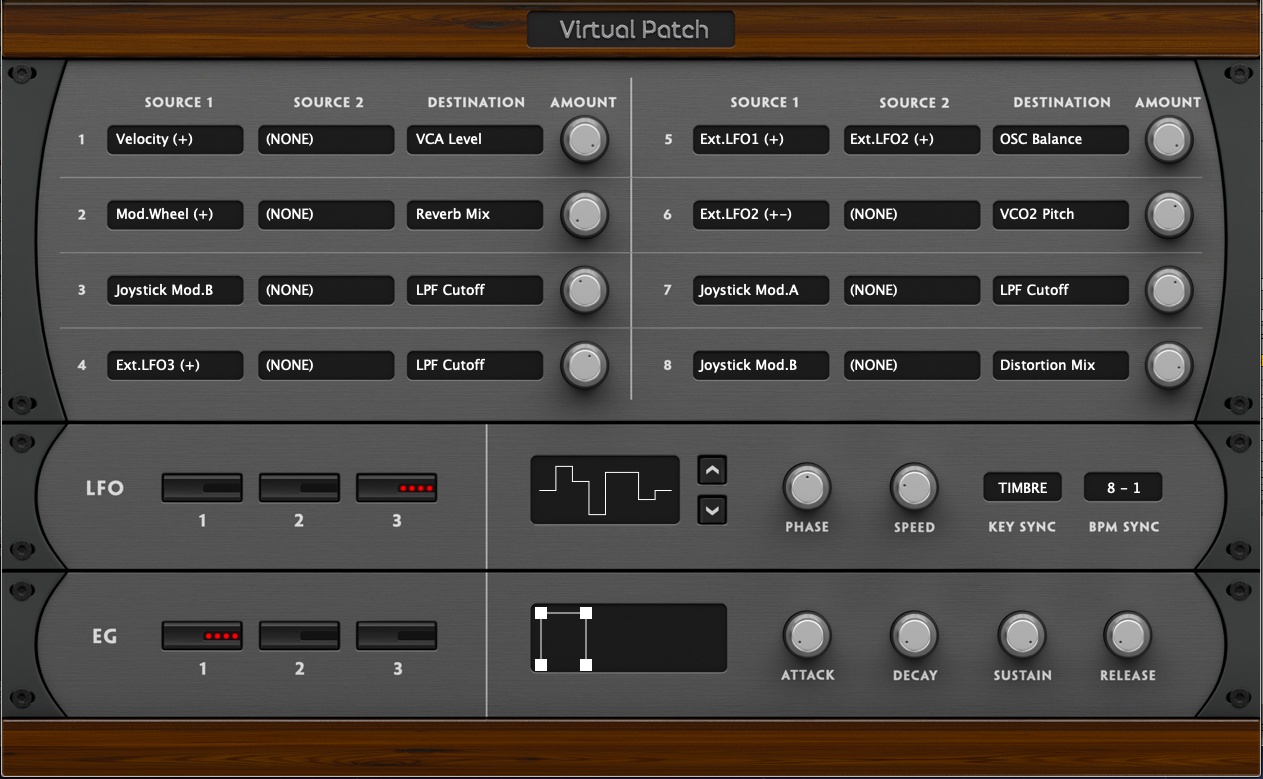
It’s inevitable that seasoned, modern users might have complained about the lack of more familiar envelopes, LFOs, and expressive MIDI control in a softsynth, so Korg wisely included a Virtual Patch page for these features. Here, you can access three more LFOs, three ADSR envelopes, and an eight-slot routing matrix that also includes the effects parameters as potential destinations. With this, you can do some pretty elaborate rhythmic effects, as well as more complex, evolving textures. Naturally, I did a few factory presets that demonstrate what’s possible with these features. Arpegginspire, Hayabusa, Underground, and Space Force bring the 700’s original architecture into the modern era, without sacrificing the analog vibes of the original.
The 700 Club
Thanks, Fran! So to everyone, hope you enjoy deep diving in KORG’s invention here. Product page:
https://www.korg.com/us/products/software/kc_minikorg_700s/
And if you’re broke, then – embrace fast, fast production, as the demo works for 20 minutes.
VST and AAX for macOS and Windows, plus AU for Mac – 64-bit only for both, but it is 2021 now.
And to help you go back in time to 1974 – and perhaps inspire what you’ll do with the software:
Mega.