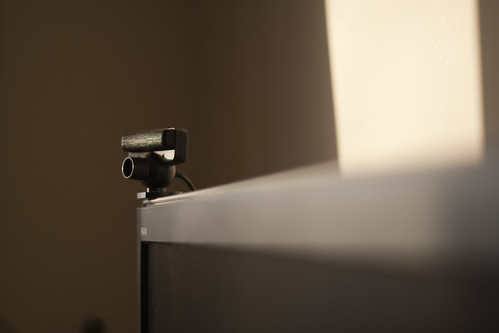
It’s just US$40, and it’s your best ticket to creating your own computer vision and augmented reality projects, imagining stuff before big game console makers do. It’s the Sony PlayStation 3 Eye. Sony intended it to be used with their flagship game console. (The guy working at my local GameStop looked emotionally dejected when I told him I don’t actually own a PS3.) But thanks to community-developed, open-source drivers for all three platforms, the PS3 Eye has become a big choice for interactive applications, from tracking fingers and objects on tables to projection mapping and augmented reality.
Why choose the PS3 Eye over another webcam? Because it was built for CV applications, the camera performs well in variable lighting, has rock-solid, low-latency USB performance, and is capable of high framerates (60-75 fps at normal resolution or even 125-150 fps if you can sacrifice resolution, which might be okay for tracking).
If you don’t already own a PS3 Eye, you should. Go get one — I’ll wait. Now, the hackers among you aren’t done yet. You’ll want to trick out the PS3 Eye to make it really yours, with drivers, infrared-tracking capability, and a beautiful, new custom housing.
Hack the Case, Remove the IR Blocking Filter
Peau Productions has been one of the best sources for information on working with the PS3 Eye, and the man himself – Nolan – has done some great tutorials.
Whether you want to use IR or not, you will likely want to hack Sony’s case. The case works fine when the camera is upright, but it’s a bit awkward, and it can’t sit horizontally for use in multitouch tables and installations and such. And it just looks, you know, like a gaming accessory. So I recommend the tutorial here even if only to figure out how to open the case. (Yes, I did in fact manage to cut myself the first time I tried. I’m a complete klutz.)
There are various reasons you might want to use infrared light only. You might be doing tracking on top of a projection, as on many multitouch tables. In this case, blocking visible light will eliminate the image of the projection (digital projectors don’t emit much IR-spectrum light), while infrared light can still provide tracking information. You might want light sources people can’t see; that is, IR LEDs or broad-spectrum lights with filters. You can also easily track IR emitters or markers using this method. Like most webcams, the Sony normally detects visible light and blocks IR light. Here’s how to hack that on the OEM-shipped lens.
(1/2) Playstation 3 Eye Camera – Removing IR Blocking Filter from Peau Productions on Vimeo.
(2/2) Playstation 3 Eye Camera – Adding a Visible Light Blocking Filter and Tests with IR Light from Peau Productions on Vimeo.
For more on many, many topics – including distance calculators and other goodies – see Nolan’s blog:
http://www.peauproductions.com/blog/
Add a Case, Custom Lenses
Nolan has also started a little store with some very cool accessories for your PS3 Eye. The lenses, when combined with his custom mount, give you the option of using visible light or infrared light easily – just screw in the lens you need. Different focal lengths make installations and interactive tables more practical. But my favorite creation of Nolan’s is his custom-designed case. I just bought a case after seeing one at digital magician Marco Tempest‘s studio.
The case is really beautiful. The camera fits snugly inside after you’ve modded it. You can still place the camera vertically – it balances atop my older Apple Cinema Display. But you can set it horizontally for use in a table, too, or easily add it to an installation.
You can’t use the built-in lens with the case, so you will need the mount and some lenses, too. That makes your US$40 camera a bit more expensive, but on the other hand, you’re still well, well below the cost of other cameras and you have a setup that’s road-ready and worthy of a variety of different projects. Nolan is also friendly with customer service, helped me late on a Saturday night, and shipped incredibly fast.
I’ve already sold a couple of these over IM. Nolan, I hope you’re ready to ship.

Use it with your OS – and try Linux
Early on, PS3 Eye support was a bit shaky, but thanks to the power of communities using these and helping with the projects, I can now wholeheartedly recommend all three desktop operating systems. And Linux isn’t a second-class citizen this time, either – it’s actually what you should consider as your first choice. I’ll go into the most detail on Linux because, while there are a few steps involved, I’ve actually found it to be the best-performing. (In other words, don’t assume just because that section is the longest means that it’s the biggest pain!)
Recommended drivers:
Mac: Grab the macam drivers. 0.9.2 is the latest version as I write this, but the revision you want was February 6, 2009, which currently is only in the CVS repository.
http://webcam-osx.sourceforge.net/downloads.html
Best: CVS build
Windows: AlexP aka Alex Popovich has written DirectShow drivers which perform really well on Windows. Early versions were a bit unstable, but the revision listed below for me works (just keep scrolling to the end of the post, before comments). The one trick is that the video driver will be listed under “AlexP Devices” and not in the video group in Device Manager. This could confuse some software.
Sony PS3Eye Camera DirectShow Capture Source Filter *Update* v2.1.0.0130
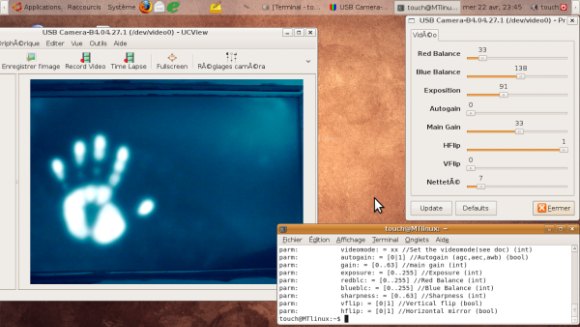
Linux: Normally, this is where you’d expect to hear that Linux causes the most trouble and requires the most tweaking, etc., etc. – not the case. I’ve been talking to ReacTable co-creator Martin Kaltenbrunner, and he and I have both been happiest with the drivers available for Linux, thanks to work by him and multitouch NUI Group contributor kaswy. First, you’ll want to download the drivers – be sure to use version 0.5, revised April 23, 2009 (or a newer version if available):
Linux PS3 Eye camera drivers&utils (Updated 23/04/2009)
The best install instructions are currently in this blog post:
PlayStation 3 Eye web cam working on Ubuntu 8.10 [blog.10100111001.com]
These work on 9.04, too, and I suspect Hardy/8.04, as well. Here’s a quick summary:
These drivers can be built from source. You may need to have your kernel headers available so that the drivers can be built for your Linux kernel. If you’re using the default Ubuntu kernel, for instance, you can simply choose “sudo apt-get install build-essential” for everything you need. If, like me, you built your kernel from source (which I did to get a newer real-time kernel), then that source folder should still be available. Clarification: Apparently the required module is built into many kernels, so if you haven’t modified your kernel, you may be okay. I still recommend having kernel source and a package like build-essentials handy, however, especially if you’re using the real-time kernel for audio. And you will still need to invoke modprobe below to switch video modes.
Installing the driver assuming that kernel is available is then simply a matter of changing to your extracted directory, entering “make,” then “sudo make install.”
REBOOT first, then make sure your kernel module is loaded with something like “sudo modprobe gspca_ov534 videomode=04.”
Here are the available modes:
00: 640×480@15
01: 640×480@30
02: 640×480@40
03: 640×480@50
04: 640×480@60
10: 320×240@30
11: 320×240@40
12: 320×240@50
13: 320×240@60
14: 320×240@75
15: 320×240@100
16: 320×240@125
If you have trouble with Linux installation, there are lots of tips in the following thread on NUI Group. I don’t recommend their installation steps at the beginning, because the driver above (updated after the original post) works much better. But you will see some common troubleshooting techniques.
Normally, cross-platform compatibility with cameras means recommending UVC (Universal Video Class) cameras. Those have become more common – in fact, any camera with a Windows Vista logo on it ought to be class-compliant and driver free, because Microsoft’s certification requires it. But the PS3 Eye trumps them on performance/price, and these drivers provide options you likely won’t get out of the class drivers.

Use Your PS3 Eye with Processing
The PS3 Eye has excellent support under ReacTIVision and several of the multitouch tracking/tangible projects. I’ve been really happy working with it so far in GSVideo.
The one decision the Processing developers have made that I strongly disagree with is shipping QTJava with Processing as a core library. It’s often disastrously bad on Mac and unusable on Windows. It’s completely incompatible with Linux. It’s proprietary, officially deprecated by Apple… mostly what it does is convince people not to ever touch video or use Processing for video. Okay, I’ll stop.
Fortunately, there’s a terrific alternative that works in Windows, Linux, and Mac that builds on the superior GStreamer framework and gstreamer-java bindings (which, incidentally, is your strongest capture and playback choice for Java projects, too).
GSVideo Library – GStreamer Video Library for Processing
Install is absurdly easy on Linux. On Ubuntu, I do like to go ahead and install “libgstreamer0.10-dev.” Other than that, just install the library normally in Processing, and try out the simple Linux capture example. For my laptop, /dev/video0 is the built-in webcam, so I just select /dev/video1.
More tips?
We’d love to hear them. I’m just getting into the PS3 Eye and I’m sure that folks from the NUI community and elsewhere know plenty more I’ve missed.