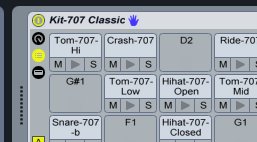
When software has “Live” as its name, you know control will be everything. So it’s great that many control surfaces will behave intelligently out of the box with Ableton Live, including devices like the Akai APC40 and Novation ReMOTE SL. If you’ve used one of these products, you’ve no doubt been able to click a device rack in Live and have a blue hand icon appear in the title bar, automatically assigning, say, the first eight macro knobs in a drum rack to your eight hardware encoders.
But what if you have hardware that isn’t covered by this functionality that you want to use? The easiest solution is something called MIDI Remote Scripting. It’s been available since Live 6, but it seems not many people know that it’s there or how to use it. It’s not a perfect solution, but it’s such an easy hack that it’s worth at least exploring.
For this tutorial, I’ll take the example of the Korg nanoKONTROL and nanoPAD. They’re a likely candidate, at about US$60 street each and with some handy controls (kontrols?) for mixer channels and drum racks. But you could take any hardware and apply the same technique — even something you’ve built yourself — so long as it sends simple MIDI messages.
The upshot: you get simple “automap” functionality without something specific like Automap (or drivers, in general).
Required for this tutorial: Ableton Live 6.x or later. I’ve tested only the full version of Live on Mac and Windows, though I think at least some of the “lighter” versions should work, as well.
This is a long article but a relatively short and easy process. I’m just giving you everything you could possibly want to know about the nanoSERIES and MIDI Remote Scripting!
Introducing MIDI Remote Scripts
Ableton Live uses compiled Python scripts to provide custom support for controllers, as I understand it. I’ve never looked into this specific functionality, and generally you wouldn’t unless you’re a hardware vendor working with Ableton.
As of Live 6, though, there’s a hack provided for everything else, called MIDI Remote Scripts. They’re simple text files that let you specify mappings of MIDI note, Control Change, and channel messages to common parameters in Live. This text file is compiled into a Python script for the hardware when Live launches. Basically, the Remote Script covers:
- The 16 visible pads in Drum Racks
- Device Rack encoders (the 8 Macros for each Device Rack)
- Bank parameters for switching between banks of encoders in devices that aren’t in racks
- Volume faders 1-8, plus the master volume setting
- Sends for tracks 1-8 (just the first two sends)
- Track arm buttons for recording into tracks 1-8
- Transport controls
Now, if you’re not familiar with Device Racks and Drum Racks, and how to use them for instruments and effects, you should absolutely go brush up now. Really, go ahead – I’ll wait. The rack functionality introduced in Live 6 is essential, because it allows you to take complex sets of effects and instruments and map them intelligently to just eight controls.
You’ll notice there’s plenty of stuff that’s not on here. There’s nothing to do with clips. There’s no way of banking up to track counts higher than 8. There’s no way to easily bank between sets of pads in Drum Racks with more slots. There’s no headphone level. There’s record arm, but not track enable/disable. I could go on…
But you do get a pretty decent base set of functionality if the list above looks appealing. Since you’re just using MIDI, you can manually assign any additional remaining hardware MIDI controls to your favorite parameters.
And the most important thing about all of this is that parameters for the Device Rack are dynamic. So while there are eight of them, that covers any selected device anywhere in your set. Click on the device, and the blue hand lets you know the device is under your control. Whichever controls you’ve chosen — say, eight huge mechanical knobs on a DIY hardware controllers — will map automatically.
Finding and Editing the MIDI Remote Scripts
I do mean finding. Your first job is to find the MIDI Remote Script location on your drive.
First, here’s where it’s not: it’s not in the Ableton program folder itself. There is, in fact, a User Remote Scripts folder in there, but it’s not the one you want to use. (I bring this up only because I tried to put my customized text file in that folder, had my script show up in Live’s preferences, but then couldn’t understand why nothing was working. Learn from my mistake, and be wiser.)
Instead, you’ll want to navigate to your user preferences folder.
On Windows Vista/Windows 7, my Live preferences live in:
[Windows boot drive] > Users > Peter > AppData > Roaming > Ableton > Live 8.04 [or your version] > Preferences > User Remote Scripts
(Yours may be in Local rather than Roaming, depending on whether you installed Live for all users. On XP, the path is similar, but in your boot drive’s Documents and Settings.)
On Mac:
[Library folder] > Preferences > Ableton > Live 8.04 [or your version] > User Remote Scripts
Note that on the Mac, in similar fashion to the Remote/Roaming difference on Windows, you may need either the Library folder at the root level of your boot drive or the Library folder inside your user folder (the one you see when you click Home, Documents, etc.).
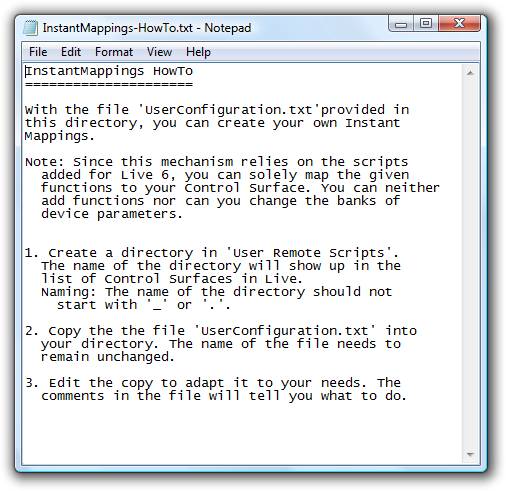
You’ll find two files in that folder. One is a how-to text file, as pictured above, though it doesn’t tell you that much. The other is a sample file.
To create your custom script, you’ll want to duplicate the UserConfiguration.txt script and place it in a folder with the name you want to appear in Live. So, for my custom nanoKONTROL script, I have:
User Remote Scripts > nanoKONTROL > UserConfiguration.txt
Note that the new file will still be called UserConfiguration.txt.
Customizing in the nanoSERIES Editor
Let’s take a quick side trip to set up our KORG nanoSERIES controllers the way we want.
Out of the box, the KORG nanos don’t come with any software disc, because you don’t need them – just plug them in, and they work. And, in fact, if you’re happy with the default MIDI assignments, you never need to go beyond this. In this case, though, I was interested in remapping some stuff, particularly on the nanoKONTROL buttons, so I went ahead and started editing.
You can head to the Korg Nano site and navigate through support, or even easier is to head to this direct link:
Support Results for nanoSERIES
(If you’re outside the Americas, there may be a different link.)
Click Downloads and choose Kontrol Editor for Mac or PC. (You may also want to grab KORG’s own USB MIDI Driver.)
The Kontrol Editor is really quite nice to use and surprisingly powerful for a $60 piece of hardware. At the top, you’ll see buttons for the scenes on the nanoPAD and nanoKONTROL. There’s a visual representation of the controller which, by default, displays MIDI Control Change and note number assignments. (To change what this preview displays, select the dropdown just below the picture of your nano.) The Browse tab allows you to navigate your file structure, but keep Control selected to change assignments.
You can safely ignore the boxes above the controller for now, which control scene settings and channels. Instead, focus on everything on top of and below the controller. On the nanoKONTROL, the faders’ CC assignments are just below the faders. (Look carefully; that can be a bit confusing at first.)
I’m providing my download of my template, so you don’t have to muck with this, necessarily. But here was my strategy:
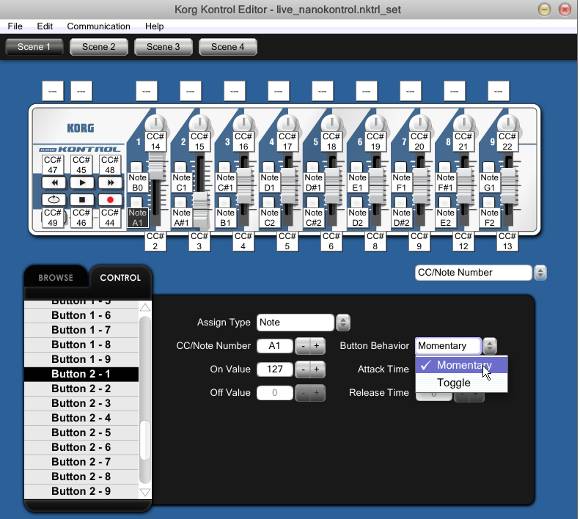
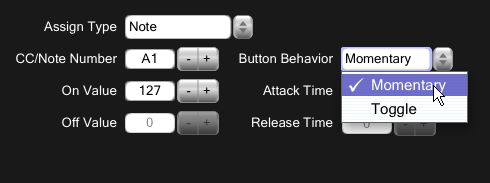
nanoKONTROL I was most interested in reassigning the buttons next to the faders. Selecting “Momentary” lights up the button only as you’re pressing it; “Toggle” has it turn on and off. Note that this doesn’t actually impact the messages it sends; just the lights. For Scene 1, I wanted these buttons to double as triggers for my drum pads, so I changed all of them to Assign Type: Notes and adjusted Button Behavior to Momentary. For the remaining scenes, they’re record arm buttons, so those I left as Control Change assignments and Toggle behavior.
The tricky part of this is that KORG has nine faders and encoders instead of eight, and everything in Live is grouped in eight. I made the ninth fader a master. You might manually assign the knob above that ninth fader to headphone out.
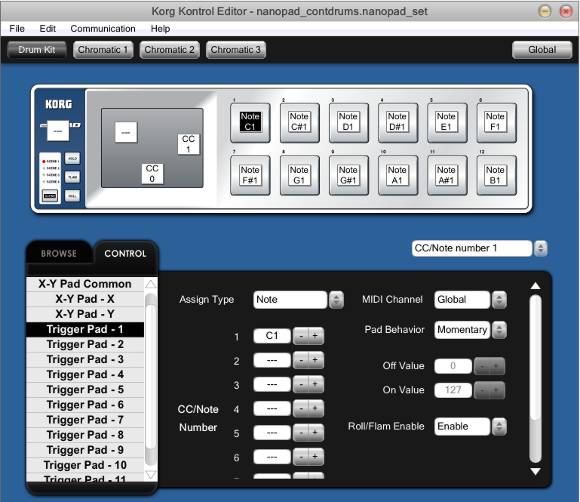
nanoPAD All the fun in the nanoPAD editor is to be had on the X/Y controller. The two boxes that are pre-assigned represent X control and Y control on the pad. The third box allows you to define an additional controller for touch across the whole pad. On the pads themselves, note that you can assign up to eight(!) control change or note messages, not just one.
For this project, I just wanted to adjust the note settings to map more intelligently across my Drum Racks, which I’ll explain with the download. That means, unfortunately, going through one by one and changing pitch assignments. For the pad, I’m of two minds. You can keep those CC assignments consistent across all four scenes, or use each scene to control different parameters for a total of eight (conveniently, the number of macros on a Live Device Rack) Note that the scene descriptions at top are just text you add, so the “Drum Kit” or “Chromatic” labels are really just suggestions; they have no functional purpose. You can change them if you want, but the editor is the only place you’ll see them.
User Configuration Settings
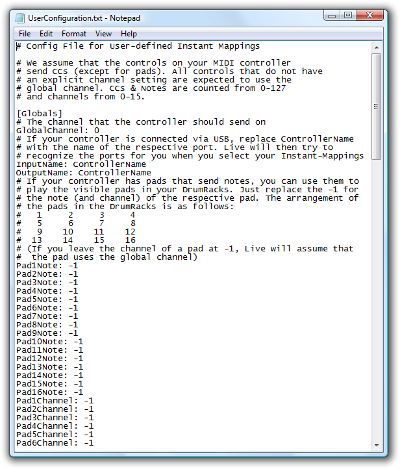
Lastly, let’s walk through the changes to make to UserConfiguration.
[Globals]:
For InputName and OutputName, it’s essential that you match exactly the text listed by a MIDI device when it’s connected to your computer. For the nanos, that’s “nanoPAD” and “nanoSERIES.” You can verify this by opening your Live preferences and checking under MIDI.
You also need to double-check your GlobalChannel. Numbering starts at zero, so channel 1 is channel 0, and 10 is 9. You can plug multiple nanoSERIES devices into a USB hub — even an unpowered hub, the power draw is so low — so I like to assign different channels to different devices to avoid confusion.
In the rest of the document, any channel that references “-1” is equivalent to the default. For that reason, I recommend leaving channel assignments along and just changing the default global channel.
Pads and Device Controls
Here’s the fun part: you can set up pads and Device Controls (Macro) encoders to dynamically control the active device. Choose note messages for the pads, and Control Change messages (with the associated numbers) for the encoders.
Here’s the trick: you need to have everything assigned, or it won’t work. In other words, you can’t assign just the first few encoders or just the first few pads, or, oddly, Live will refuse to recognize this as a mappable device.
Banks and Locking
I didn’t find Banks as useful. Banks allow you to choose banks of unassigned controllers. That can get confusing, though, so I still recommend using Device Racks to manually pick and choose which macros you want assigned.
There is, however, an assignment for LockButton. This allows you to pick a button that will “lock” your dynamic controls to one device. So, for instance, let’s say you have a rack of effects you want to control with your nanoKONTROL. When you’re at home in the studio, you might want to mouse around and click different devices for tangible control. But live onstage, you want just one live performance effects rack. Lock the device, and you won’t accidentally click something else and lose control.
I didn’t assign this on the nanoKONTROL because there wasn’t a convenient parameter to assign, but you can still lock a Device from within Live.
[MixerControls]
This gives you limited automatic control of mixer levels (for channels 1-8), sends (1-2 for each of those channels), record enable (for arming tracks), and the master mixer level. I like having a master to control, so having that ninth fader on the nanoKONTROL wound up being very nice.
Now, it is a little annoying to be limited to eight tracks, but there are two important factors here. Firstly, this is a dynamic assignment, meaning you don’t need to manually assign anything or make a special Live session template. That means you can mix and match MIDI and audio tracks arbitrarily, which you can’t do with a template. Secondly, sometimes having the arbitrary limit of eight channels is ideal in live performance — and it means you don’t have to bank around.
Transport
This winds up working perfectly: you get play, stop, record, forward scrub, reverse scrub, and even a loop on/off switch. Of course, you don’t get some of the other parameters you get from an Akai APC40, like turning on and off MIDI overdub. But, hey, you spent sixty bucks on the Korg and you really can’t balance an APC40 and your laptop on Greyhound.
Setting Up Live
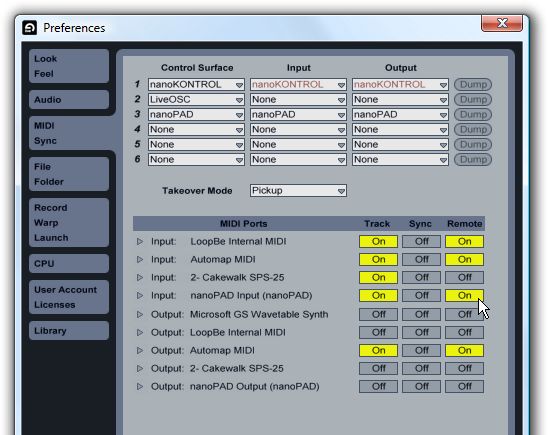
Once your MIDI Remote Script is in the proper folder, your device will show up automatically in Live. That’s especially cool if you’re a DIYer; you could have Maria’s Arcade Button Mashapalooza show up if you want.
Select a configured device just as you would any other control surface. Choose Preferences > MIDI/Sync, select Control Surface in the first column (nanoPAD, for instance), and then its Input and Output ports. Finally, enable the Control Surface Input for Track and Remote. This will allow you to manually override assignments if you want, and to assign controls on your hardware you didn’t assign in the MIDI Remote Script, both via the usual MIDI Map method.
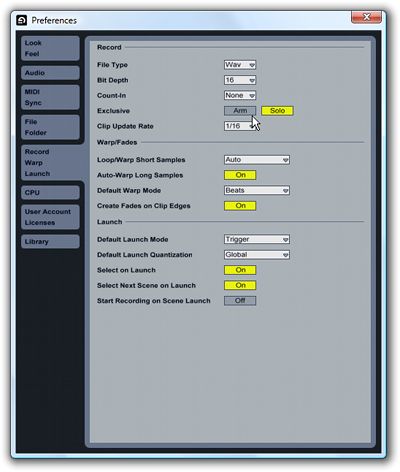
Because I want to be able to easily record-toggle multiple tracks — and because anything else will mean the “toggle” lights on the nanoKONTROL are wrong — I also like to turn off “exclusive” arming in preferences. This way, you can record-enable multiple tracks at once, so that when you want to feed MIDI into your soft synth on track 7, your vocoded vocal track on track 2 doesn’t immediately switch off. Go to Preferences > Record/Warp/Launch > Record > Exclusive and make sure Arm is unlit. (Pictured above.)

One last tip, as suggested by Mike Hatsis of Trackteam Audio: use the Drum Rack’s Auto Select feature, and you’ll automatically toggle the interface to whatever part of the rack’s various pads you happen to trigger. (This works in Live 7 and later only.) This way, you can easily toggle more than the 16 visible pads. On my nanoPAD template, for instance, I’ve already gone to the trouble of mapping the remaining scenes, so the first 16 pads map automatically, and then scenes 2-4 can access other pad slots.
To enable Auto Select, make sure the Chain is visible in the rack, then click the small A button as pictured above.
Alternatives, Future
Now, go forth and have fun!
Granted, this isn’t a perfect control mechanism. If you need to bank more easily between tracks, control a whole lot of mechanisms that aren’t here, focus on clips, or … well, do anything other than the stuff described above … it’s not ideal.
On the other hand, I find this resolves about half of the situations that would otherwise require manual MIDI assignments and, worse, templates rather than dynamic assignment. For basic MIDI tasks, it’s a hack, but a useful hack.
What about the future? HyperControl from M-Audio and Automap from Novation both have more sophisticated integration. The Akai APC40 goes further than previous devices as far as dynamic clip triggering and shortcuts. And other integration is possible with Ableton’s own scripts than what you can do here, although you don’t necessarily get support for all the hardware you’d like to use.
MIDI Remote Scripting is frozen in time in Live 6, so as its own documentation says, there’s some stuff missing. I don’t expect it to be updated, however — too bad, as it is a nice hack.
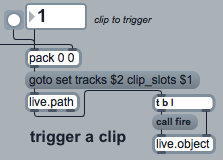
The Ableton Live API is likely where future action is at. While it’s not an official or supported feature, I have no reason to suspect that it’s going away. On the contrary, you should be able to use API functions controlling clips and most functions of the user interface in Live dynamically. This functionality will be baked into Max for Live if you’re a Max user, but should also be accessible via the hacker-spported, community-based Python API wrapper. Most promisingly, hackers have already wrapped this Python API into both MIDI and OSC implementations, meaning you should have a choice between using Max for Live and supporting this functionality directly from hardware, even without M4L.
I’ll be documenting what’s coming very soon, both on the Max and Python/OSC sides. In the meantime, here’s a preview of what the API will do from our friend Andrew Benson at Cycling ’74. Andrew is himself a visualist, so I expect we’ll see some nifty visual applications.
Max-for-Live: A Sneak Peak at the Live API features
And looking beyond even Live, I think we’re now in a world in which we’re finally moving beyond simple MIDI learn. That’s a big relief. Next stop: OSC.
KORG owners: Downloads coming in a separate article later today!
Corrections/tips: More to add? Let me know and I’ll update the story. -Ed.

