Creating digital music is about more than audio. Notation remains an essential way to communicate among musicians. Notation is deep and complex, so there’s plenty to talk about. As a long-time Sibelius user, though I want to discuss some core techniques that I find open up a lot of other possibilities, techniques to which I continually return. I happen to be sharing this at a discussion at the City University of New York Graduate Center today, so the timing seems right.
Teachers and experimental, avant-garde composers have something in common: you often need to convince notation software to behave in a way that’s contrary to the expected norm.
To save you time, notation software generally assumes that all music has bars, and that those bars go from left to right with everything visible. This is especially true in Sibelius, which is able to perform as quickly as it does because everything you see on a score is relative to a position in a bar, rather than being set up arbitrarily as you would in a page layout program.
That works much of the time, but what if you have music that isn’t in a time signature? What if you’re transcribing early music or world music that doesn’t operate in 4/4? What if you’re making a quiz in which you don’t need bars, or want to have a blank space for students to fill in answers?
Updated: Just days after this feature, Sibelius announces Sibelius 6. Relevant to this story, this means at least some of the manual hacks for things like beaming across bars and feathered beams will now be automatic! Neat! I’ll have to do new tips for Sibelius 6 when it arrives.
Technique 1: Staves and Instrument Types
Oddly enough, the answer to all of these questions is basically the same: change the way the staff is displayed. You’ll still need to account for bars behind the scenes, but once you learn how to handle Sibelius’ staff options, this isn’t so difficult. This step is a bit confusing for those of us (hand raised) who have been using Sibelius since 1.0, as Sibelius 5 changed the name of this option from Staff Type Change to Instrument Change. (The latter makes more sense in conventional music, even though the former will make more sense for this tip.) But the technique is basically the same.
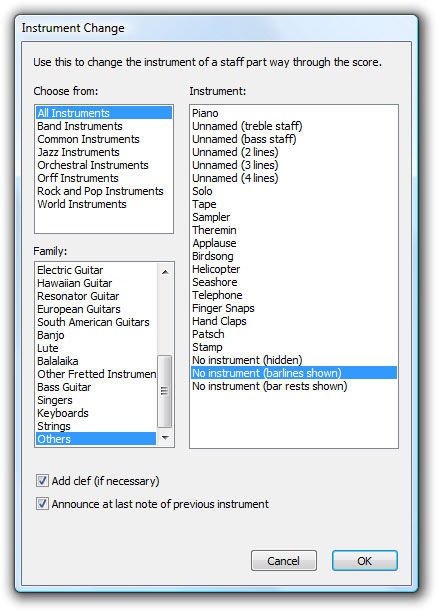
To insert a new instrument type, right-click (or ctrl-click on Mac, or choose Create) and select Other > Instrument Change.
Select Choose from > All Instruments and Family > Others (for the most generic type).
You’ll see some useful options already. In addition to choosing different numbers of lines, there’s an option that entirely hides a staff — “No instrument(hidden)” – and options that show just barlines or just bar rests.
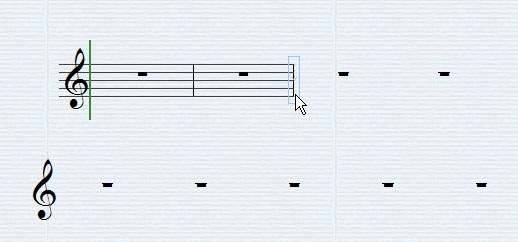
Try selecting the “No instrument (bar rests shown)” option, then click in the score where you want the change to happen. You’ll see a blue rectangle around the barline at which the change is inserted. Clicking this barline in the center will allow you to select the change itself. Once selected, you can drag it left and right to change the point at which the change occurs, or press Delete to remove it. (That’s important for hiding portions of staves, as you’ll need to be able to select them even when hidden!)
You can imagine lots of possibilities for using this simple technique. For quizzes, for instance, you might simply hide the portion in which you want a student to fill in an answer. Or you can use those hidden bars to help space out a quiz. Or you can use some hidden bars to provide space for a graphical notation in a contemporary / experimental score.
For all of those applications, though, you may need some different variations.
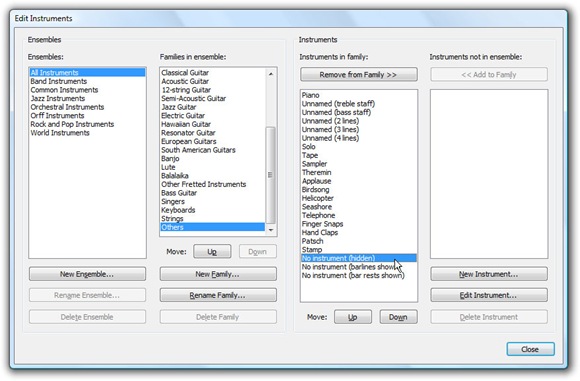
To create your own instrument type, choose House Style > Edit Instruments.
Choose Ensembles > All Instruments, then Families in ensemble > Others to get the generic types.
Let’s try creating a staff type that looks like a normal treble staff, but hides the barlines. Select “Unnamed (treble staff)” and choose New Instrument… to create a new instrument that will be based on that existing instrument. Sibelius will ask if you’re sure. (It can smell uncertainty. You’re sure.)
Under “Name in dialogs,” choose a useful name, like “Treble staff (barlines hidden).”
There are actually lots of powerful options here, but skip straight to “Edit Staff Type.”
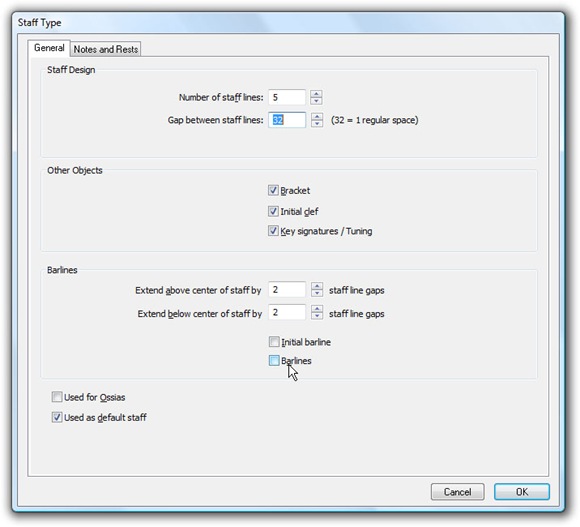
Under General, you can choose the number of staff lines and what objects are shown.
Uncheck Initial barline and Barlines, and you’ll have a staff with hidden barlines.
Also make sure to uncheck “Used as default staff.”
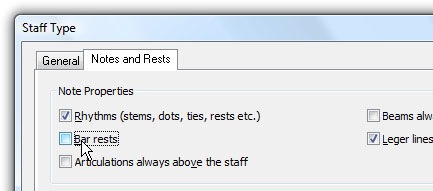
Bar rests won’t make much sense if you don’t have bars, so click the Notes and Rests tab, and uncheck “Bar rests.” You’ll want to leave the Rhythms options, because you probably do want rhythms in this case, just not the barlines and bar rests. (Unchecking Rhythms could be useful, though, for things like plainchant.)
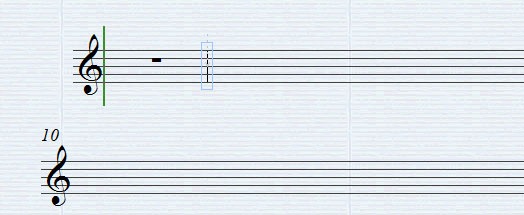
Again, to insert, you’ll right click, choose Other > Instrument Change, and use the blue arrow to click where you want the change to go. Here’s our result:
And yes, this can be handy for printing out blank notation paper if you’ve run out / forgot your manuscript notebook. (Been there.)
One last note: you may have noticed that you still have bar numbers. Check House Style > Engraving Rules > Bar Numbers. Other global score settings are found here, so you should get in the habit of a trip to the Engraving Rules any time you’re creating a new score or developing a new template.
Technique 2: Noteheads
Just about anything you can’t do with staff types, you can do with noteheads.
The most useful notehead, of course, is a dead notehead.
Okay, that sounded like some sort of anti-notehead bitterness. But seriously, by hiding noteheads, again, you can create all sorts of alternative notations, and because stems are still visible, musicians can more easily see where beats are. You’ll also need noteheads for percussion notations and the like.
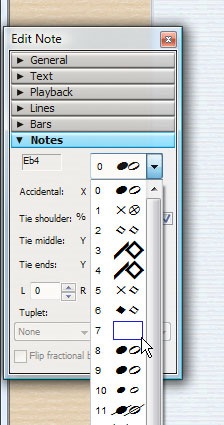
To change notehead types, make sure the floating Properties window is visible (Window > Properties). This is useful for changing other settings, too, so it’s well worth exploring. In the dropdown, you’ll see headless noteheads (position 7).
You can also edit your own Notehead types, just as with instruments and staff types, by selecting House Style > Edit Noteheads.
One other neat trick using the Notes panel is that you can turn on and off tuplet brackets. That allows a little hack that gives you feathered beams. You’ll find instructions under Feathered beams in the manual (p. 79 in my edition).
Technique 3: Locking Layout
The problem with just hiding barlines and such is that you still have bars underneath, and they’ll continue to automatically flow as Sibelius adjusts the layout. With most scores, that’s a good thing, but with ametrical scores or quizzes or short example snippets you want to export, that’s obviously a bad thing.
The solution? It’s time to learn the keyboard shortcuts for locking your layout in place.
System breaks: Click a barline and hit the enter key. You can insert forced system breaks just like carriage returns (line breaks) in a word processor. You’ll see an icon above the score both in the line with the break, and the line immediately following.
Page breaks: Ctrl-Return / Cmd-Return breaks the page.
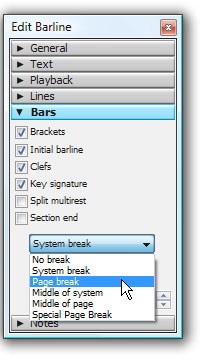
Special breaks: You’ll find other options in Properties > Bars, including a Special Page Break that inserts a blank page. Click a barline first, then choose from the drop-down menu in Bars.
Indentation: You can move a line left or right by clicking the left-hand side of a stave, then moving it right with the left and right arrow keys. Hold down ctrl (PC) or cmd (Mac) to move by larger increments.
Expand or contract bars: Invariably, you’ll find some of the automatic spacing doesn’t look quite right – especially in these special cases. Click a bar, then press shift-alt (shift-opt) and the left and right arrow keys to make a bar wider or narrower.
If you ever get lost with any of these steps, Layout > Reset Position restores the default.
Technique 4: Exporting Score Snippets
At a certain point, as a composer or a teacher, you don’t always want to do all of your page layout in Sibelius. Likewise, I’m surprised that people don’t more often use little snippets of scores to communicate ideas, whether it’s highlighting a specific comment on a bigger score, or using notation software to quickly communicate short bits of music. Obviously, this is useful for musical examples in essays and the like, too.
When you’re ready to export parts of a score, you have several methods in Sibelius:
The graphics-copying way. Choose Edit > Select > Select Graphic (Alt-G), and Sibelius gives you a bounding box that allows you to select a portion of your score. (If you select your bars before choosing this option, it will attempt to snap to the right area, from which you can adjust it further if you like.)
Once you have the area selected the way you like, use the standard copy shortcut (ctrl-C / cmd-C), then choose your word processing or layout app and paste. To cancel out of this mode, hit Esc.
Most of the time, this is really all you need to do, unless you’re concerned about higher-quality output. In that case…
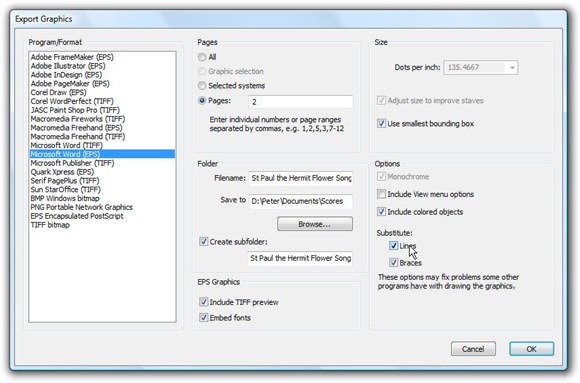
The export way. If you need to fine-tune output options and DPI, you should instead use File > Export > Export Graphics. Here, you can select the format you like. OpenOffice isn’t listed, but choosing the Sun StarOffice(TIFF) method is your best bet. For Word, choose the explicit Word EPS setting for the highest-quality output.
The PDF way. If you’re on a Mac or have Adobe Acrobat Professional (or another PDF generator) installed, there’s an additional way, which is to export to PDF. I find that inserting PDFs is the best way to go for inserting later to software like InDesign. The default PDF creator on Mac is pretty good, but a full version of Acrobat is often preferable to other options.
Screencast: Sibelius has a screencast of these techniques, which you’ll find from the opening screen.
Technique 5: Making Teaching Materials
The other techniques all work for teachers and composers alike, but when you do need to teach…
Does all of this seem like a lot of work? Still not sure how you combine the layout techniques above to make something look like a quiz, flash cards, or the like? Need to teach something and running short on time?
A recent feature in Sibelius is a comprehensive, shared set of teaching materials. (If you want to share and share a
like, you can also publish your own materials to the site and spread the love.)
You’ll find the site itself at:
http://www.sibeliuseducation.com/
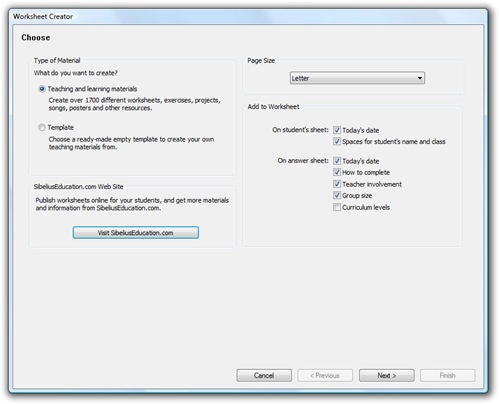
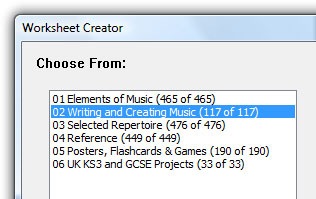
When you open the program or choose File > Worksheet Creator, you can tap into these resources.
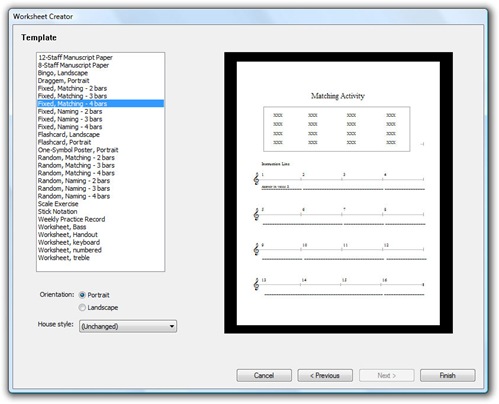
Choose Template, and you’ll find a number of blank templates set up by activity (manuscript paper, worksheets and handouts, matching different materials, and flashcards).
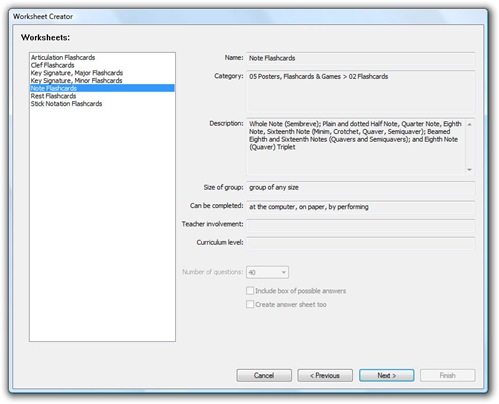
If you want still additional help, ideas, and starters, choose Type of Material > Teaching and learning materials. You’ll want to limit your search, or loading the possibilities will take a long time. But from there, you can find all kinds of additional examples. Many of these come from the UK, so be prepared for English terminology and even UK-specific projects, but they’re still quite useful even if you’re American and tend not to call things “breves.”
Pick a category, and you’ll find other layouts that can be the basis of your own work, as well as some relatively generic materials that are useful to everyone.
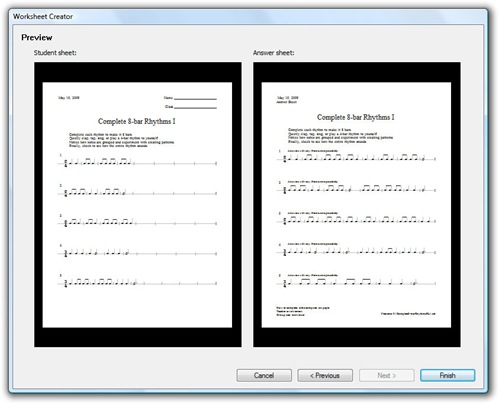
Here’s what you’ll see as you dig into worksheets:
Pull up an example, and you’ll find something that you may be able to use as-is, or at least a template that could be useful for adapting to your own coursework.
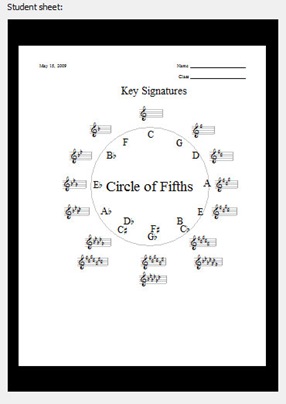
There’s even a Circle of Fifths ready to go. (The only change you might need to make, depending on the part of the world in which you live, is to call it the Circle of Fourths!)
Other ideas?
This is a bit of a departure for CDM, but I know lots of you out there are producing notation for various reasons. I hope this was helpful, and if anyone wants to do a similar story for Finale or another tool, I’m happy to have it. Let us know what other tips you like or if you have additional questions.
Addendum
Having just done this workshop, it’s worth noting a couple of things I discovered.
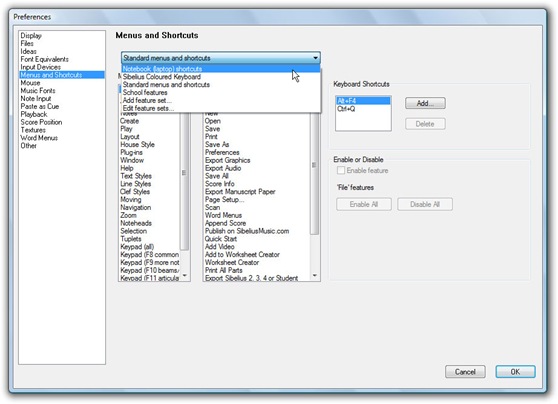
First, Sibelius I see now has an option in Preferences to account for laptops that don’t have numeric keypads, making entry much easier (though I still prefer the numeric keypad layout):
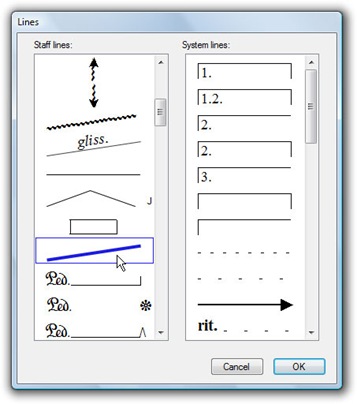
Next, I was reminded that a lot of tricks use the Beam line type, which you’ll find in the Line dialog. Any old line will do, but this will look like your other beams. This way, you can manually draw in notations that the software itself may not recognize.
And it’s worth noting that a lot of beaming tricks can be accessed in one of two places:
1. Beam display in the Staff Type House Style (there’s a checkbox buried in there for forcing “horizontal beams,” alongside the options for hiding rests and such above)
2. Beam groups and beaming rules (including the ability to beam across rests) in the Time Signature dialog.
For Finale users, most of these basic strategies will translate to your notation tool of choice. Generally, Sibelius lets you select objects directly, whereas Finale uses specialized tools, selected by toolbar icons, for each job. That also means that when you’re using Finale, you may need to select the tool before you’re presented with variables related to that type of object, whereas Sibelius consolidates those settings under House Styles.
For instance, Finale edits the staff types via an item, accessed from its staff tool, called Define Staff Types. That dialog is very similar to the Staff Type and Instrument dialog above.
Ultimately, in fact, both Sibelius and Finale have a lot of the same strengths and shortcomings once you learn them, because fundamentally they do treat scores according to regular bars and barlines. Interestingly, Finale has the abilty to have independent time signatures on different staves, but it’s almost useless, because it still puts the barlines in the same place. (That is, both tools are limited in this respect.)
