You’ve seen some feature lists – and this time Ableton are even running a 90-day free trial. But how do you actually dig into what’s new in Live 11 and start working? Here’s a deep guide to all the essentials.
The basic idea here is to have field notes you can keep handy while you work in Live, so you can get to playing, jamming, editing, and arranging. It’s not a review – I’m assuming you’ll reach those conclusions on your own. It’s rather a one-stop starting point for beginning to make some music or explore the new tool.
For all the fun instruments and effects, it’s also worth noting that a lot of the tweaks to workflow can only come from Ableton Live – and that the Max for Live API changes are likely to make still more third-party modification possible.
Let’s start at the most significant workflow change in Live 11 – comping, takes, and linked-track editing. You might think this one isn’t for you. It sounds like something of interest to people wanting to nail a vocal recoring, for instance – but it can make just about everybody more productive in arrangement, too.
Before you begin: a recommendation. Keep your old Live version!
Ableton allows you to run different versions of Live alongside one another. Just remember that file formats are forward-compatible but not backward-compatible – you can open up a Live 9 session in Live 11, but if you save it, you can’t reopen it in Live 9. But this way you have an older version should you need it for unexpected compatibility issues. The Live installer also leaves the User Library alone, so you won’t lose any of those settings.
Also worth noting, Live 11 is incompatible with Python 2. This means some add-ons that use Python scripts will require an update. Python 2 was deprecated across all OSes with an end to support at the start of 2020, so this is more an impact of what’s happening in the Python world than the Ableton one. That’s another reason to keep your old version around, though.
Comping and takes
For those of you who haven’t used this functionality elsewhere, “comping” is short for “composite” – and it effectively comprises two parts. First, you capture multiple takes of the same recording, and second, you’re given the ability to composite those back into a preferred take. The “comp” part involves making the best take out of multiple takes.
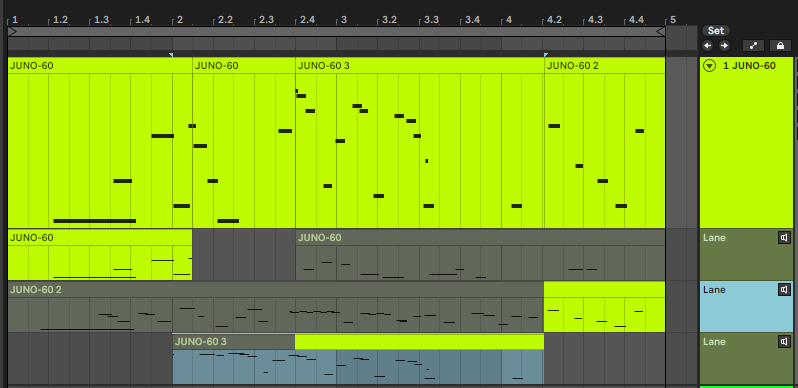
Comping is a standard feature of many DAWs, but Ableton have a unique twist: each take is a clip, and then those clips sit in Take Lanes inside each track. As you divide the full take into time ranges, those also become clips. This also means you could work the other direction, dragging clips back to Session View to trigger interactively. And you can also use Take Lanes as empty slots that line up multiple Clips inside Arrangement View – giving your Arrangement some of the open space for different combinations of patterns in a way that previously was limited to Session View.
So yeah, you might be using Comping and Takes as you shred your way through a MIDI keyboard or record a vocal a few times. But you might also use them as a way of building variation in clips – which is a little different than how you’re likely to approach this feature in other DAWs. Rather than being limited to having those different Clips in Session View and then a single, committed arrangement in Arrangement View, you can add a number of alternate Clips to each Take Lane in your Arrangement.
Here’s briefly how to get going with Comps:
Start recording (audio or MIDI). Each take now gets its own lane as you record to an armed audio or MIDI track, so the way to get started here is just to record something. Most likely, you’ll set a loop range and enable looping before recording, so you quickly build up a few takes.
Check out your takes. Right-click a track and choose Show Take Lanes to see the alternate recording Takes. (Ctrl-Shift-U / Cmd-Opt-U is the new keyboard shortcut.)
— or create take lanes in an existing track. You don’t need to start a recording to set up takes. You can also right-click a track header in Arrangement and choose Insert Take Lane (Shit-Alt-T / Shift-Opt-T) and make empty Take Lanes in any track. Then you can add alternate audio and MIDI materials directly in Arrangement View by slicing and copying clips, or drag in Clips from Session View. It’s a great way to commit to an arrangement, and interestingly it lets you get less linear in moving from Session to Arrangement.
Comp it together. The real power of Takes/Comping is the ability to choose from different takes or build composites quickly. Ableton built a number of ways to do this, but the quickest ways to add material from a take to the main take is to open up the Take Lanes and then, to select the best bits:
- Select a range and press ENTER
- Select time, then ctrl-UP (cmd-UP) / ctrl-DOWN (cmd-DOWN) to cycle between takes OR
- Switch into draw mode and then just ‘paint’ through what you want by dragging across materials
If you have MIDI Arrangement Overdub selected (the ‘+’ icon on the toolbar), Live will still overdub what you play as you record – just as it would normally. But now each successive take incorporates each overdub pass, making this a great way to layer material. Look:
Linked tracks
Related to the addition of Take Lanes and Comping to Arrangement, you also have the option of Linked Tracks. You’ll only see it in the Arrangement View – again, just right-click on the track header on the right to reveal “Link Tracks” with multiple tracks selected.
If you’ve ever multiple-selected tracks to apply fades, cuts, or edits, or slice or delete or move its around, or forgotten to select multiple tracks before doing that, or painfully gone through individually editing each, you actually already know what Linked Tracks could be for.
Once tracks are Linked, they behave the same way as if you manually selected all of them at once. That’s it. It’s evidently useful to the Comping workflow, and may have grown out of that development process, but it is obviously useful whether or not you’re using Takes or Comps, too.
Various DAWs have some kind of separate arrangement track that can also do something like this by arranging chunks of material. That adds a layer of abstraction, though, in exchange for being non-destructive. And when you’re in the musical flow, what you really want is to be destructive and compose your arrangement. Linked Tracks let you edit right in Arrangement as you might intuitively want to do.
Ableton’s documentation is light on this, but you will actually figure most of it out by linking tracks you want to edit together and playing around. You’ll see the “link” icon appear in the track header as a small chain (like on a boat). This is also useful in working in grouped tracks (like drum parts).
Probability, Follow Actions, and more: Meet your new Clips
Clip View is one of the oldest and most-used parts of the Live interface. There are a lot of changes in there, and it’s really best to just open a Clip and discover them.
The main thing to look for here is that there is now a tabbed view with up to three tabbed sections –
- Samples/Notes (Alt+1 / Opt+1)
- Envelopes (Alt+2 / Opt+2)
- Expression (Alt+3 / Opt+2) [MIDI only]
I’ve been staring at Clips View for about 20 years, yet honestly the change here was so easy to assimilate I didn’t even notice a lot of the tweaks (like the adjusted Transpose settings).
Basically, explore the tabs, and click the disclosure triangles – particularly the one at the top left, at the title of the Clip, as it exposes the new Follow Action section.
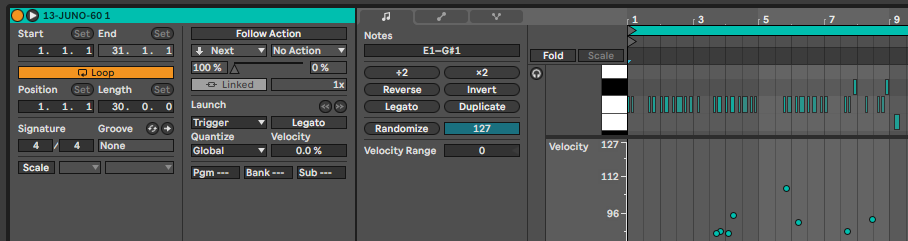
Probability is a feature that is becoming popular among hardware users, so now we’re seeing it more closely integrated with music software production, too. If you ever had some tracks that got boring because of endless repetition, you might find this a welcome feature.
It’s tiny – there’s just this little button that looks like a dot right underneath Velocity:
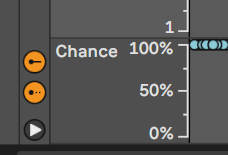
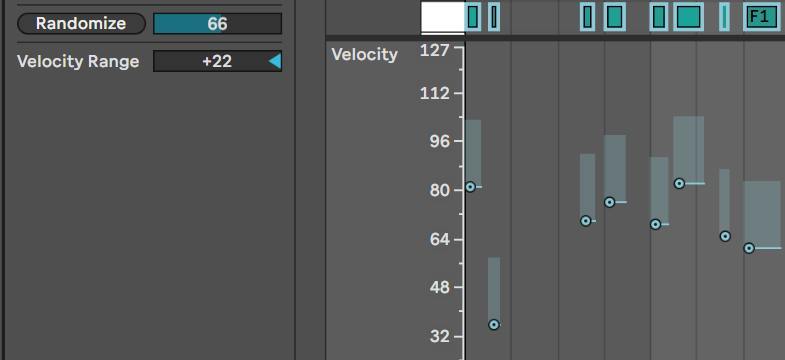
plus, a Randomize button with Range, and a separate Velocity Range:
Let’s be clear on what these mean:
Chance is a probability of a note being triggered.
Velocity Range sets a range of values for velocity for a selected set of notes, from which velocity values will be randomly chosen each time the Clip plays.
Randomize randomizes notes or probability values. (Right, so you can randomize probability to get a whole bunch of Chance values in one go!)
Randomizing notes will randomize pitches, but also within a range you set from 0 to 127.
Note that this will not always be the best way of adding randomization or chance – there are plenty of Max for Live devices that do the same and allow real-time manipulation. But by the same token, you can use MIDI note values to control other devices, not only pitch, and this will be useful for adding some extra spice to clips – at least in certain cases.
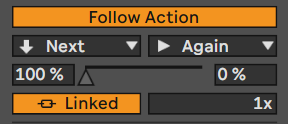
Follow Actions also get a big makeover in Live 11:
- They work in Scenes (finally!)
- You can turn them on and off globally (there’s a new button next to Back to Arrangement in Session View)
- There’s a slider for adjusting Chance A and Chance B, so you can balance the odds of one of two Follow Action outcomes
- Improved triggering: It’s easier to set triggers to make Follow Actions jump to other slots, and you have more intuitive, complete control over when a Follow Action is triggered
- Create Follow Action Chain command lets you loop a whole bunch of clips at once
Some of this functionality was already in Live, but it’s more discoverable. I do find it a lot easier to loop clips without warping them, which is something that bugged me since version 1. Set the Follow Action to Linked, and just set the trigger at the end of the clip to “Again.”
There are some cases that weren’t possible before – like setting Follow Actions to Scenes. But even if some stuff that was possible before is now labeled in a way that you can actually understand it without getting lost, that’s almost as good as a new feature.
Your best bet is just to open up Follow Actions in a Clip and have a good play.
Expression
There are overlapping areas of use for expression in Live 11:
- Working with an MPE-capable controller device (like ROLI Seaboard, Roger Linn Linnstrument, Sensel Morph, Polyend Medusa)
- Controlling and editing expression data for an MPE-capable software synth (including some updated Ableton devices) or outboard hardware synth (there are a few emerging now)
- Working with polyphonic pressure data from Ableton Push
Let’s back up. The upshot of this is that you don’t need new hardware or software to take advantage of Live 11’s Expression editing. You might just mouse around and edit data that way, for instance. Or you might record and edit Ableton Push’s pressure per note – which previously was tricky to do.
Everyone is rightfully buzzing about MPE – MIDI Polyphonic Expression. It’s now an official part of the MIDI spec, and even the original MIDI spec. But polyphonic aftertouch has been around since the 1980s. Hardware like Push is just making it possible to use again.
So now in Live 11, you can work with all these lanes of data, some of which are MPE-related, and some of which are more general MIDI implementation features:
- Per-note pitch bend (MPE)
- Per-note slide or y-axis data (MPE)
- Polyphonic pressure (aka polyphonic aftertouch as on Push, or MPE Press on MPE devices)
- Velocity (this one you know – MIDI)
- Release Velocity (Note-Off Velocity – MIDI)
Velocity is also a polyphonic expression detail of MIDI – it’s just you probably didn’t think about it that way, because MIDI software and hardware has already allowed you to take it for granted. You’d find it really confusing if velocity of one note in one hand impacted the velocity of all other notes at the same time. (First time Max and Pure Data patchers often discover exactly what this is like by accident when they wire it up wrong!)
In other words, what all of these things have in common is that they record, edit, and play back all of this data per note.
Just don’t feel like you need to go buy new hardware to play around with this. One of the first things to do with Live 11 if you haven’t already is to open up the Expression tab in Clips View and look around. You can play with Push hardware pressure if you own a Push, or just draw in the data with the mouse.
Sampler, Simpler, and Arpeggiator all have been updated to take advantage of MPE. But you shouldn’t feel limited to those Devices or your supported plug-ins, because there’s also Expression Control (in MIDI Devices).
You can use this device to map MPE control to anything you want – whether or not it’s MPE-aware. That makes your MPE controller a powerful effect controller and not just an instrument. (This works really well with the Sensel Morph with Buchla Thunder overlay.)
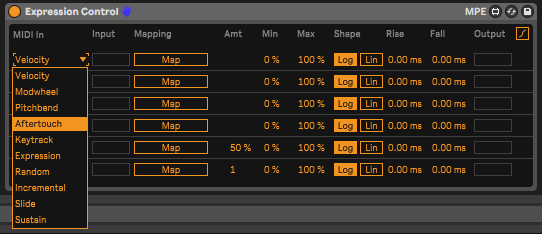
This is also useful for instruments like Operator which don’t yet have a voice architecture that it suited to MPE control, but which could use MPE to manipulate other parameters.
It also works with a selection of plain-vanilla, non-MPE MIDI parameters, too – like modwheel and pitchbend, which can also be useful to assign. And it gives you shape (linear or curved aka “Log”), min and max, amount, rise and fall envelope controls, and there’s a “Random” thrown in.
And Drum Racks and Instrument Racks are now also MPE-aware, meaning if you have per-note expression in a device inside a Rack, it will forward that data. MIDI Effects forward that data, too. (Otherwise, adding these would interrupt your MPE goodness but – don’t worry, it won’t!)
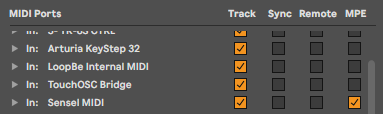
Also check for the MPE checkbox in Preferences > Link Tempo MIDI > MIDI Ports:
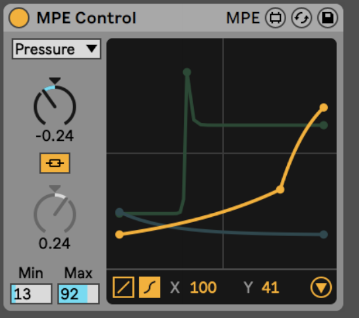
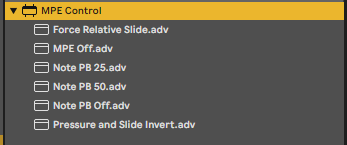
For more fine-grained control of how Live responds to expression data from MPE controllers, see MPE Control, which lets you create your own curves for MPE Pressure, Slide, and Pitch. It also works with polyphonic pressure from Push.
Tempo Follower
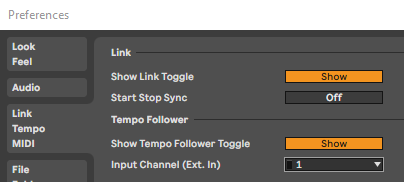
Live can now follow an external audio input – ideally something rhythmic with clear transients – and adjust the session tempo in real-time. That’ll require some experimentation, but here’s where to find it (and it seems this can also be used to follow trigger inputs as well as audio from something like a drum or a turntable):
In Preferences > Link Tempo MIDI > Tempo Follower, switch from the default (Hide) to Show and set the input channel you want to follow.
And then Follow appears (as it should) right next to Link:

New Devices: a field guide
Devices are generally the bit we don’t need in an upgrade – especially with all those plug-ins about – but they do provide extra creative inspiration. And as per tradition, Ableton have some new toys and some improvements to existing effects and instruments. These could each be the subject of an article, so here’s an elevator pitch for each.
One word of caution: the newer Ableton Devices are much heavier on CPU than the older ones, so keep an eye on that CPU meter or consider bouncing tracks.
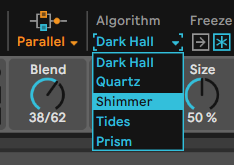
Hybrid Reverb. Half convolution reverb, half algorithmic reverb. This is really a bunch of reverbs in a single device. There are multiple algorithmic reverbs in that section (Dark Hall, Prism, Quartz, Shimmer, Tides). And you can route convolution and algorithmic sections into one another – series or parallel.
Something like this has appeared in plug-ins and other DAWs beginning with the letter ‘L,’ but this is an unmistakably Ableton device, especially with the different routing options.
To understand that full range, head first to the Blend knob, and the routing options above it. (Routing now includes a cute little diagram for added emphasis.) Plus you can completely transform this reverb with different convolution impulse responses, but also the Algorithm menu tucked above the Decay parameter:
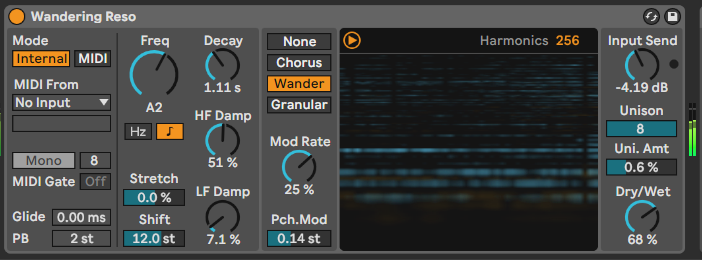
Spectral Resonator. A likely new Ableton classic, this one is not something you’d likely find in another DAW. It divides up a sound into a spectrum and transforms inputs into ghostly, ringing resonances, for both subtle and experimental effects. Try changing the number of Harmonics, and using its powerful modulation settings, which apply to individual partials – with a chorus (simple triangle modulation), random “Wander” modulation, or exponential “Granular” settings. You can also sidechain this one or trigger it with MIDI, so there’s a lot to explore.
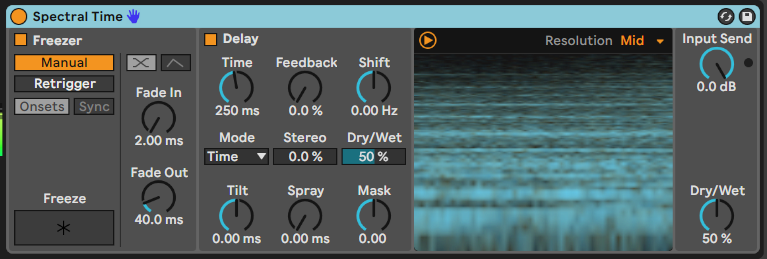
Spectral Time is in a similar category and is my other favorite of these. It’s a spectral delay, and it time freezes, with the ability to combine the two. Retrigger spices up the freezing options, or set it to manual and play it like an instrument. Resolution also has a bit impact on character, so it’s worth experimenting, and Tilt, Spray, and Mask give you uniquely musical controls over the Delay.
Chorus-Ensemble is what it sounds like, and makes an essential tool that feels like it belongs in the Ableton toolset.
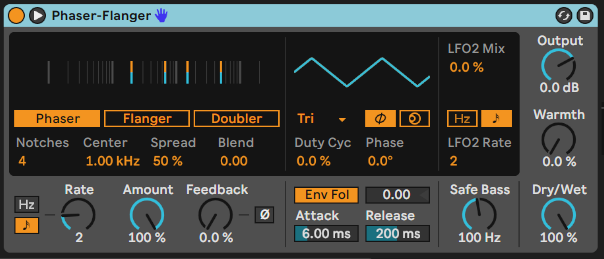
Phaser-Flanger is also self explanatory, but be sure to hit the disclosure triangle to check out all its advanced modes. It’s also useful that there’s a Doubler mode, Phase and Spin options (familiar from elsewhere in Live Devices), and som seriously powerful modulation options.
Oddly, with so many plug-ins emulating hardware for these categories, it’s oddly useful having something that will actually be precise, digital, and modern. (I do have fun spitting out tons of noise with emulated JUNO choruses these days, but – you might not want to do that on every session!)
Other updates. Redux also got some tweaks, so check that out for digital downsampling/bit crushing. Collision, Corpus, Electric, and Tension are essentially the same as before, but they do have new UIs for better cosmetics.
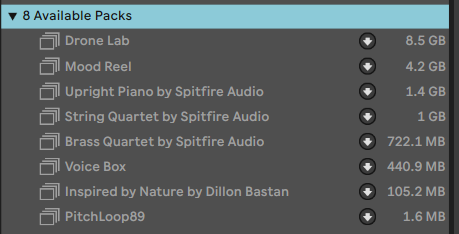
Check out the new sounds and packs. Head to Brower > Packs and grab some additional optional add-ons.
Spitfire Audio, who do some seriously high-end sample work, have included new string and brass quartets and an upright piano, in Live Suite.
Inspired by Nature gives you a bunch of new Max for Live-powered, organic experimental devices, made by Dillon Bastan. It’s a little like having a sampler of the great stuff posted daily at maxforlive.com, but well worth a look.
Included are some instruments (Emit, Vector Grain, Vector FM, and Tree Tone), the Vector Delay audio effect, and most importantly, the Bouncy Notes MIDI effect. The ones starting with “Vector” all use a 2D particle system. Emit is a granular looper. Tree Tone is an exciter/resonator but with some generative organic branches (hence the name). Bouncy notes… makes stuff bounce.
Check the separate documentation for these, or there’s a short quick start included with the software. https://dillonbastan.com/inspiredbynature_manuals/
I’m going to write it up separately because it’s my new favorite thing, but I have to say my favorite Dillon Bastan creation actually didn’t get included in Live 11, and that’s the new Fractal Filters. It’s free, so go get it. (See video demo)
Of course, Robert Henke and Ableton are not posting every day, so you will also likely want to try out PitchLoop89. It’s a pitch-shifting device with tons of unique glitch, delay, and vibrato effects, inspired by the classic Publison DHM 89 (though you don’t need to know what that is to appreciate it).
Racks, Macros, Scales, and Scenes do more
Add an Instrument or Drum Rack, and you’ll notice some new buttons have been added.
‘+’ and ‘-‘ buttons let you add or remove Macro knobs – previously fixed at eight, now you can choose 1-16.
The Rand button at top lets you quickly randomize values (which is also useful for testing).
Map to Siblings support is official. “Map to all siblings” was an undocumented way of copying Macro mappings from one Drum Rack part to all other parts. It’s now been quietly added to the contextual menu if you right-click a mapped parameter. (I only know about this because some of you enabled it via the unsupported method of hacking options.txt. See comments on this story and this tweet.)
Variations are effectively Snapshots for Racks’ Macros. (Finally!) Click the camera icon on the left of the Rack, set the Macro knobs where you want them, and then click New to store the setting.
Recording Variations: You can also record Variations as Automation. You’ll need first to enable Session Record (the record button at the far right of the toolbar), which overdubs automation recording as you play.
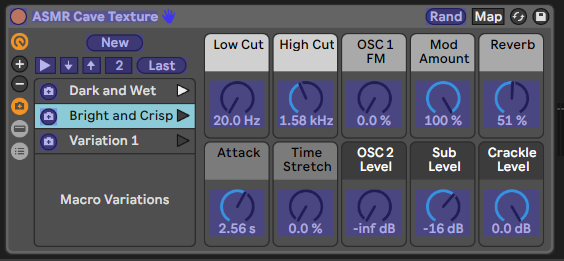
Variations are MIDI-assignable. The options are a little confusing, though, as you can see in the image here. The one thing you can’t map directly is individual Variation snapshot triggers. I expect some funny MIDI workarounds for anyone wanting to trigger Variations from Clips or Scenes. Probably a better solution will become possible with Max for Live. I’m investigating; see discussion in comments.
Updated: there is already a Max for Live Device for that. Pall Idum aka Valiumdupeuple writes in comments that they’ve produced SnapShooter, a free/donationware M4L Device that automatically maps to all Racks’ Variations from the Master track. (Whoa.) In development, undocumented, I’m still researching, but yeah –
And another one, with interpolation – Smooth Operator also assists with automating switching between Macro Variations, but adds another missing feature – morphing between snapshots, through intermediate values.
https://gumroad.com/kblivesolutions#lGDVv

No surprise this comes from Krazy Baldhead, creator of some favorite Max for Live automation inventions.
This is obviously important to folks, so more on putting these pieces together soon.
More clearly implemented –
Scale can now be stored with MIDI Clips. What’s mainly useful about this is that it works bi-directionally with Push – you can set the scale of a clip from Push, and visa versa.
This of course is less useful to those of us wanting real flexibility with tuning and mode. The solution there is Max for Live or third-party plug-ins, but more on that topic on another day.
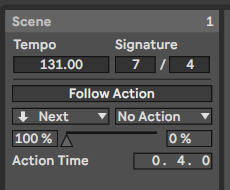
Scenes get the overhaul they’ve been wanting for years. Drag the left edge of the Master Track title bar, and expand the Master channel strip to reveal new scene options where you can directly enter BPM and tempo changes.
Plus, at last, you’ll see Scenes also have a Detail View that shows this information, and now adds per-scene Follow Actions.
Follow Actions seem obviously suited to Scenes, so this deserves a triumphant “finally!”
What’s new for Max for Live
Max for Live improvements are doubly important. Patchers will want them, but even if you don’t patch Max for Live devices yourself, you’ll then reap some of the rewards.
The main story of Live 11 and Max for Live is closer integration between Live 11 and Max, via the API that links the two. That includes:
- MIDI inputs and outputs are routable in Max for Live, and those sources and destinations show up in the MIDI From and MIDI To chooser you see in a track
- MPE-compatible note API lets Max for Live access probability, velocity deviation, and release velocity
- Max for Live can access individual Simpler slices, and warp markers in a clip or sample
- Max for Live UI integration promises to perform more smoothly; Ableton says this includes improvements to focus, positioning, scrolling behaviour, and performance
For creators/patchers, you also get an oscilloscope (live.scope), easier Max Console debugging, and some other nice stuff.
In detail, here are the Live internals that Max for Live can now access:
- Notes (probability, velocity deviation, and release velocity) – without losing MPE data
- Sample rate of a Sample loaded in Simpler
- Slices of a Sample loaded in Simpler
- A Clip or Sample’s warp markers
- The Clip launch properties: Legato mode, Launch mode, Launch quantization and Velocity amount
- Arrangement View Clip IDs in a Track
- Adding or removing macro controls in a Rack
- Macro randomization and variations, plus variation count
- The set’s Groove pool and groove properties
- Hybrid Reverb device
- Spectral Resonator device
What to check next
This is not a complete list of everything that was updated in Live 11. If you’re an advanced user of Clip and Arrangement editing, you’ll want to dive into those sections of the ‘what’s new’ documentation. And there’s a lot more to explore in the Devices here, to say nothing of Max for Live.
Since the sorts of people who do go wild with Max for Live tend to read this site – as would the people curious about it – expect more on that soon.
In the meantime, hope this gives you some tools to shake up your music a bit, get some new things started, and some other stuff finished. Enjoy!
https://www.ableton.com/en/live/