So, you’re ready to try a free and open platform for modular synths – even if you’re new to modular. Here’s how to get started.
Ed.: In part one of Ted Pallas’ guide to VCV Rack for us, we got an overview of VCV Rack, an open source platform that brings software emulations of Eurorack modules to Mac, Windows, and Linux computers.
A guide to VCV Rack, a software Eurorack modular you can use for free
It’s pretty transformative stuff. You can run virtual modules to synthesize and process sounds, both those emulating real hardware and many that exist only in software. You might try out modular synthesis for the first time, even if you’ve never worked with this approach to sound before. Or you might use Rack as a computer complement to physical hardware rigs, a way of testing out new modules before investing, or as a way of mixing computer and hardware modules.
Of course, where to begin can be overwhelming, especially if you’re new to this kind of software or hardware. So, let’s talk about how to get up and running – even if you’re new to these kinds of tools. -PK
Where to find Rack
This article is for people who are new to modular, open-source software, or both! We’re going to go over where to find Rack, how to get it on your machine, and then will examine a sample patch to check out some modular techniques — the sort of techniques you might lack if you’re more used to working with desktop synthesizers or computer DAWs and soft synths.
The best place to find Rack is at its official project homepage:
https://vcvrack.com
(Check out the official Facebook group for additional community and support, as well.)
Before you grab the download, register an account (or login if you’ve got one already). Linking your Rack to a user account makes it easier to install virtual modules automatically and to stay up to date.
Then, you have a choice: you can build from source, or use pre-built stuff. If you’re not accustomed to this choice, that is to say, you have easy conventional installers linked right from the top of the VCV page – installed as you’d install any other Mac and Windows software – or the option of building from source if you prefer, more as a developer (or typical Linux user) would.
Building from source means maximum compatibility with every cool new module, and the ability to stay up with the developers – not a bad idea, given this project is in active development. On the other hand, using pre-built software is easier, and now provides access to a package manager for one-click installation of the most popular modules (including commercial ones), and account synchronization.
That’s not an either/or choice, you can do both. So, we’ve included some tips on building from source. And a note on that:
Don’t fear the source. Don’t panic. The installation process for the developer version is relatively painless, so for this tutorial, we’ll follow along with that. (If you just want to get going quickly, and our explanation here loses you, you can try one of these pre-built binaries.) And some modules – like, as we write this, the monome modules – do require the developer version.
Translation: if you can follow instructions and use copy/paste, you’ll be okay, and you’ll be done in under about half an hour (or much less depending on what’s on your system)!
Here, we’ll walk you separately through the automatic binary installation and the process of building from source for those who want to try it.
Downloading binaries, package manager for modules
Grabbing the pre-built binaries is definitely the fastest way to get up and running, and it does support a lot of modules via a new automatic package manager.
You’ll find installers at the top of the VCV Rack page for Mac, Windows, and Linux.
With VCV installed (either from source or from the binary), you have just an empty rack – the same as if you bought an empty Eurorack case from the synthesizer store. So, you can add some virtual modules. A series of modules called Fundamental are now bundled in the pre-built binaries, but you can add some more fun stuff to that.
Grab installers automatically via the new plugin manager. Just sign up for a free account to keep in sync.
For automated installation of both free and paid modules, there’s now a plugin manager that works with any version of Rack 0.51 or later. The plugin manager syncs your favorite plugins via your account – a cloud sync for modules, if you like.
http://vcvrack.com/plugins.html
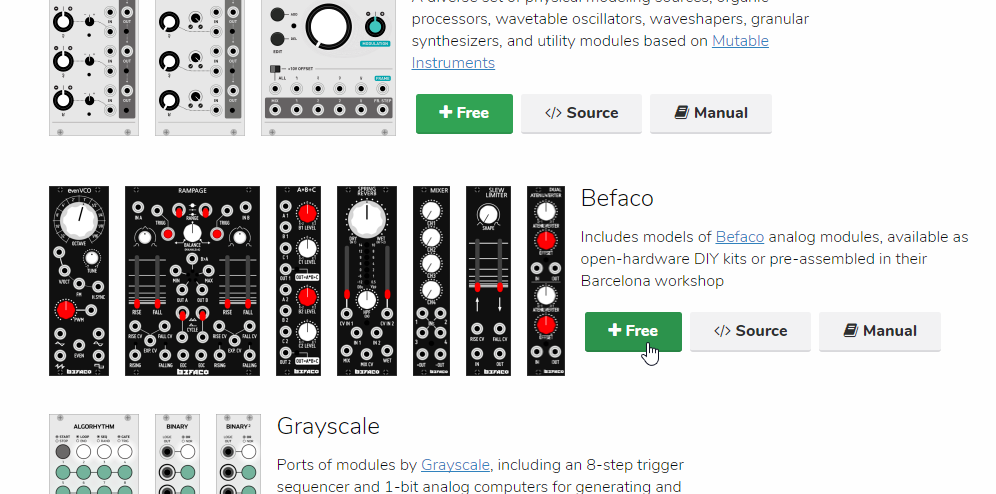
From your Web browser, once you’re logged in, you can scroll down and click the green buttons that say ‘+Free’ to add all the available free modules. (Later, when you’re comfortable, some more sophisticated modules are available as inexpensive paid add-ons.) The growing range of free selections already includes a nice collection of virtual modules with real-world equivalents, with modules from popular Eurorack manufacturers Mutable Instruments, Greyscale, E-Series, and Befaco. The button will change from green to red to show you’ve added the module to your account.
Then when you open Rack, just hit the Update Plugins button on the toolbar on the top of the program, and you’ll automatically download those modules to your system.

First, log in.

Then update.
(You may want to check the documentation for some modules, even if using the plugin manager. For instance, the free Ableton Link support provided in Stellare’s module requires manually copying a DLL file. This is still software actively in development.)
Building from source
If you prefer to try the build-from-source approach, here’s how to proceed.

Head to GitHub for the developer version. Choose GitHub on the main VCV site, then click Rack, or head to this link:
https://github.com/VCVRack/Rack
Install your build environment. You’ll need to install some developer tools – the tools developers of Mac and iOS software, Linux software, and some open source Windows software would use. The process doesn’t require any actual developer knowledge, though – just some extra steps.
Mac users will need Xcode, which is now a one-click download from Apple’s App Store. You’ll also need wget, a command line file downloader. The two-step method to get that is via a very simple project called Homebrew. Look at the Homebrew site and copy-paste the command for installing Homebrew (right at the top of that page), then wget (the second line on that page).
Windows Since Windows lacks a *nix-style command line, there’s a one-click installation of MSYS2. Then install everything you need via one line from the VCV instructions:
pacman -S git make tar unzip mingw-w64-x86_64-gcc mingw-w64-x86_64-cmake
Restarting MSYS2 before the next step will let you make sure the make command finds the path to the compiler.
Linux users probably don’t need our help, but you’ll want to double check you’ve installed the packages gcc, make, cmake, tar, and unzip.
Then follow the remaining instructions for building VCV from source, which involves simply copy-pasting a few lines of text into the command line.
In short, it’ll be something like this:
1. Grab the source code:
git clone https://github.com/VCVRack/Rack.git

Grabbing dependencies on Windows.
2. Build it:
cd Rack

make dep

git submodule update --init --recursive

make
But see the VCV site for full instructions. (Don’t forget the submodule update; otherwise, the build won’t find needed headers.)
Add some modules. As with Rack itself, you can build plugin modules from source manually. Those instructions are also on the GitHub page. You’ll find “source” links for all the open source modules next to the ‘free buttons.’ That’ll give you a link to the repository – where up-to-date code from the developer is stored.
cd [change directory] to the plugins folder inside your Rack install, git clone the plugin’s github (or other) repository, and then cd to the plugin folder. Run ‘git submodule update –-init -–recursive’ Chances are this command did nothing – that’s ok. Once these are all done run ‘make’. To add more plugins cd to the plugins folder, clone another repo, run another git submodule update, execute another make run. There are a ton of third party modules out there; they’re listed on the same page as the pluginmanager (just copy source links for what you want to build to the command line):
http://vcvrack.com/plugins.html
Doing stuff with Rack
Now you’re ready to start patching.
You start with an empty virtual rack when you first open the software or start a new project – a bit like a Eurorack case awaiting new modules. Right-click anywhere in the Rack window to bring up the Add Modules window. The left-most list represents different collections of modules, grouped by ‘manufacturer’. The list to the right of this contains individual modules. Hovering over a module will bring up its information in the pane to the right – right now, this information only contains the author and tags the developer of the module might have chosen to add.
All of the text present is searchable in the bar on the top of the Add Modules menu, from manufacturer names to module names to tags.
It’s helpful to know common synthesizer shorthand – if you’re looking for a filter you can type “filter” or “VCF,” for example.
Step by step, Hello, world!
Let’s quickly make the Hello World of modular synthesizers – an oscillator plugged into a VCA [amplifier], with that VCA plugged into a soundcard [your audio output] and a scope [so you can see what you’re doing]. This is about as simple as a synthesizer can get. Starting with a blank Rack document, here are the steps to building this first patch:

From a blank canvas, you add the first module.
1. Add an oscillator Right-click to open the Add Modules menu. Click on the manufacturer name Fundamental – that’s the bundle of built-in, basic bread-and-butter modules that now are included with the package. Add a simple oscillator to the rack by clicking VCO-1. The module will be dropped in just under where your mouse was positioned.

The VCO-1 is a basic oscillator with four waveforms – sine, triangle, saw, and square – with PWM [pulse width modulation] on the square wave. An FM [frequency modulation] input, a sync input and a PWM CV input round out the offering. These three inputs let you color the sound by adding envelopes, LFOs, or other modulators to affect the signal over time.

2. Scope it out. Let’s use a virtual oscilloscope to see the signal the oscillator is generating. Right-click again and choose Fundamentals > Scope. Drag any blank part of the faceplate of the module to move it around in the rack and snap it into place; let’s move Scope next to VCO-1.
Connect the oscillator to the scope by dragging to create a virtual patch cable: drag from VCO-1’s SIN [sine wave] output to Scope’s X IN input. Sine waves should appear in the scope!
Now drag VCO-1’s SQR to Scope’s Y IN. You now have both waveforms displayed overlapping one another; drag up the Y SCL knob one notch so it’s easier to differentiate between the waveforms. Also, run the TIME knob all the way up.

3. Add volume. Adding a VCA module is really a fancy way of adding volume you can control both with a knob or by patching in control signal (VC = voltage-controlled). So, right-click an empty area again, and choose VCA.
We’re going to do something that’s not possible on a physical modular (without an adapter) – plugging two jacks into a single hole. Once a patch cord is connected, dragging from that hole will disconnect the cable. So, we’ll patch from an empty hole into the connected hole.
Drag from VCA’s IN on the top half of the module to VCO-1 SIN, and from VCA IN on the bottom half to VCO-1 SQR. Then drag the LEVEL knobs all the way down – this will keep us from accidentally hurting our ears or our speakers with level that’s too hot.
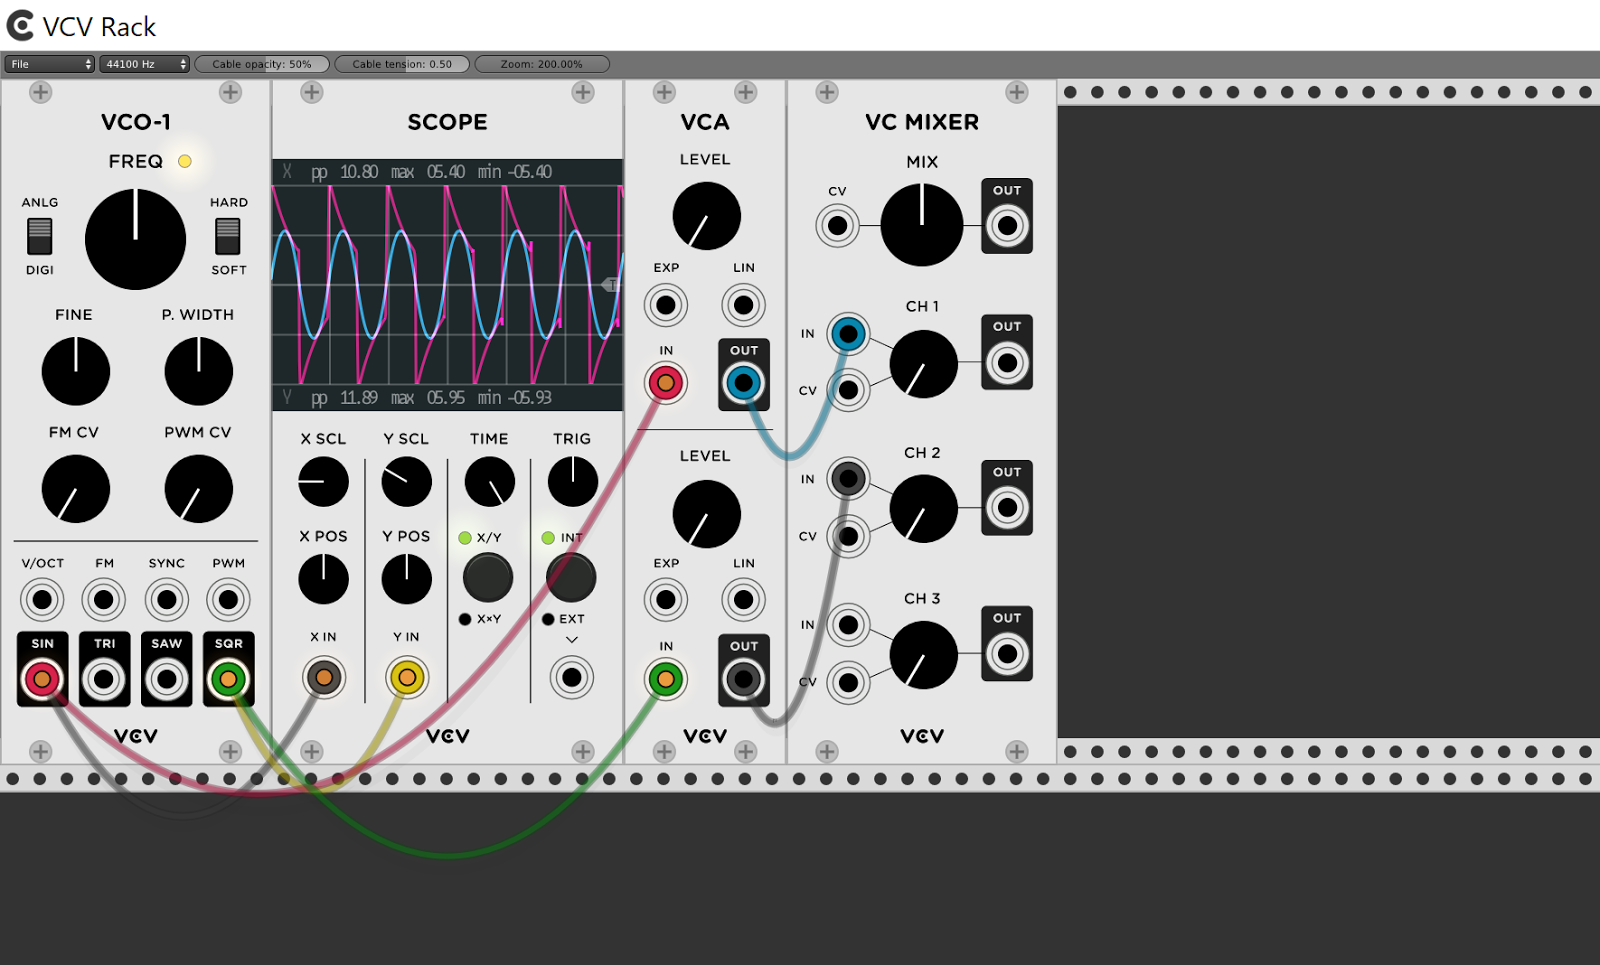
4. And mix. We have two signals – square and sine – that we want to connect to our output via a single cable. Right-click to bring up Add Module and choose VC Mixer. This has the controllable levels the VCA had, but adds a mixed output that combines up to three signals into one – giving you one pipe, one cable to connect out. Patch each OUT on the VCA to CH 1 IN and CH 2 IN.

5. Connect sound to the outside world. This time, to save time, let’s type in our module name. Type ‘audio interface’ into the search bar on the top of the Add Modules window.
Click on the Core manufacturer – these modules ship with all versions of Rack, whether installed via binary or built from source. They offer up integration with the world outside of Rack, through audio interfaces and MIDI inputs. The Audio Interface device handles both input and output, whether to internal software audio interfaces like Soundflower and ReaRoute or to hardware devices.
First, drag a patch cable from Output 1 on the Audio Interface to VC Mixer MIX > OUT. Repeat for Output 2, so you get stereo sound. , and drag from Output 2 to the Mixer Mix Out. Select your preferred output in the drop-down menu (for internal audio interfaces on laptops, look to “Built-In Speakers” on Mac or “WASAPI > Realtek” and the like on Windows). 1 and 2 will most often represent the main left and right audio outputs, but your mileage may vary.
Turn up the VCA LEVEL knobs to twelve o’clock. Run the mixer CH 1 and CH 2 knobs up to about ten o’clock, and then gradually increase the MIX knob on the top so you hear sound. If you don’t hear anything, turn down the knobs and double-check the drop-down interface options and your patch connections.

6. Now let’s play. Drag the VCO-1 > FREQ to change the frequency of the oscillator, and watch the Scope for some groovy shapes. (Try adjusting the SCOPE > TIME to change the displayed scale, and switching SCOPE > X/Y to X+Y for a radial view, for added variety.) For fine-scale adjustment of knobs, ctrl-drag (Mac: cmd-drag). While you’re making groovy shapes, try patching the VCO-1 TRI output into the VCO-1 FM Input, and add some of the FM knob.

7. Stop the endless drones. Let’s give this patch some life by adding an ADSR and an LFO-1 from the Fundamental modules collection. The ADSR is a standard Attack-Decay-Sustain-Release generator. It’s used to make envelopes that open and shut on a contour, in response to a gate input. The LFO-1 is a low-frequency flavor of VCO-1, with an additional FM Input in place of the VCO’s 1/v Oct and a Reset input in place of the VCO-1’s Sync input.
Patch the LFO’s square wave output [SQR] into the gate input of the ADSR. Patch the OUT of the ADSR into the EXP inputs of the VCA channels – Exp and Lin refer to exponential and linear, which are different ways of interpolating the incoming envelope. Digital modular is fun! You should also move the scope patches from the oscillator to the VCA outs, so you can see the shape of the envelope in the scope. You’ll probably need to adjust X and Y Scale a bit.

8. Mo modular modulation. Here’s where we go crazy: right-click your ADSR and select ‘duplicate’ to create an additional ADSR envelope. Do the same with the LFO, and then go ahead make a third LFO the same way. Unpatch one of your VCA CVs and patch it into this newly-created ADSR Out. Patch one of the new LFO’s Square wave outs into the Gate input on the new ADSR. On the other LFO, the one without anything patched, patch the Square wave out into the Reset inputs of each of the other two LFOs. This last patch will retrigger the two LFOs, so they can start on a “downbeat” determined by the leading post of the LFO. Groovy!
While we’re in here, let’s add a couple of VCF’s, and patch them in line between the VCAs and the mixer. For a bonus bit of modulation we’ll patch the ADSRs into VCFs opposite from their assigned VCO’s – let’s put the first ADSR on the second VCF’s Freq CV input, and patch the second ADSR into the first VCF’s Resonance CV input. Turn the Freq CV knob on the first VCF up a little bit, and make sure your LFO driving the resets is slower than the other two.
Free downloads: PolyBlip, Ableton Push/MIDI, and Extras
Since you’ve made it this far, you’ve earned a reward. We’ve got a patch, a maxforlive device, and a module installation script and meter for you.
First up: the PolyBlipper, a patch I made around this idea of LFO triggering with some added FM modulation fun thrown in the mix.
PolyBlipper [VCV patch download]
Download it and open it up from within VCV, and you’ll hear nothing – until you select your driver and soundcard on the audio interface, and then run up the Mix knob on the VC Mixer in the top row, above the audio interface. This is a simple patch, but it can offer up a wide variety of sounds.
The main concept of the patch is a more complicated version of the LFO-triggered helloworld patch we built in the tutorial above. Two almost-identical voices sit to the left of the VC Mixer and Audio Interface. Both feature a VCO-2 (a waveform-morphing oscillator with a CV input for wave shape) with FM input from the mixed outputs of a VCO-1. Mixing the VCO-1’s outputs creates a complex modulation oscillator, for some fun West Coast vibes. Each voice has its own gate, and additionally the first voice has its wave shape modulated by one of the “sequencer” outs. For a different flavor, you could modulate this via an ADSR, such as one of the ones already present in the patch. Adding a VCA will let you scale the effect of the modulation, as well.
To the right of the mixer and audio interface are three LFOs and two voltage controlled mixers. These act as something of a sequencer – the waves act as triggers for the ADSR, after being combined in the mixers below. Each mixer triggers one of the voices, by combining the signal in different ways on different mixers you can find unified polyrhythmic sequences, such as the one on the patch at the start.
For some applied coursework – can you figure out how to get each of the three LFOs triggering the oscillators resetting poly-rhythmically, in overlapping sets of two? Can you figure out how to reset everything, including the above, so you get repeating measures of music? Answers next week, along with some tips on using VCV as an effect.

Next, we’ve got a Max For Live device called AbleRack that sends MIDI from your Push 2 (or anything else mapped to the device’s knobs) out to VCV Rack for conversion to CV via Rack’s Core MIDI CC-To-CV Converter.
Drop this on an empty MIDI channel, and then select the desired MIDI output in Live’s MIDI Out dropdown menu. Make sure to set the desired MIDI channel as well – incoming MIDI from the device and your Push 2 (or other controller) will be remapped as well. You’ll notice an offset knob on the device – turning this knob clockwise and then hitting the button will add the stated value from the knob to the 16 knobs present. This is MIDI, so it’s important to remember that 0 is a value.
In VCV Rack, add a MIDI-to-CV module, and then patch the CV Outs as desired. The text boxes above the outputs denote which MIDI CC the output is listening for. You can change these text box values to listen for different CC’s, which is where the offset knob comes in – multiple MIDI-to-CC converters and multiple channels of AbleRack can be used simultaneously, and within live each knob can have it’s own automation per-clip. Adding a MIDI-to-CV converter to rack and selecting the same MIDI Port and channel will let you use a keyboard alongside AbleRack. I put each instance of AbleRack I use in a set on its own channel, and route all the MIDI through its own IAC [“Inter-Application Communication”] Bus (on Mac) or LoopMIDI port (on Windows). (See instructions for Mac/IAC Bus or download loopMIDI for Windows. LoopBe1 is another excellent MIDI loopback driver for Windows.)
Lastly, we’ve got a script and a fun toy from our friend Jeremy Wentworth, creator of the Wavhead and several other notable modules.
jeremywen/community-builds-from-source.sh [build from source script download]
The script is super-helpful – put it in your plug-ins folder and run it with the terminal, and the script will download and build all the plug-ins listed in the community repo.

He’s also got a special module for you to play with – an X/Y version of his famous WavHead meter, with a special alternative logo switch for changing up your flavor and adding some Berlin to your patch. Download binaries for all systems:
We’d like to thank Jeremy for all of his help providing technical read-throughs and proofreading of this article. His website is a treasure trove of fun bits of code and other things to poke at, including this browser-based synthesizer and this super-weird browser-based random syllable generator.
By now you should be relatively comfortable using Rack, know where to find the community (in the Official VCV Rack User Group on Facebook) and have a good sense of what you’d like to use the tool to do. Have fun exploring the modules and patching up a storm! I’ll be keeping an eye on Rack, if anything big happens I’ll be back with more coverage.
Ted Pallas makes techno as Greco 727, and performs with Chicago’s M Sylvia under the name Str1ke. Ted recently released The Sor EP on Lisbon’s Toxic Recordings, available on Beatport. Get in touch at http://savag.es