Composers Desktop Project has been producing secret sauce of sound spelunkers since the cooperative began in 1986. But it’s receiving newfound attention — partly because of the revelation Aphex Twin used it, but mostly because we finally get a usable GUI. Here’s your guide to how to install this on Mac, Windows, or Linux, and how to dive into the rabbit hole.
History
CDP began as a UK-based collective, originally looking into how they could get cmusic running on home machines like the Atari ST, not just on hard-to-access UNIX mainframes. The late 80s were just beginning to see advanced DSP liberated from those kinds of institutional mainframes and high-end workstations at the likes of IRCAM and MIT. (cmusic is part of the Computer Audio Research Laboratory – “CARL” – software distribution; it’s a sound creation environment created by F. Richard Moore and colleagues. cmusic now does happily run on your machine, too, by the way.)
The first iteration of CDP’s work arrived on Atari ST in the form of software and companion hardware as a cartridge. None other than composer Trevor Wishart wrote the original spectral programs. The software grew, the collective grew, and CDP has steadily put out software ever since. In 2002, Wishart’s music with the tools sounded like this — and, hell, this kind of plays better to a 2025 crowd than it did the 2002 one! Now you can play this in a club or party. Well, the right one, anyway:
And yes, Aphex Twin also used CDP, as Benn Jordan details (about eight minutes into this video). Though I’m kind of too busy vibing on Maestro Wishart’s sounds.
The development model itself is an interesting one: the collective has topped out at hundreds of contributors, with collective work on software, now released under an open source license, and some of the work supported by grants. It might be a nice model for new projects in our dark times. (Okay, who wants to create a sound group called The Foundation to shorten the darkness?)
But this history will make the rest of this make sense. CDP software and its original GUI, The Sound Loom, represent a collection of all those separate projects. You’re getting an archive of a lot of different musicians’ ideas.
It continues developing, too. Version 8.0 (the eighth release since open source arrived in 2014) added a ton of features, including some of the formant manipulation and waveset distortion you hear people so excited about, plus some “special Wishart” action (as described in the release notes).
These all run non-realtime — you build a thread and then get the results. But that’s part of the fun, really. If, like me, you used to do that with Csound and Soundhack, you’ll feel right at home. And if you haven’t had the joy of rolling the dice and seeing what you get, now’s your chance.
The big breakthrough here is Jonathan Higgins’s work on an entirely new graphical interface, built from the ground up and unlike anything The Sound Loom (cross-platform, Tcl/Tk) or SoundShaper (PC) had achieved in the past. That interface is slick and modern, with patch cords that work more like newer apps, but also provides extensive usability improvements and detailed documentation to make it easy to build up your patches and learn what you’re doing. Even if you decided to use the CLI for some tasks, it’s still a great reference and prototyping environment.
Downloading and installing, simplified
Hey, let me at the free software!
Let’s do it! There’s a longer guide included with the software, but here’s your quick start.
Download CDP first. You need it to run the new SoundThread UI.
macOS and Windows, binaries are built for you: https://www.unstablesound.net/cdp.html
Linux, build from source: https://github.com/ComposersDesktop/CDP8
Install CDP. Windows users have it easy; just run the installer. One caveat: you need to locate the installation in a directory that does not have a space, so avoid Program Files.
macOS:
- Drag the entire cdp8 folder anywhere you want, inside your classpath. (your home directory is a good choice.)
- Disable Gatekeeper security for just the installation command: in Terminal from the install directory, run the command:
xattr -rc cdpr8 - Run
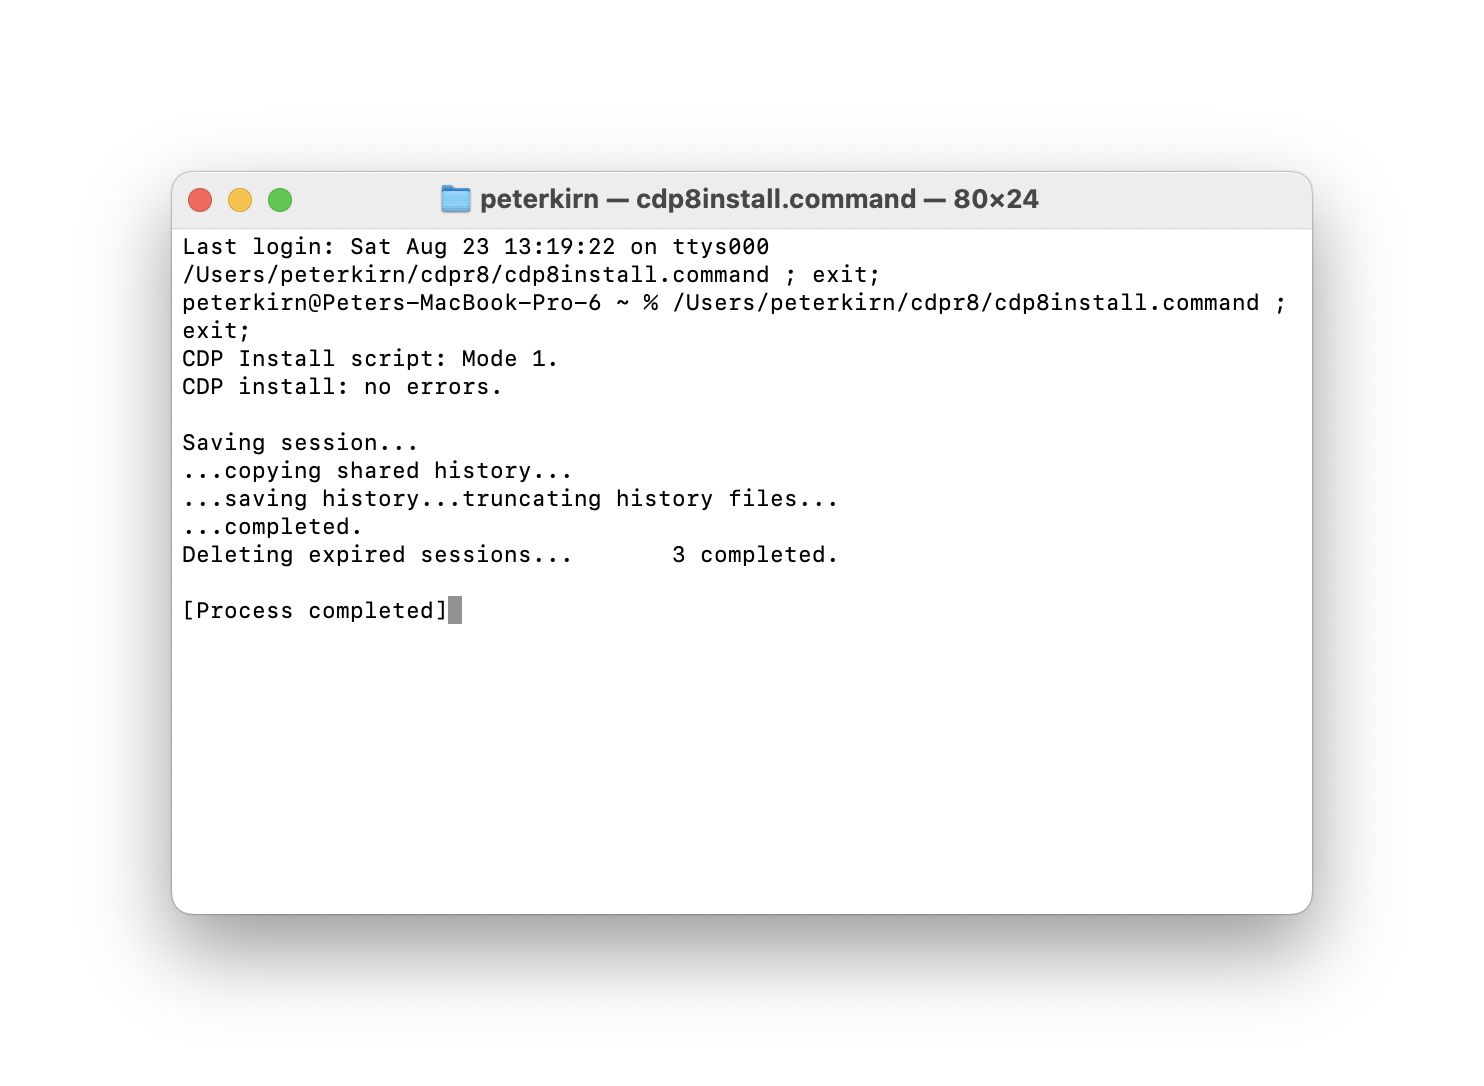
cdpr8install.commandto install
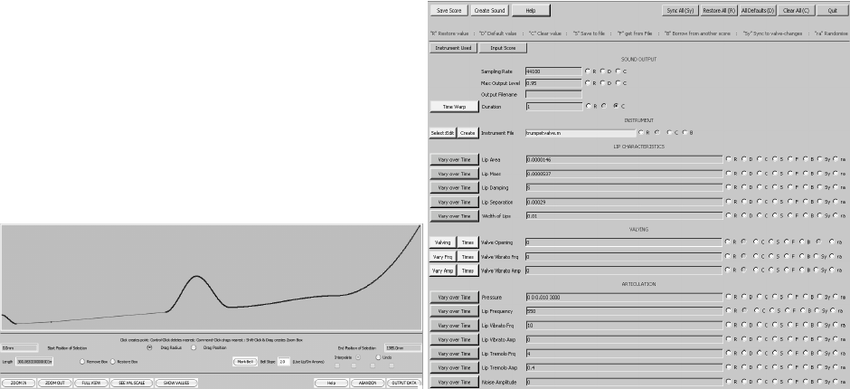
If you want to quickly test your installation, launch The Sound Loom, though — be warned, that software is esoteric. It would have looked esoteric even 30 years ago. Let’s enter the modern era:
Install SoundThread. Jonathan Higgins built a beautiful node-based, visual tool for working with CDP. Grab it on GitHub, with builds for Mac, Windows, and Linux:
https://github.com/j-p-higgins/SoundThread
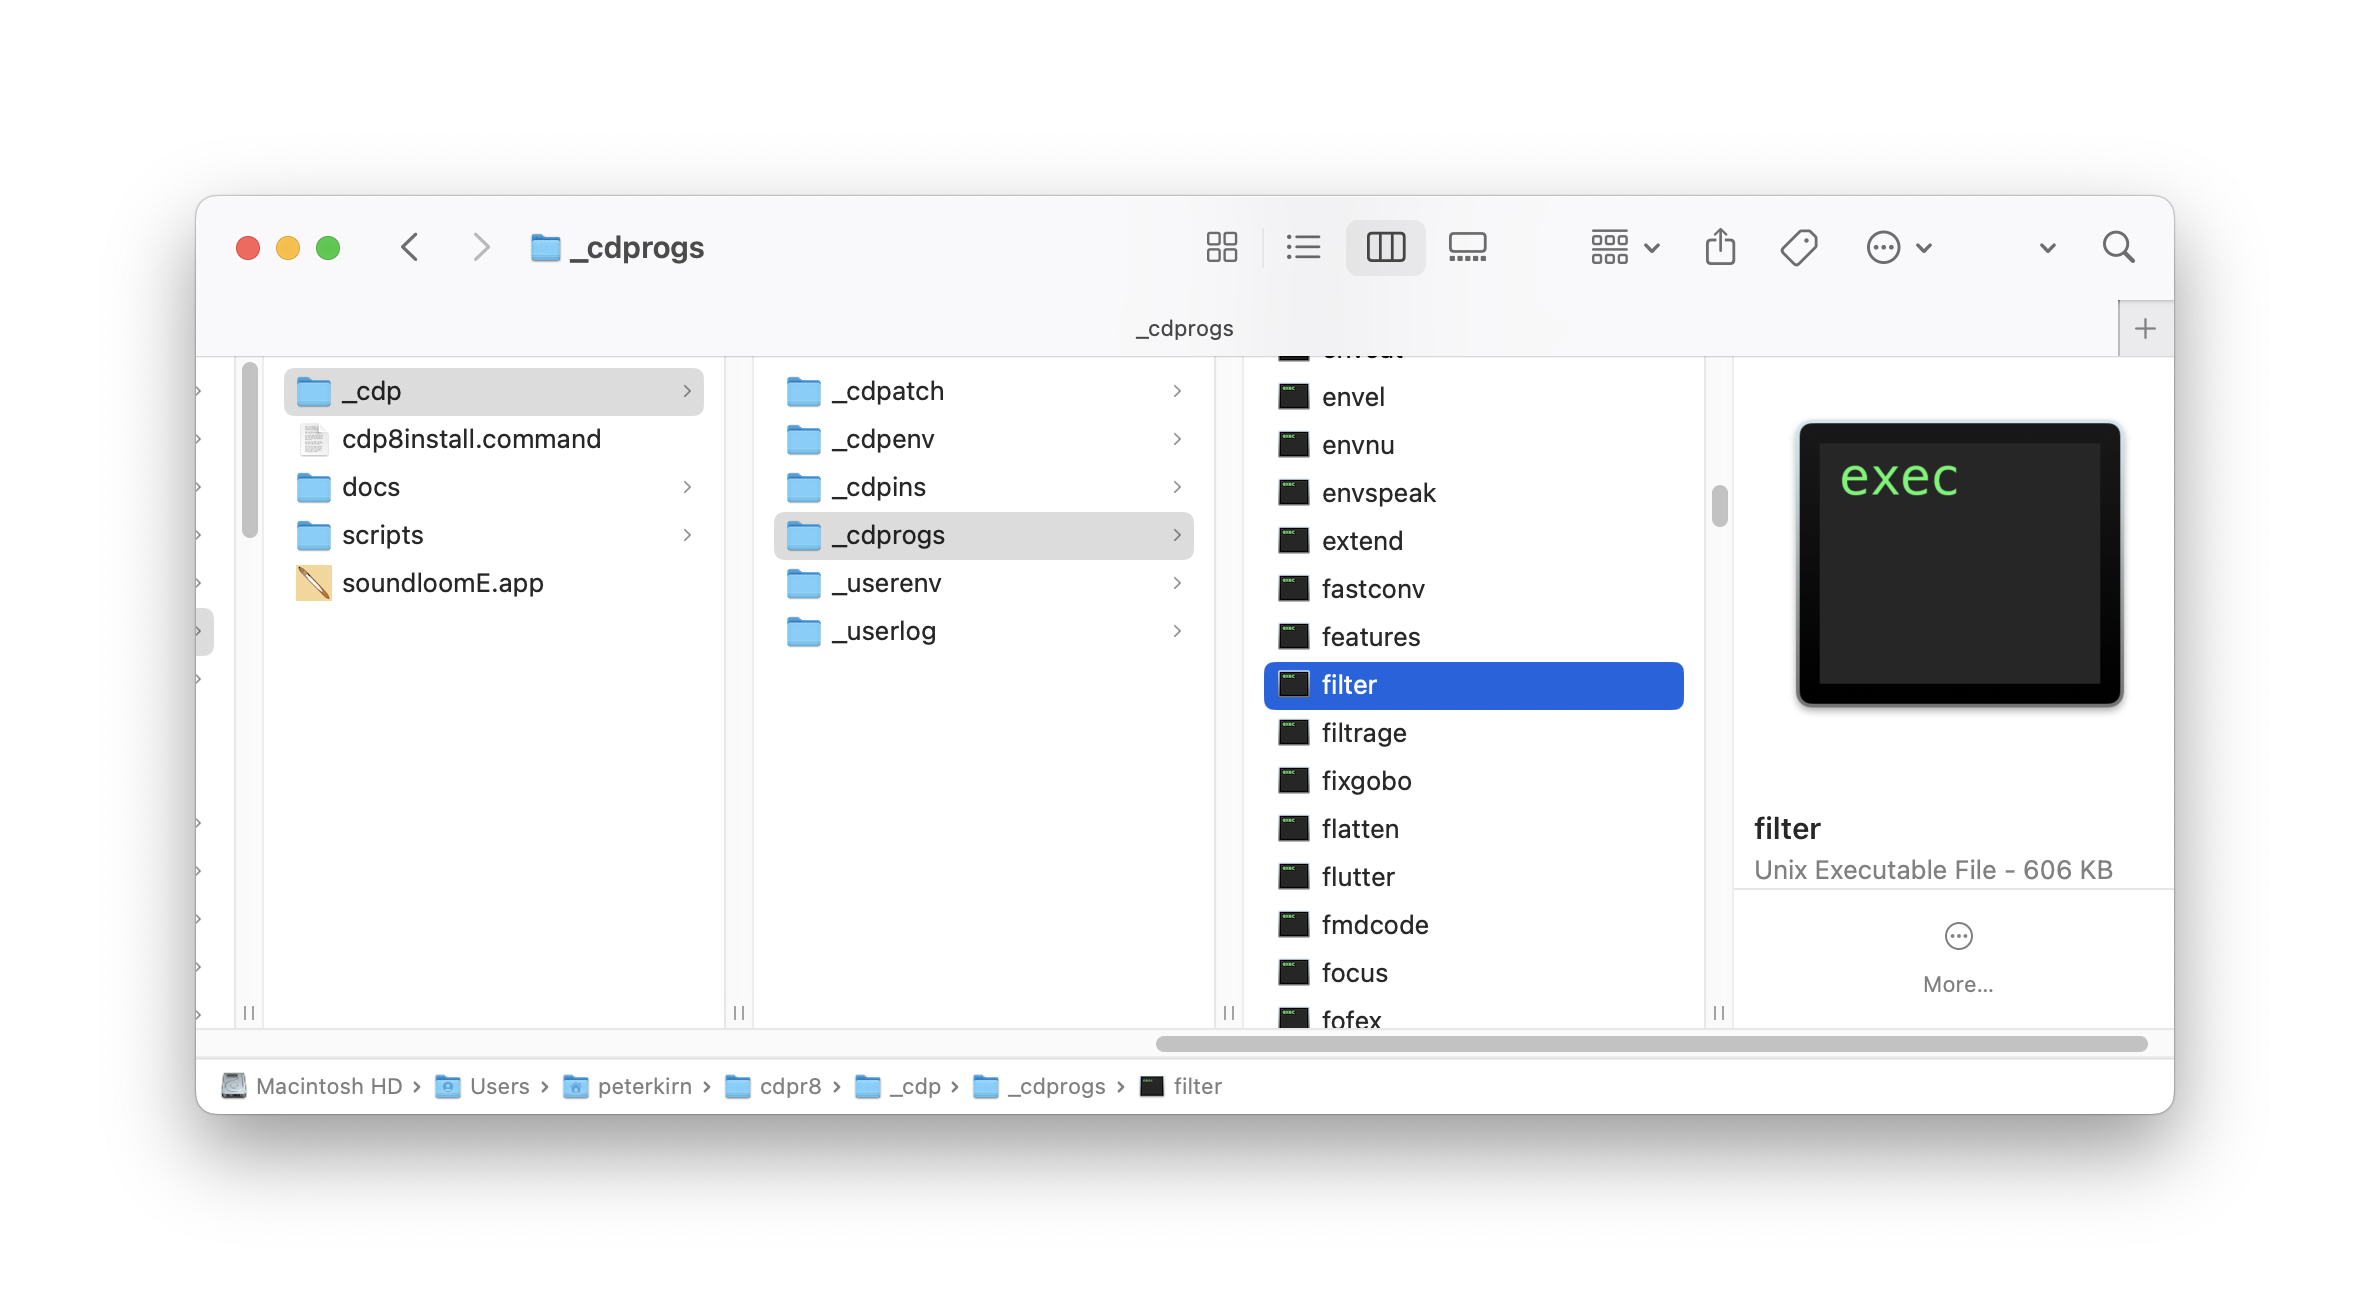
There’s just one trick — as I write this, CDP has a bug in the filter processes on macOS. There’s a fix included in SoundThread which patches both the GUI and the CLI/Sound Loom versions. Just delete cdpr8/_cdp/_cdprogs/filter and replace it with the filter you find in filter_patch in your SoundThread download.
For review:
Tips for getting started
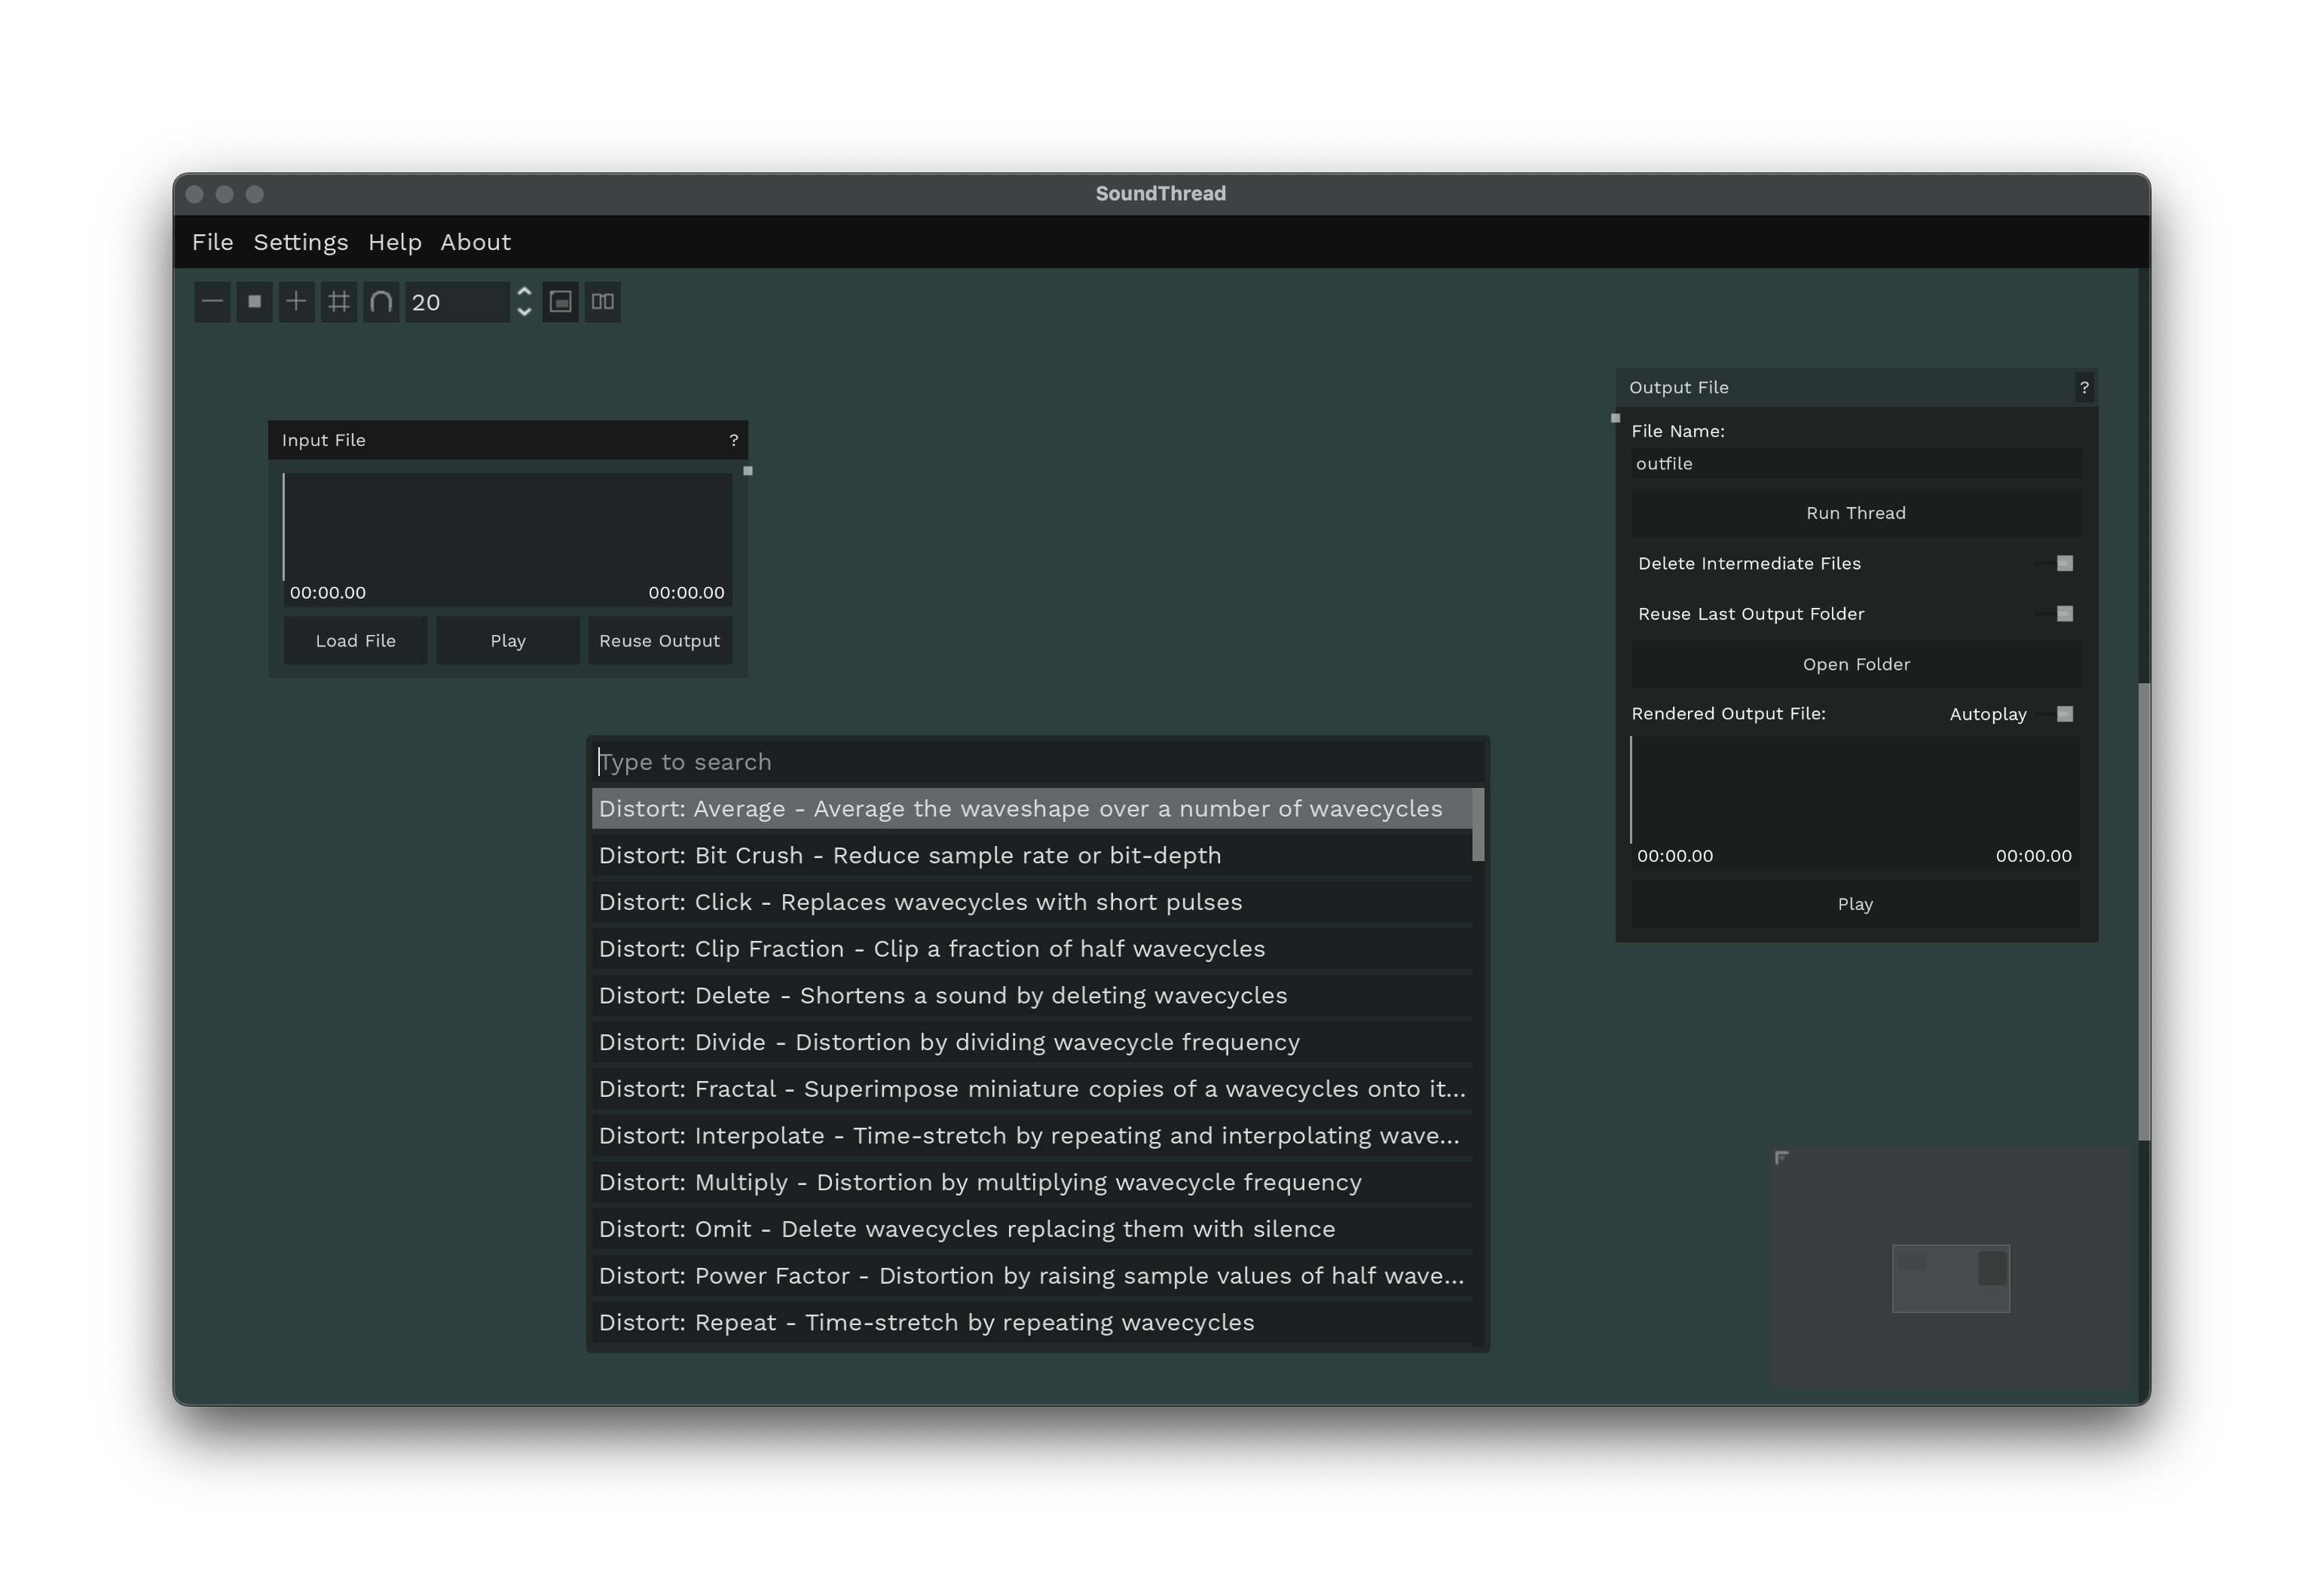
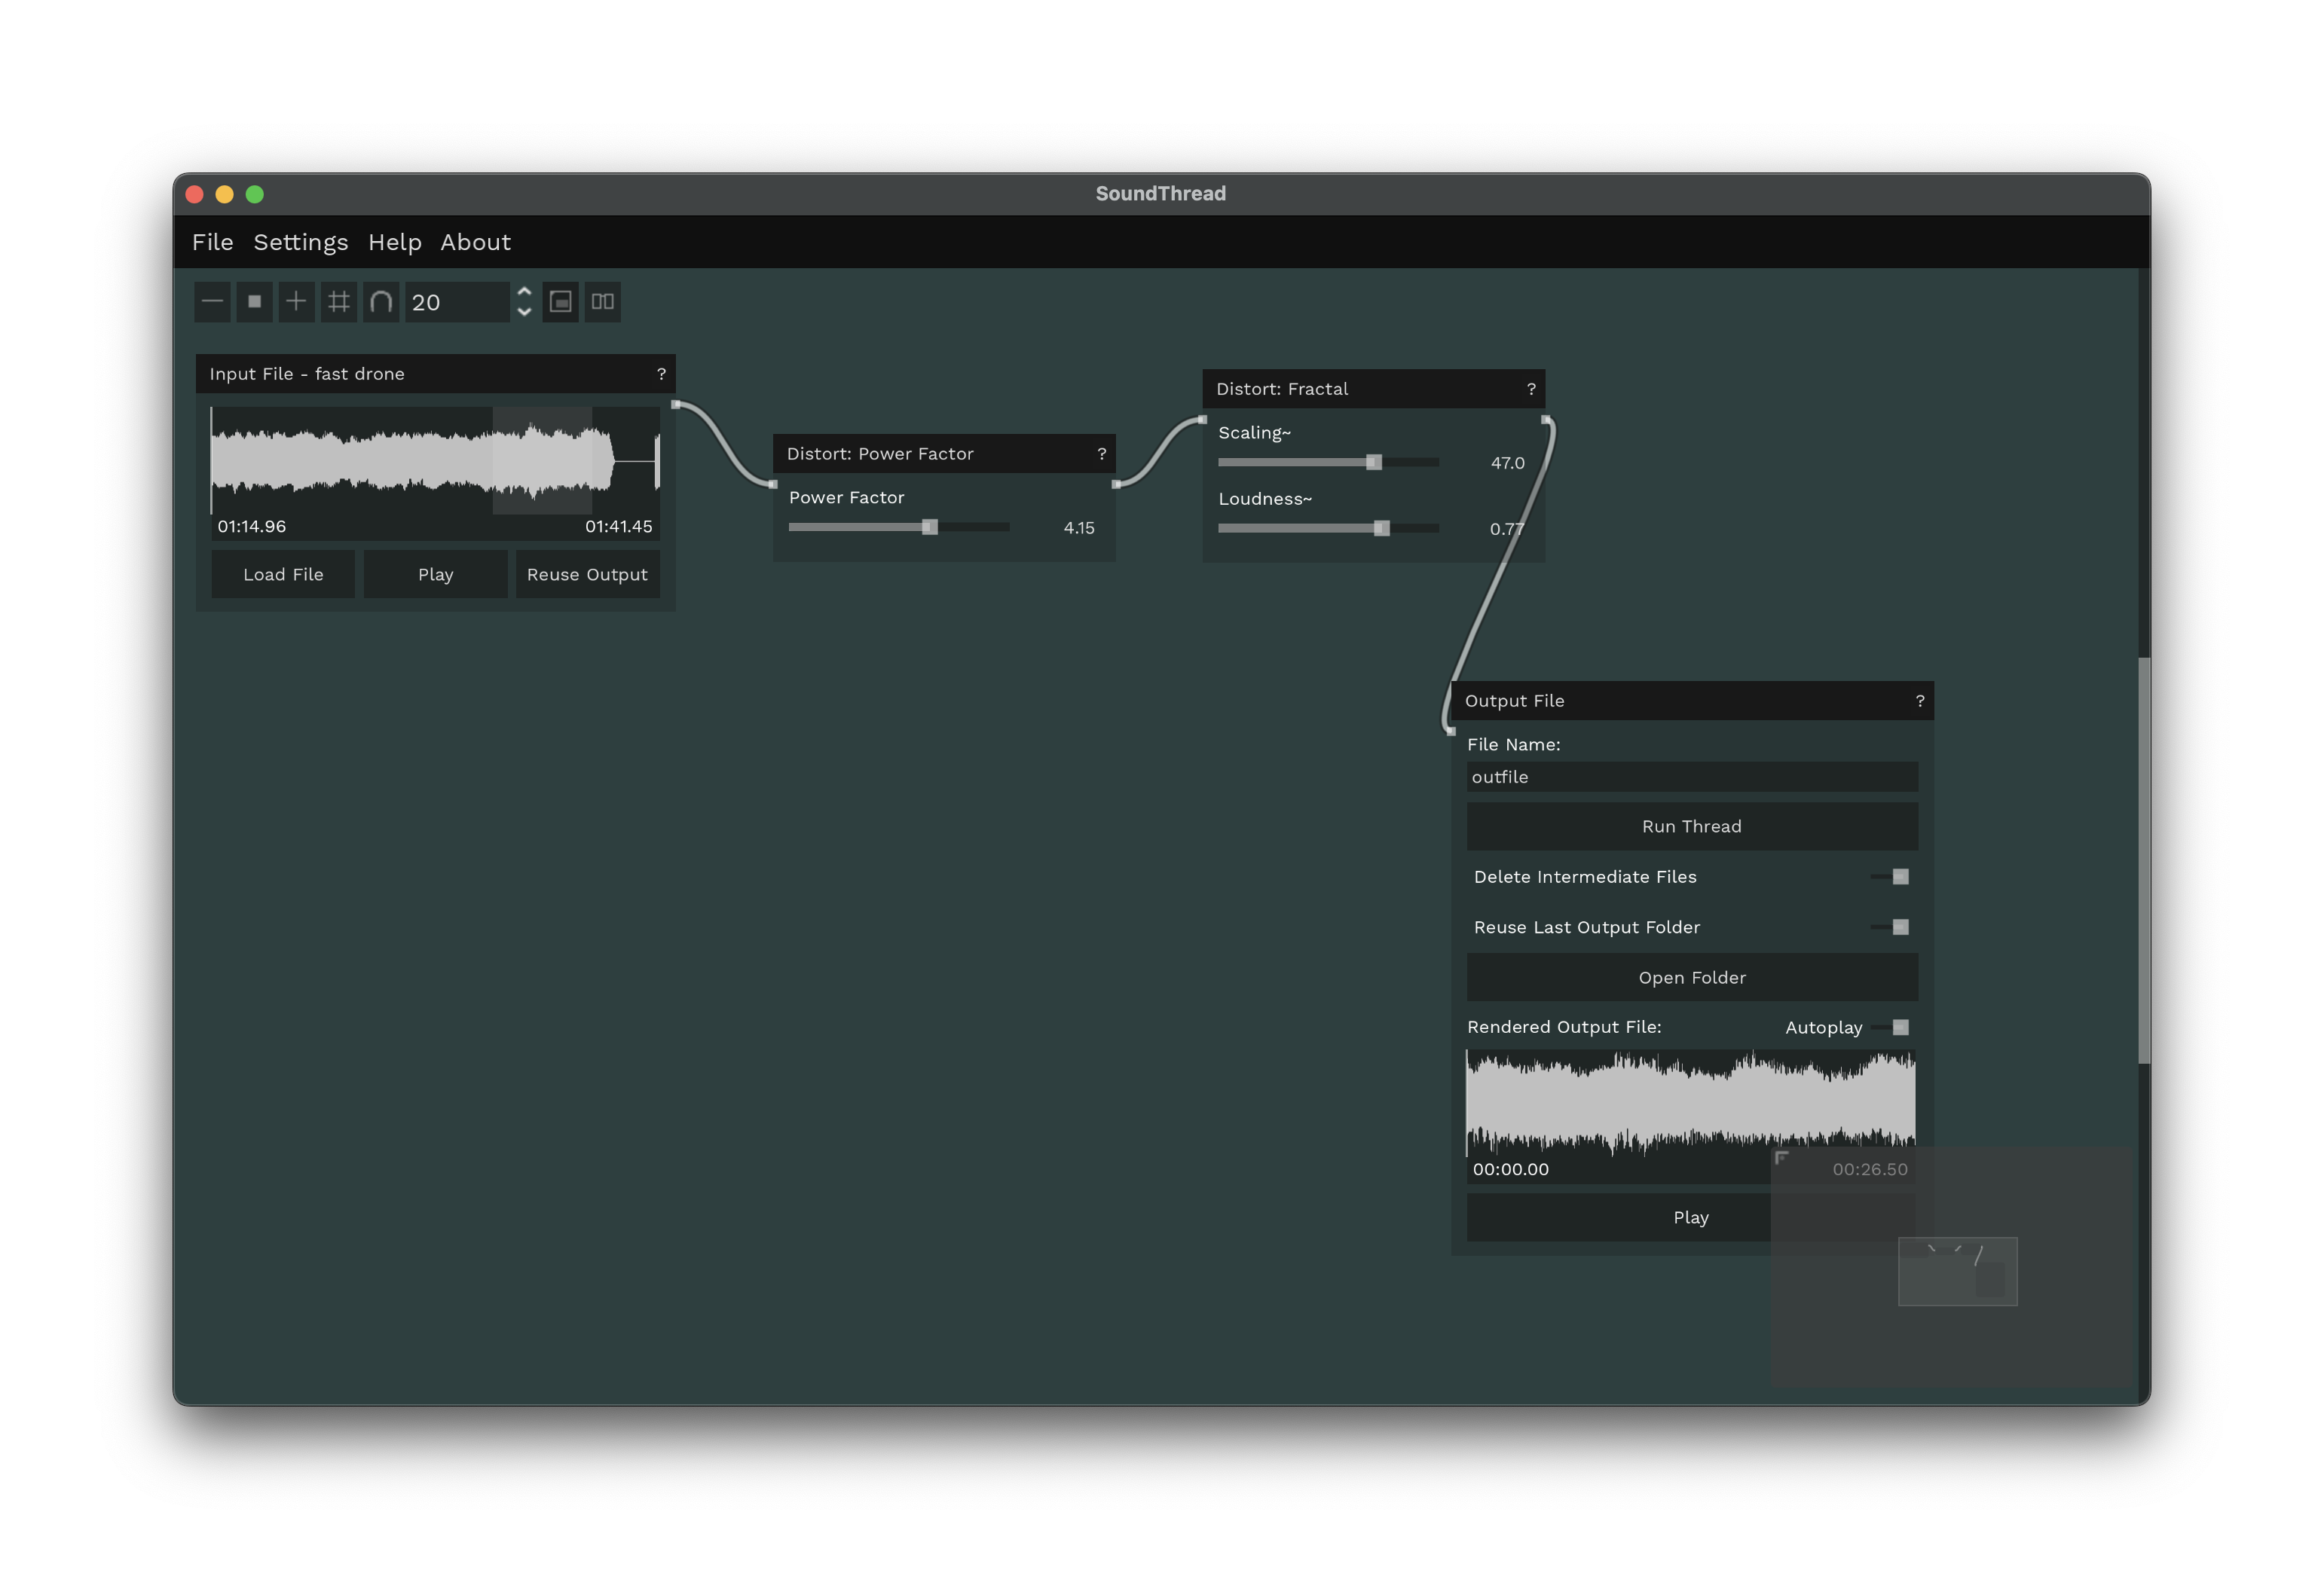
Once you load SoundThread, you’ll immediately be presented with the two objects you most need: an Input File and an Output File. Remember, this is a non-realtime environment — you’ll render the sounds. So each time, you’ll choose Run Thread. (Leave Delete Intermediate Files toggled on so you only get the final file.) SoundThread automatically iterates the filename, though you may want to change the base name to something other than “outfile” so you remember what you’re doing.
From there, patch the input to output by dragging virtual patch cables between nodes — just like in Max, Pd, TouchDesigner, cables, and others. Right-click to bring up a set of processes. Use the gray window at the bottom right-hand side to navigate around your patch. Zoom using a pinch gesture or the scroll wheel of your mouse.
Experimenting is really completely okay. And embrace the idea that some stuff will come out shite — all the more exciting when you get a result you like. Hit run process to see what happens.
A few tricks to get started. First, you don’t have to process the entire sound file. To hear what you’re doing faster, just drag to select a segment of the audio. Only the portion that’s actively selected in Input File will be processed.

Then patch up your “thread” to see what results you can get.
Often, limiting yourself to one or two elements is a good place to start. Don’t fear the defaults — because the processes are heavily source dependent, just swapping audio files will get interesting and even extreme results. You can always crank it up later.
You can also type in values directly.
Save or render often so you don’t accidentally lose anything.
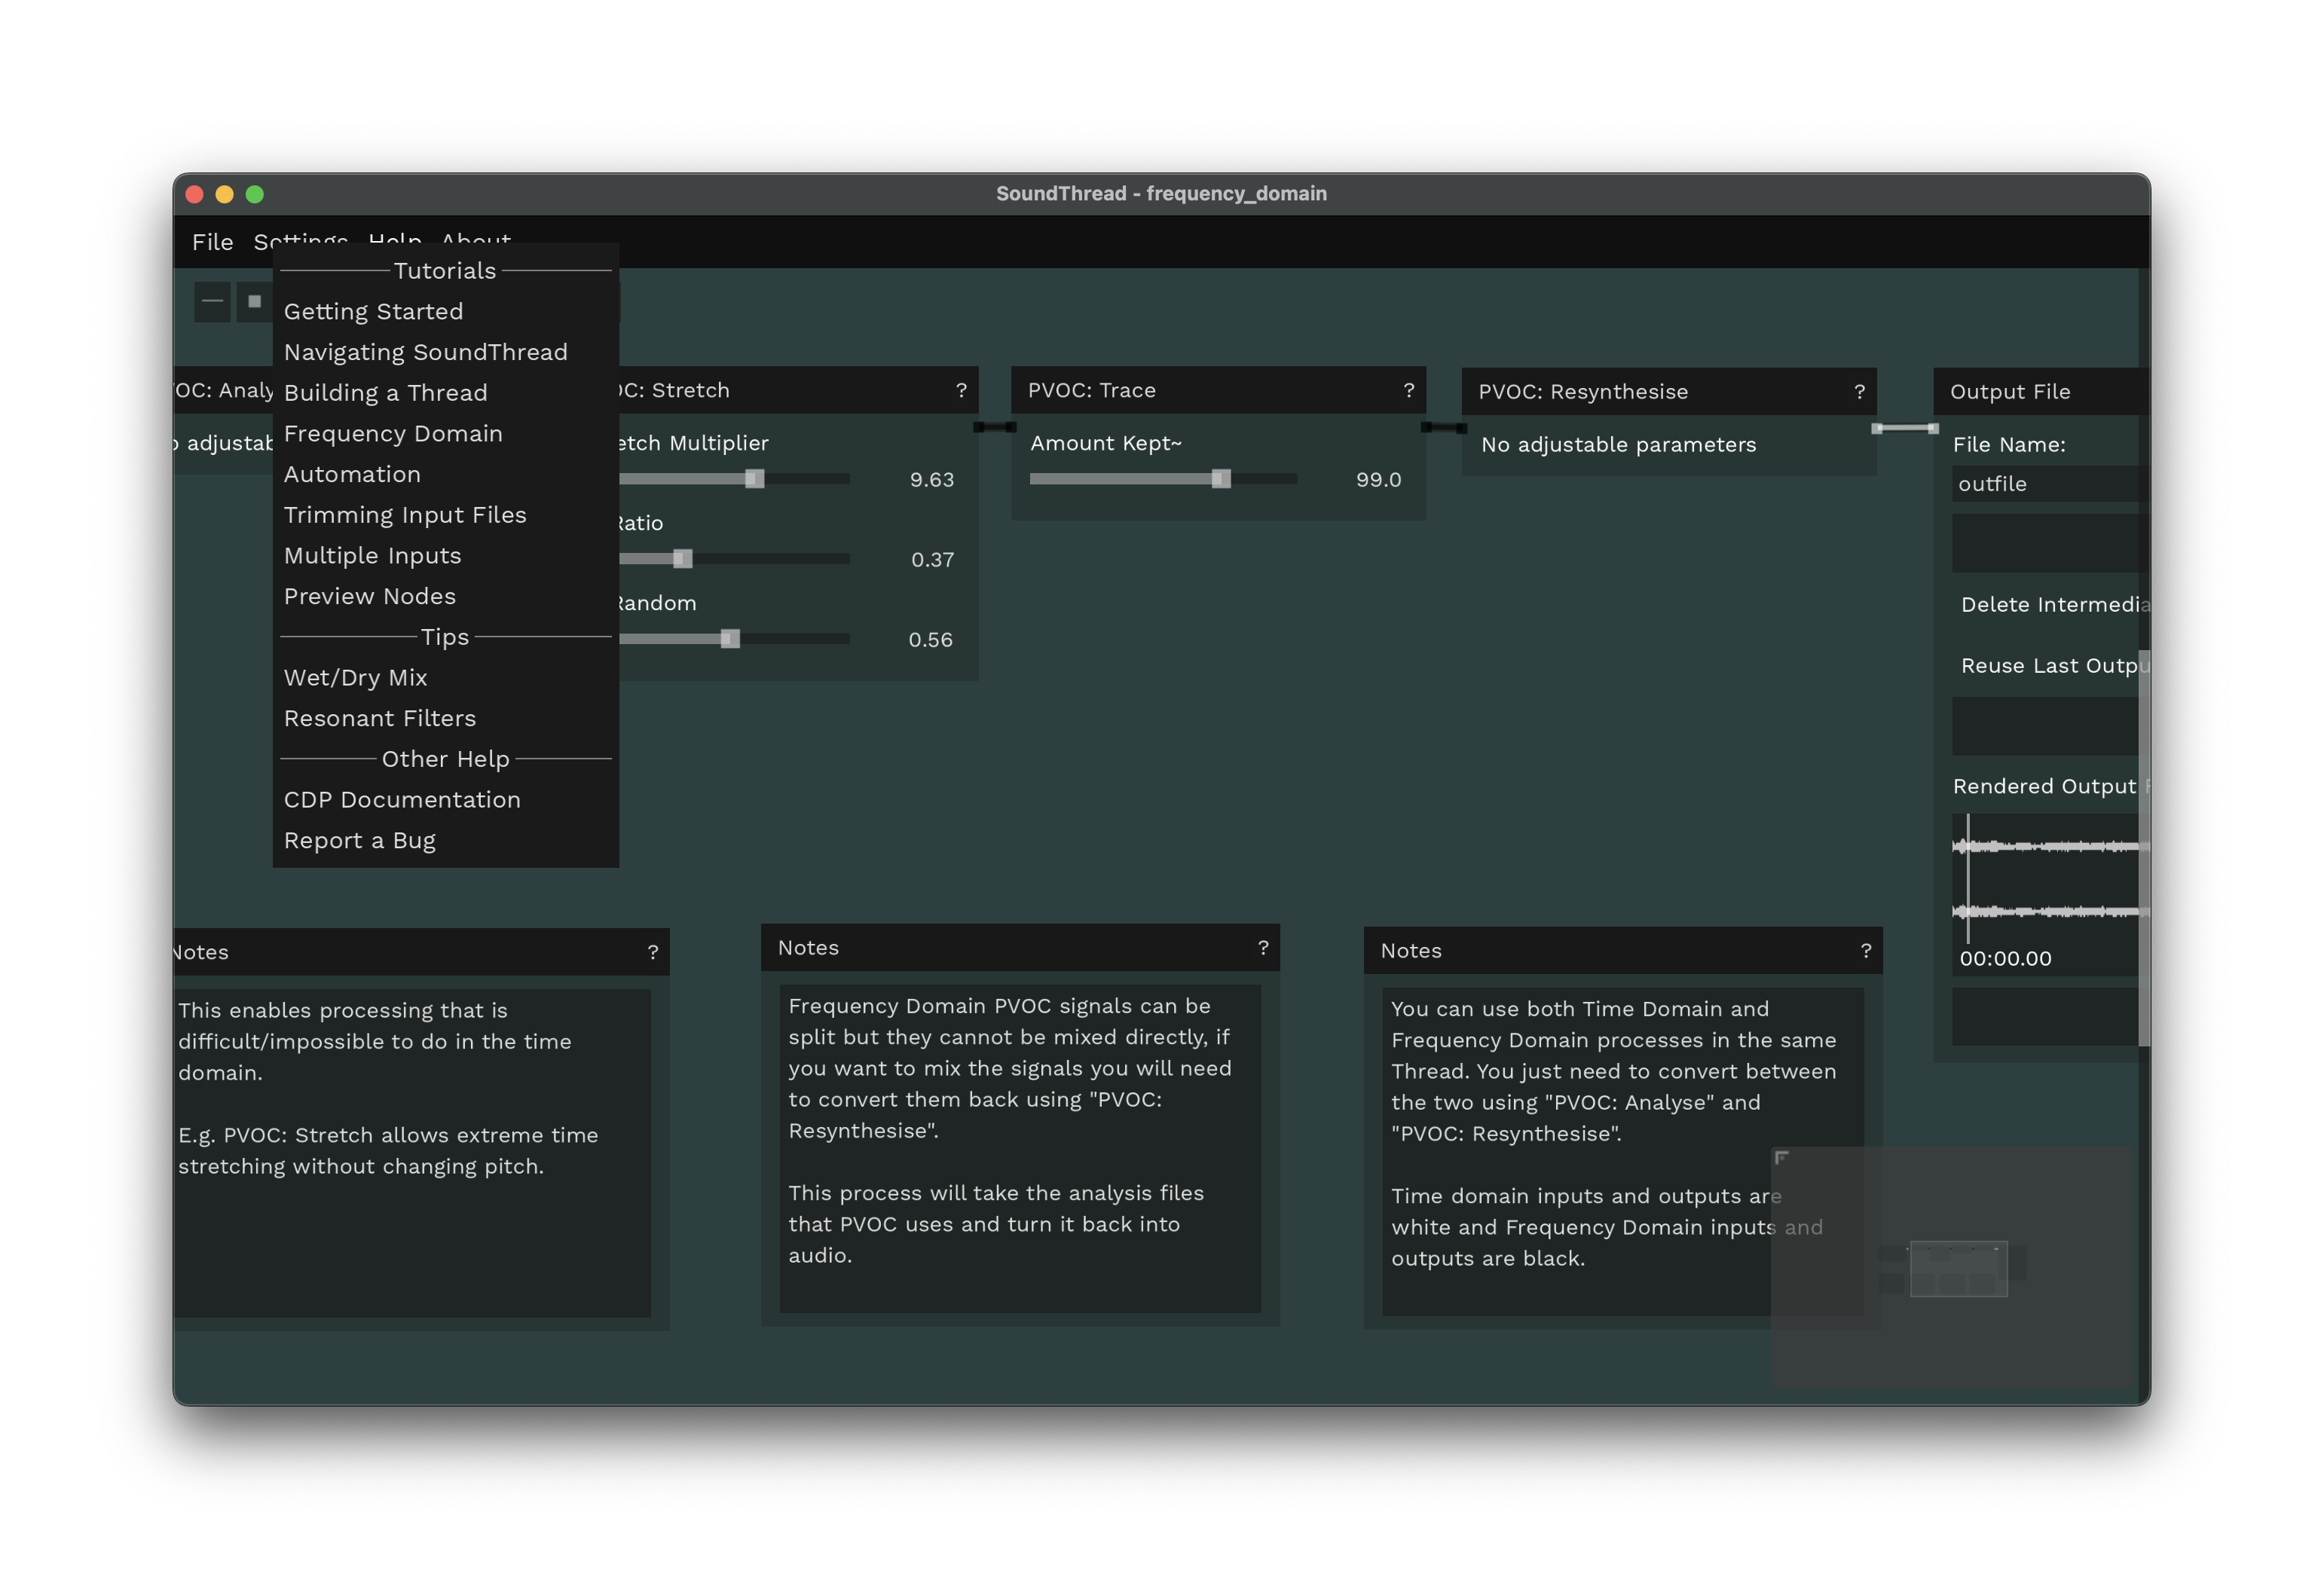
Do try the tutorials! Sometimes you’ll even get interesting results just swapping in your own sound materials here.
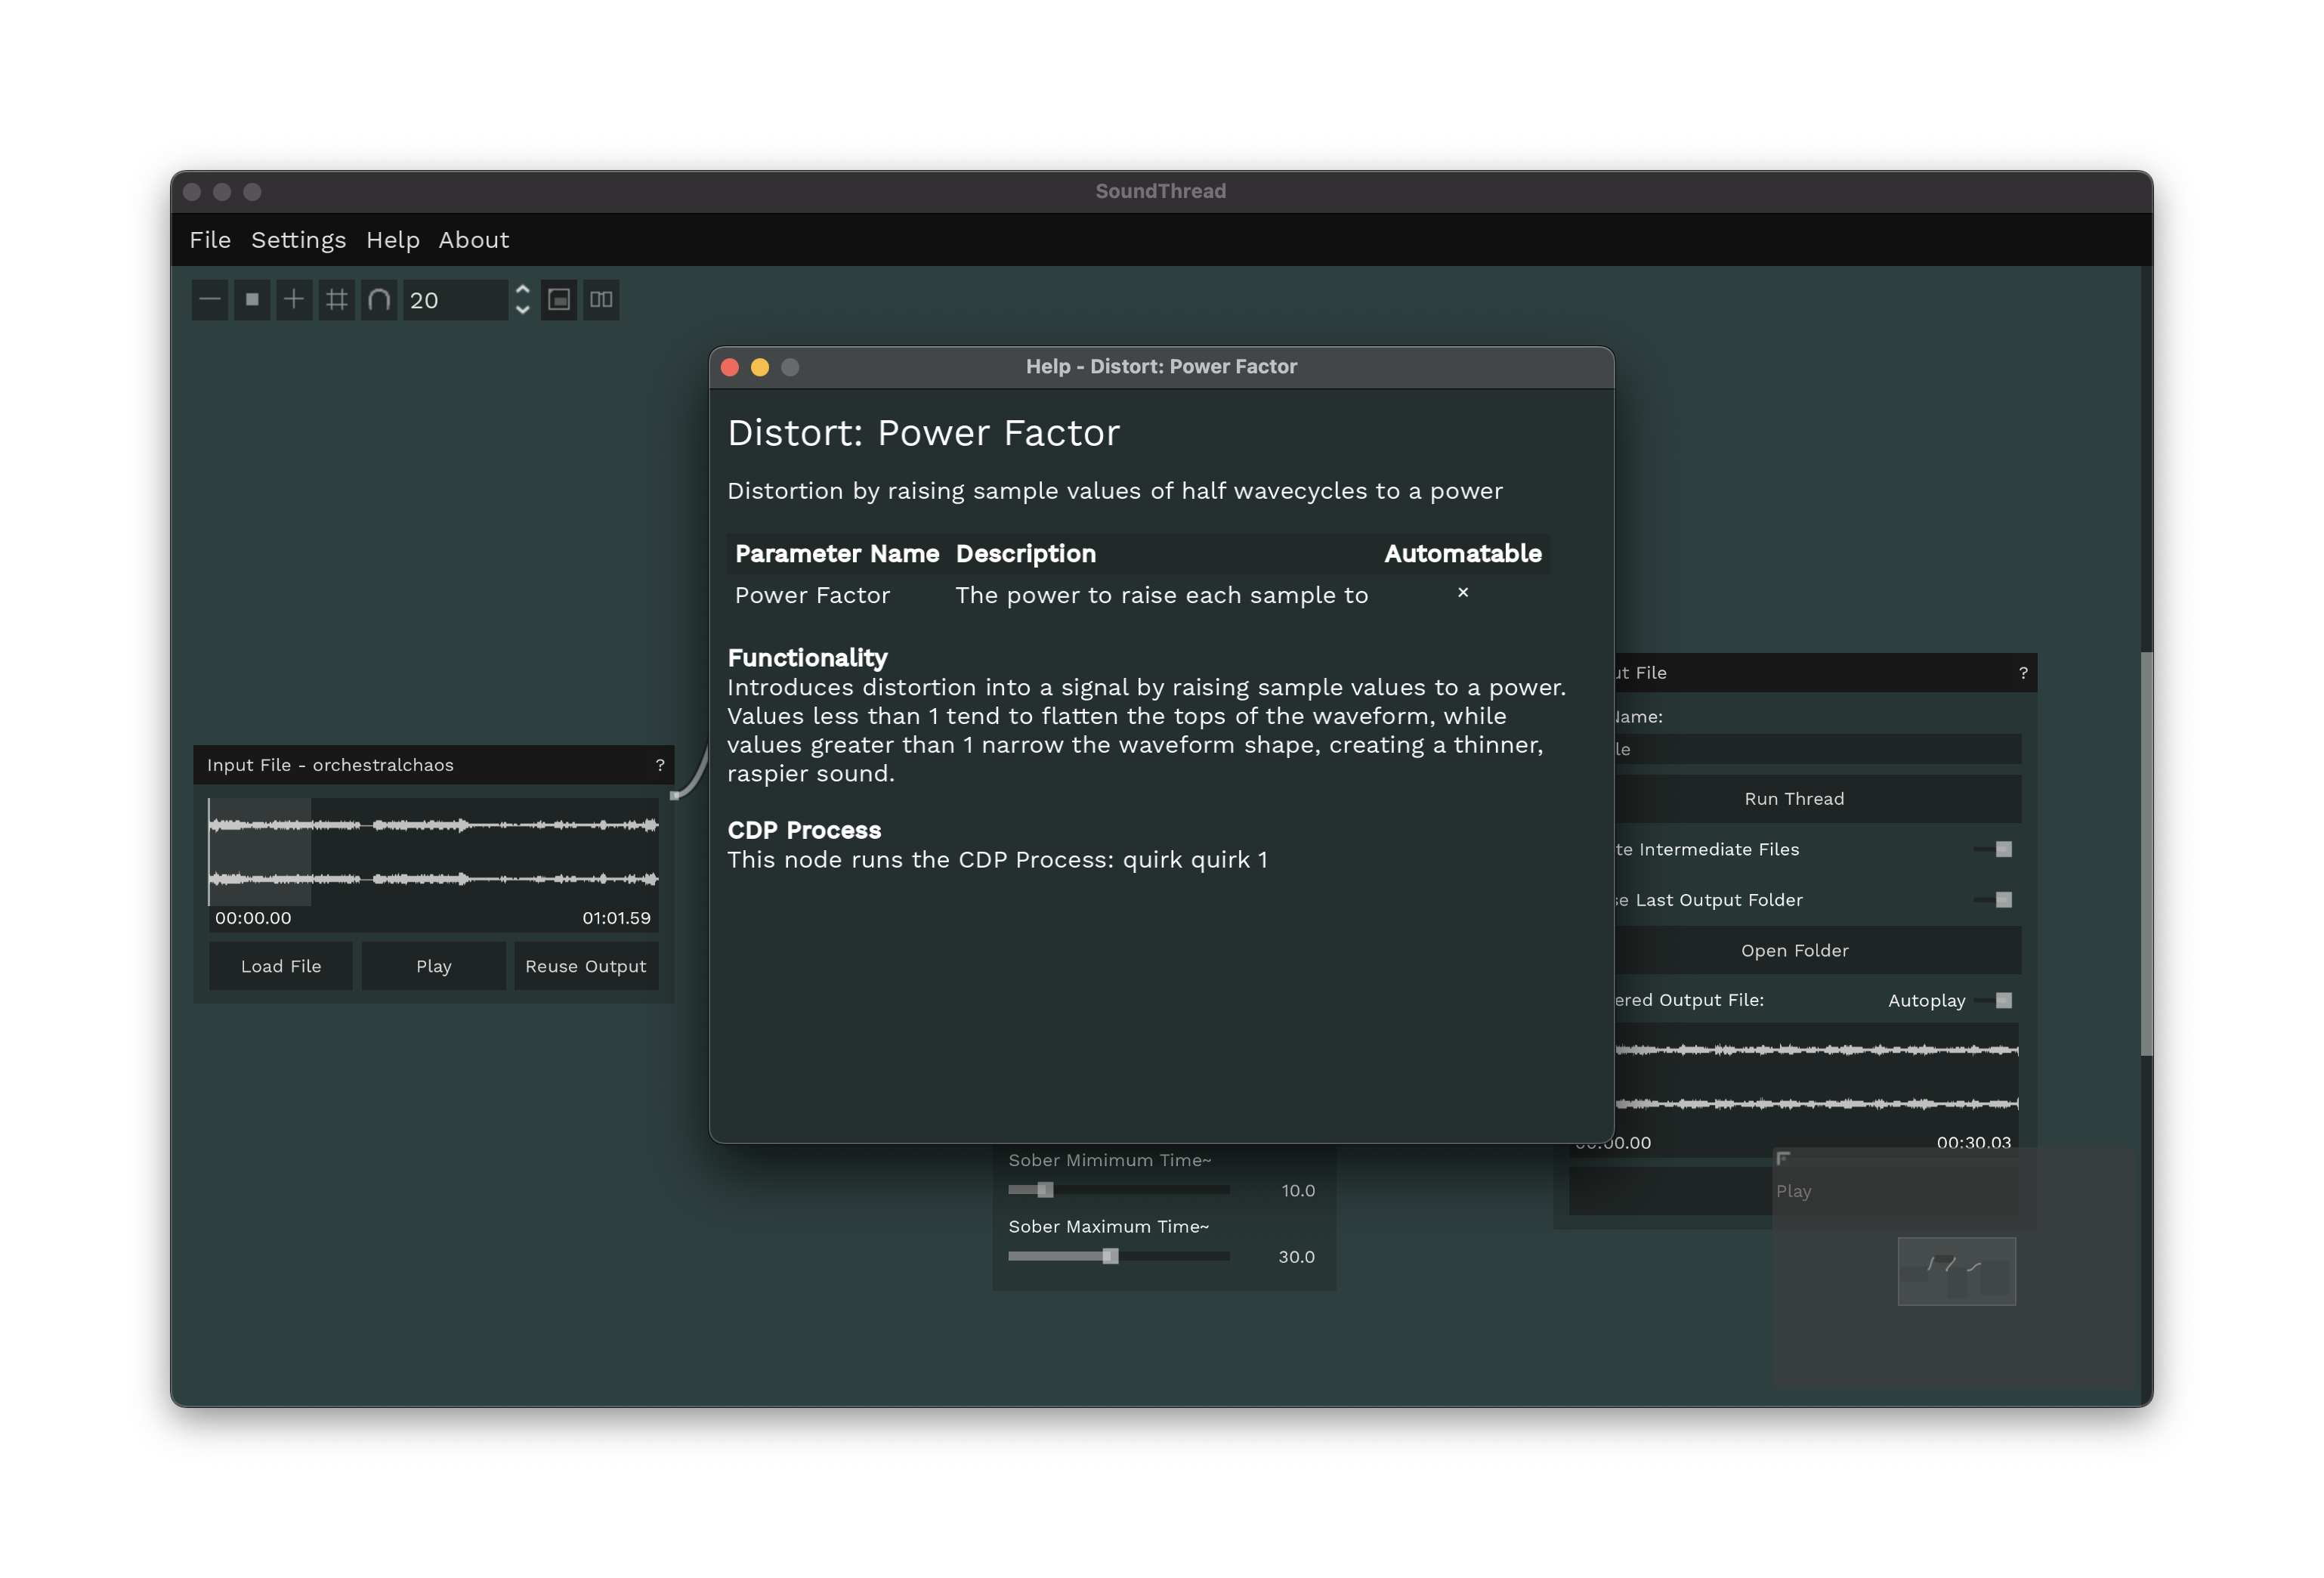
Check the help. The ‘?’ links to (mostly) helpful descriptions of each sound process.
Sound guides
Try everything! You can (generally) patch multiple patch cords to the same node meaning multiple processes can run at once, then get mixed back together.
There are beautiful results possible with filters — check the Resonant Filters example for a gorgeous technique for feeding granular inputs into the filters, which is quickly addictive.
And there is a ton of frequency-domain processing possible via PVOC — that’s as in “Phase VOCoder.” pvoc is a concept in Csound, but the results here are really special. Check Tutorials > PVOC.
The short version of PVOC is this. First, convert to the frequency domain with PVOC: Analyze (indicated by black cables). From there, you can split cables, do all your PVOC processing, whatever. Convert back with PVOC: Resynthesize to get back into the time domain so you can hear (indicated by white cables again).
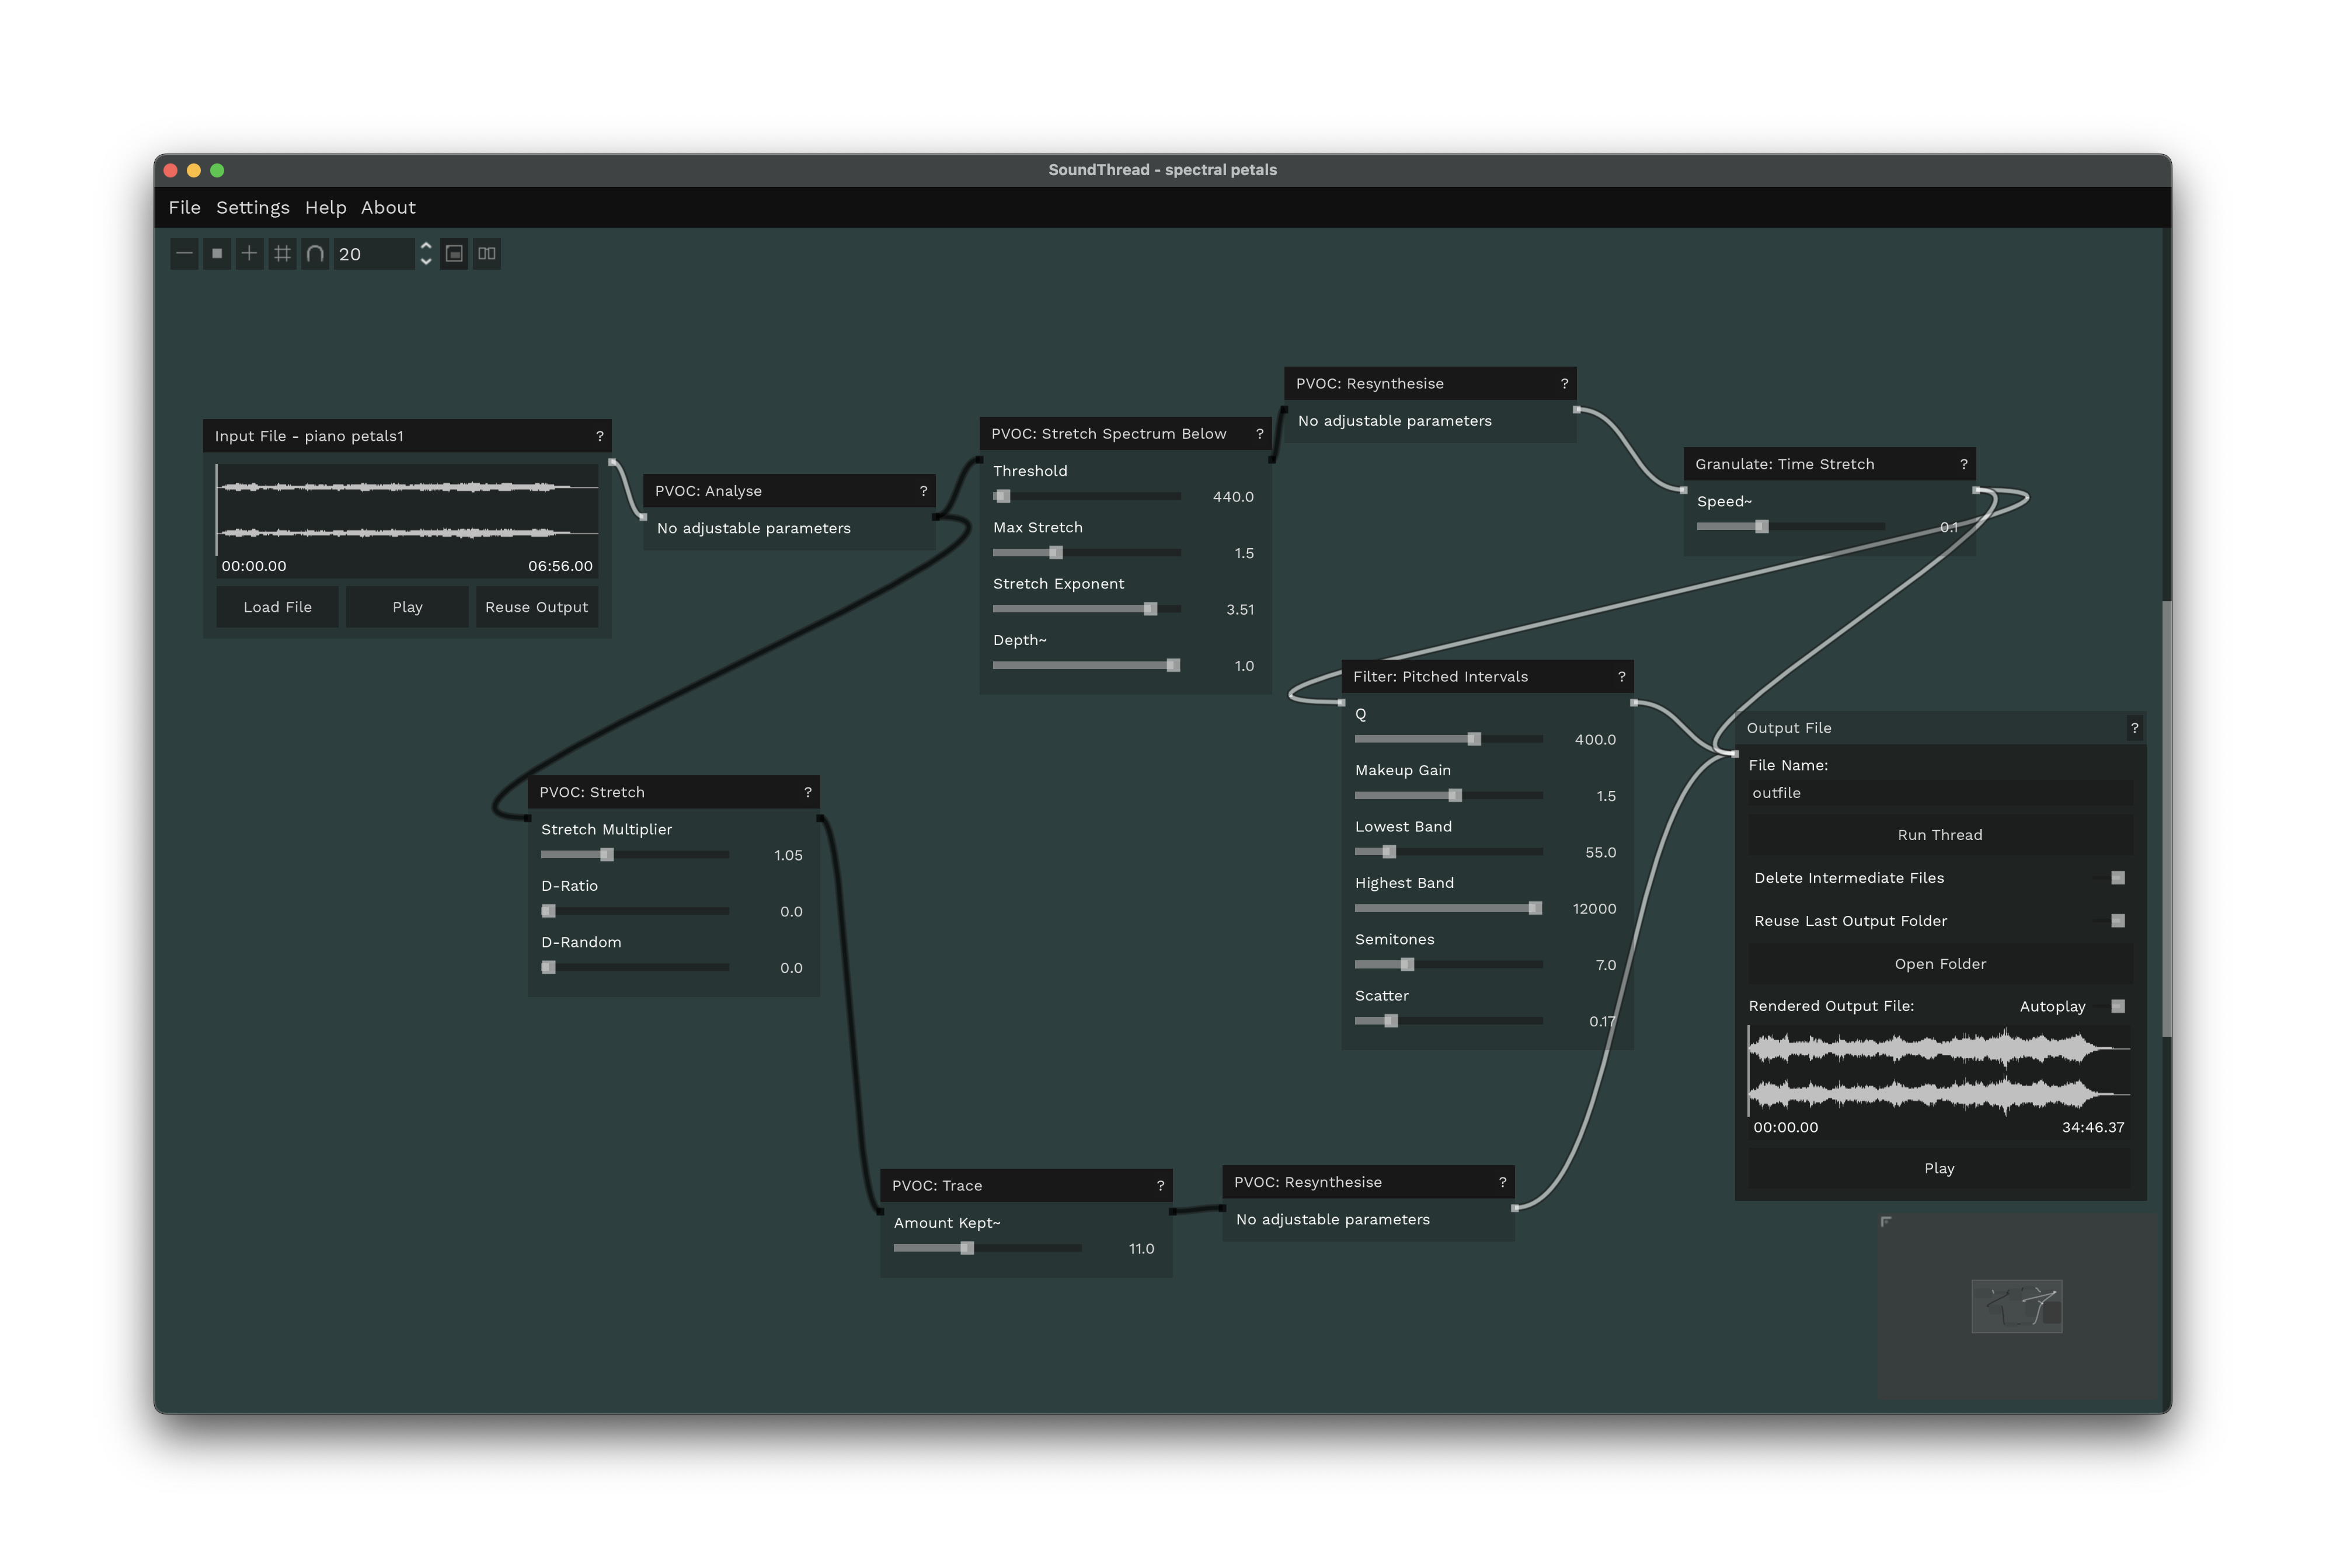
Here’s an example, stretching and messing with the spectrum all at once:
Higgins has a full guide. Honestly, there are almost endless possibilities even with just a handful of nodes; I could watch tutorials like this all day.
Wave cycle distortion is really worth a deep dive all on its own:
0.3.0 beta hit at the start of this summer, bringing this to a public eye.
And Mylar Melodies has put together a video, too:
VJ Union has a nice take on this from a visual perspective:
Think Like a Sound Designer: A VJ’s Introduction to SoundThread
Don’t forget to support the SoundThread project and its developer! Donate, donate!
Enjoy! I might go into more detail on this soon. Actually in the meanwhile, a great place to go deeper is in the easily overlooked workshops section on CDP, which has tips that will apply here, too. (It’s the work of one Archer Endrich):
https://composersdesktop.com/workshops.html
Also, it’s interesting what SoundShaper can do — the Windows-only graphics tool. I’ll test this in Parallels for you so you don’t have to:
https://www.composersdesktop.com/docs/html/soundshaper.htm
What are you doing here? Cancel everything. Go make threads.
Bonus: Renoise integration. This hasn’t been updated in a while, but I love the idea of this being integrated in Renoise sample workflows — see the CDP Interface for Renoise. Some of the spectral capabilities of CDP were also adapted for the now-defunct Cakewalk Project 5 in real-time use according to the history, too; I’m in touch with some of the Cakewalk folks so will ask about this.
Most people will probably happily just tweak and generate sounds and drop them into your hardware/software of choice, but it’s interesting from a historical standpoint.