Max for Live is now available, fusing the multimedia, visual programming environment of Max/MSP/Jitter with the plug-in hosting and sequencing and clip-launching and recording of Ableton Live. With two complex products interacting, there are plenty of questions to answer. I asked Michael Chenetz, the creator of the online tutorial site and community max4live.info, to tell us what major points we shouldn’t miss.
Here for launch week are Michael’s answers, information on what you get in the box (including videos from Ableton), plus the best video tutorials from Michael’s site to get you oriented in the new tool – and to begin to determine wheterh Max for Live is for you.
1. You get more than a blank slate – Pluggo and more come in the box.
If you’re wondering how to justify the roughly $300 most people will pay for Max for Live – particularly if you aren’t a Max owner and may not be able to do much with it until you learn it – there is some significant relief. The package comes with a number of pretty powerful instruments and effects you can use right away, even if you aren’t going to have much going with your own patches right away. Some (but not all) of the Pluggo collection plug-ins are included. See the full description below.
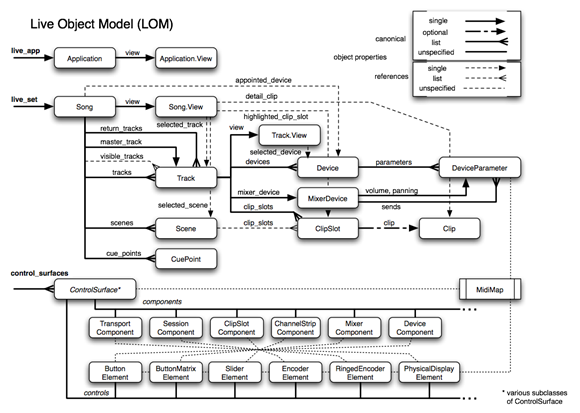
2. Know your LOM (Live Object Model).
The Live Object Model describes how your Max patch interacts with all the stuff Live does. It looks complex, but it’s basically a hierarchy that allows you to connect to many of the clip, set, and control surface functions in live. (Not all – see below.) The LOM is to the Live API as the NYC subway map is to the NYC subway – it’s the map that describes the thing that helps you get around.
Interaction with Live is, of course, a big part of the appeal of Max for Live. After all, while you can build sequencers and instruments and effects and video players, you could do that before – it’s the promised integration that’s new.
Live integration currently includes both the ability to provide user interface elements for your patch that appear within Live’s Device display – and behave (mostly) as built-in Devices would – and hooks into Live’s own behavior.
You can do almost anything with the Live Object Model and the Live API, but here’s one notable catch:
3. You can’t access absolute Clip position, or directly update clips.
Michael writes, “Accessing absolute Clip position is currently not available. Please do not ask again. They know and they are working on it. :-)”
Update: The Live API is also not yet as complete in its capabilities as the mouse. As noted in comments, you can’t directly add audio and MIDI clips, either.
4. You can’t use SysEx.
System Exclusive messages are currently filtered in Live and thus not available through a Max for Live patch. This allows Live to use those messages for interaction with control surfaces. However, you can access some control surface functions through the Live API, so while that won’t help with everything you might want to do with hardware using SysEx, it should be useful for some tasks.
This does illustrate a case in which there’s still some advantage to applications that access input and output independently from the host.
5. You can use Open Sound Control.
OSC is the next-generation, networkable, human-readable messaging standard for multimedia.There’s still no native support in Live for OSC. But as a Max for Live user, you have the same access to OSC that you would in Max, via TCP or UDP. That means one big role for Max for Live is likely to be mapping input from OSC-sending tools like iPhone controllers and other software to and from Live.
max4live.info: Tutorial M4L Lemur and OSC from max4live on Vimeo.
6. You can control Live-ready control surfaces like the APC40, Launchpad.
Devices like the Launchpad, APC40, and any of the control surfaces you see defined in the Live Control Surfaces dialog should be able to be addressed right from Max for Live patches. Correction: It seems only “official” Ableton devices, currently meaning the APC40 and Launchpad, are supported, though you can communicate with anything else via MIDI (just not set up as a control surface per se, as a MIDI input device). Michael writes, “If you use a hardware controller the is made for Ableton, then you can access its functions through the Live API control_surface object. Basically made-for-Ableton devices differentiate themselves by using Python scripts in the MIDI Rremote directory that define the functions available in Live.”
Now, the interesting twist here is that, as far as I know, this should work not only for Ableton-approved devices like the APC40, but also for scripts like those for the KORG Nano Series we’ve run here on CDM. You might actually want to hack together your own interactions with Max patches instead of using these control surface options for those controllers, however. This will obviously be something we cover more over time.
7. You can store presets for Max within a Live Set.
This is where the integration gets really cool. You can not only load specific Max creations with a set, but presets inside your patches.
8. Max, Jitter, and MSP are accessible through Live depending on your License.
For those unfamiliar with Max, it’s divided into three groups of tools and their associated objects. Max is the original part of Max, handling basic math, simple messages and lists, and MIDI. MSP does audio-rate signal processing for sound, synthesis, and effects. Jitter does matrix processing of video, graphics, and 3D geometry.
All three are included, in their entirety, inside Max for Live, and they all work as expected. Audio and MIDI routing aren’t directly accessible, as they come from Live – but that’s what you want. One catch, though, is that Jitter disables its output when you edit patches in Live unless you own a full Max/MSP/Jitter license, separate from your Max for Live license, but that’s something to address in a separate story. All will run inside Live with complete functionality, however.
9. Read the manual – both of them.
RTFM? Michael suggests, “Take the time to learn. Check out the documentation and tutorials available in Live and in Max. There are actually two different areas in which this information exists.”
You’ll find both documentation inside Live itself – where the tutorials are – and in Max for Live. These remain the best place to begin. That said, any documentation online on either Max or its very similar open-source cousin Pd may prove helpful for solving a specific problem.
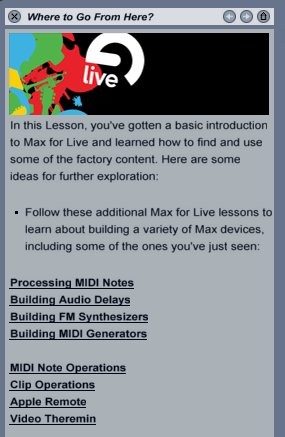
In other words, look under Live’s manual and Lessons (now found at View > Help View, as seen below) and in the Help menu and manual and documentation in Max itself.
10. Don’t forget to have fun.
I know, I know – top ten lists are often padded with extraneous filler items. But this is probably the most important thing to mention on this list.
Michael is already a convert, of course, in that he runs a community for the tool, but in talking to him over the last few weeks, he’s been really positive about the experience – even with background in many other development tools. And he has had a great time, and believes other folks will, too.
“It may be a learning experience for new users, but it is definitely worth it in the end,” Michael says.
And maybe that’s the real bottom line – whatever you do, have fun. Having taught Max/MSP in the past (at Brooklyn College, among other places), I’ve noted that sometimes it’s doing really simple things that makes these tools useful. Enjoy what you’re doing, and you’ll be more productive.
What’s in the Box, from Ableton
Ableton provides a video overview above of what comes in Max for Live. Included in the package:
- Step Sequencer: 16-steps, adjustable step size and probability, shift, random mode, real-time MIDI control
- Buffer Shuffler: randomized, shuffled audio reordering with different patterns, beyond what is possible with Beat Repeat
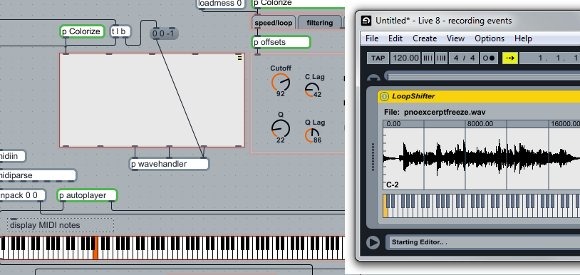
- Loop Shifter: trigger playback with MIDI notes, change rate + loop points + filter, morph between states, auto-play without MIDI
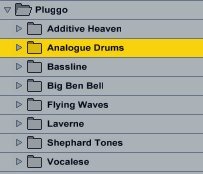
- Pluggo For Live: 40 devices from the original Pluggo collection
- Building blocks from Pluggo: basic functions that can be easily combined into your own creations
- Button matrix step sequencer: a step sequencer for grid controllers like the APC40 and Launchpad. (Apparently only those two “official” devices are currently supported; I’m confirming this.)
Because the devices included with Max for Live are really patches, they can be unlocked, modified, mashed up, or turned into your own creations. That had long been a big advantage of Reaktor, but even the full version of Max/MSP/Jitter, for all its included examples, didn’t have some of these kinds of demonstrations.
UPDATED – Max 5.1, gets some additions too: The new objects – though not these whole patches – are included with Max 5.1. That means that, while they’re a strong incentive for those new to Max, some existing Max users may wind up being satisfied building their stuff in Max and skipping Max for Live. After all, a lot of the live performance rigs today – like the monome’s now-legendary MLR patch, used most famously by Daedelus – don’t rely on any other software. Regardless of what makes sense in your work, it’s nice to see Max 5.1 benefiting from Max for Live’s improvements.
Getting Started Tutorials, from max4live.info
I think the folks at Ableton and Cycling ‘74 expect most people to be interested primarily in making musical instruments and effects. But what I hear from a lot of Live users is that they really want to know more about the API and how they can control Live itself. Michael has put together two fantastic tutorials on the subject.
The first video details how to work with the API and the LOM, so that your patches can interact with what’s happening in the set.
Max For Live Paths, Objects, and Observers from max4live on Vimeo.
The second video talks about how to work with clips.
Max For Live Clips tutorial from max4live on Vimeo.
Pricing
Here’s the simplest breakdown possible:
First, you’ll need a copy of Ableton Live 8 or Ableton Live Suite 8. Earlier versions won’t work, and neither will any of the LE/Lite/Starter editions. You’ll need the full-blown Live. (That’s too bad, in a way, as I imagined the idea of buying the cheapest Live possible and then building everything yourself!)
You own Max 5. You can add Max for Live for US$99/EUR79.
You own Live, but not Max 5. You can add Max for Live for US$299/EUR249.
You don’t own Live 8/Live Suite 8/Max 5. Discounted pricing is available.
You own Pluggo 3, Mode 1, or Hipno 1 or later. A US$49/EUR39 coupon is available via Cycling ‘74.
You own an earlier version of Max. You need to upgrade to Max 5 first. You might consider the Live/Max bundle if you don’t yet own Live.
Academic pricing. There’s no individual academic pricing, and the 9-month Max 5 license doesn’t do anything for you (though you are, as before, eligible for $39 off a full Max 5 copy). Institutions are able to get a discount, though; email Ableton educational sales.
For the record, the version that supports all of this on the Max side is 5.1, and on Live’s side is 8.1.
Where to Go for More Information
Cycling ’74 Max for Live Product Page + FAQ + Resources
Our friend Andrew Benson did a really wonderful round-up of all the things people are doing with Max for Live. I could plagiarize the thing, but I’ll let you read it at the source. (There are some useful resources in comments, too.)
The Edit Button Has Been Pressed [Cycling ‘74 Blog]
And of course, be sure to follow Michael’s superb resource:
Nick Rothwell is also blogging on M4L topics:
http://maxforlive.loadbang.net/


