
With the advent of consumer-level HD camcorders, Blu-Ray and HD DVD players, and HD-format disc burning, HD content creation is becoming ubiquitous. However, for realtime visualists looking to mix HD sources live, there hasn’t been a real HD mixing solution. Want to mix that HD footage on your PC with that awesome high-res project in VJ software like Modul8? No can do, buddy!
At least, that had been the case. With two Blackmagic Design Intensity cards and Blackmagic’s On Air software, you can mix two streams of HD as a simple AB mixer. With one Intensity in your machine, you can use a second laptop or source to feed your main VJ / live visual app of choice with true, uncompressed HD input.
We tested live, HD mixing for color performance, quality, and ease-of-use with some powerful, DIY visual software for live visuals. With the ability to mix in live HD inputs, live HD cameras, live computer inputs at full HD resolution, and more, the potential for live visuals is clear.
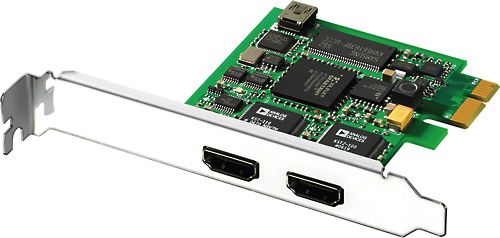
The Intensity is a 1x PCI-Express card with one HDMI input and one HDMI output. An Intel Mac Pro or any modern PC system will have a PCI Express slot, and with the Intensity’s HDMI input and Quicktime-based capture component, any Quicktime-compatible VJ software will have an option to bring in real-time, uncompressed HD video from an external source, be it a Blue Ray/HD DVD player, HDV Camera with HDMI out, or computer system with a DVI->HDMI converter. The Intensity card retails for $250. Blackmagic has also just released the Intensity Pro, which gives much needed Analog inputs for an extra $100. Unfortunately as of our testing, we did not have access to a Pro card.
Caveats: Note that Dell systems are not currently supported; see Blackmagic’s tech note on the subject. No idea why, but it’s really a shame. Make sure to check the certified motherboards and configurations before buying.
Also,the Intensity card cannot decode HDCP content, so any HD DVD or Blu-Ray discs you play must be unencrypted. Ed.: Of course, this does open up the possibility of using discs you have burned yourself, so long as you left out encryption at burn time. Spiderman, meanwhile, is out. -PK
On Air: A software-based HD mixing solution
The bundled On Air software takes advantage of two installed Intensity cards for realtime A/B mixing. There really isn’t much to say about it; there are no included effects as it isn’t aimed at visualists, but for its intended purpose, it just works. It isn’t a software-based equivalent of a hardware video mixer like Edirol’s V4, but it is currently the only application that can address two Intensity cards, due to driver limitations as of this writing. If you want to mix from two external sources, your only option is On Air. Don’t fret however, as you can still use a single Intensity card with a live visual host application for two-source mixing, so you could mix one HDMI input and one feed from your desktop rig.
Supported Resolutions and Frame Rate:
There are some technical requirements of which you’ll want to be aware. This is a true HD standards-compliant card, meaning that it will only sync or “lock up” to a proper HD video input signal, not any old “higher than standard def” computer signal. The Intensity card supports 1080i @60 & 50hz, 720p @60 & 50Hz, and 420p @60 & 50Hz signal standards – basically, anything but 1080p @ Pal and NTSC frame rates. This means that you can drive your second monitor output (say from your Macbook Pro) at these resolutions and expect to see a picture with the Intensity input. If you try to drive the system at something other than a standards-compliant frame rate and resolution (say 1024 x 768 @ 80Hz), you will not get any input to the Intensity card at all. You may not even see any obvious indication of a problem.
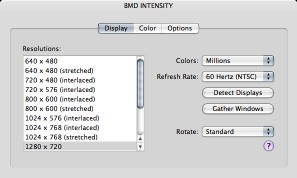

The Intensity was properly identified by my MacBook Pro, connecting the laptop’s output to the input of the card. Not all systems will be able to drive their external display at these resolutions; for example, our 12″ PowerBook could not output 1080p, interlaced video. Results will depend on the video card in your machine.
Video nerd talk galore: 8/10 bit 4:2:2 YUV and HDMI
There are some additional details to be aware of, for those of you who are lovers of minutiae of video editing. (If you don’t know your RGB from your YUB, move along; nothing to see here. -Ed.)
A source of some confusion with the card initially was that computer sources and consumer electronic sources deliver 2 different types of video signals over HDMI/DVI. Computers with a DVI-to-HDMI adapter typically send a 10-bit RGB signal down the line, whereas a Blu-Ray or HD DVD player or HD television set top-box and other similar devices generally send a 10-bit YUV signal. Fortunately, with the 1.3 drivers from Blackmagic, you don’t need to worry about this technical detail, as the Intensity card works just as well with either source, automatically.
Another detail we noted is that the video signal is YUV 4:2:2 sampled. That’s a standard output format for broadcast, but it is, strictly speaking, a non-perfect representation of your computer’s output. Unless you are a true stickler, though, this shouldn’t bother you in the least; it doesn’t make that much of a difference. You’d also need to be prepared to spend an order of magnitude more of your dollars for a true, 4:4:4 RGB capture source and required converters to get sample/signal-accurate representation. You may notice a gamma shift in the RGB-to-YUV conversion, but it is minimal and correctable in software. In other words, the picture is uncompressed, beautiful, and visually loss-less.
Testing 1, 2, 3
Now that we’ve geeked out on our video specifications, let’s get to the meat and potatoes.
Typically for visualist/VJ setups, we would be using a laptop or small form factor (SFF) PC to drive the Intensity card, and run another VJ app on our ‘desktop’ system, treating the laptop as a camera-style input. Ed.: I could also see using HD-DVD or Blu-Ray here, even for computer lovers — especially if a client delivered footage in that format. Again, though, PC laptops with those drives built in could be a good option. -PK
To test this setup, I’ve evaluated the Intensity card with three DIY visualist programming environments, the open-source Pure Data/GEM, commercial Max/MSP and Jitter and commercial but free Apple developer tool Quartz Composer (I’m a DIY kind of guy). Ed.: For those of you unfamiliar with this software, all three are interactive patching environments, allowing powerful custom setups for live video and 3D image processing, often with hardware graphics-card acceleration. They use visual patching metaphors rather than coding metaphors, though all three can support extension using code. Apple’s Quartz Composer even ships by default with the developer tools in Mac OS X. If this isn’t your cup of tea, though, the same sorts of results would apply to using other software, such as dedicated VJ apps like VDMX, Modul8, and Resolume, or even using software like Apple’s Motion in a live setting. -PK
I’ll be looking at ease of setup, picture quality, and performance, on both the Intensity itself and each host app.
Test Rig:
Apple Mac Pro Dual 3.0-Ghz, 8GB RAM and ATI X1600 graphics card, OS X 10.4.9, QT 7.1.5
Apple MacBook Pro 2.33-Ghz 3GB RAM, OS X 10.4.9, QT 7.1.5 with a DVI-to-HDMI conversion cable.
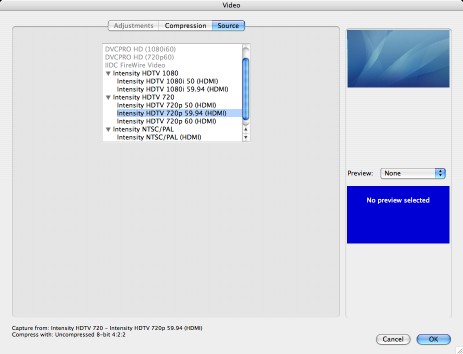
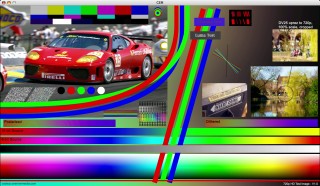
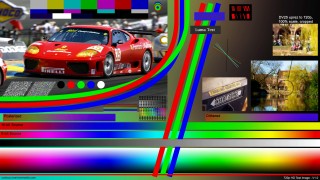
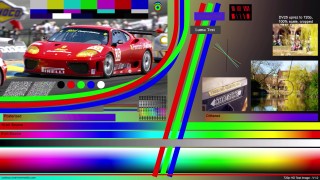
The MacBook Pro was driving the Intensity at 720p@60Hz. (Interlacing is so 1940s!) In order to test color and picture accuracy, we borrowed an incredibly useful test pattern from One River Media’s codec resource. (If you haven’t seen that site, it’s a great resource and explains a lot of concepts clearly and concisely.)
Pure Data/GEM
Setting up Pd used to be an incredible chore in the old days, but now it couldn’t be any easier, thanks to the Pd-Extended distribution. Pd-Extended is lovely because it comes pre-packaged and pre-compiled with many useful abstractions and externals for Pd, including GEM, which is a necessity for visual processing. I recommend this distribution for those who want an easy-to-use and easy-to-configure Pd install without the deep knowledge required for compiling and configuring the software manually. Ed.: As with open software like Linux, the alternative is a set of binaries and dependencies only a Pd guru could love. For reliability and ease, Pd-Extended is indeed a good choice.
For those who are not aware, GEM is an OpenGL wrapper for Pd, an exposes the full OpenGL API in the Pd patching environment. This allows you to import models, create procedural animations, import video as textures, add shaders and effects, and so on. Ed.: What’s a 3D API like OpenGL doing in a video tutorial? Simple: 3D capabilities can come in handy for drawing and hardware-accelerated video tasks.)
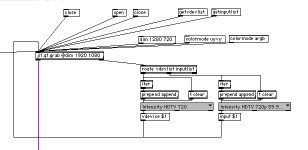
To get a basic Pd/GEM patch going for use with the Intensity, I simply modified the pix_video help file (pix_video is the QT compliant video capture object for GEM):
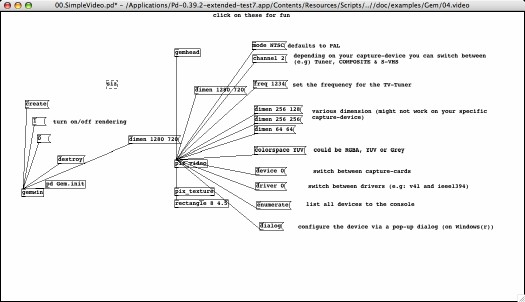
I found that, despite the help file’s warning to the contrary, the “dialog message” method was by far the easiest method to choose the proper capture device, and did work under OS X.
You have to send the dimensions to both the GEM window as well as the pix_video object if you want to see a true 1:1 representation of your incoming source material. The enumerate message we got when following the help file’s advice was frankly entirely unhelpful – look at the mess in the console:
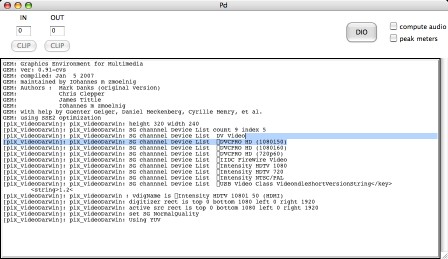
So, once again, use the dialog message and don’t trust Pd’s help files; it’s not worth your time.
Now for the good news: Intensity capture works fast and looks lovely under Pd. One small default setting to be aware of is that GEM windows for some reason default to render at 20 fps. You can up that to 60 by adding 60 to your gemwin arguments (see help file for details). All in all, it’s pretty easy to get set up and running, and it works like a charm. Pd and GEM run on OS X, Linux and Windows, but there are no Intensity Drivers under Linux, so open source software junkies are out of luck here.
Quartz Composer
Many apps take advantage of Quartz Composer patches and integrate Quartz Composer/Core Image functionality into their systems. Modul8 and the current VDMX beta from Vidvox, along with many DIY/open source solutions can support Apple’s Core Image technology or Quartz Composer patches — or both. How does QC stand up? Well, first, let’s be honest, QC is not meant nor designed to be a performance environment in and of itself, but rather as a visual programming environment to be wrapped in a Cocoa/Objective-C app. Despite Apple’s design intentions, though, I’ve seen many visualists use QC in their performance setups. Ed.: Non-programmers need not run in fear, especially with software like VDMX to host your Quartz Composer sketches. -PK With that in mind, setting up QC to use the Intensity card is a snap, and everything just works – sort of.

While the above QC patch is as basic as it can get, I discovered some very odd issues. QC lagged up to 1.5 seconds (yes, ladies and gentleman ,that is a full 90 frames at 720p x 60 fps) behind the audio. This seems to be related to 10- versus 8-bit capture mode, but I was unable to pinpoint the source of the delay, as it was very intermittent. Even at its lowest delay, around 10 frames, the input latency was greater than you would normally see with a FireWire capture source normally, and was definitely higher-latency than Pd/GEM. The picture and frame rate were all up to par, though, and image quality looked fantastic. I’ve yet to get an answer on where this latency is introduced, and am quite curious as to what is causing it.
Max/MSP/Jitter
The grand daddy of DIY performance environments: how easy is it to get real-time HD input and display to Jitter without hiccups? Well, it’s not straightforward, to say the least. Jitter is a complicated beast with many formats, pipeline options and objects that can help or hinder your frame rate. The only way to sustain decent frame rates at HD resolutions in Jitter is to leverage OpenGL, and that requires some fairly in depth knowledge of Jitter, its pixel formats and its OpenGL metaphor.
Getting access to the Intensity card itself, at least, is as simple as copying and pasting the patch in the help file for the QuickTime capture object, jit.qt.grab :
Using a YUV pipeline for speed and OpenGL for display, one can easily get high frame rates, even with shaders and effects for mixing on top of the input video stream. I don’t want to turn this into a Jitter tutorial, but suffice it to say, realtime HD input in Jitter with high frame rates is indeed possible and looks great.
Color Accuracy and Performance:
As mentioned earlier, we wanted to look at color accuracy and picture quality from the Intensity card. Interestingly enough, we saw some different results in all three software solutions. Lets get right to it.
For comparison, you can download a zip file with the uncompressed PNGs:
CDM Intensity Color Reference Images [ZIP archive] Updated: Link fixed.
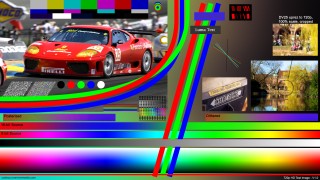
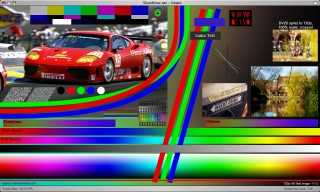
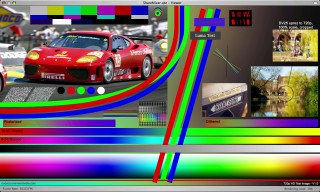
Jitter gets a bit complicated due to its myriad of pipeline options. This first image is a full argb pipeline from start to finish (jit.qt.grab @colormode argb to jit.gl.videoplane @colormode argb for those who are curious).

Analyzing the Test Results
The first thing that we notice is the gamma shift in all images. Secondly, you’ll see 4:2:2 sampling artifacts (look at the angled RGB bars); this sampling is expected for any 4:2:2 implementation. There are some slight differences between the pipelines with color hues (check the reds if you are curious), but nothing drastic or really out-of-whack. Personally I find that the last Jitter image — the chroma-smoothed shader — looks cleanest, but that’s my personal opinion. The good news is that no image really has a major issue with color accuracy or picture quality. You can expect a gorgeous picture in any app from the Intensity card.
I mentioned the odd frame delay with Quartz Composer, but neither Jitter nor PD exhibited this behavior. The frame delay that I measured was between 3 and 5 frames, a bit better than the average DV device, which felt very snappy.
As far as application performance, I was surprised to say that both Pd/GEM and Max/MSP/Jitter felt more responsive than QC when effects were applied to the HD source material. Jitter’s included shader library made it incredibly easy to stack effects and mix sources out of the box with almost no slowdown. Unfortunately, adding shaders to a pipeline in Pd is closer to rocket science than to patching, so I did not explore that route too extensively.
Conclusion
That’s quite a big bang for your buck. At $250 per card, you get an industrial-strength video capture card and QuickTime compatibility for many major applications. Blackmagic Design has promised to allow multiple Intensity cards to be driven by a single host application. There’s no timetable for the release of those drivers, but if the company follows through successfully, I think we’ll see quite a few people invest in these cards. I’d also personally love to see an Intensity Mobile 3/4 ExpressCard with a single HDMI input for a two-laptop mobile session. Unfortunately. I didn’t have access to an HDMI-capable display, so I couldn’t test HDMI output. I imagine the process would be pretty straightforward, but I would like to test it in the near future.
My only major complaint is that the Intensity requires a desktop-style computer system for use, and a fairly recent one with PCI-Express, to boot. It’s also rather unfortunate that Dell systems are not supported on the PC side, even if they have a PCI-Express expansion slot. While I’d rather not lug a desktop system to a gig (especially if it’s a Mac Pro), I’d much rather avoid sacrificing image quality down to standard-definition just to mix, as we have in the past. All in all, I think this card is of great value for both live usage and for post production. I’m impressed.
Blackmagic Intensity Product Page
Got more questions about the Intensity card and our tests? Hit us up in comments. And watch for more coverage of real-time HD mixing using this and any other solutions in the future; we’ll definitely have some follow-up coverage. -Ed.