For a lot of users, it’ll just mean the splash screen goes from pink to gray. But Live 11.1 is a beta no more. That’s huge news if you’re on Apple Silicon, but there are a lot of other little improvements you’ll want to catch whatever platform you use.
As usual, the page to scour is Release Notes:
I’ve been using Live 11.1 beta intensively. Here’s what to know:
Apple Silicon native. Live you’ll see is now available to download as a Universal Binary. That means it’ll run native on the Apple Silicon architecture. Intel-native Audio unit plug-ins will be compatible, too, under Rosetta 2. For Intel-native VSTs, you’ll need to get an update from the plug-in developer or force Live to run under Rosetta 2, as well – it’s a checkbox when you choose Get Info from the Application icon. See the previous story on compatibility.
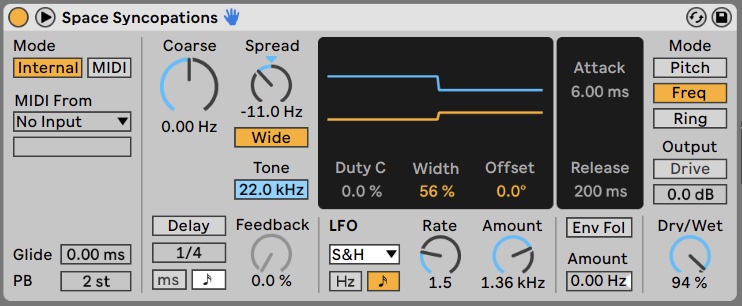

Shifter. Shifter consolidates features from the past Frequency Shifter device and adds new ones, and it’s absolutely a must-have. You get pitch shifting (quantized to musical pitch), frequency shifting, and ring modulation in a single Device. There are Coarse and Fine choices, a Tone filter, Window parameter, Delay, LFO, and Envelope Follower. You can even quantize frequency to incoming MIDI notes, so it’s ‘playable.’

Shaper. (Suite/Max for Live only) A modulation device built around envelopes. Yeah, typically I mention stuff like this and readers point out it’s available in some other place but – it is useful to have stuff with Ableton’s level of polish, built in, and this one is especially nice.
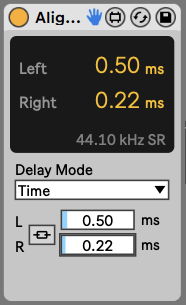
Align Delay. (Suite/Max for Live only) Does what it says, in Time (ms), Samples, or the fun one, Distance, which calculates time delay according to the distance in meters or feet, and temperature in C or F, since the speed of sound through air differs depending on the temperature of that air. No Kelvin, though. For shame.
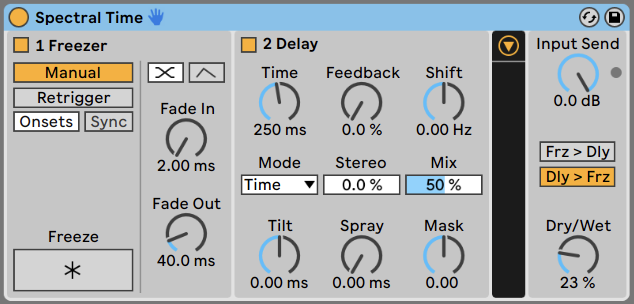
Change effect order in Spectral Time, and use it with zero-latency dry output. This is a small pair of tweaks, but in my experience just about doubled how often I use the new Spectral Time effect. You can swap the order – Frz > Dly or Dly > Frz – for more sound design possibilities. And there’s a Zero Dry Signal Latency which means the effect itself adds no latency to monitoring the output of the dry end of the signal. (Wet is still processed with latency, but with this effect you probably don’t care about that. You still have whatever latency you normally get from your audio interface and OS.)
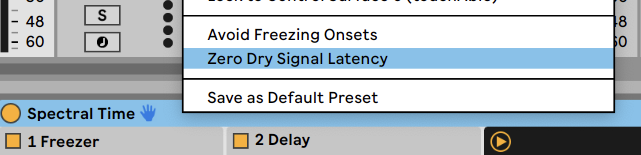
To get that zero-latency option, right-click on the title bar of the Device:
Spectral Resonator precision. Hold down Shift + up/down arrow with Freq in Hz to move one full Hz at a time. With note value selected, hold down Shift + up/down to move by octave (instead of semitone).
(At press time, this is described incorrectly in release notes.)
Wavetable Hi-Quality on and off. Right-click the title bar to toggle Hi-Quality mode on or off (it’s off by default). The main change here saves CPU (by about 25%), by calculating only every 32 samples and adjusting the use of the Cytomic filters.
Off is probably where you want to leave this most of the time, but you have the option if you just really want to flex that new computer’s CPU or something.
Improved Cytomic Filters means better performance and stability in all the many devices that use them – so Wavetable, Echo, Simpler, Sampler, Operator, and Auto Filter devices.
Bounce these first! That said, there are subtle differences in how the MS2 and SMP filters and Amp and Cabinet might sound, so you might want to bounce them in your old Live projects first if you’re using them.
Navigate Devices in Browser. This is a big one, in that you can now see Device chains inside sets in the browser and drag them into Sets. (I still like to store these as presets first and even in Favorites, but it’s also helpful to have this additional support in case it isn’t, like, quite preset-worthy yet.)
Use those arrow keys. Arrangement editing is gradually getting easier and quicker. Hit the left arrow key to jump from an automation lane or take lane up to the main track, folding them back. Hit right to unfold.
Expand Clip View. CTRL+ALT+E (Win) / CMD+OPT+E (Mac) makes Clip View expand to vertical height so you can quickly see what you’re doing, especially on small screens.
Customize the CPU Meter. Ableton kind of confused folks at first with this, with a CPU Meter that was a lot more precise but also gave users the impression they were maxing out their CPU. What I like now is, you can choose how it works – Average, Current, or both. (There’s a pop-up on the menu.) It’s really useful for optimizing sets and preparing for going live with them.
Of course, if you do go get that M1 or new Intel or Ryzen on the PC side, you’ll be doing less of that, anyway. (It’s not just Ableton – plug-in devs in general have gotten a little greedier with CPU cycles.)
Duplicate stuff! Two useful shortcuts here – you can duplicate selected loop bars, and now selected take lanes. Context menu, or better still learn CMD + D (Mac) / CTRL + D (Win).
Max for Live and Python get major API additions, like note access. Max is up to 8.2.1, and also has some nice extras like new theme colors. But the big story here is that they keep adding to the APIs for Max for Live and Python. Newly created notes are now accessible in both – note access opens up some major new features. Max for Live can work with Ableton Link, so sync and jamming powers are available, too.
select_notes_by_id gives you note-by-note selection in Max for Live.
You can even access the new CPU stuff, which I guess could be used for something useful, though also could be used to build a Max for Live patch that intentionally chews CPU and maybe makes the system crash in an interesting way? Trust me, you’ll want it in 15 years when the sound of an overtaxed 2020s computer for its “retro” appeal!

Update your Packs! In the beta cycle, a number of Devices with Max for Live dependencies didn’t work in Apple SIlicon mode. One notable case for me was my beloved Convolution Reverb Pro. (Hybrid Reverb covers some of that ground and puts it in a new context, but the Convolution Reverb Pro controls are still very welcome!)
I just did a fresh install, and it works perfectly when running Live natively on M1. You’ll want to open Packs and look for updates. (Ableton had already confirmed this is how Pack updates would work.)
Multi-Clip Editing is improved. Here’s what to know while editing:
First, selecting and editing is easier:
– Time in the MIDI Note Editor can be selected across loop and clip boundaries.
– Note editing (e.g. copy, cut, paste, delete) can be used when working with note selections across clips and loop boundaries.
– Notes can be cut or copied from multiple clips and inserted into the same set of clips, as long as the clip selection/foreground clip has not changed, or into a different clip once that new clip has been selected.
You can also draw notes in background clips without changing the foreground clip, and there are some other improvements that address editing.
There’s a new set of options for handling MPE controllers and external hardware. Best to quote Ableton on this one, but it gives you some additional fine-tuning options for MPE:
Added an MPE Settings dialog box to the I/O section of Live’s mixer. You can use the settings to:
– configure the MPE zone and range of note channels used by Live when sending MPE to an external MIDI device or plug-in
– select the upper or lower zone and number of note channels
– select multi-channel mode, which sets an arbitrary range of note channelsThe above MPE settings can be used for hardware synths that require a specific MPE configuration, or plug-ins that do not officially support MPE but can be used with MPE controllers due to their multi-timbral support.
Other improvements: Capture MIDI works more seamlessly. Clip View is hugely improved in ways you will probably not notice but will benefit you anyway. You can duplicate take lanes.
And that’s it for now. Holler if you’ve got some tips of your own.