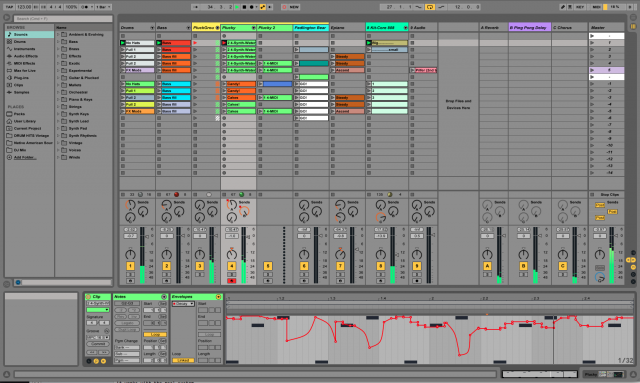
The new Session View. Yes, it’s a different color. But mostly, look to the bottom of your screen: automation recording in clips, and curves in automation, at last.
Ableton today has revealed the details of Live 9, alongside new hardware called Push. The software update brings new ways of transforming sound into MIDI, new and improved devices for shaping sounds, tools for automation that work inside clips and with curved interpolation, a new Browser, and a number of interface and usability enhancements. There are also some features, conceived for Push, that could benefit people using any hardware controller they choose. And alongside these enhancements, you’ll also find a host of new sounds and preset content with which to work.
First, here’s a quick look at what’s new, before we go into more detail and consider this more musically:
- Session automation – the “about freakin’ time” feature: Record automation into clips (no dummy clips), move clips between Session and Arrange, and use curved automation in Session and Arrange. Yes, they heard you.
- Convert audio to MIDI – the “pretty freakin’ awesome” feature: Transform melodic (monophonic), harmonic (polyphonic), and percussion audio content into editable MIDI clips, transcribing pitches, drum parts, and rhythms. It’s not Melodyne, but it’s uniquely fun in the context of Live’s Session View.
- A new Browser: The browser is now better organized, easier to customize, faster, now makes it possible to audition more presets instantly, and searches all devices and content from one place.
- More sounds: 3500 sounds in Suite, and a surprising number in Standard, all with easy-to-control Macro controls.
- Glue Compressor: from Cytomic, a new Compressor modeling a (cough) popular 80s compressor.
- Improved EQ 8: The flagship included Ableton equalizer now includes more graphical feedback, and newly-modeled filters for better sound and more-precise isolation of frequencies.
- More MIDI clip editing: Transpose, invert, and reverse MIDI notes inside clips.
- Max for Live is faster and included in Suite: Max for Live will sync up with the newest version of Max/MSP, bringing reduced load times and other enhancements. It’s also, at last, included as part of Suite (though not Standard).
- New Max for Live-based devices: A number of oft-requested Devices are now available implemented in Max for Live. The bad news: you need Suite, and they’re not “native” as such. The good news: they’re editable. You get an LFO you can assign to other devices, a whole host of drum synth instruments, MIDI echo, and improved Step Sequencer and Buffer Shuffler.
What it costs: For downloads, Intro is US$99/ 79 €, Standard is US$449/349€, and Suite is US$749/599€. Upgrade pricing is too complex to explain, so, uh, ask Ableton.
When you can get it: Beta testing will begin by next week, but the shipping version will arrive first quarter of 2013, says Ableton. If you buy Live 8 now, though, it’s 25% off and includes a free Live 9 upgrade, meaning the cheapest way to get Live 9 is actually to buy Live 8 before it’s out.
Live attracts a unique level of attention and anticipation because its way of working is different than other tools on the market. So let’s look at it that way: let’s look at what Live 9 means for making music, not just as a set of new features.
A number of partners, press, and artists were invited last week to Ableton’s headquarters for a day-long tour of the new products. I’ve had some opportunity to play around with Live 9 beta builds at Ableton’s offices, as well as talk to developers at Ableton about what they’ve built in Live and Push. In those conversations and some hands-on time, I’ve gotten a bit closer to the tool. There will be more to say over time, but here’s a look at the new software from how it might impact your creative musical process.
Starting Musical Ideas
A number of new features focus on how to get new musical ideas going. It’s subtle, and involves some enhancements that might otherwise seem unrelated, but it’s enough that I’m looking forward to sketching new ideas in the beta.
Ableton’s Dennis DeSantis did a nice demonstration last week in Berlin to first present Live 9, and I think it was dead-on in refocusing this from features to music making. Using the built-in laptop mic, he sang in a melody, then converted it to MIDI and turned it into a clip with an instrument. He beat-boxed a drum loop, then turned that into a MIDI clip – complete with bass, snare, and hats correctly-identified by Ableton’s new algorithm. (Dennis is a classically-trained percussionist, not really a beat boxer, so that means you could do this, too.) He found sounds using the new Browser, auditioning them instantly, and transcribed a single chord from a Bill Evans solo for a harmonic stab, finishing things off with some of the new effects.
Converting audio to MIDI. When Live added MIDI, it was such a boon to the tool that it’s been hard for any upgrade to live up since. This isn’t adding MIDI again, but it might prove to be the next best thing. Ableton isn’t Celemony – you can’t convert audio to MIDI, then edit the MIDI, then change the pitch and rhythm of the original audio. (For that, you’ll still have to run Celemony as a plug-in, and I’m sure this will disappoint some users.) But what Live 9’s new “convert to MIDI” feature can do is “transcribe” melodic, polyphonic, and percussive content to an editable MIDI clip. Some content, of course, works better than others. Clear melodic content works better than polyphonic content. Dry drum loops work better than loops with effects. Kits work better than unusual percussion (because Live generally assumes it’s mapping to a kit, for convenience).
The way the feature works: you select a clip, right click (or control-click), and then choose harmonic, melodic, or drum content. Live spawns a new channel with either a default drum device or synth, and converts melodic/harmonic pitch information to MIDI notes and drums to kick, snare, and the like. (Ableton says they’re planning to eventually allow you to set your own default instruments; in fact, Live 9 includes enhancements to how defaults work in the program generally.) You can also drag audio to a new MIDI track, and a pop-up appears allowing you to select the kind of material you’re dragging. What you can’t do is alter any parameters for how the conversion works; you have to trust the algorithm.
So far, though, it looks like almost any result will be musically useful. In fact, even in early testing, I sometimes found the mistakes more interesting than the correct transcriptions. But whether it’s being precise or – uh, a bit more creative – I think the audio-to-MIDI technique is going to be the biggest draw of the new version, because it can break you out of creative ruts. It’s not so much about stealing ideas as it is generating new musical DNA with which to work.
New clip recording workflow. In previous versions of Live, it could require some extra steps to start a new clip, record into that clip, and then play back what you just recorded. Finding a way to streamline that is significant, because it means you can start ideas faster in production – or more confidently start laying down new clips live onstage as you perform. Now, Live 9 has a new record workflow that allows you to combine these steps, starting a fresh clip, selecting it, recording into it, and being able to quickly play it back once you’re done recording. It’s functionality designed for Push, but it can work with any controller (or keyboard shortcut) you like; we’ll look more in detail at this subtlety as I think it’s really important.
Finding and Designing Sounds

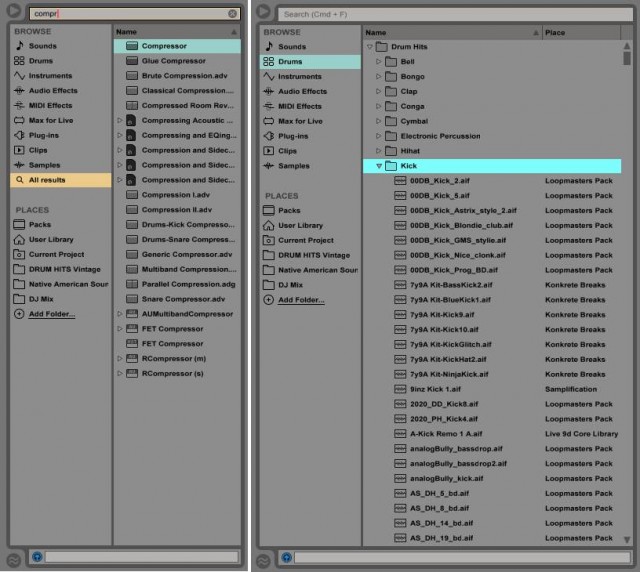
Browsing via search-as-you-type, browsing by type in the new Browser, showing off the newly-flexible, multi-pane interface.
It’s tough to overstate the importance of the new Browser. From the video over the weekend, you may have imagined this was mostly cosmetic, but seen in practice, it could be the Live 9 feature that would make it most painful to return to Live 8.
For one, you can now preview Devices nearly-instantly. Previously, Ableton would dutifully instantiate each Device chain in order to audition its sounds in the Browser. The result: it was painfully slow. Now, it instead plays an audio preview.
It’s also at last possible to add your own folders; gone are the absurd “1,” “2,” and “3” slots for finding files. You can easily find anything you need, including Max for Live patches, via a convenient multi-pane interface, and search across everything with a speedy “search-as-you-type” facility.
Ableton also emphasizes the amount of work they’ve done on the sound library. The Orchestral Library is improved. There are new hip-hop-themed sounds, and they’re available in Standard. Drums include new sounds from Sonic Couture, and kits played live by skilled session drummers. There are stranger additions, like Berlin-based artist Hecq (Ben Lukas Boysen) and his wild creations with coil pickups. (Hecq is someone I hope we speak to soon here on CDM, unrelated to his work on Live 9.)
It may be some of the bread-and-butter sounds that make the biggest difference for a wide audience, however. Ableton has worked on a new, reasonably compact grand piano that’s also included in Standard, along with new guitar and bass instruments.
With any of these sounds, of course, you can go inside and learn what the sound designer has done with Ableton’s tools, or use the samples as the basis of new sounds.
Finishing Tracks

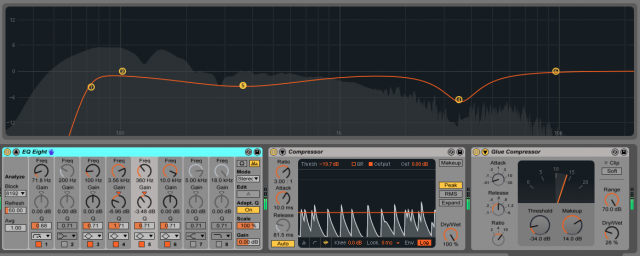
Live’s Devices sound better, but also give more visual feedback. Note the oversized EQ Eight view, and live feedback on how dynamics effects are impacting sounds.
“Finishing tracks,” one Ableton rep told me last week, was one of the principle needs of users. (Fancy that. I certainly never have any problem finishing anyth…)
I do still routinely hear complaints about Ableton Live’s audio quality. I’m going to leave that discussion until we do a double-blind test. Maybe it’s time for me to go out on a limb here, though: I believe there is no difference between Ableton’s “mix engine” and other tools. From an engineering standpoint, in tests done with phase cancellation, it simply doesn’t matter. I also hear work like Monolake produced entirely in Live, and – whether you love or hate the music – I have to say, the level of audio clarity is beyond compare. I’ll use what he’s using; I’ll have what he’s having for breakfast.
That does raise the question of why people aren’t happy with this or any other tool, though. I think very often this comes down to the included effects, presets, and effect interface for finishing tracks – in any host, with even fairly advanced users.
Enhanced Devices, New Glue. Ableton has worked both on the sound of its effects (in some measurable, quantifiable, non-voodoo ways), and the way in which you visualize their results. In Gate and Compressor, you see live visual feedback that shows you what the effect is doing to the sound. In EQ Eight, there’s a new, expandable visualization that shows you the spectrum. Experienced engineers will tell you to make adjustments by sound, not sight, but I think these visualizations help reinforce what the ear is hearing. And there’s no question they’ll be a boon to those new to sound who are trying to understand what these controls do.
EQ Eight and Compressor sport improved audio operation. EQ Eight has a new filter model that Ableton says sounds better, and allows more precise selections. You can audition individual bands to hear the changes you’re making (back to that hearing, not looking thing). And Ableton says the improvements actually uses less CPU resources; EQ Eight now includes SSE optimizations. (SSE is a cool way of optimizing computation by parallelizing instructions; it’s been part of Intel chips for some time.) EQ Eight as a result now always operates in what had been called “Hi Quality” mode. You can enable or disable Oversampling, and you now get a linear phase oversampling filter in EQ Eight. (Ableton tells me that will be a big deal to some of you; I’m assume the “some of you” will be the people whose eyes don’t glaze over at the sight of the words “linear phase oversampling.”)
Compressor features a new alogrithmic slope, making it more precise – for digital-style compression. And Compressor can now act as an Expander – perhaps the least-visible, but most important (musically) of the new Device changes.
For analog-style compression, Ableton has turned to Cytomic to bundle an Ableton-native version of Glue, an already well-loved 80s compressor emulation in software. If you’ve used it before, you already know Glue. What’s new in the Ableton version is improved performance: you get 1 sample latency and less CPU utilization versus the original plug-in, says Ableton, now that it’s native in the host. Interestingly, you get fixed ratios on the Glue slope, to make it easier to use. (I tend to agree – a 2.358 compression ratio doesn’t really make any sense. Correction: I originally mistakenly said the default Compressor switched to these fixed ratios; it’s still continuous, as always. Apologies for the error.) Ableton has largely adopted Glue directly from Cytomic, with the addition of their own sidechain filter and Oversampling optimization.

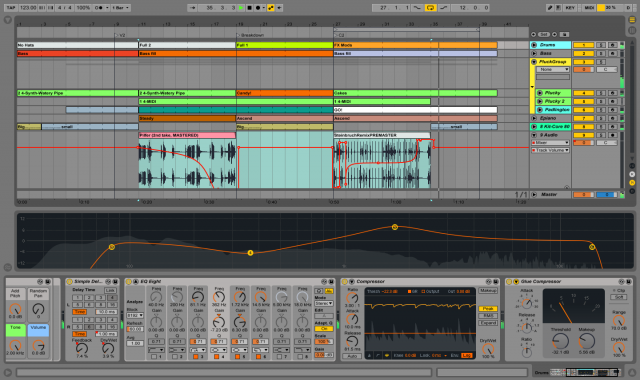
The new Arrangement view, also showing off Devices. Note the curve in Automation – and you can drag Session Automation from Session View to Arrangement view. You’ll also see a tweaked Transport bar.
Session Automation, Curve. Here are the features a lot of you have been waiting for. At last, you can record Session Automation as easily as you do MIDI and audio information; a new toolbar and record workflow makes this quite accessible, and it goes nicely with the new Push controller (or, via mapping, any other controller, for that matter). This lets you create little automation clips for various forms of modulation.
You can also create curved automation in those clips and in the Arrange View, in a long, long-overdue feature. The curves are fairly intuitive; you first create a straight-line automation segment, then drag on it to produce a curve.
Extending Live

Some of the nicest add-ons in Live 9 come in the form of Max for Live plug-ins, including a convolution reverb, mappable LFO, and drum synth collection, seen here.
Max for Live, while a powerful way of extending what Live can do, could sometimes feel disconnected from Ableton. First, you basically needed to be a fan of Max before you got it, since it was a separate add-on. That also meant people who didn’t care much about Max were probably not going to be using the (often amazing) Max patches being produced by the Max for Live community. There were limited examples for what Max for Live might do in Live. And perhaps the biggest deal-killer was that Max for Live made you wait for a painful load time the first time you started it.
I think a lot of people probably won’t notice it about the announcement today, but Max for Live improvements are actually some of what I’m most excited about. Max for Live will now sync up with the newest Max/MSP from Cycling ’74. That brings various improvements, including the insanely-powerful gen, which basically lets you patch together your own high-performance DSP at a low level. Max for Live (and video support, by the way) should at last be 64-bit by ship date, clearing the way for 64-bit Live for everyone.
Load time is something I’ll be testing, but I’m told it’s an area of focus, and one demo I saw was blazingly fast to load Max. (It’s too early to say in beta, but — yes. Working on that is good.)
Then there are the devices: you get 35 new device, ranging from a beautiful-sounding convolution reverb with a lucid, easy-to-understand interface to a whole bunch of drum synths. Mmmmm… drum synths. (Sorry, I may have temporarily lost any sense of journalistic distance.) There are also those aforementioned improved sequencer and buffer shuffler.
Oh, and while you didn’t get the native LFO you’ve been asking for forever, you do get an LFO as a Max for Live device with a handy “map” button that lets you access any other parameter in Live. In fact, it might be better than the native device, because it should work perfectly as an example of how to navigate Max for Live’s API for controlling everything else in Live.
What’s Not in Live 9
This isn’t a review; the software isn’t out yet. But I might as well list some features that could be on your wish list that aren’t there:
Quantization and grids still lack anything beyond the most basic rhythmic units. I’m going to keep complaining about this; hey, they did eventually give us meter changes in Scenes. Until then, Ableton still isn’t going to be able to pass my Music Theory I course. (Whew, that does remind me that I’m glad I’m not teaching Music Theory I any more.) Speaking of Scenes…
Scenes aren’t any smarter. It still seems to me that this feature needs attention; Follow Actions in Scenes, for instance, seem a no brainer.
MIDI mapping could still benefit from some tweaks. (It seems it’s still impossible to enter in Control Changes manually, unless I’ve missed something. For controllers that send several messages at once, that makes MIDI mapping difficult. Maybe Ableton wants to sneak this in before Q1. I’ll buy champagne for the engineers, and we can map until dawn.)
The user interface has mostly subtle improvements, not a complete overhaul – if that’s something you wanted. Actually, I love the light gray theme and the fact that they’ve evened out some borders and made other improvements. I love that Live’s interface has stood the test of time; I still like seeing it on my screen. If they can include a “night vision,” onstage/club-friendly skin by the time they ship, I’m happy.
DJs have long asked for the ability to use cue points inside clips, and to see waveform displays of more than one playing clip; neither those features is available. In fact, there really hasn’t been anything arguably geared directly at DJs in Live other than the crossfader (and, separately, crossfader curves). That hasn’t stopped Live from becoming immensely popular among DJs, but it means Traktor and Serato and the like remain fairly safe. I’ll defend this as a feature request, though, beyond just niche appeal. I can imagine anyone playing live wants the ability to use mappable cues inside clips, and more waveform views would always be nice – particularly given that screens are generally higher-resolution than when Live first shipped.
For those of you buying high-end new Macs, there’s no Retina Display support. (I may have to cue up worldstiniestviolin.als to lament your pain. Okay, seriously, yes, this does make sense to support, and maybe eventually we’ll even be able to afford these machines. Ahem.)
But Yes, We’re Excited to Start Testing
Because users have had some time to think about it, I expect that means there’s no way this release can please everyone. The “ah-hah, now it finally does this!” moment will invariably be followed by, “but it doesn’t do this thing from my wish list.”
And of course this update brought an unusual degree of impatience, because, following a brisk update pace for much of Live’s life, Ableton slowed down this release, focusing first on stability in the Live 8.x series before continuing on Live 9.
As a long-time Ableton user, though, I’m more excited about this release than I’ve been in a long while. Converting audio to MIDI promises some new creative ideas. Improving the Browser, Compressor, and EQ are important because these are things you tend to touch all the time. Better integrating Max for Live – as a product as well as technically – could finally deliver on some of the promise of that technology. Just being able to record into clips more easily could be a big boon. And all in all, while Live 9 lacks a single “banner” feature, the feeling I got looking at these beta builds was a sense of sophistication. After years of gradually adding the basics (MIDI!), it seems like Live is growing into something more mature. I’ll trade sophistication for getting everything I want. And I’m eager to sit down with the beta and make some music, which is surely what matters. Stay tuned for more details as we test, and a proper review once we have a final, shipping version.
Videos will be added to this story once we get them.
