You know Max for Live can help you create your own instruments and effects in Ableton Live — but you’ve got to take the first step. Max 9’s addition of the Ableton DSP Library gives you a huge leg up, unlocking Ableton’s own sonic building blocks in ready-to-mod form. Let’s dive straight in, because this is both an easy entry point for absolute beginners and a toolset that’s useful to experienced patchers, too.
Part 1 of a series… Part 2 | Part 3
No Max for Live/Suite? Ableton has you covered via upgrades or rent-to-own.
abl Objects
The Ableton DSP Library’s abl.dsp and abl.device Objects feature a ton of stuff from Ableton Live. This is essentially the same Ableton DSP code, packaged into Max objects you can recombine to your heart’s desire.
That includes:
- Full Ableton Devices: abl.devices recreates Compressor, Roar, Drift, Redux, Reverb, Spectral Resonator, Spectral Time, Echo, Limiter, and Channel EQ as patchable objects you can use in your own patches. For more granular control:
- Distortion with multiple algorithms (plus fuzz and more)
- Reverb algorithms like darkhall, shimmer, prism, tides, and quartz
- Filters with multiple types (FM, vowel, and more)
- Other effects like the Ableton flanger, ensemble, vibrato, phaser, and waveshaper
- Modulators, including those recent new LFO shapes (like wander!,) and a Euclidean generator
- Oscillators, including various types from Meld (from bubble to rain, shepard to chip to swarm…)
- Harmonic FM, ramp and pulse generators, stereo LFO, envelope follower, compander, utility, shaper, and more
Side note to more experienced Max users. Before we start, a quick word. Yes, the ABL Objects are black boxes; you only have access to parameter values, not low-level DSP. Unlike abstractions, you can’t open them up and make changes, and I do wish more parameters or “hackability” were exposed beyond what’s already in Ableton Live’s devices. But you do get new access to audio-rate modulation of some key parameters and the convenience of the library for rapid prototyping. I’ll also write a separate story about the ABL Effect Modules package and how it interoperates with Max 9’s MC [multichannel] patchcords for Max users/license owners, as that opens up some other possibilities on the Max side.
The basics: where to begin
If you just want to mess around with Max for Live, Ableton’s DSP devices make it more accessible than ever before. Let’s assume you’ve never done that before. Here’s how to get going.
Create your Max for Live Device.

Select Max for Live from the Library in the Browser, and choose Max Audio Effect for our first example. (Notice there are some useful tutorial files in here, too, to check out later!)

You get this really simple display of the patch. To get into the actual patching, you’ll choose Edit in Max. (If you ever tried this in an early version of Max for Live, life has gotten so much better. You don’t need to download and install Max separately anymore, and everything loads a lot faster.)
Look around the interface.
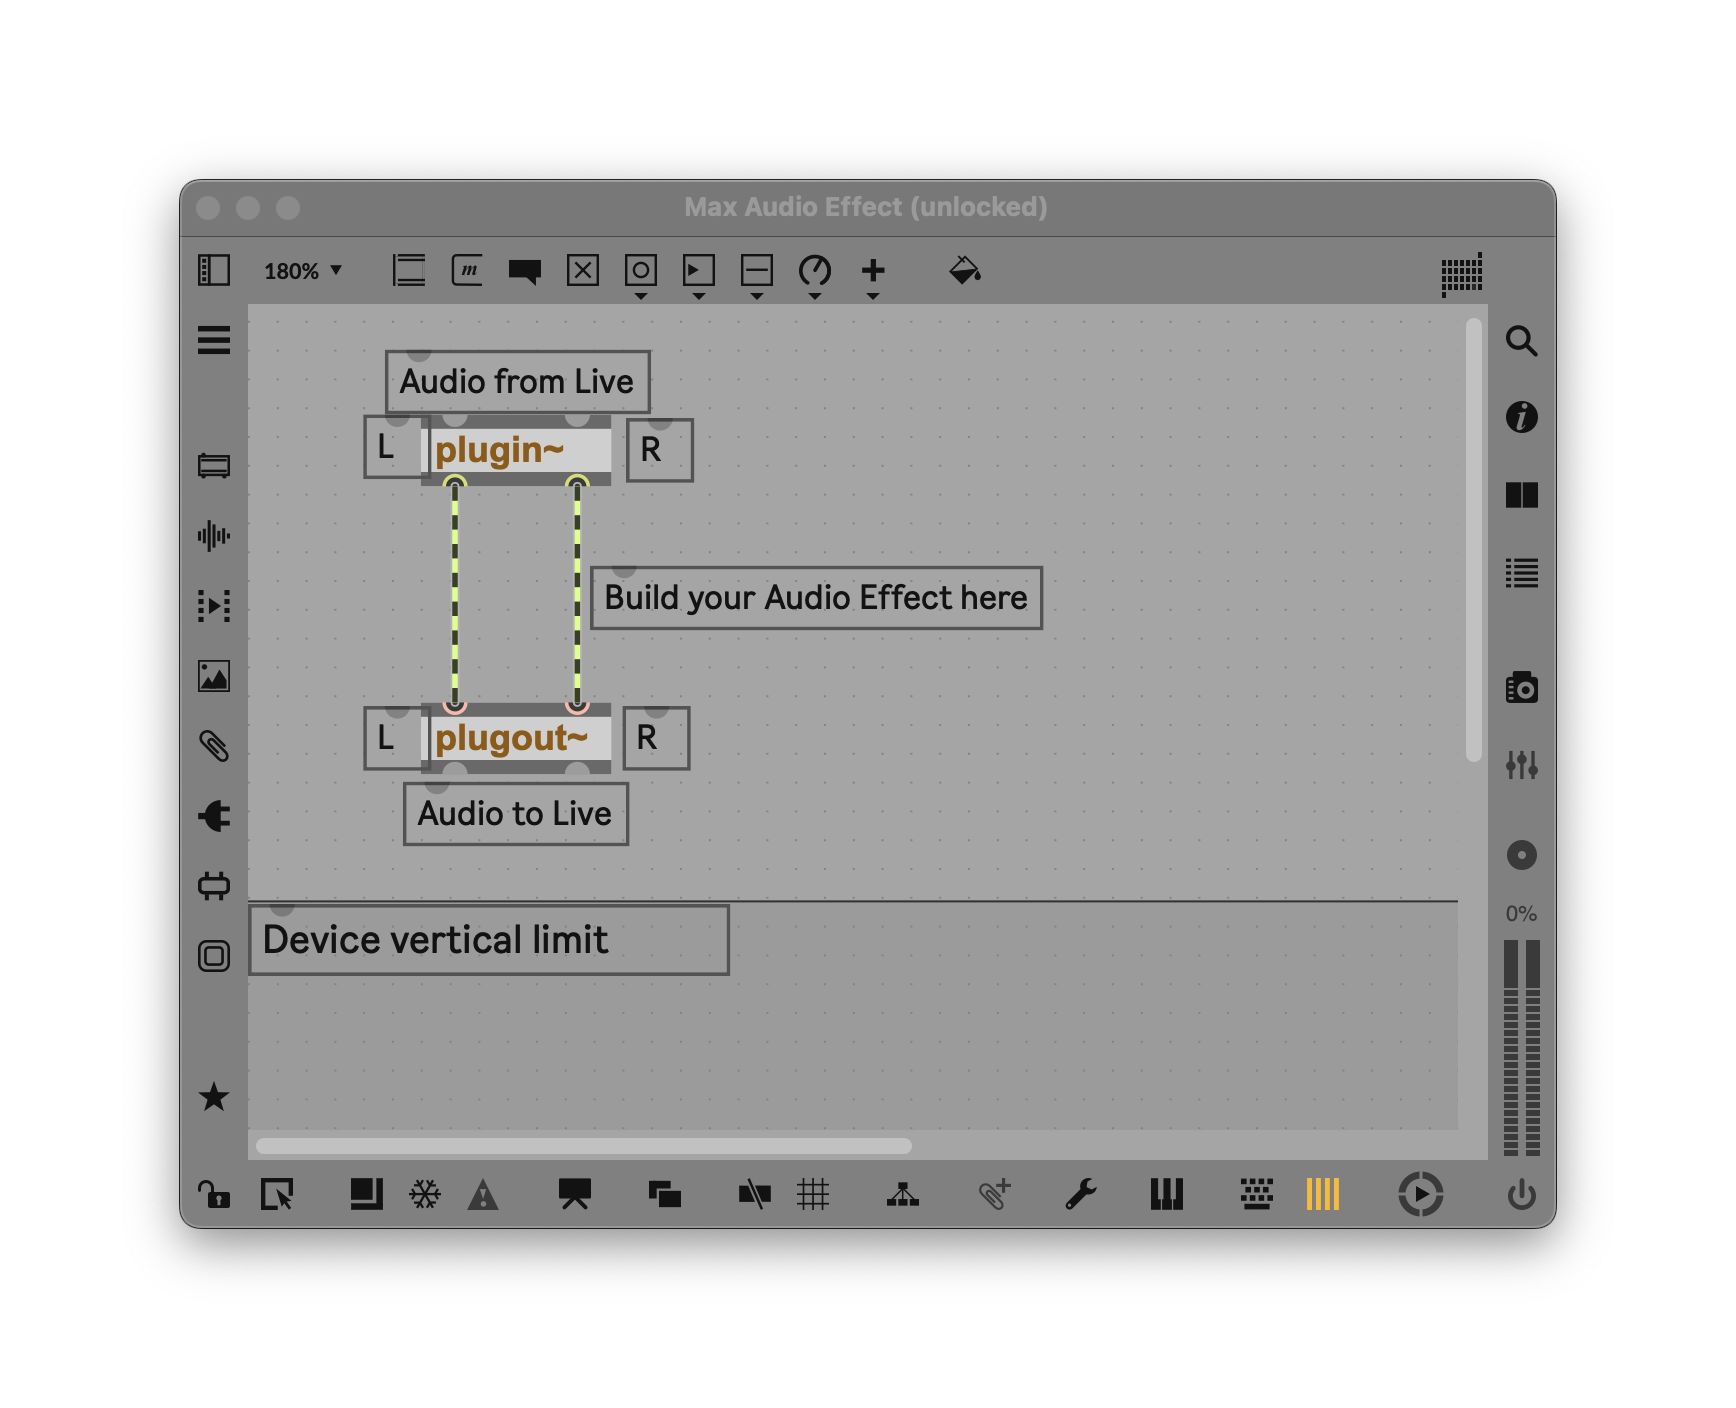
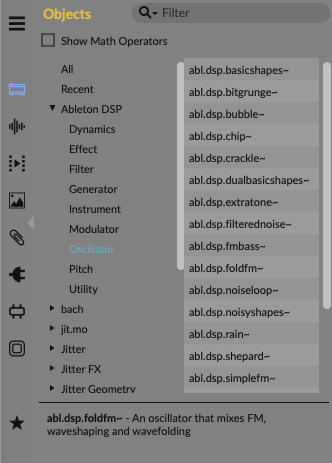
Max loads as a separate application, with this editor window and a lot of different icons; you can hover over them to see what they do. On the bottom are various editing and editor options. On the right, you’ll find the Inspector, Console (where messages from Max appear), and other options you might want to pop in and out. The two sides that are most important to us are on the left and the top. On the left, you’ll find ways of browsing all of the many objects and tools that give Max its power, including a pane full of Ableton Live-specific options (like the API), and this set of Objects (note the Ableton DSP, right at the top):
You’ll also notice the word “Unlocked” in the title bar. That means the patch is open for editing. Use cmd/ctrl-+ and – to zoom in and out, or use a pinch zoom.
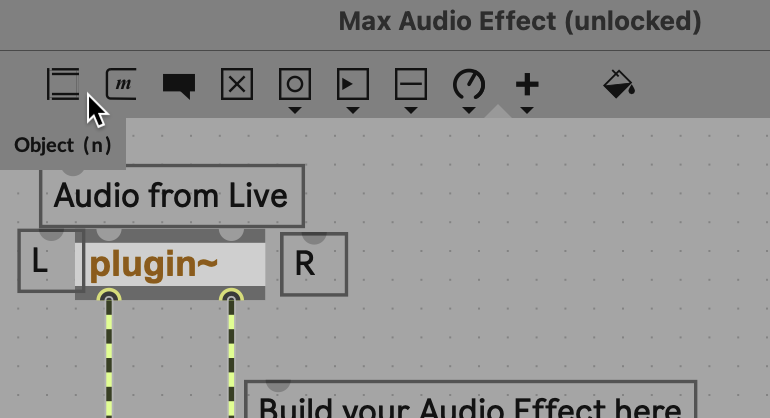
On the top are the most basic elements of any Max patch. Think of this like your standard LEGO bricks, including UI elements and Max’s Objects and Messages. (Pd users, and Plug Data users in particular, will find all of this very familiar – Pd and Max are cousins and use the same basic syntax!)
Add sound processing
Add your first DSP.
Let’s try something really stupidly simple and add the shimmer effect from Live to get some immediate results. Find some material on a MIDI or audio track, you want to process, then connect the module.
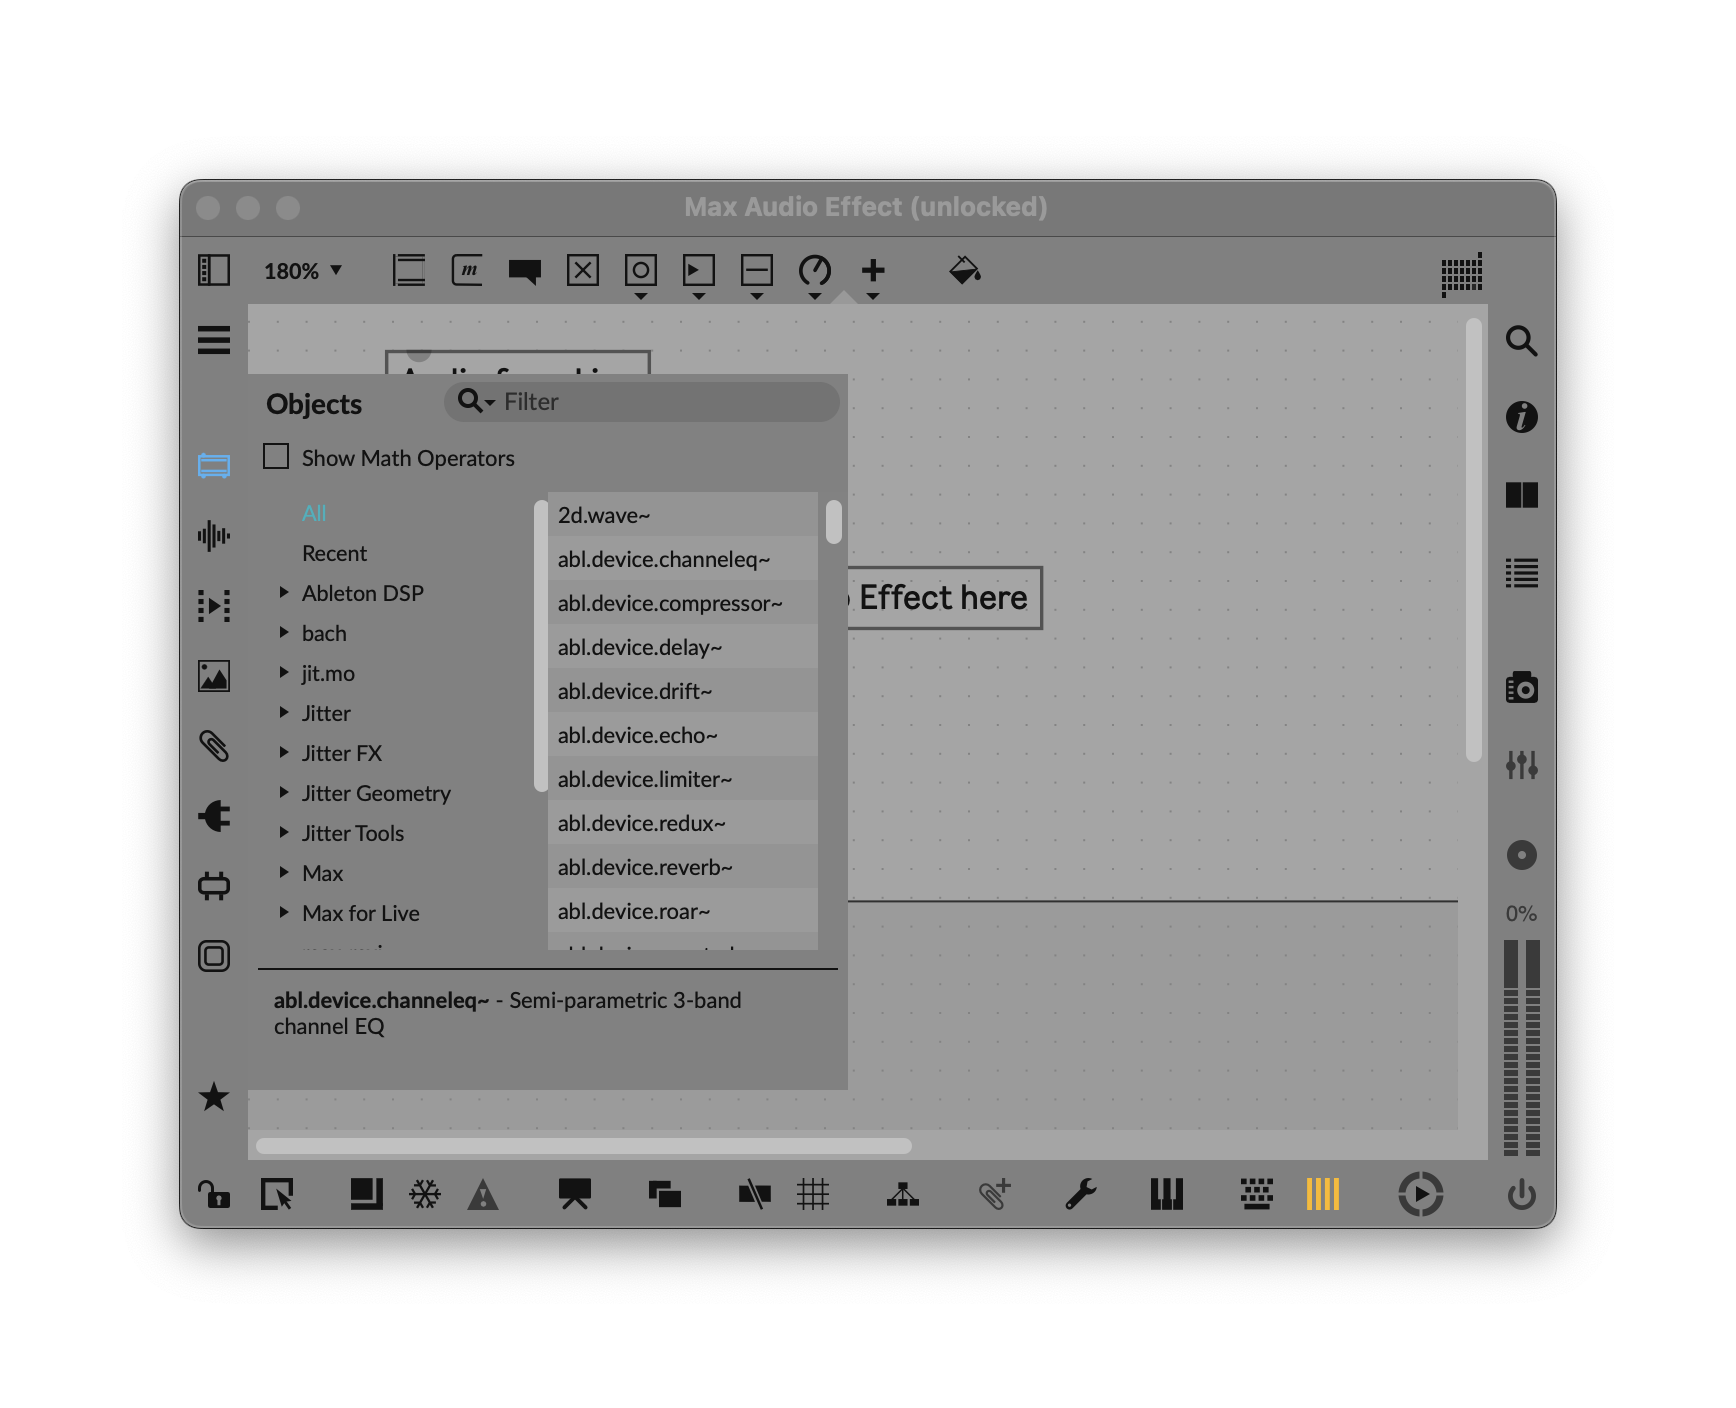
Type n to bring up the new object dialog, then type in abl.dsp.shimmer~ (it will auto-complete as you type). The tilde (~) indicates an audio-rate object; that character’s wavy shape looks like a sine wave.
Tip: Ignore devices starting with “mc” for now. These are multichannel variants of the Ableton DSP objects. They’re not licensed for use in Max for Live unless you have a separate Max license — and you don’t need them for now anyways.
Connect the module. The yellow and black striped chords represent the flow of audio signal. Click one of them, and you’ll see red handles you can grab:
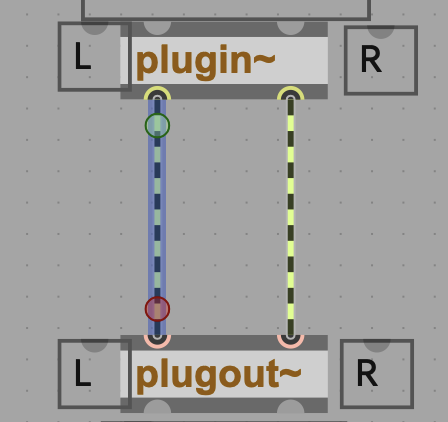
Each object you’ll see has semicircular notches at the top and bottom, “inlets” and “outlets.” Signal and messages flow from top to bottom, into the inlets and out the outlets. That’s the “dataflow” concept this site regularly refers to in software like Max, Pd, TouchDesigner, and Reaktor.
Connect the patch cords into the left and right inlets of the abl.dsp.shimmer~ object, then connect the left and right outlets to the plugout~ device.
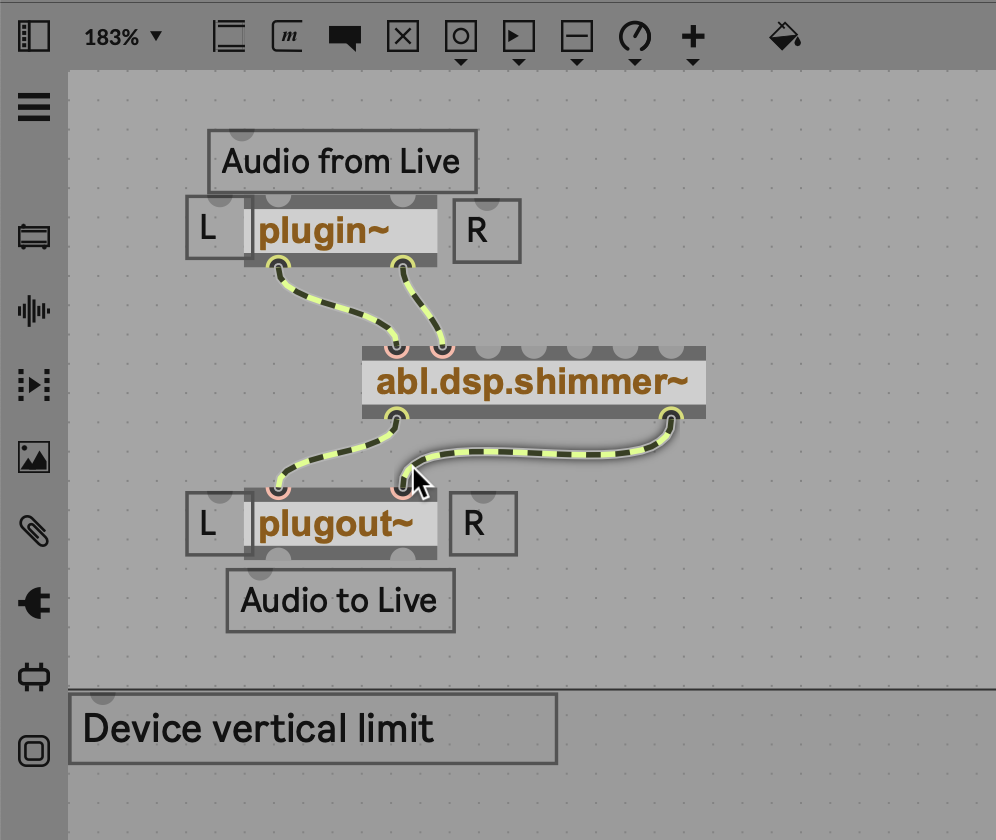
You now have stereo signal flowing through the Ableton DSP shimmer effect, and you’ll able to hear the results immediately. Max for Live works as a live patching environment, too — you don’t have to save to hear the results; they’re updated immediately as you patch. (You can toggle this on and off via the Preview button at the bottom right-hand corner of the Max interface.)
What we don’t have is controls. If you hover over the inlets on the top of abl.dsp.shimmer~ , you’ll see some parameters have live audio inputs. The third inlet from left is Decay. Let’s connect a number box to control its parameter.
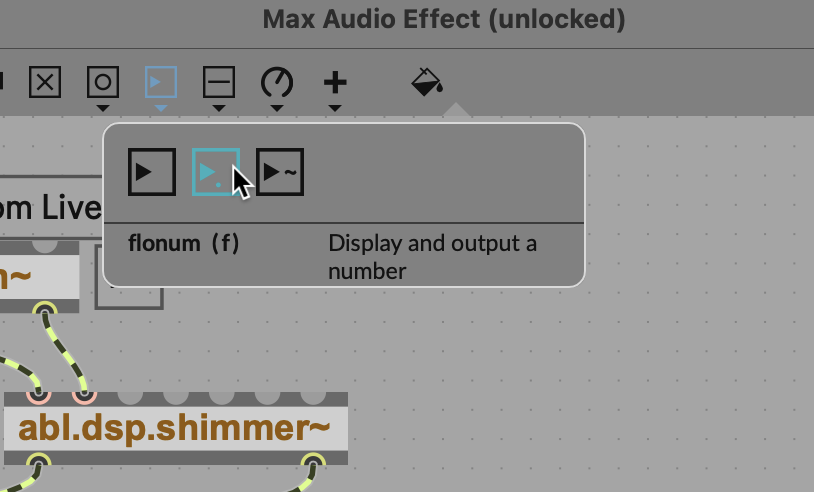
You’ll see different elemets on the top of the Max window: Objects, Messages, Comments, Toggles, Buttons (known as “bangs” to some patchers after the message they send), Numbers, Sliders (think faders), and Max for Live Objects (including Dials, Dropdowns, and the like). Choose the Number with the decimal point on it — that’s a floating point number, with decimal precision:
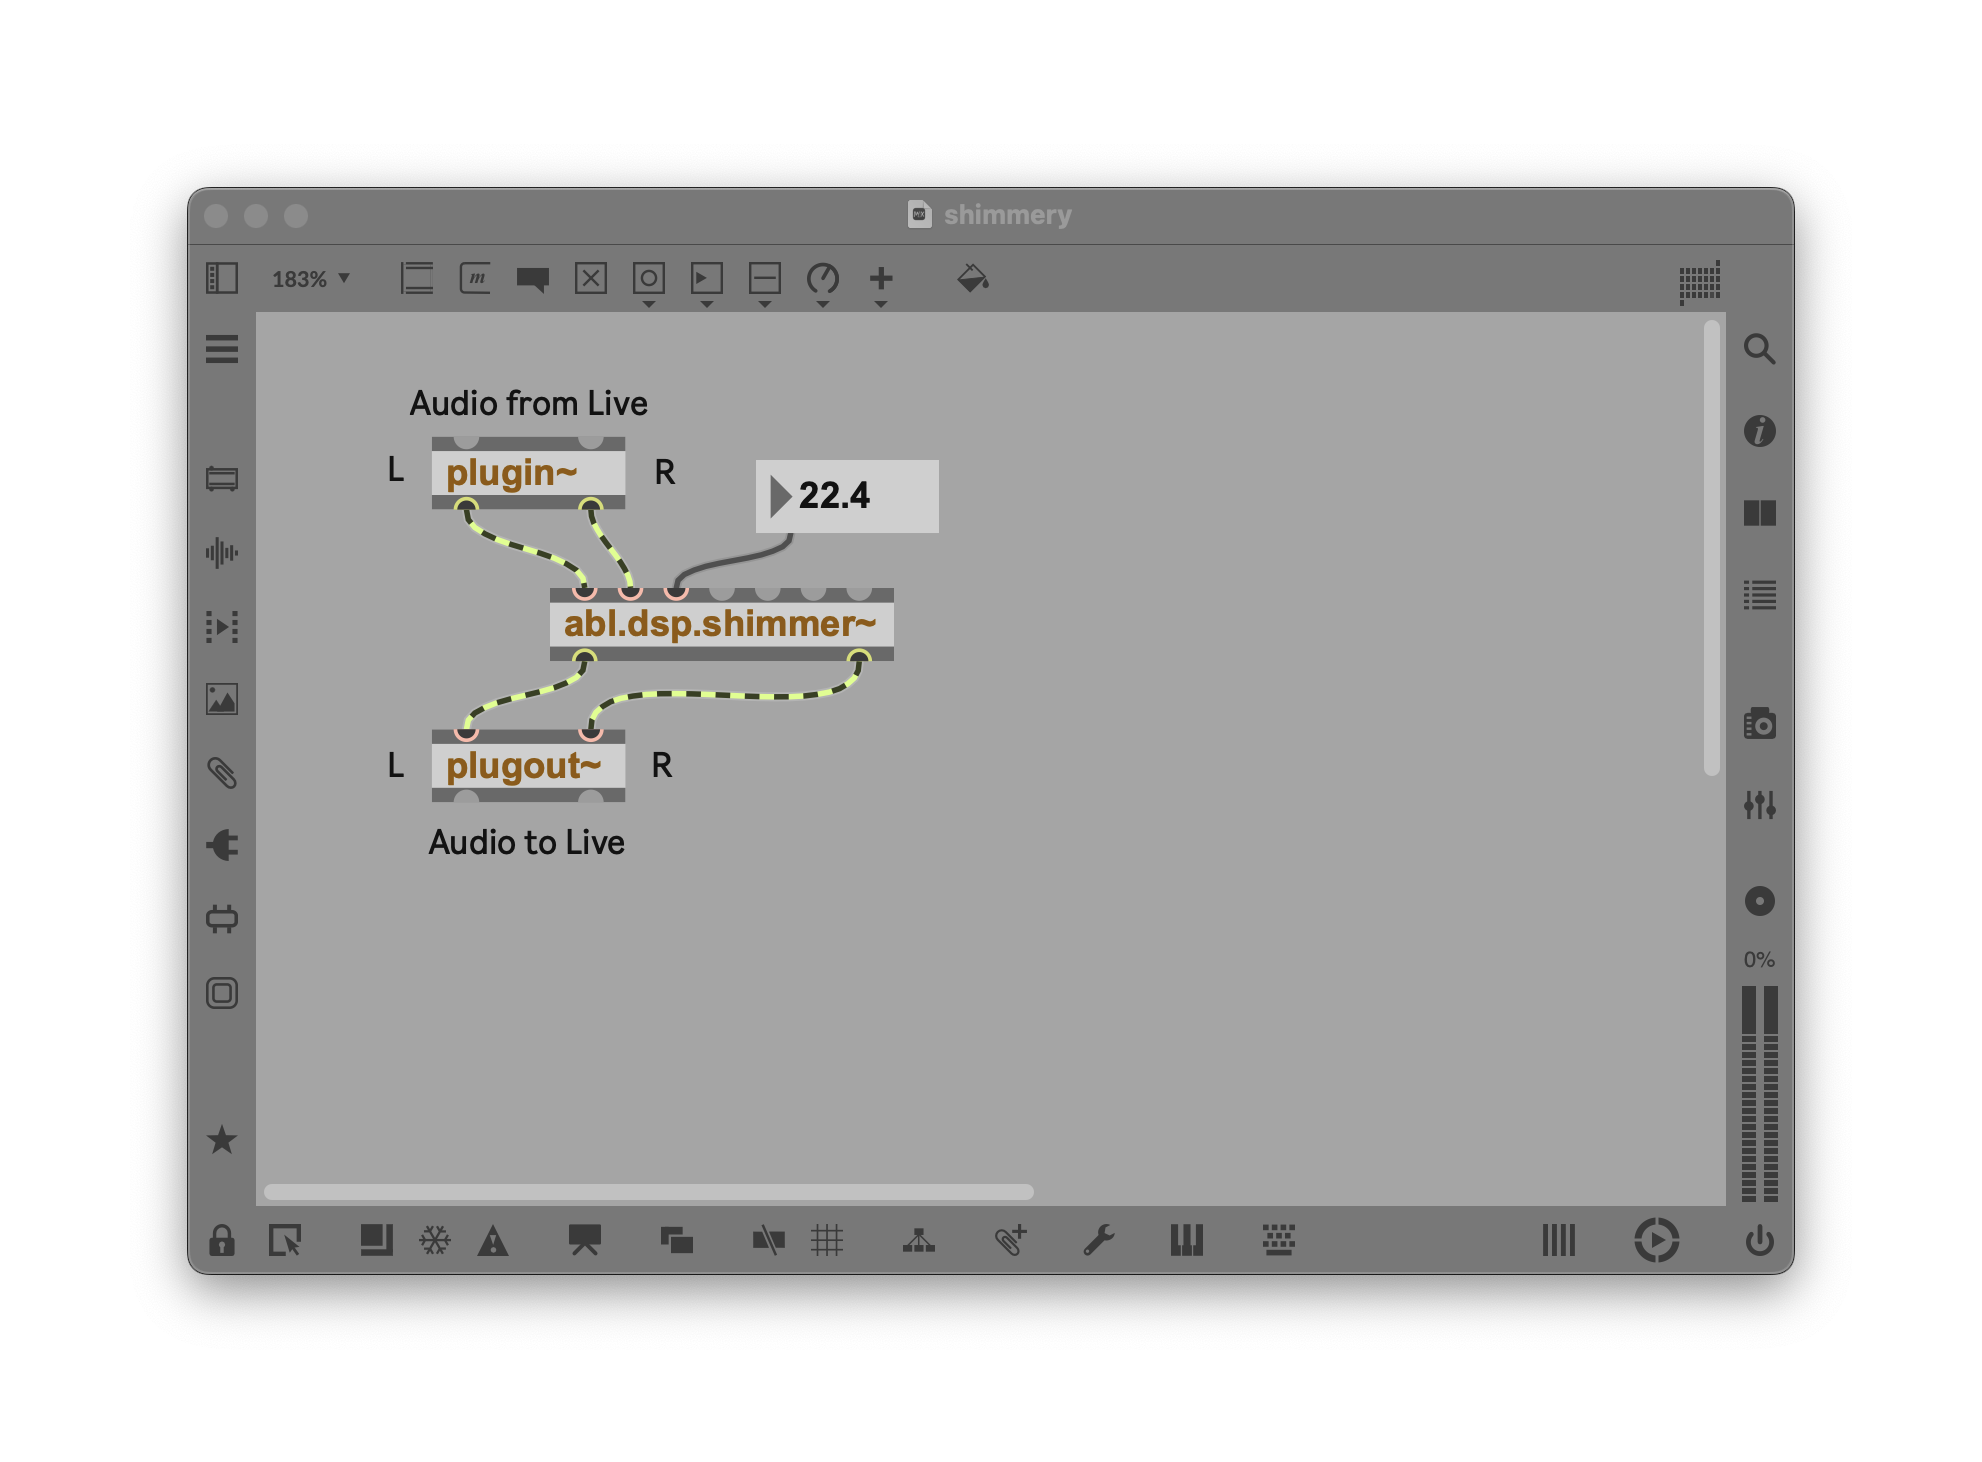
If we connect the number box to the Decay, we can send floating-point values to the decay parameter. Connect up the object, and then “lock” the patch by choosing cmd/ctrl-e or clicking the padlock icon at the bottom left-hand corner of Max. (That’s “e” as in “edit,” not “e” as in “lock…” — erm, “Locke”.)
Locking the patch will let you use your mouse and keyboard on the UI elements without dragging around parts of your patch. Try it now — you can drag the number in the box or type in values and the decay will change as your Max Audio Effect continues to process sound. (If you need to change the number with more precision, type in a decimal value and then drag, or hold down cmd/ctrl as you drag.)
Try it now. Values from around 0-10 or 20 sound pretty nice.
Understanding Ableton DSP: So smooth!
One unique feature of Ableton DSP objects is that they apply smoothing internally. If you’re working with Max on its own, you’ll typically want to add some additional processing so that changing parameters doesn’t cause stepping in the sound output — also known as zippering. The abl.dsp.* objects handle this for you.
For more on doing this with your own patching:
https://max-tricks.com/20-Objects/15.-line~ (simple)
Linear mapping and linear interpolation, Introduction to Linear Interpolation and Linear Mapping (a little fancier)
Add modulation
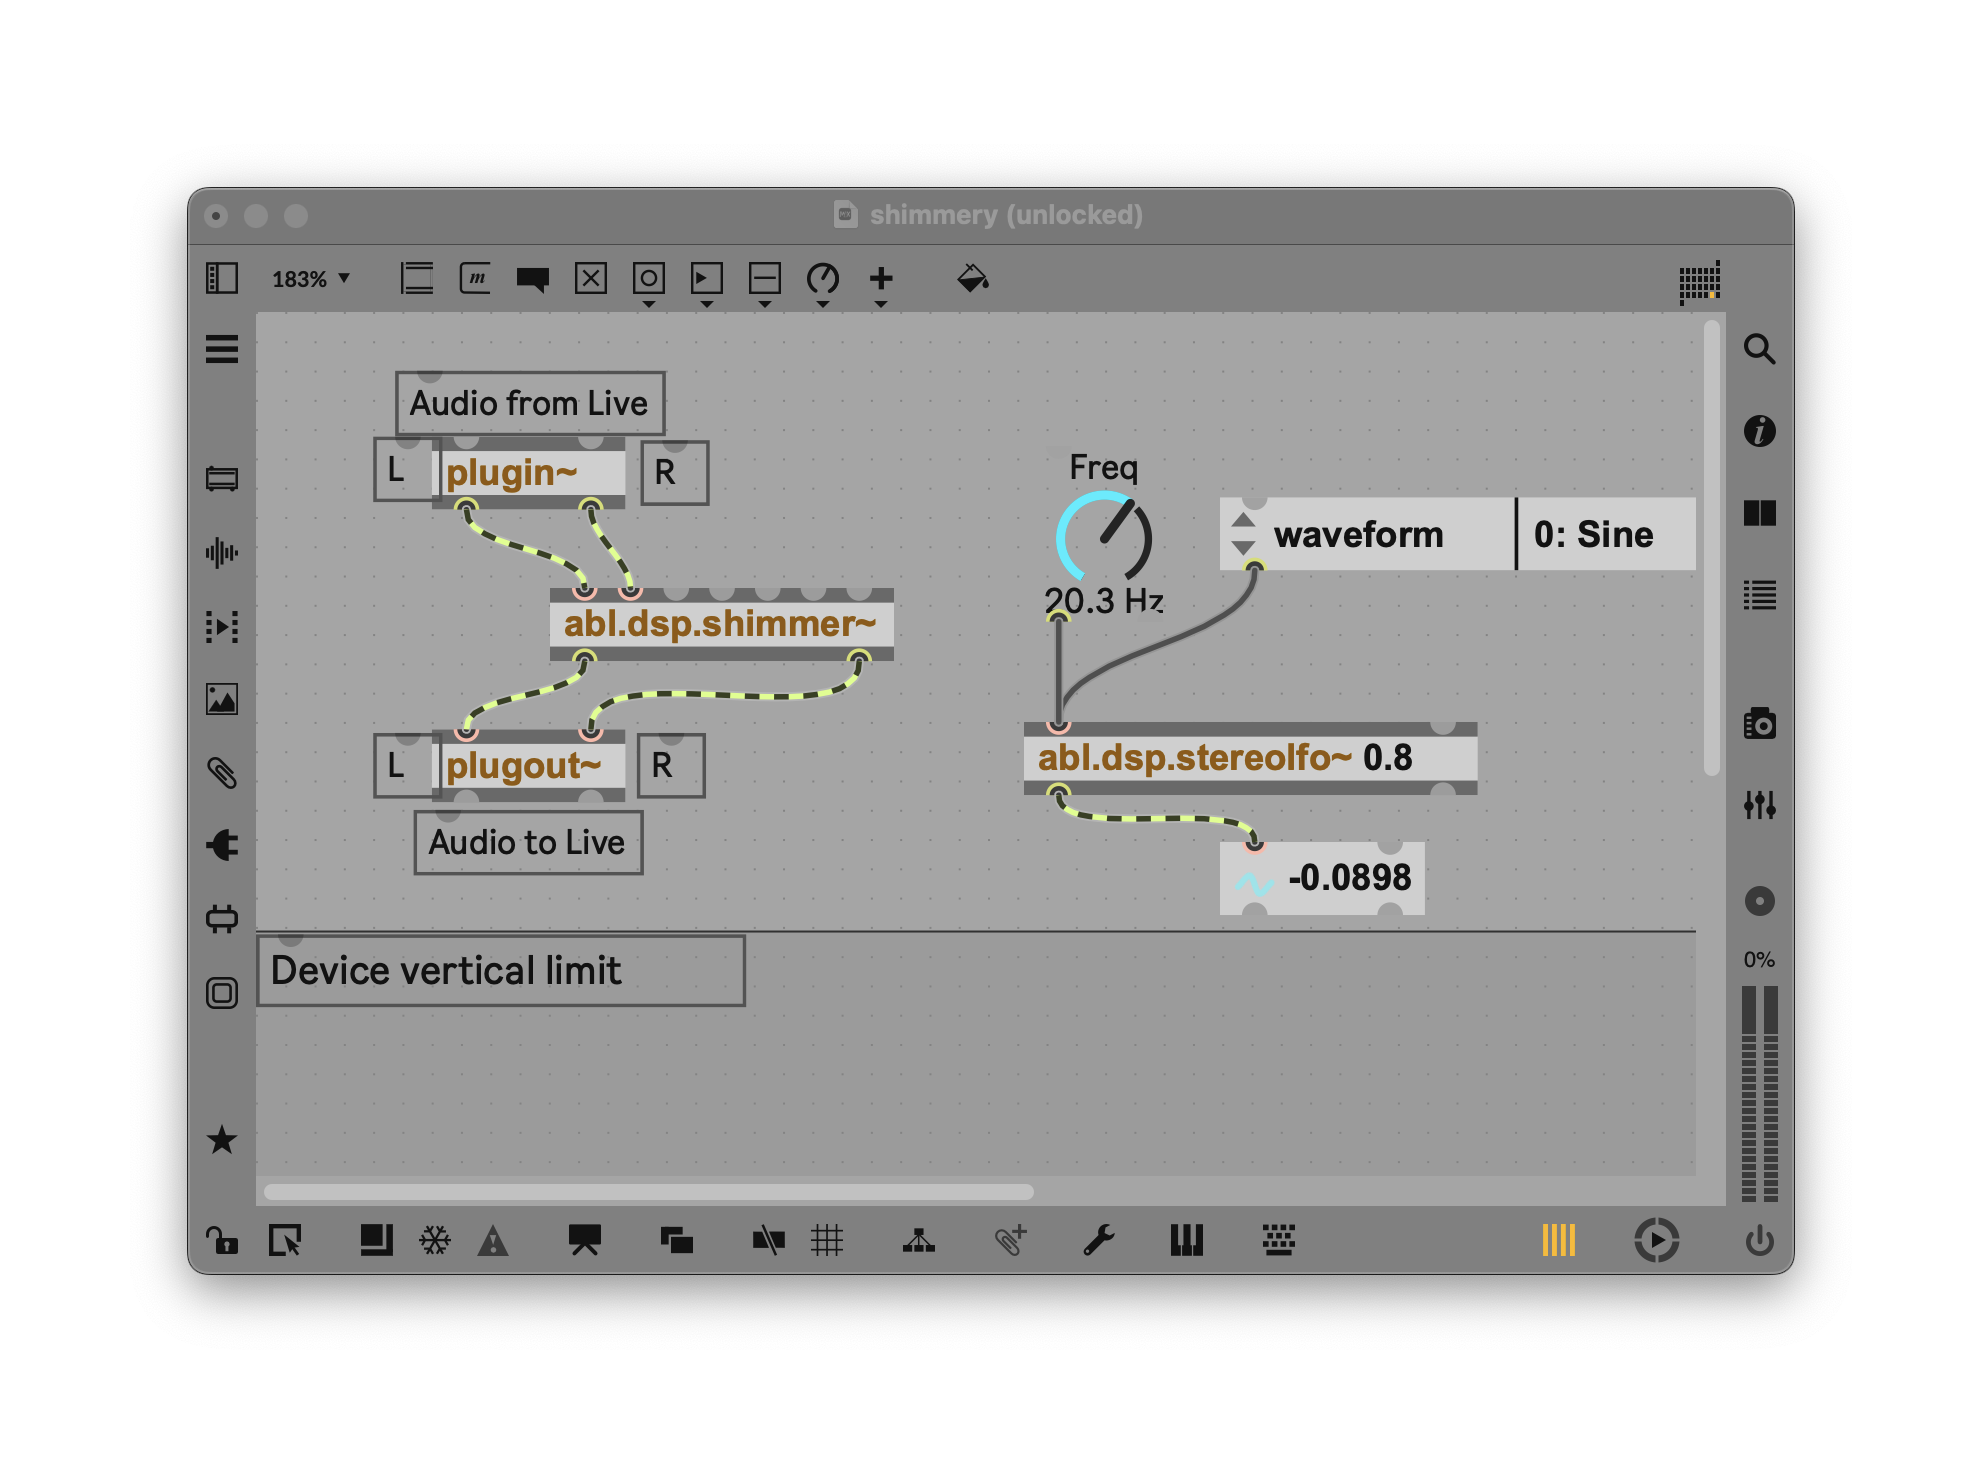
Wouldn’t it be nice to modulate that value programmatically? Let’s try it. We could use a standard Max object to make an LFO, but let’s use another Ableton DSP object. Hit n for new Object, then create abl.dsp.stereolfo~.
Don’t do anything yet. Right-click on the object, and choose Open abl.dsp.stereolfo~ Help. All Max objects have this useful help documentation, which includes not only a reference to the object, but an example patch you can try. Max 9 now even walks you through the steps in working through the example patch, so it’s truly beginner-friendly.

Here’s the trick: the examples are also editable. That means you can try stuff out inside them; just make sure not to save over the help file. In this case, let’s cheat by bringing in some of the LFO’s UI elements back into our patch. Unlock the patch (cmd/ctrl-e), then shift-click the Freq dial, waveform dropdown menu, and the abl.dsp.stereolfo~ object.
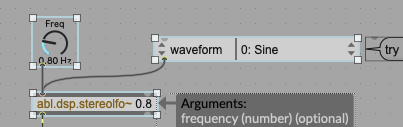
Cmd-C/ctrl-C to copy, then paste these into your patch. (You can delete the previous abl.dsp.stereolfo~ object and number box as you won’t need them.)
This LFO outputs signal rate, so I need a signal Number box to display its values. It’s right next to the float you grabbed before:
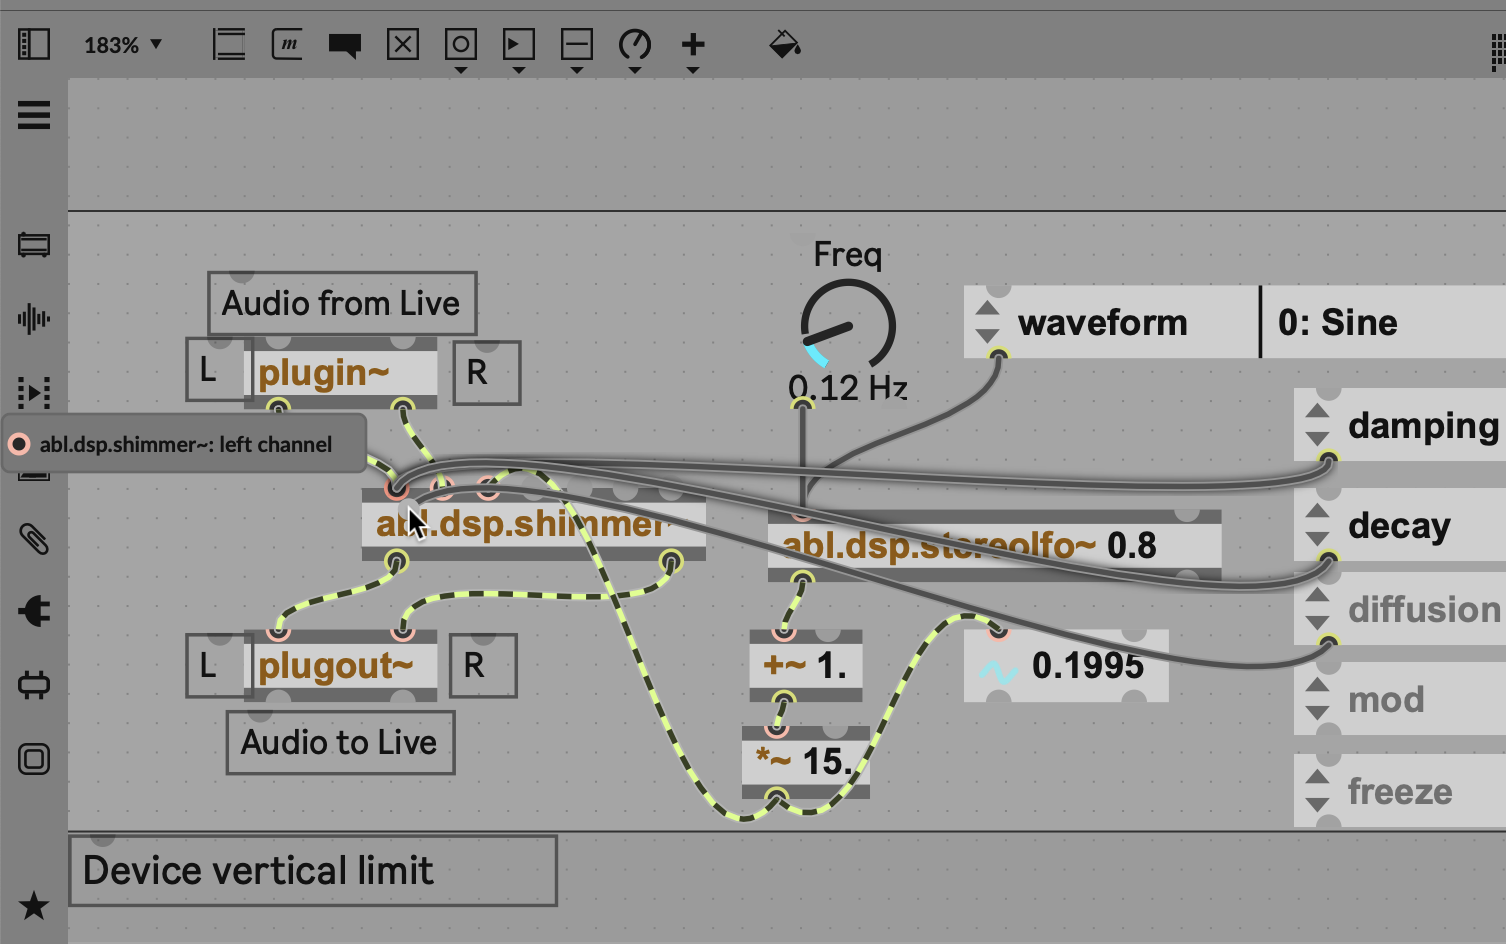
That range isn’t quite what we want, so it’s time to do some math in our patch! To make the range unidirectional (as negative values don’t make sense for a decay), we’ll add one to the value. (Now the range is 0…2.) Then I want the maximum value to be 30, so I’ll multiply by 15 (2×15 = 30, so the range is 0…30). These are still audio-rate signals, so we use objects with the ~ after them: +~ 1. and *~ 15. — we maintain the decimal place after each number to indicate that we want the processing to be floating point precision.
With the range scaled the way we want, we can now connect that output directly to the Decay input of our shimmer object. (This is a stereo LFO, but we’ll only use the left channel.)
Now listen: we get some beautiful waves of shimmer! Lovely.
Review so far: in action
Here’s a (rough) version of that same sequence as video, by way of review. You’ll want some source material, so for testing purposes, I pulled up Clips > Arp Build Up C Minor 130 bpm:
Controlling DSP parameters
Digging into DSP settings.
This little shimmer object can do more than what’s available as inlets. In addition to signal ins and outs, Max objects often contain parameters that can be modified by sending Messages to the object. Again, we can cheat by copying and pasting from the help. Open up the help file for abl.dsp.shimmer~.
You’ll find a bunch of exposed parameters. The patch cords here have this nice shape to them because they’re what’s called “segmented patch cords.” That’s nicely tidying up the help patch, but a little messy for our purposes now, so let’s just marquee-drag across the dropdowns and patch ourselves back in our patch:
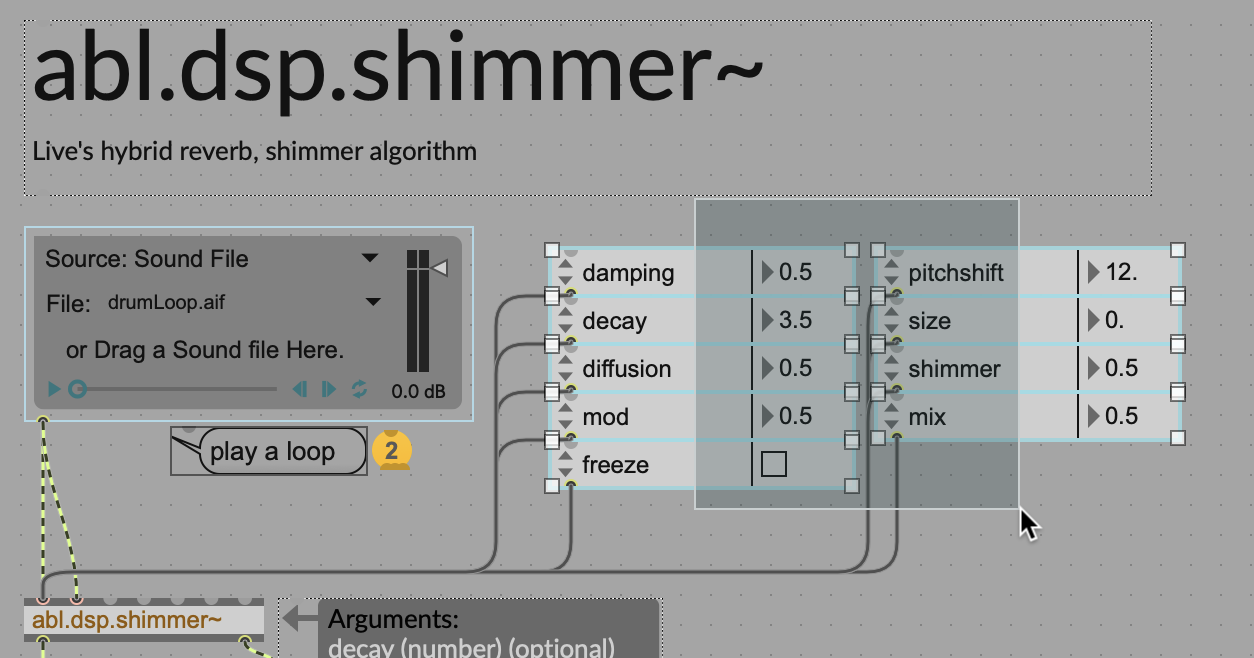
Copy, paste back into your patch, and you can wire up each of these messages from the outlet on the dropdown to the left-most inlet on abl.dsp.shimmer~ (left channel input). Parameter attributes are relayed to that first inlet on the object.
Make sure you’re getting the outlet of each parameter, not the inlet. You may need to drag apart the dropdowns as it’s a little tight. (If you try to patch from a parameter inlet by mistake, you’ll find you can’t connect to the inlet on the shimmer object!) You can leave out decay if you want, leaving it controlled by the LFO.
Try exploring these different parameters. Mix, the wet/dry value, is of course really important, with values 0…1 for 0-100% wet. Ticking freeze is great fun, too. (That’s your chance to try a Toggle in Max, the box with the X you can tick. Be careful with freeze, though, as it can overload/feed back.)
Here’s a quick run-through in video:
A cool feature of parameters is that the display is dynamic, so you’ll see values update when the parameter is connected:

Another way to send a parameter value is with a message object. We can try this with mix. Hit m to create Messages, and enter mix 0. and mix 1. into each. Connect these to the left-most inlet of abl.dsp.shimmer~:
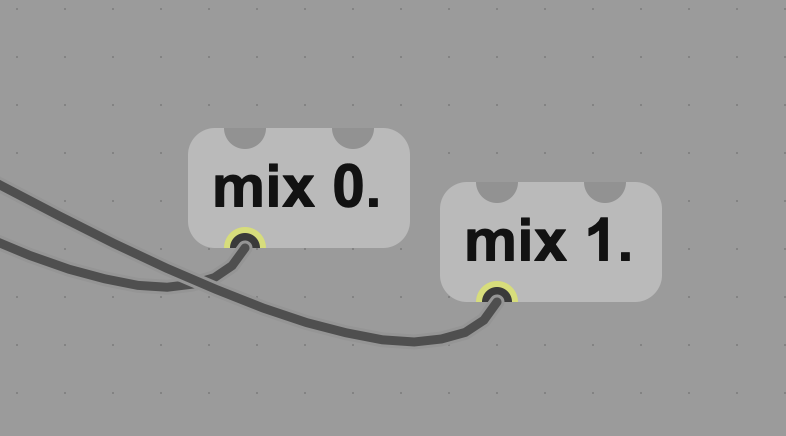
Lock the patch and click each message, and you’ll hear the shimmer go to completely wet and completely dry.
Tip: you don’t have to toggle lock/unlock each time you want to use UI elements. With the patch still unlocked, hold down cmd/ctrl and drag on the interface. They’ll behave just as they do when the patch is locked.
Now is a good time to save and name your patch. You can store it wherever you like; just remember that your Live set will need to be able to find it later.
After you save and close the patch, you’ll notice the Device back in Live goes from a grayed-out display —
— into an updated version of the patch (as saved) and an interface you can use just as you can the locked patch inside the Max editor:
This is obviously really not attractive, but when no one else is looking, it’s entirely usable for messing around with what you want your Max for Live patch to do. We’ll add a better-looking, standard Ableton Live Device UI next.
But wait! Couldn’t we have just done this with the Hybrid Reverb and its Shimmer plus a standard Live LFO? Yes, totally. But now that you have this default template, you can add more functionality via Max, and create a device that works and looks the way you want. It’s like your now product managing your very own version of Ableton Live. We’ll also get to some demos that go beyond what those devices can do — patience! You’ve just made your first device!
Let’s pause and consider, though: look how much we did with just one object. Imagine what can happen as we add more!
Learning Ableton DSP: Parameters, attributes, signal, and priority. Now that you’re the programmer, you want your effect or instrument to recall states and settings when you load it up, and later you’ll want to be able to manage presets and controller mapping. Parameters, exposed as attributes, are the way to do that in Max. (No more loadbang confusion, Max/Pd veterans!) In the Ableton DSP objects, it’s important to understand the priority between signal and attributes. (You may have spotted this already as your dropdowns suddenly grayed out.)
Signal connected takes over control as soon as it’s connected to an inlet, but —
Attributes take over again when the signal is disconnected.
When a signal is connected to the inlet, the attribute will become disabled while the signal takes over control. If the signal is disconnected, the attribute will re-enable.
Ready to delve deeper? Read up on Parameters Connect (with setters and getters, if you’ve got some coding background and were wondering about that), Parameter Mode, and more info on presets, saving, and snapshots. You don’t need that yet, but it can provide powerful morphing possibilities and could be another reason to dive into Ableton DSP in Max for Live instead of just the stock Devices.
Create an interface for Ableton Live
There’s no reason you can’t use the interface elements right on the interface as you’re patching — it’s a great way to prototype, and it’s part of Max’s appeal! But as you’ve noticed, the results quickly get messy-looking and hard to control. We’ll want to address that in two ways: one, choosing some interactive interface elements so we can better control our patch, and two, cleaning up the layout and appearance of the UI.
Max also has a way of doing this that doesn’t require the old approach of hiding patch cables and other tricks. That’s a UI layer called Presentation Mode, which separates the UI from the sound plumbing underneath. (That approach may be familiar to you from tools like Reaktor.)
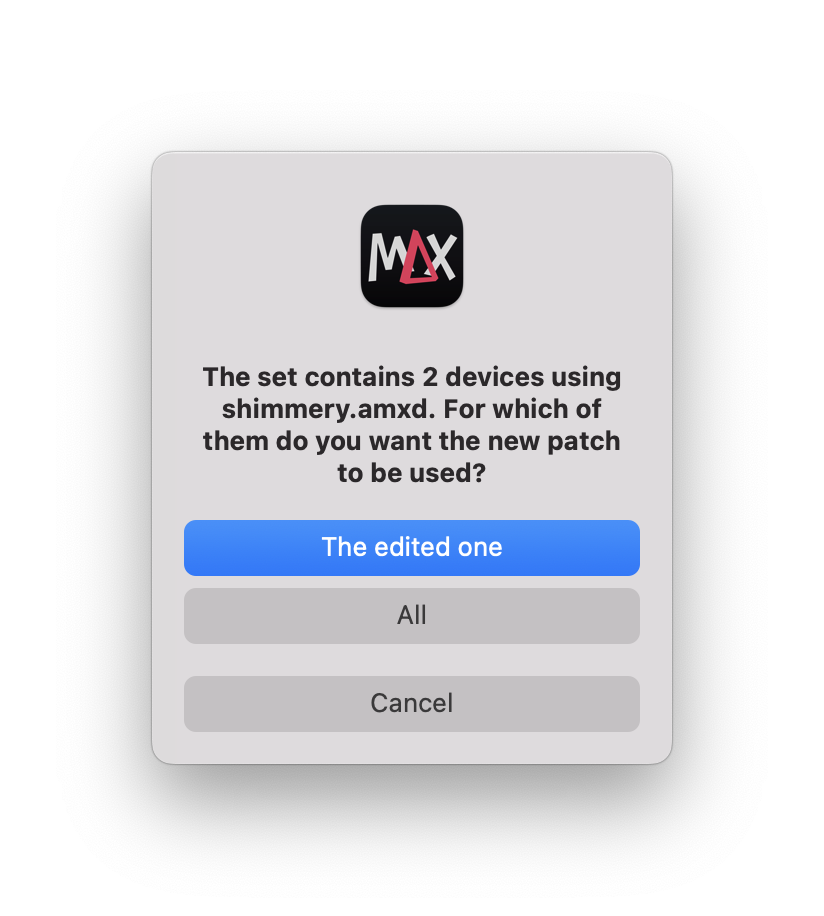
Quick tip: make copies of your patches! If you don’t save it under a different filename, any Max for Live Device referencing the patch will impact all devices when you edit. As you’re working and trying different ideas, it’s often helpful to make some copies. So here, I’ll duplicate my Max for Live device and then save it under another name. Max will remind you that you have it open in more than one place.
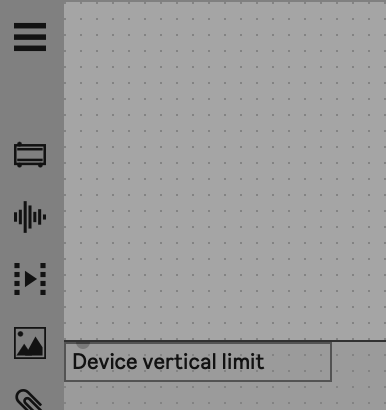
To the Limit. First, it’s important to understand how Max for Live device sizing works. You may have noticed the big horizontal line labeled “Device vertical limit,” and that anything below it is hidden. Like all Live Devices, Max for Live Devices have a fixed height. This can be scaled relatively with Live’s own Display > Zoom setting, but the vertical space is otherwise pre-determined.
What you can change is the width, either dynamically or with a fixed width.
Dynamic Device Width: while editing, choose View > Clear Device Width and save — the width will be automatically set around your UI contents. If you want more control:
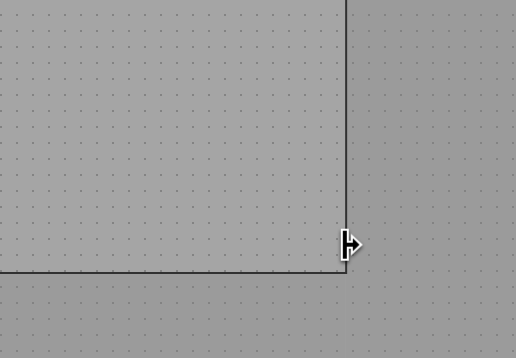
Fixed Device Width: while editing, resize your window so that the width looks like what you want, then choose View > Set Device Width and save. You’ll notice the view changes, too, the first time you do this — instead of a continuous light gray area, you’ll see you now have an edge on the right. Drag that edge, and you can resize more precisely:
Get it? Clear Device Width sets the width for you based on contents (dynamically), and Set Device Width configures it based on the size of the window (fixed). Just remember to save and update in Live; we’re not quite at real-time UI editing yet.
Pick your Parameters. As you were messing around, you may have noticed that some parameters are more interesting than others. That happens all the time in effects and instrument design, generally. We’re going to want to pay attention to the parameters and ranges that interest us, and select those.
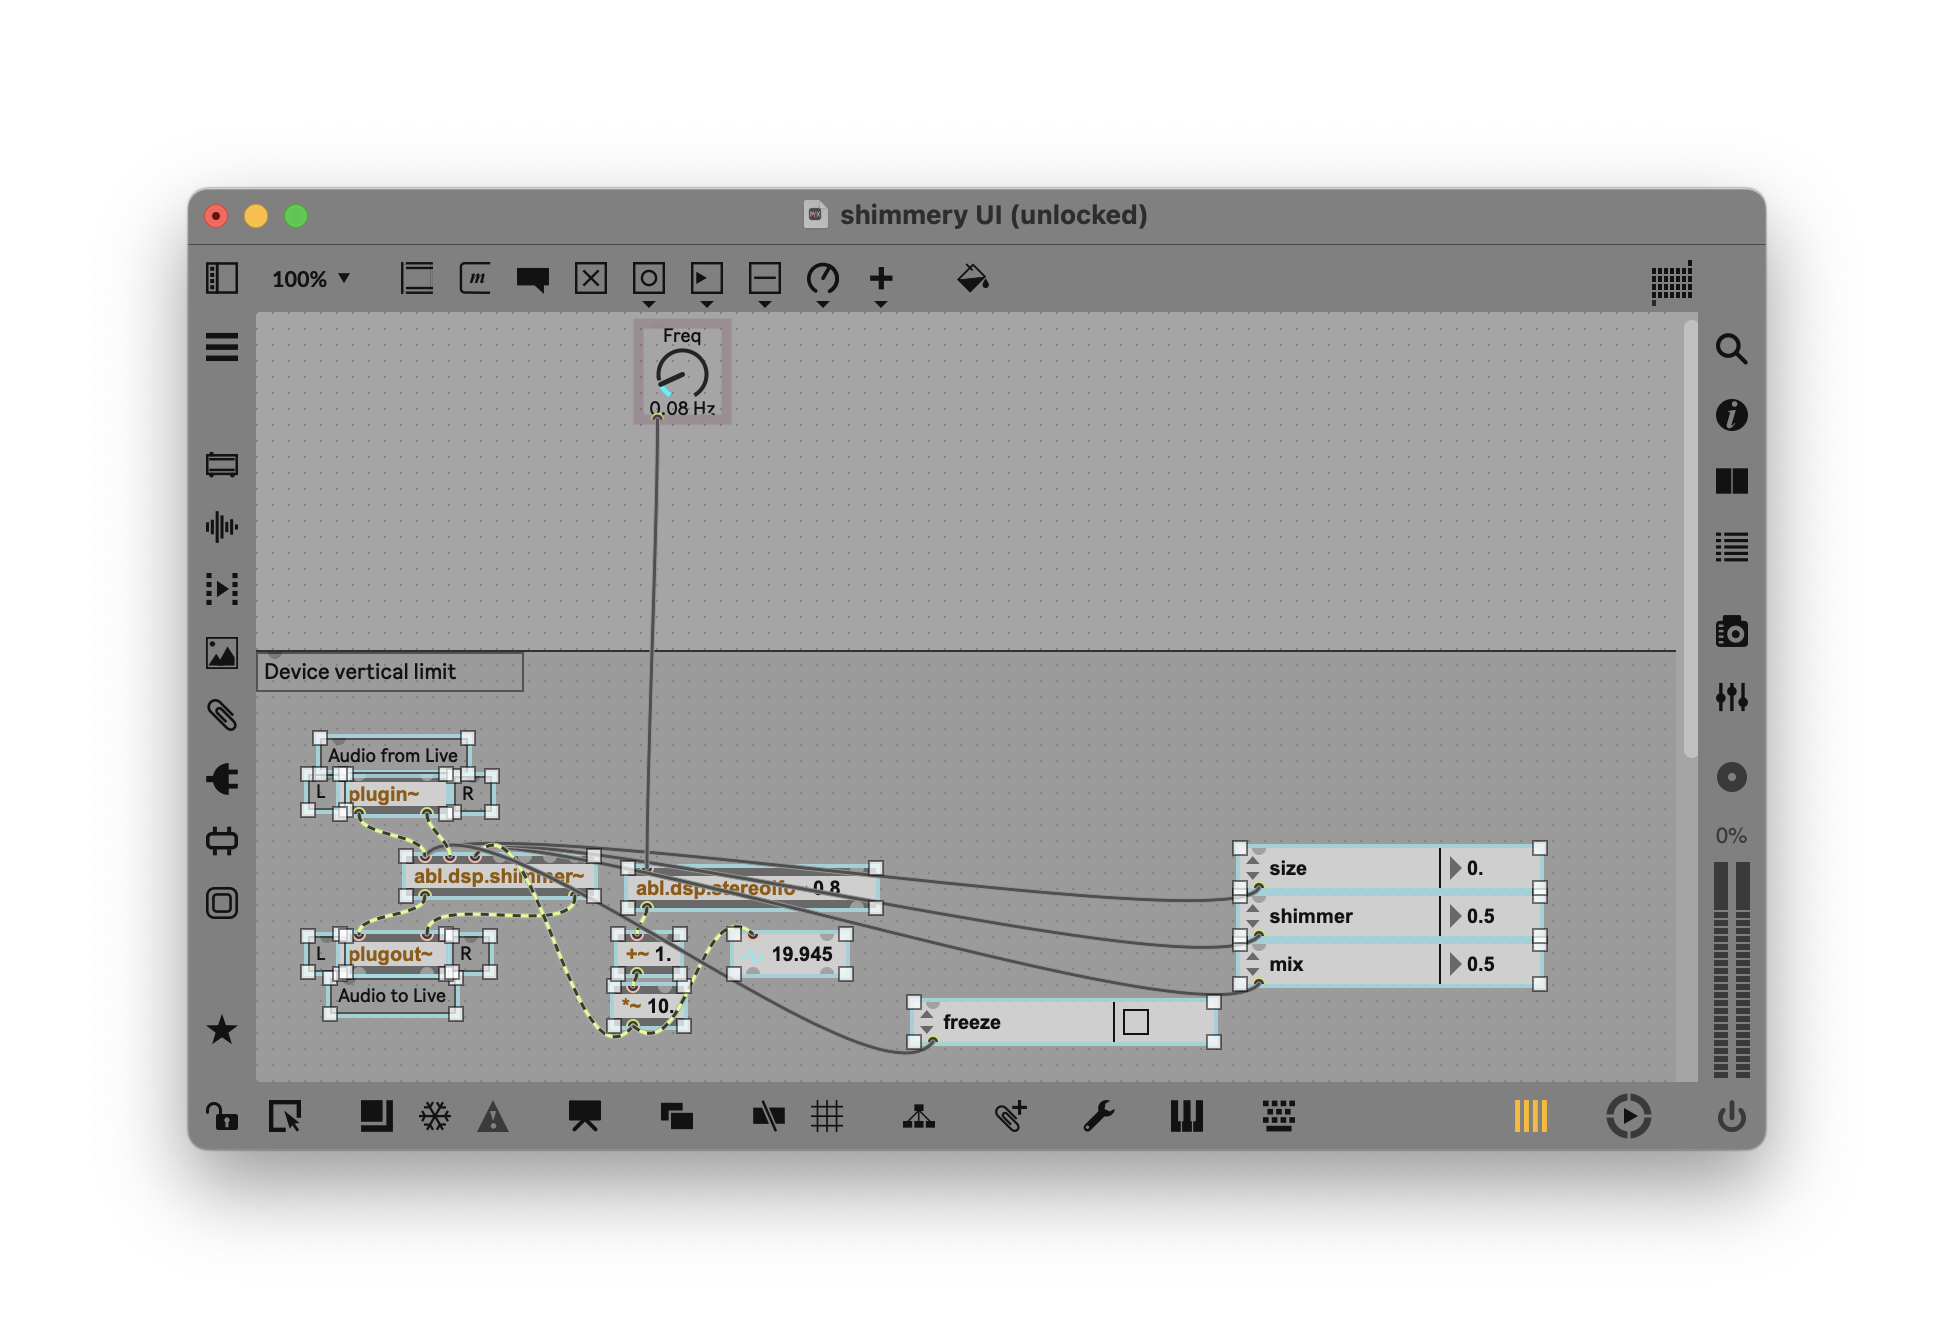
With the shimmer, I find mix, size, the freeze function, and the titular shimmer parameter all to be important. And I liked our little LFO on decay for something different. So I’ll delete parameters we don’t use, and drag all the other plumbing down below the Device vertical limit. I’ll leave the frequency dial where it is for now. (Ableton’s internal devices, like Wavetable, can unfold an additional pane vertically by toggling Expanded View, but we can’t do that with Max for Live just yet without more advanced features like opening an additional view.)
Add interface elements. There are elaborate ways of custom-designing and custom-coding interfaces in Max for Live. Typically, this is accomplished with jsui, the JavaScript-powered custom UI tool; Estevan Carlos Benson has even made a tutorial on working with jsui and Figma, as I’ve written about previously. But you’ll want to start with the built-in interface widgets — and even these can reproduce a lot of what Ableton’s stock Devices can do.
The tools are included under the Max for Live Objects on the toolbar. You’re not restricted to using these in Max for Live — they’re also great for Max patching in general. But they’re great here, as they’ll make our custom Device look almost like it was built by Ableton. (Uh, once we line up the Dials and labels and things, anyway!)
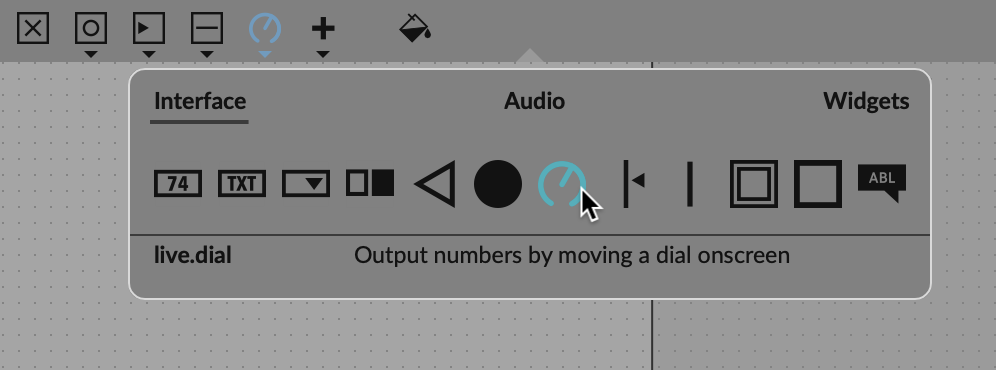
Let’s start really simple. The parameters we’ve chosen can all use a Dial, plus a Button for the freeze function.
I’ve already got a live.dial for the LFO frequency. I can make more adjustments by opening up the Inspector, setting its display type to Panel, and changing its name from “Freq” to “LFO Freq”:
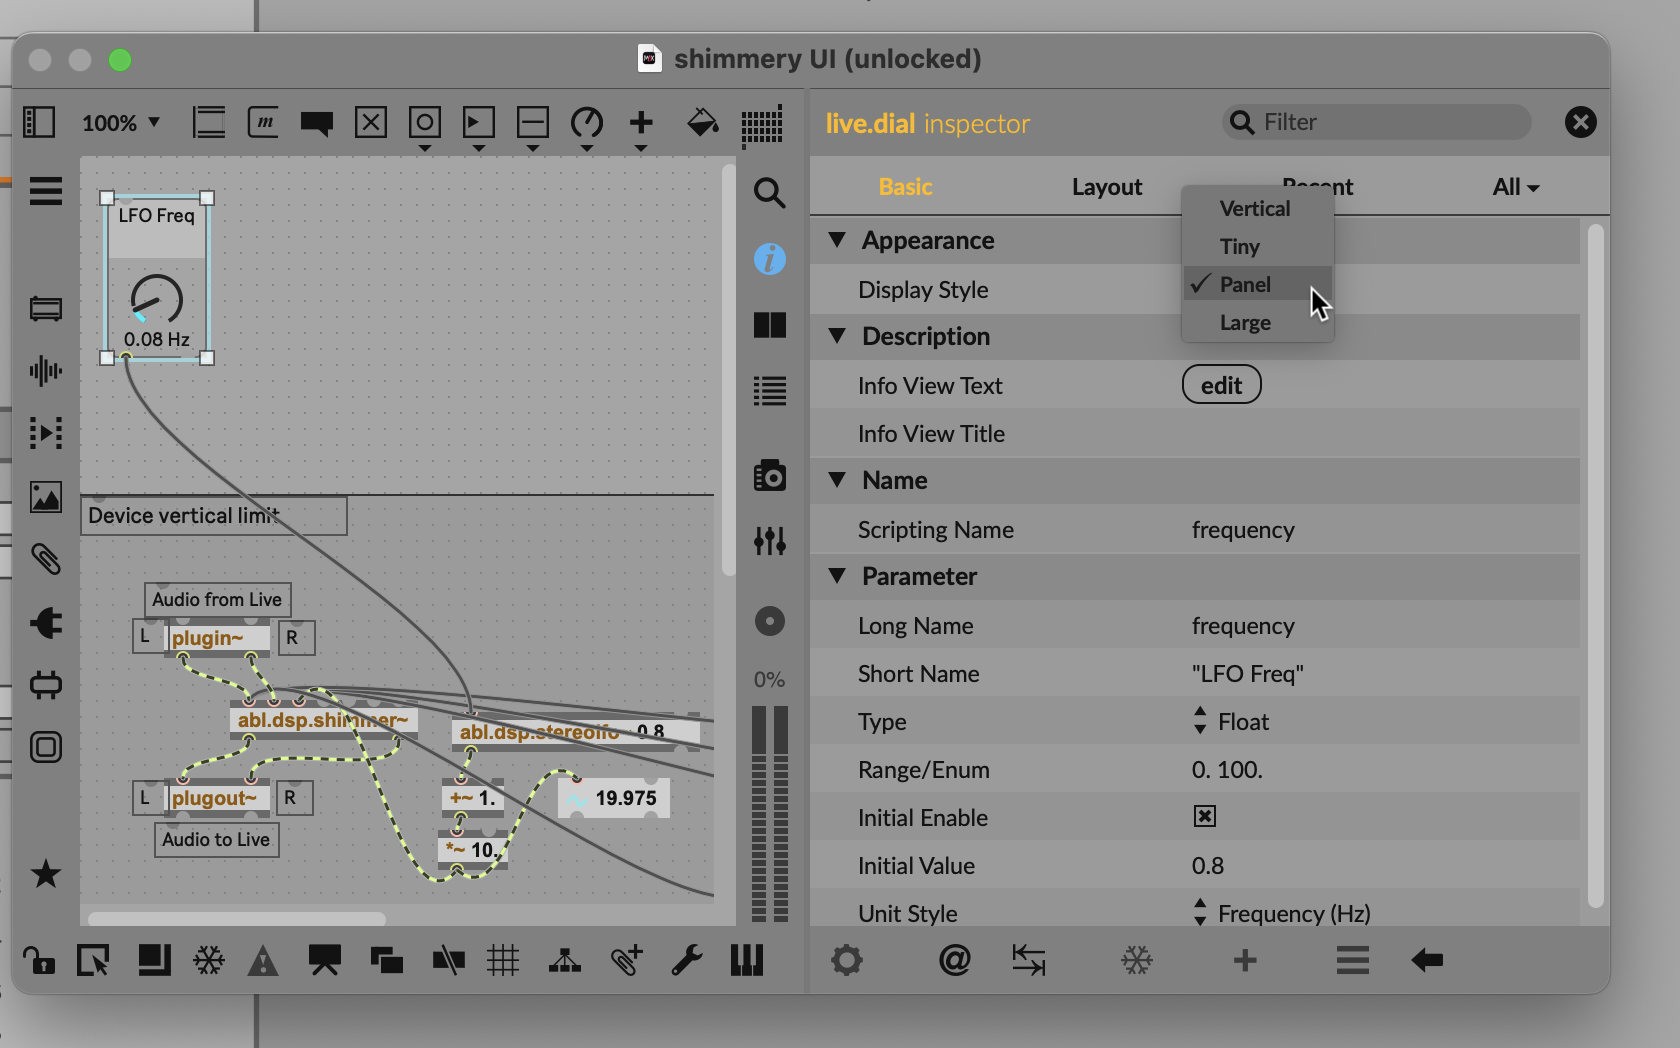
Take a look around, too; you’ve got lots of powerful options here. You can set the Info View Text and Title, for instance — that’s the help that pops up in Live in the Info View.
Now we can go through and add the other Dials we want. Let’s add Mix, for instance. We’ll want to set the dial’s range in this case to the same range as the parameter — just to be literal. So set the Range to 0. to 1., and the Unit Style to Float (otherwise you won’t get all the values between 0 and 1).
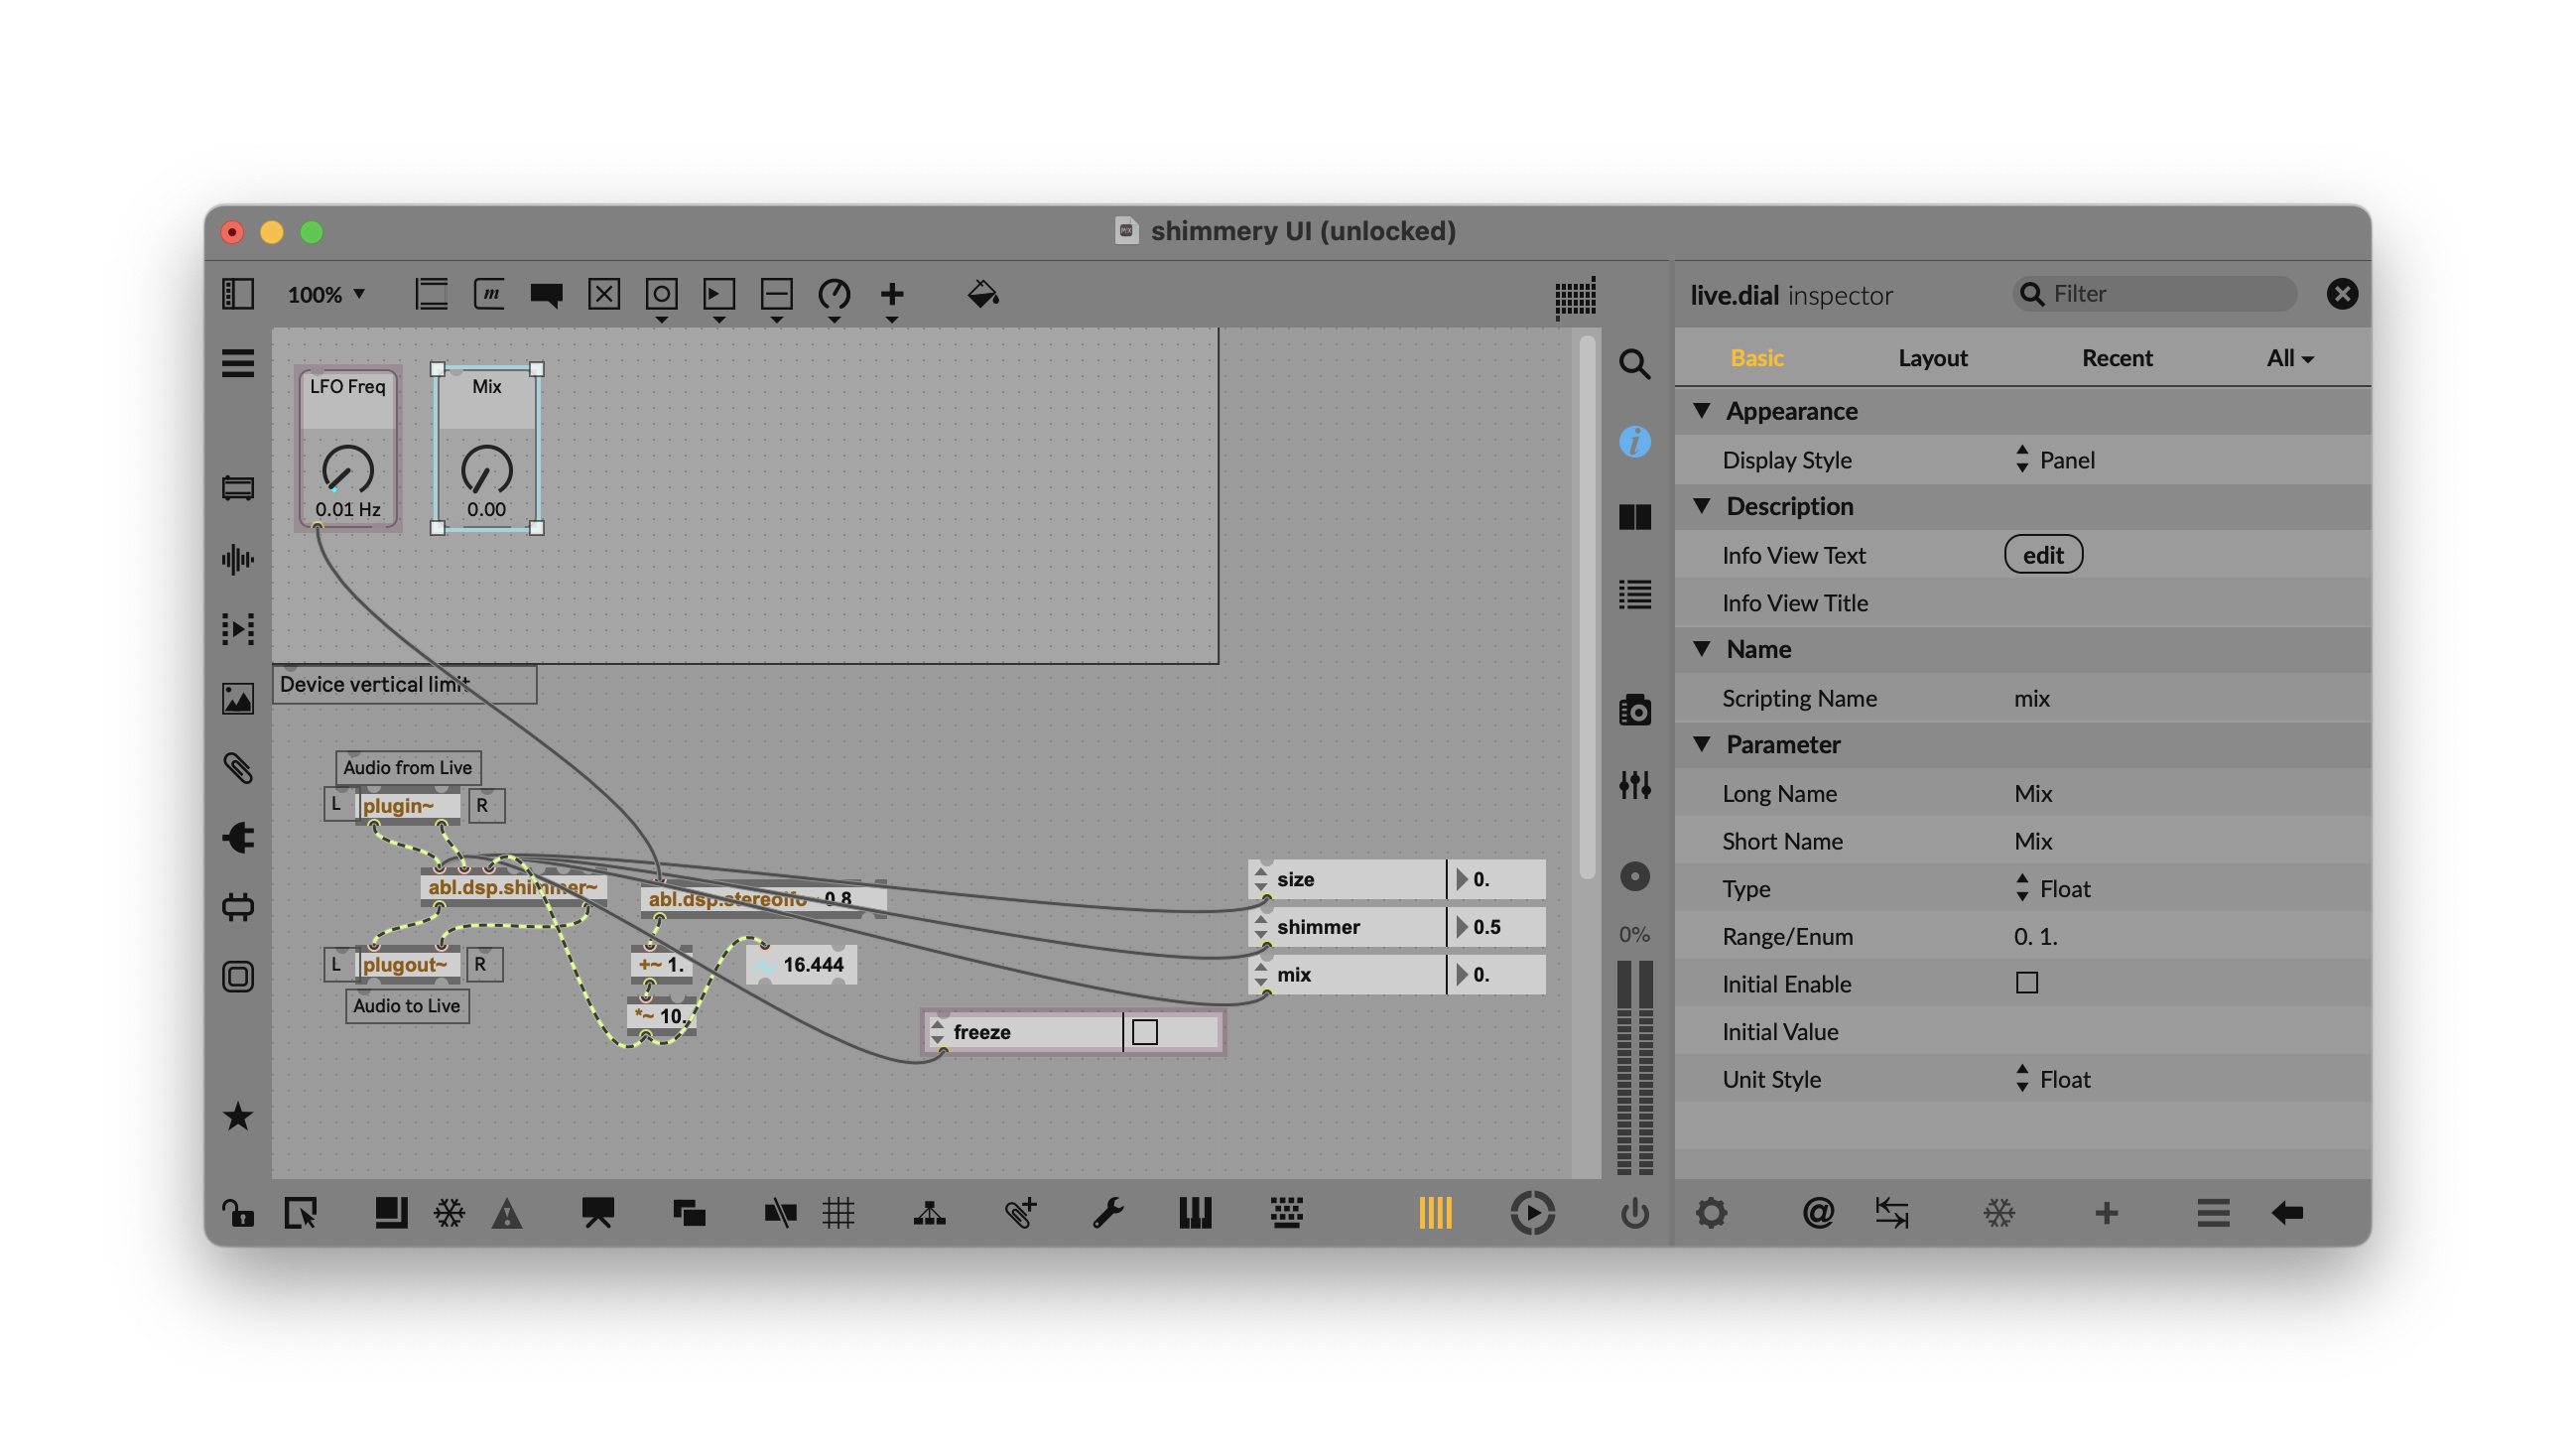
Now connect the Mix Dial to the Mix parameter:
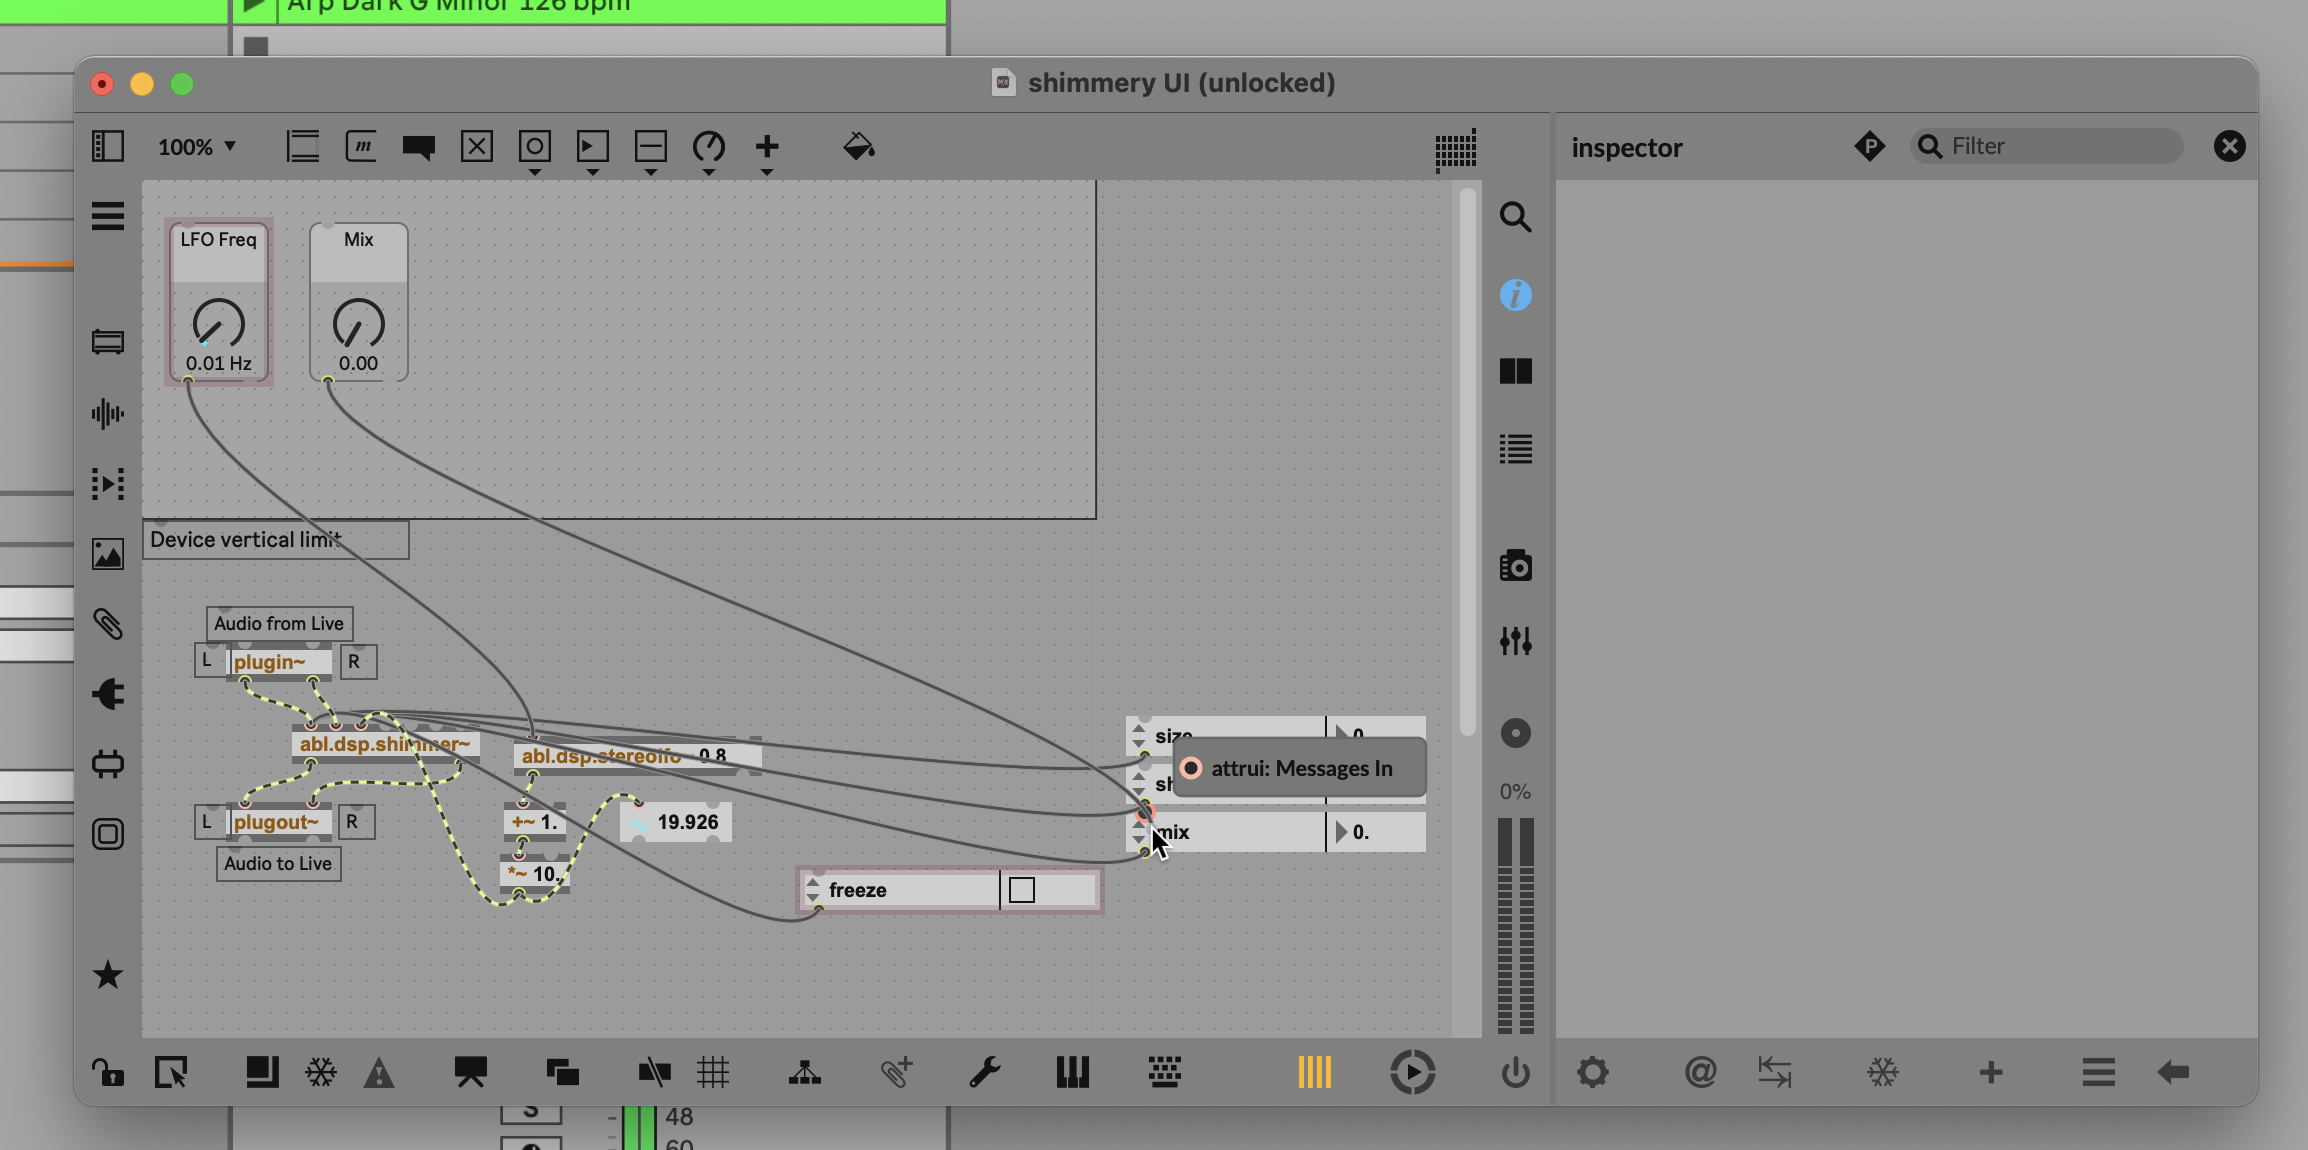
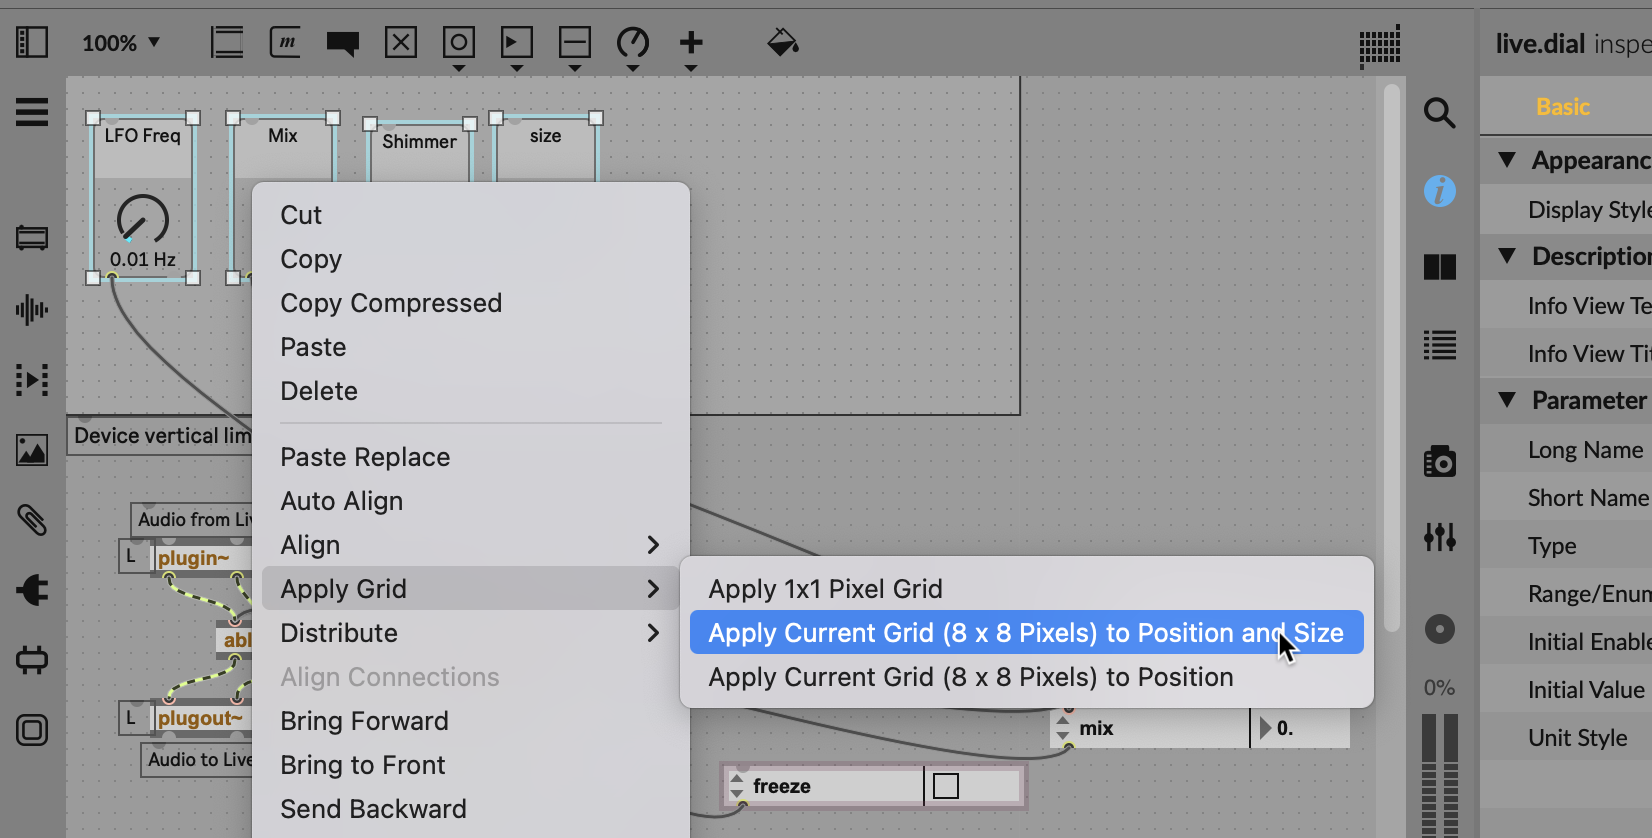
Repeat for the other Dials you want. There are some tools to help you keep everything in alignment. Drag your UI elements roughly where you want them to go, then right click for options to align, distribute, and apply grid:
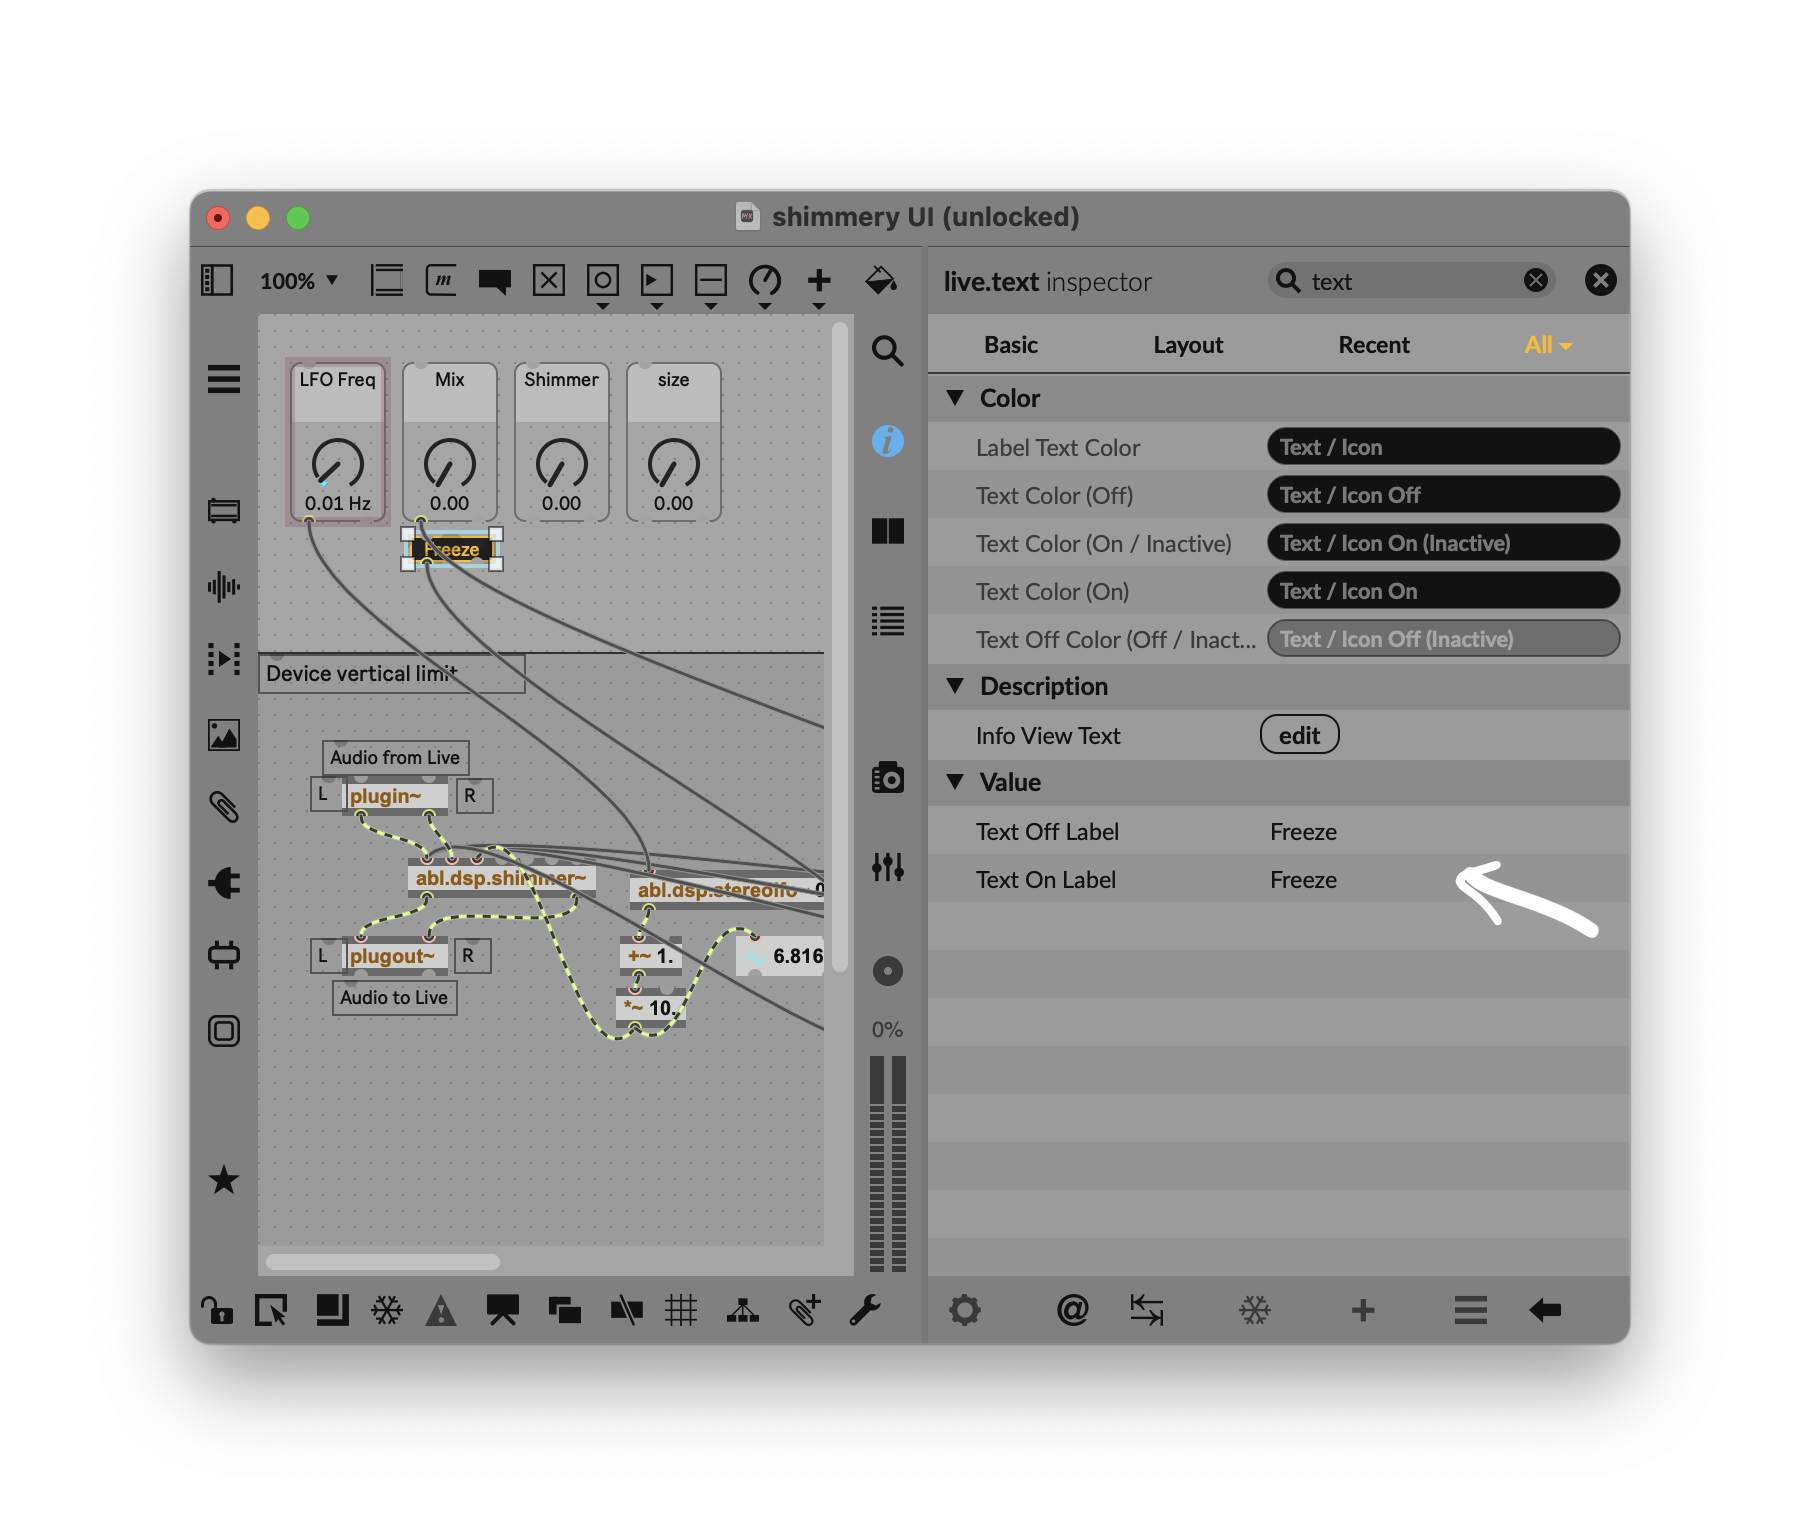
You can get creative from this point on to customize the parameters and design the way you want! But let’s give one more example. Add a live.toggle (it’s the outlined square on the right-hand side of the interface pop-up). I like the Display Style set to LCD as it looks cool. By default it’ll just toggle between “A” and “B.” To make this make sense, I want both those states to just display “Freeze”. Click through to the All column in the Inspector, then enter “Freeze” for Text On Label and Text Off Label (or whatever makes sense to you):
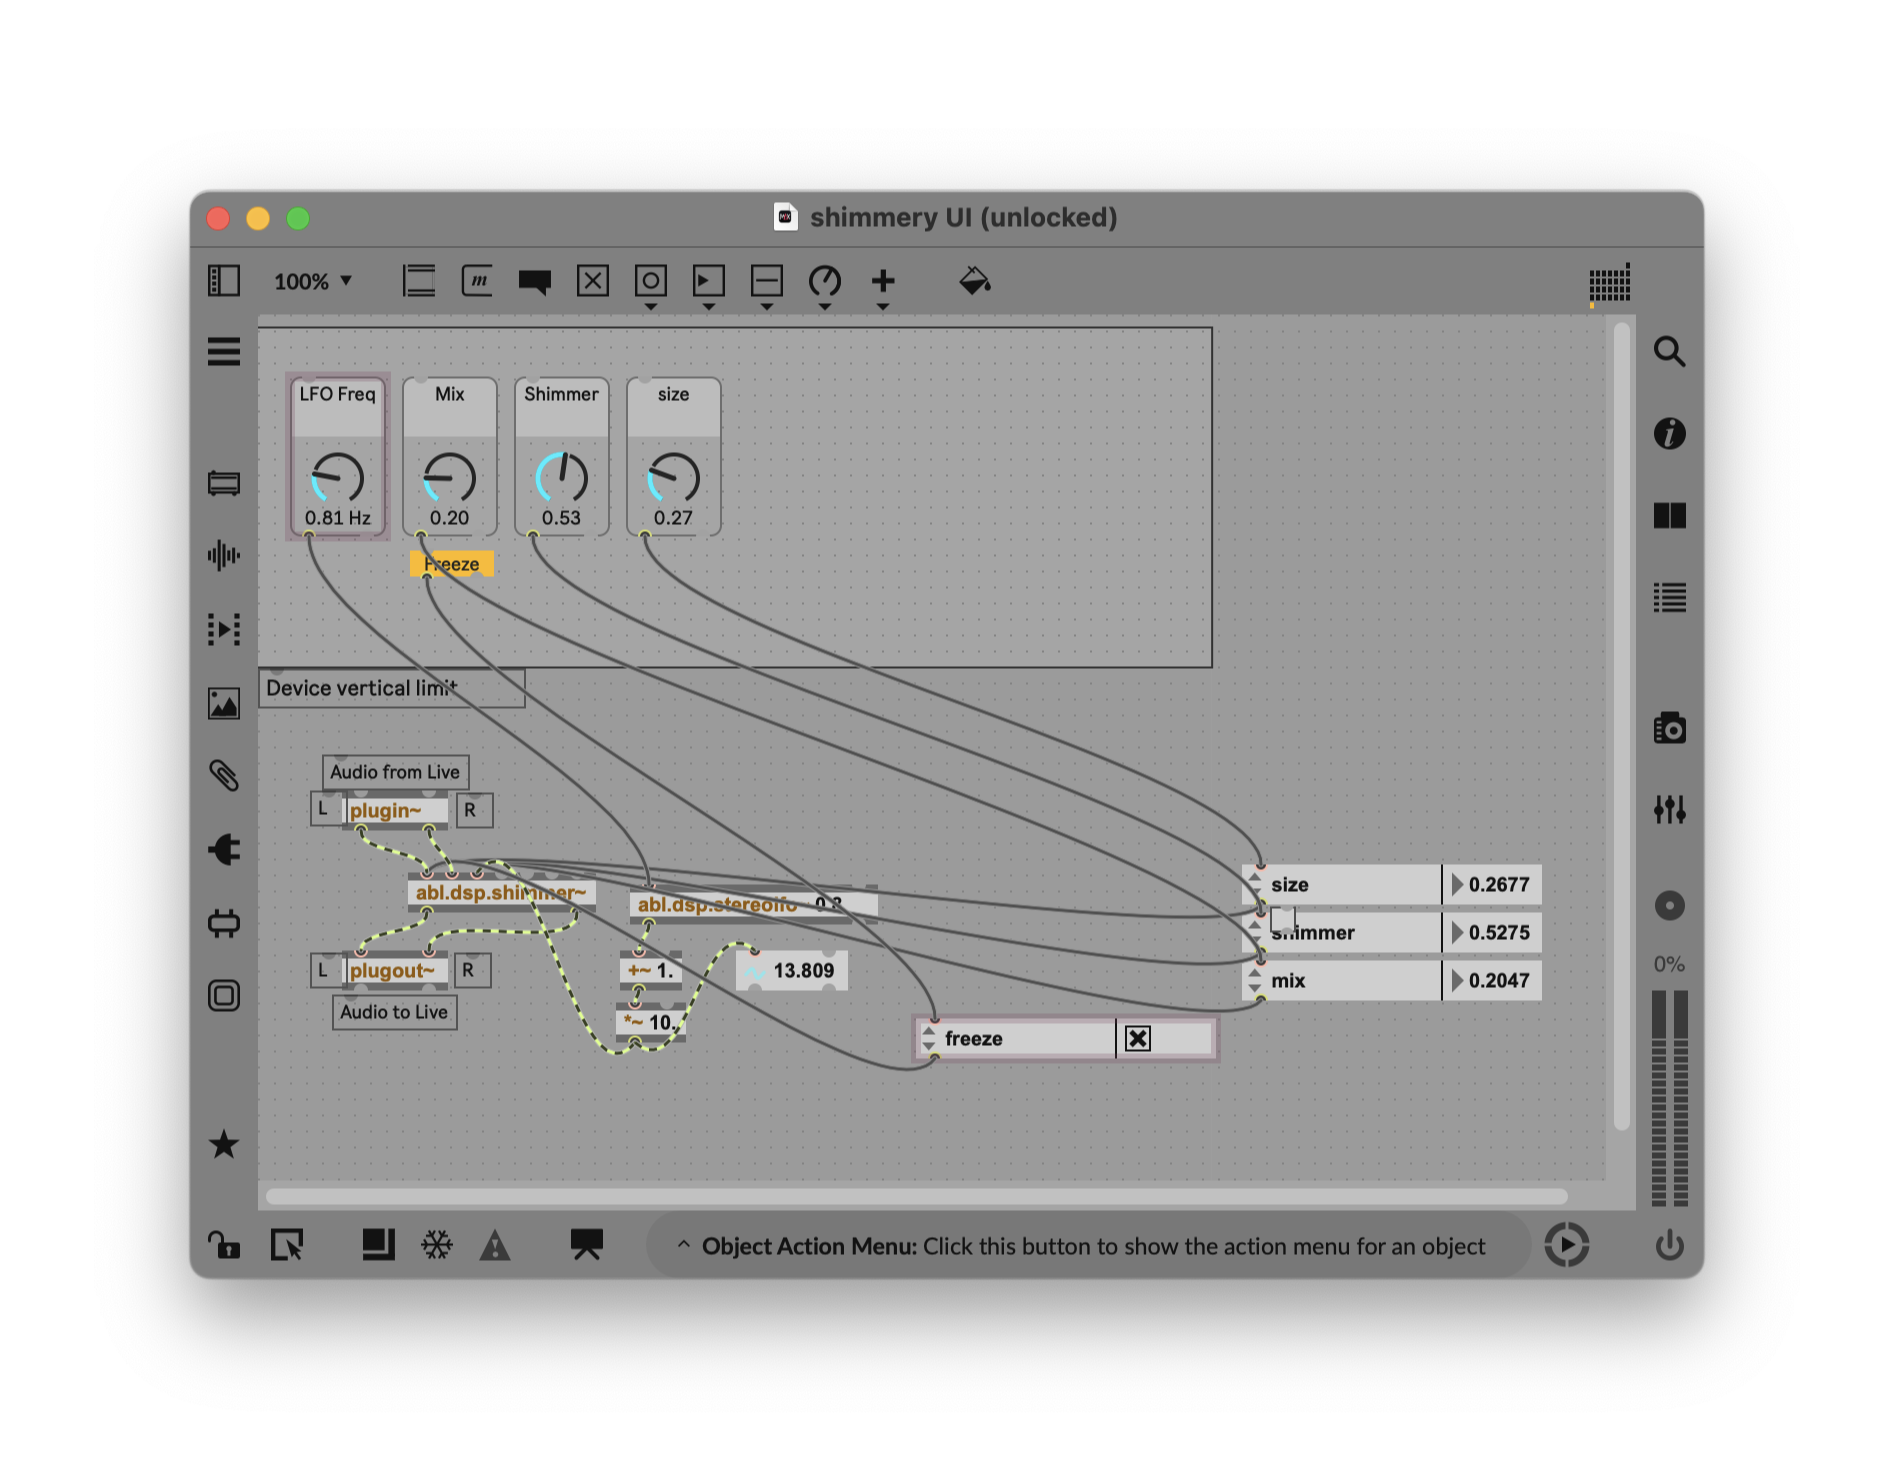
You probably won’t always work this way when you get further into Max for Live patching, but this workflow is well-suited to prototyping and learning, because you can check that all the parameter values are as you expect:
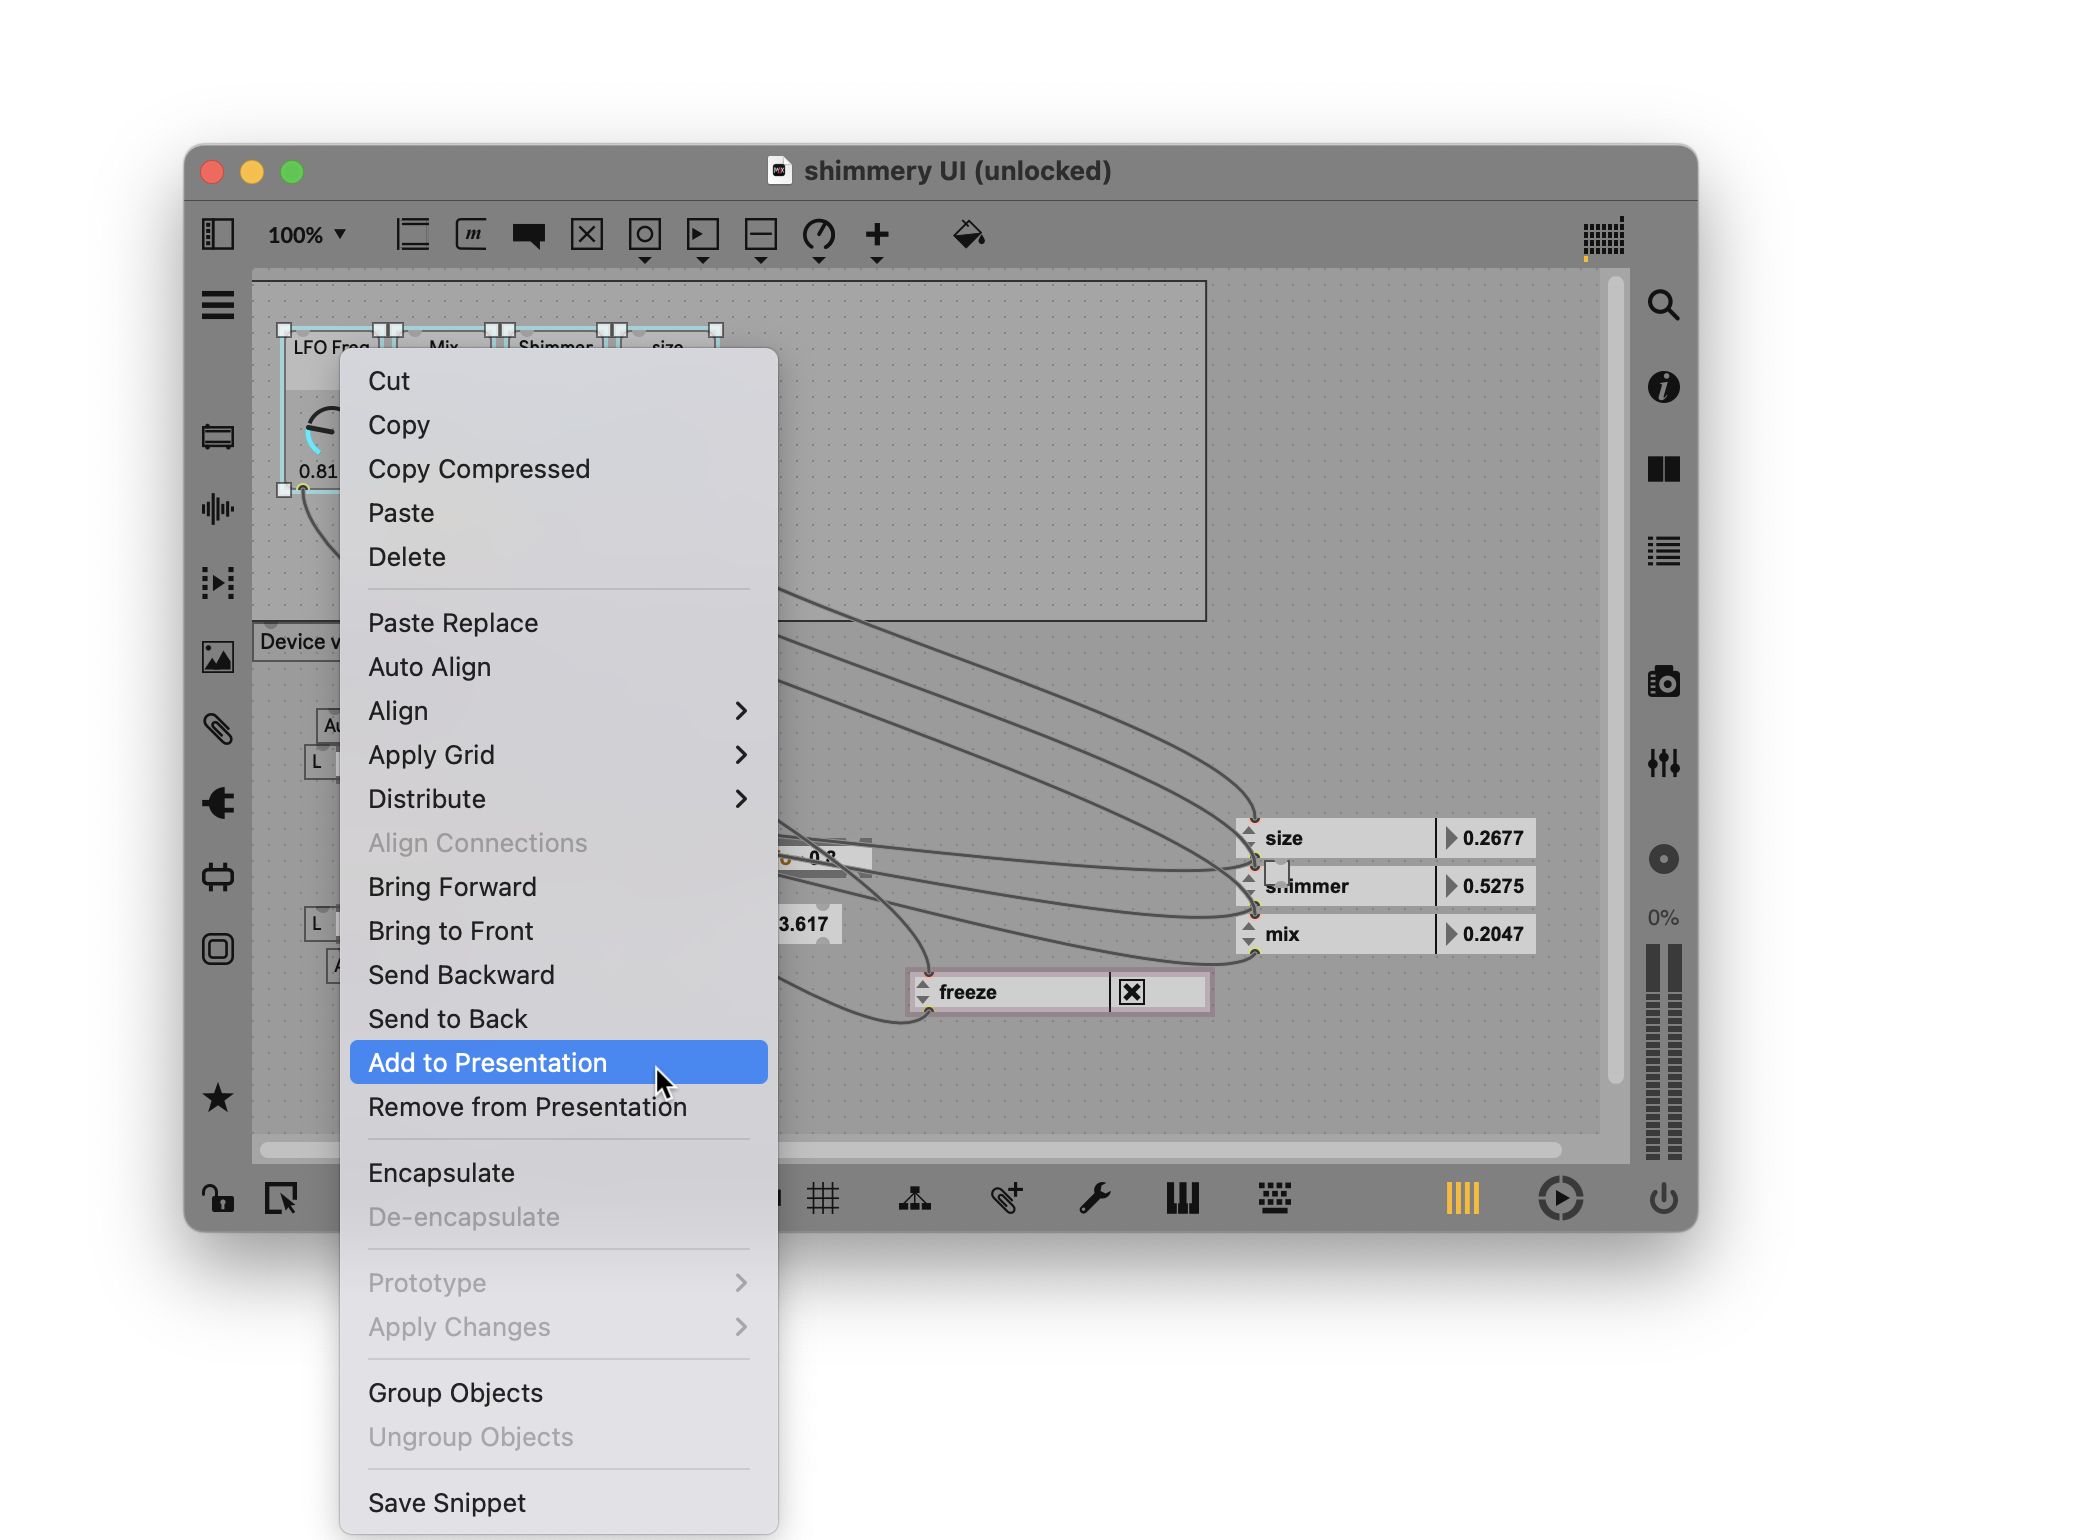
Presentation Mode. Inside the Max editor, drag across all the elements you just added, right-click, and choose Add to Presentation:
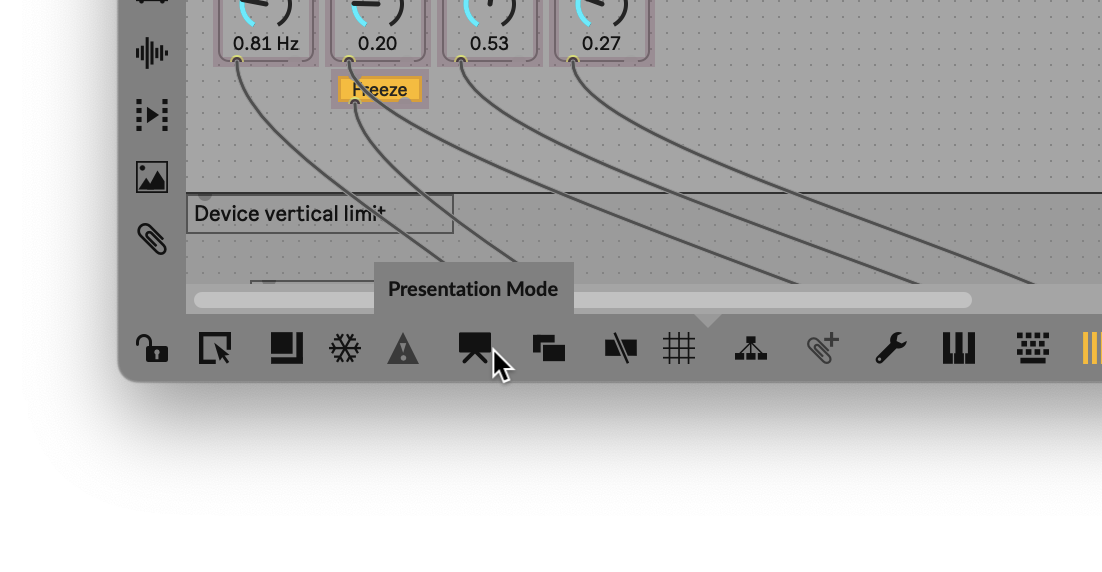
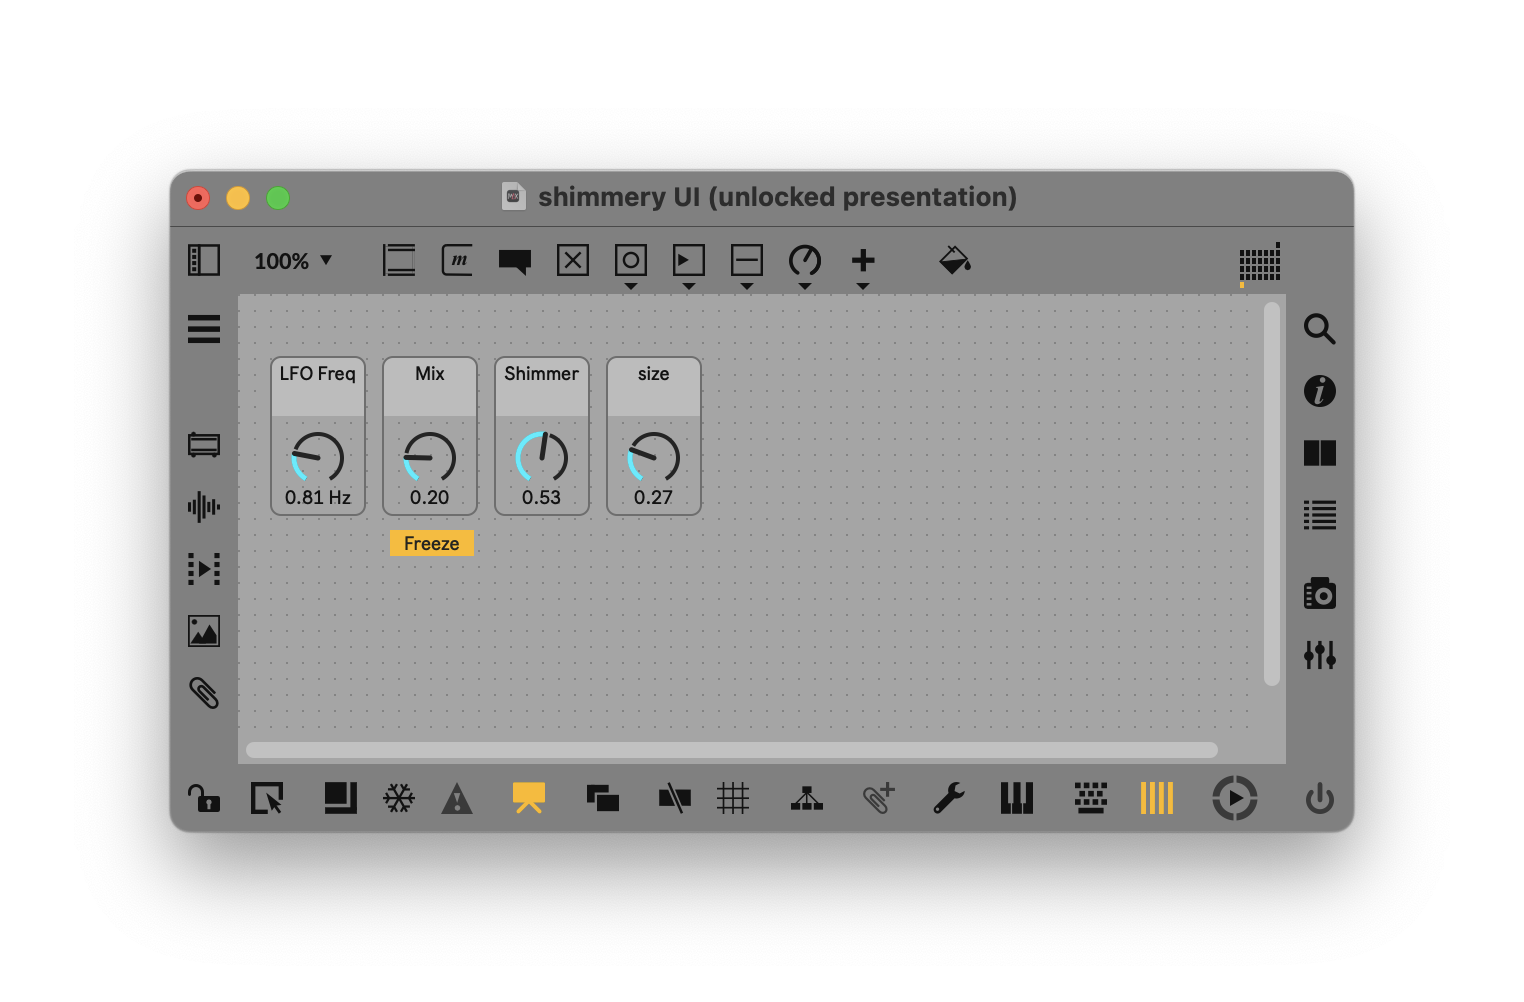
Now, toggle the Presentation Mode on the bottom of the toolbar, and watch what happens. Your patch “plumbing” disappears and your UI remains.
One important point: once an element is added to Presentation Mode, its position there is independent from the position when you’re editing and Presentation Mode is turned off. That’s a feature, not a bug, but if you didn’t know that, you might wonder why things started moving around like they’re possessed as you toggled modes.
The advantage of this is, you can now feel free to toggle Presentation Mode and go back to patching, without worrying about messing up your nice UI!
We’re getting closer! There’s just one last step.
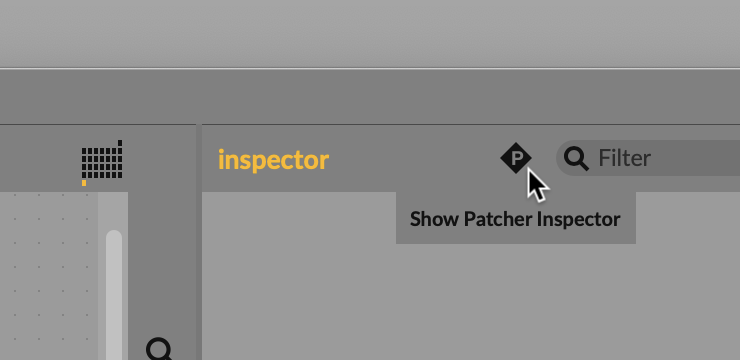
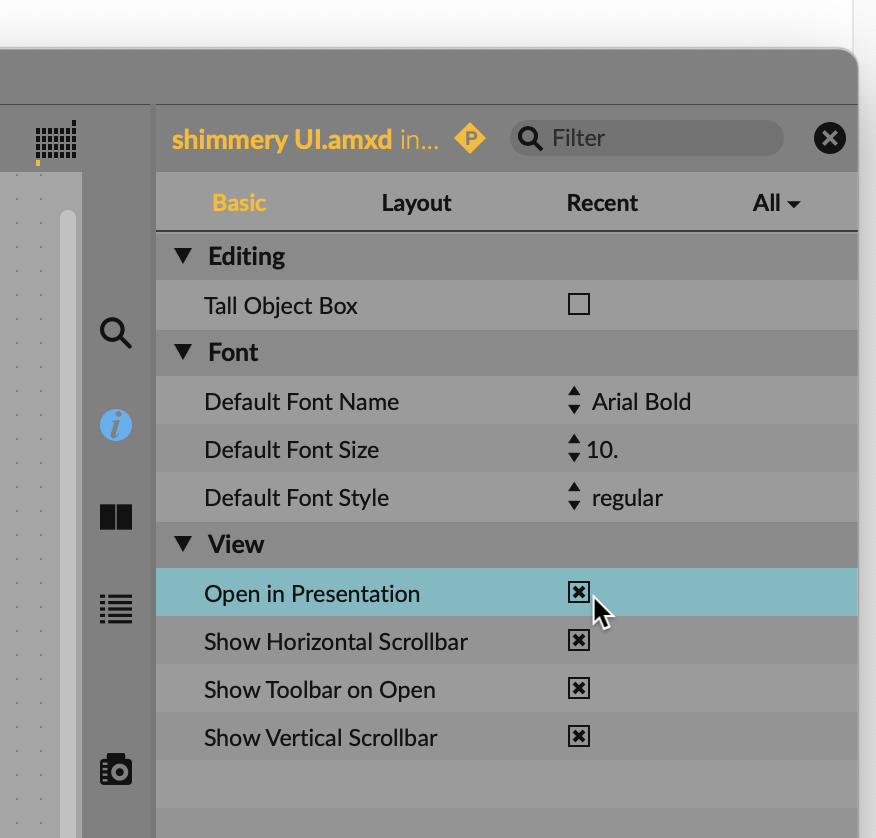
You’ll notice the wires are still visible back in Live. We need to set a global setting for the whole patch, and for that, you need the Patcher Inspector. It’s hidden behind a little “P” icon (for Patcher):
Now just tick the Open in Presentation box so this same Presentation Mode is what you see in Live:
Save, go back to Live and — behold! We have our basic element. There’s a lot you can then tweak with parameters and the like, but you’re getting the hang of it!
Notice, too: all of the parameters we just created are key- and MIDI-mappable. (If you have a Push, you’ll notice they don’t yet show up there. We’ll review how to do that in a future installment, or check this guide.)
What’s next
Congrats! You completed a “Hello, World!” shimmer! There’s more to come. In the next episode, we’ll look at how to create a more sophisticated effect Device, mixing and matching abl.dsp objects with stock Max ones for an effect that wouldn’t be possible in Ableton Live alone.
In the meantime, you might explore other reverb algorithms from Hybrid Reverb, like abl.dsp.tides~ or abl.dsp.quartz~. You could create some parallel and serial processing that goes beyond what Hybrid Reverb even using what you already know; we’ll build on that more next time with signal mixing skills. (Hybrid Reverb has two algorithms and two routings; you can make other combinations in Max for Live.)
And let me know if you have questions or you got lost anywhere. This guide will be a living, growing guide to Max for Live.
Happy patching.
- If you load Max directly, before you run Live, and you don’t have a separate Max license, you won’t be able to save. Just run Max from inside Live and you’ll be fine.
- The same applies to mc objects — they require a separate Max license to save, so if you don’t have that, just ignore them.
- Max, by default, opens with all the windows you had open in your last session.
This how-to guide continues
Part 2:
Part 3:
An absolute must as you follow along with this guide!
Plus: