Live 10 adds a tasty new synth and delay effect, an updated look, and many more small details. We’ve had it now a few weeks; here’s a look at what’s new.
What’s the story behind 10?
It’s tough for updates of mature music production software to keep us happy. On one hand, we’ve all got a big list of stuff we want to see improved, fixed, added – and that list tends to get longer. On the other hand, we don’t want any major changes to disrupt how we work, break our existing projects, or lead the tool away from why we chose to use it in the first place.
What Live 10 does is to focus on making a lot of little changes that have a big impact on how you interact with the interface, in editing, arranging, and finishing tracks. There’s more and clearer visual feedback and editing behaviors, on screen and on Push.
In other words, imagine it’s a studio overhaul that did some cleaning, renovating, and reorganizing. And like a studio reorganization, you’ve also added some new gear – in the form of new devices called Echo, Wavetable, Drum Buss, and Pedal.
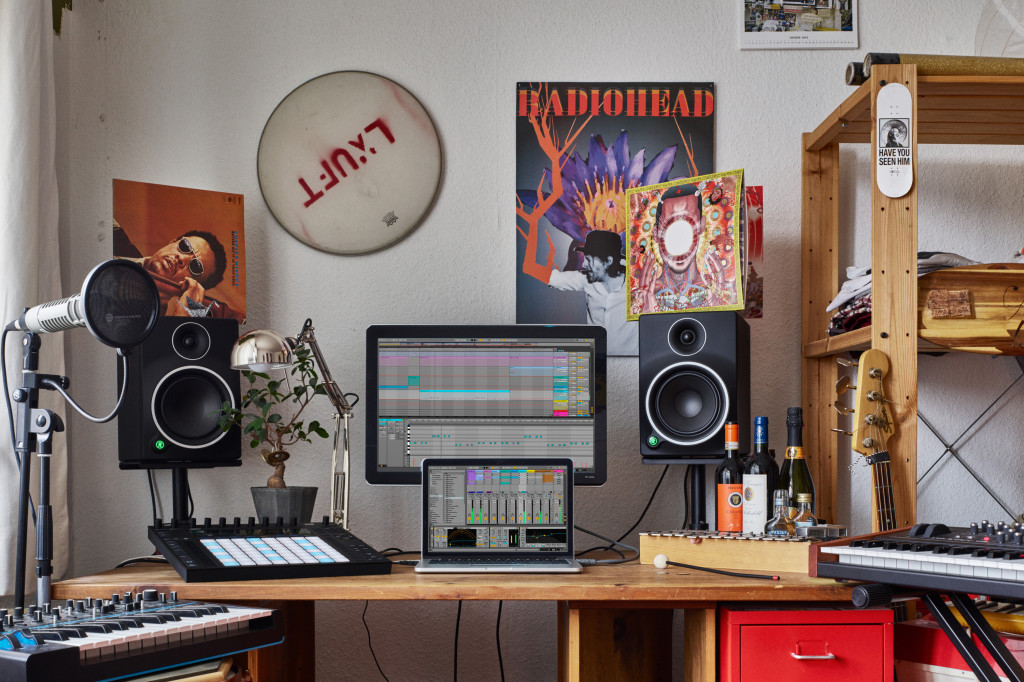
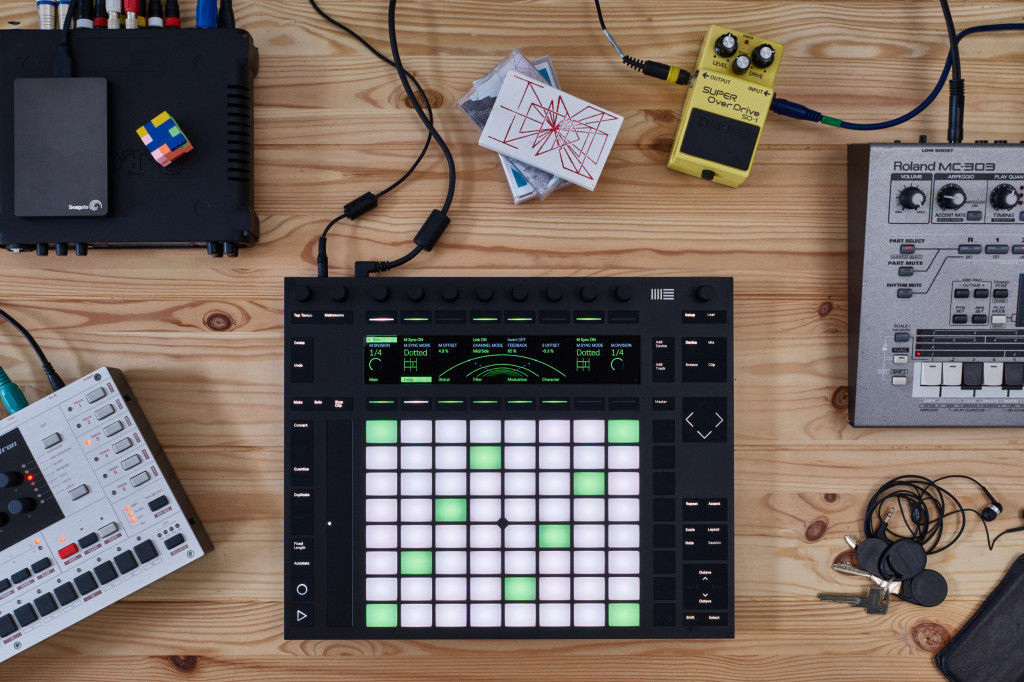
Photo courtesy Ableton.
An updated interface
Ableton has doggedly resisted messing much with its minimal interface. And sure enough, the biggest Live makeover yet is – actually pretty subtle. Those just get more useful as you dig.
So, on the surface, you can instantly see some new colors (now organized in “themes”), including some much more consistent darker themes. And there’s the new Ableton Sans font.
On high-density screens or as you scale, you’ll notice still more improvements – particularly around vectors like knobs. Windows users also get specialized HiDPI support – crucial since the PC platform otherwise doesn’t work as seamlessly as Retina displays on Mac. There’s also a Pen Tablet mode, which works with graphic tablets as well as tablet PCs, though I didn’t get to test it yet.
Scaled up, you can see the impact of that new font and lots of precise details (even a tiny notch indicator on the knobs).
Lots of little details like these add up to being able to more clearly see what you’re doing – sometimes even without noticing why you’re suddenly working faster. Ironically, this is probably the biggest UI overhaul Live has ever had – and yet you won’t really notice it, which is sort of the point.
Capture: Never miss an idea
The new transport – your challenge is to try to recognize it over someone’s shoulder in a club. That dotted rectangle icon on the right is significant.
So, there’s a funny mystery to the universe: the moment you hit the record button, all your creative ideas go away. Also, if you aren’t recording, you’ll suddenly play something ingenious – and then immediately forget it.
“Capture” is a way around this – it listens in on any connected MIDI input on armed/monitored tracks. Just played something on the keyboard you like? Hit the Capture button, and it turns instantly into a clip – no recording needed. (You can do this from Push, too; it seems inevitable that a Push 3 will have a dedicated button, but for now the Record and New buttons will do.)
Arrangement and Automation
The Arrangement View is the reason I think you’ll want to update to Live 10. It’s now finally easier to edit, arrange, and automate your projects. And here, it seems like they were watching over our shoulders, adding in features we had been looking for (shown with shortcuts):
- Stretch Arrangement audio clips directly. (Shift-drag the border)
- Slide the contents of an Arrangement clip directly, by dragging. (Alt-shift/Ctrl-Shift)
- Reverse a selected bit of time, or part of a clip. (R)
- Activate/deactivate just a portion of a clip, if you select only part of it.
- Move clips by dragging the upper half of the clip.
- Double-click on a MIDI track to create a MIDI clip.
- Minimize all tracks at once, aka “Show All Tracks.” (S)
- Zoom to and from a time selection. (Z/shift-Z)
- Zoom tracks by scrolling with (alt), (cmd/ctrl) vertically
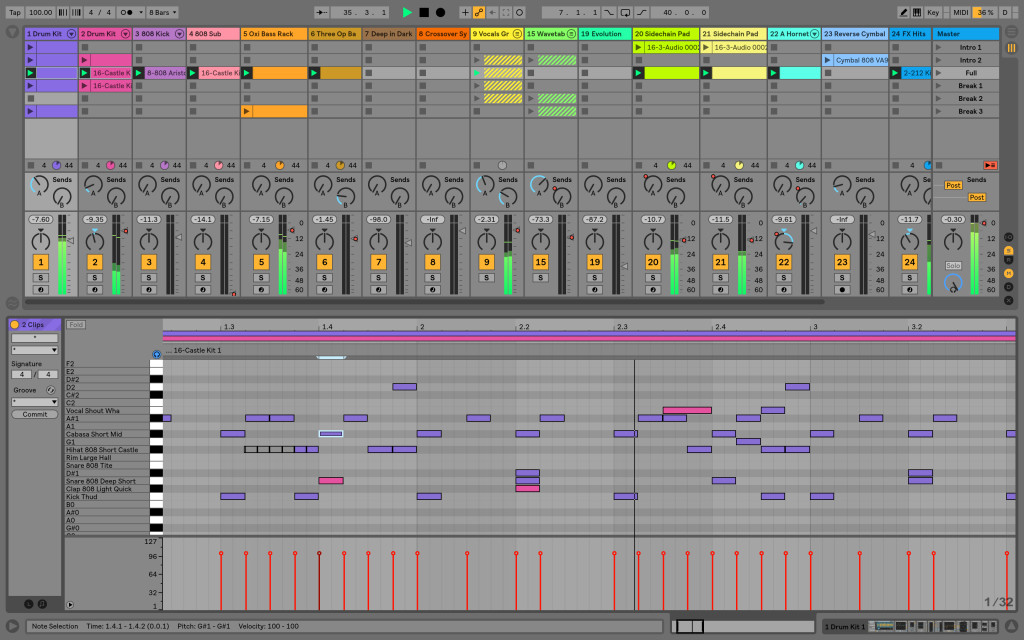
At last – view more than one MIDI clip at a time. Image courtesy Ableton.
The fact that a lot of this is true of other DAWs makes this even more welcome – both because it’s hard to re-train those habits, and because, well, this is a better way for this to work.
In addition to adjusting how you edit that content directly, Ableton has also made the whole view far more sensible by separating out automation – those “rubber-band” line segments that control changes to device parameters and mix settings. Now, you can hide or show all automation lanes via a global Automation button (or hit ‘A’).
This makes adding fades and cross-fades easier, too. You can always just drag from the corner of a clip to create fades.
Things you wished you could do previously suddenly magically start working: like you can double-click anywhere and make an automation breakpoint (not just on the envelope itself).
Oh yeah, and finally: “It is now possible to move automation segments horizontally.” (People who have been next to me in the studio while editing know that I tended to use … colorful language … in past versions over this.)
Many other DAWs work in similar ways to this already, but Ableton has managed to add these features without messing too much with its own distinctive interface. And that means you’ll adjust I think very quickly – ironically both if you were doing most of your editing in Live, and if you weren’t (because you found the absence of these things frustrating).
There are lots of other subtle helpers and visual feedback that make it easier to select, edit, and move breakpoints as you’re working. So there’s nothing new here in the sense of the addition of fade curves – just everything works better.
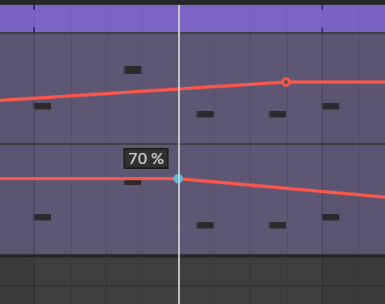
Small details abound – fades are always accessible at clip corners, cursors change more clearly so you’re aware of how you’re editing, and — even little stuff like this visual feedback on breakpoints can be a big help.
One thing that wasn’t changed here: you still can’t edit MIDI events directly in the Arrangement View lanes. But at last, you can edit multiple MIDI clips at the same time – both in Arrangement and Session. That’s beautifully implemented, and at last stops all this hunting in and out of clips when you’re editing. That may be a better solution, on balance.
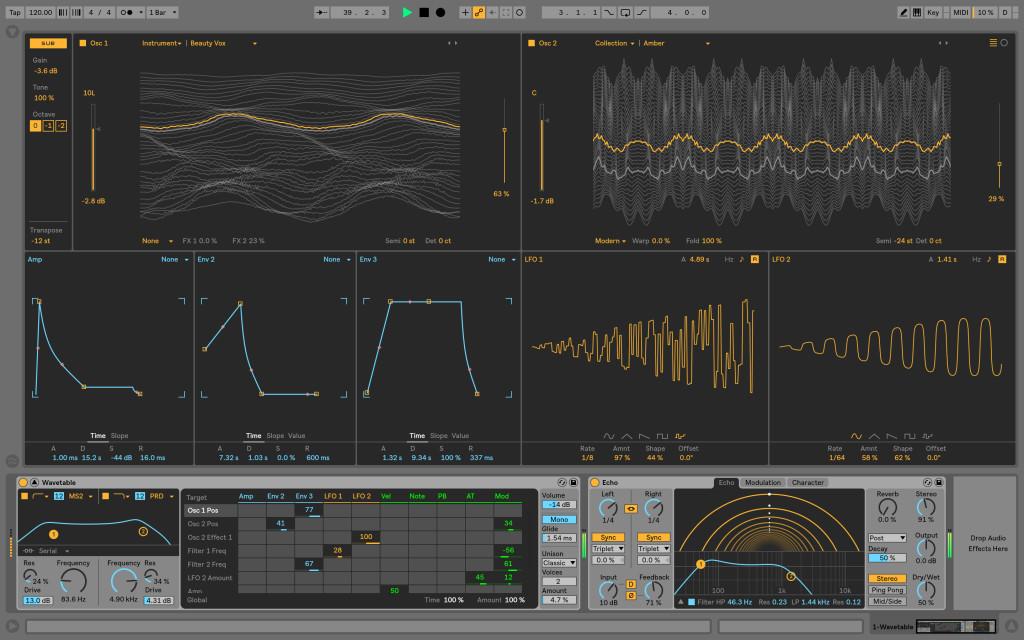
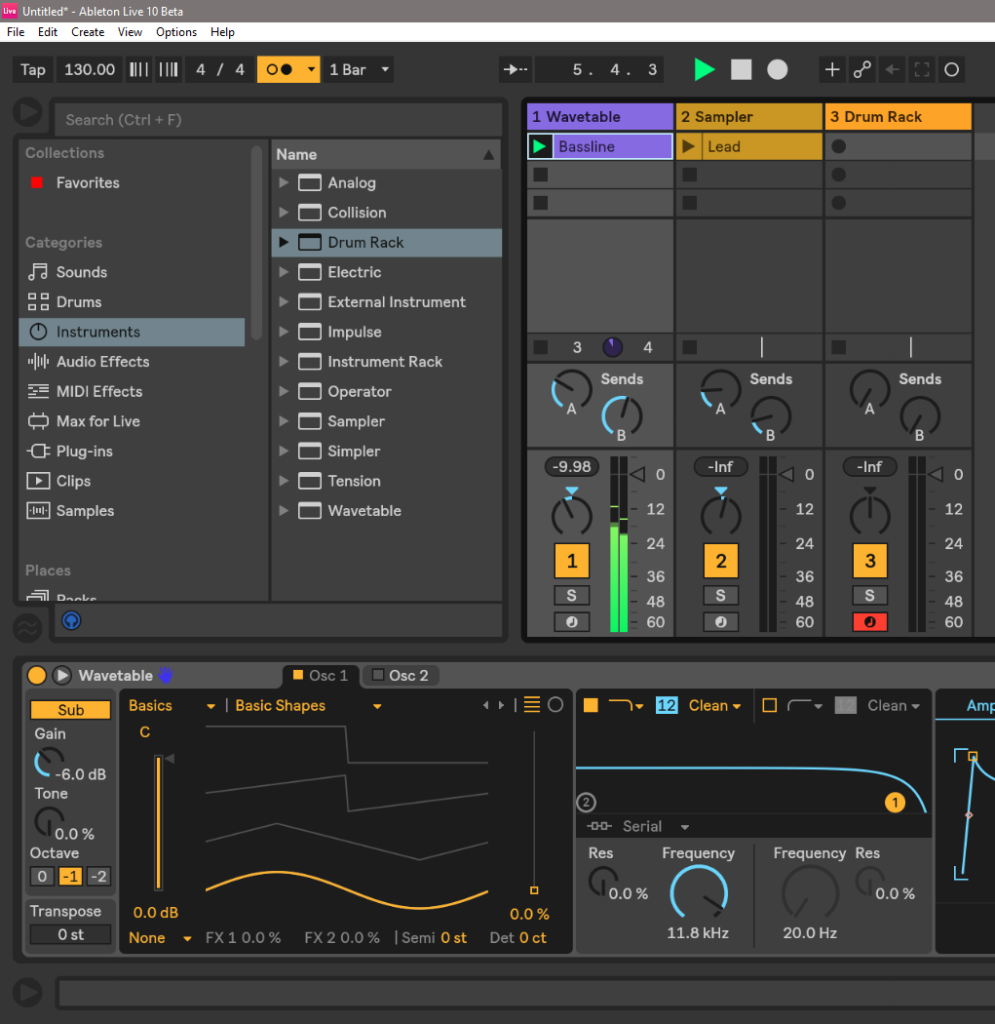
Wavetable, the new Ableton synth. Looks impressive with everything expanded, but it retains a simple interface. Image courtesy Ableton.
Wavetable
Finally, Operator has a worthy sequel – a synth that feels truly native to Ableton Live.
And it’s about the most flexible synth you could wish for. It’s also more approachable than Operator’s FM (frequency modulation) synthesis – even though that design, conceived by Ableton co-founder Robert Henke, made FM easier to understand. By contrast, Wavetable is a synth that almost dares you to dive in without reading the manual.

Bride of Operator: classic Wavetable architecture, simple design, but with interesting twists. Note the Sub oscillator at left, Unison modes at right.
Wavetable synthesis is all about starting with an interesting waveform, then adding modulation and moving through that waveform. Animations show you how that works, even if you’ve never done it before. (Waldorf’s synths do that beautifully on the iPad, built by Wolfgang Palm, the man who perfected the technique. That seems to have influenced the design here, but — imagine it far simpler, more compact, flat, and Ableton-y.)
From there, you can add filters and modulation in a terrifically straightforward way. Filters look the way they do elsewhere in the software – you’ve got two multimode filters to apply as you like. Choosing some different filter models and adding drive will dirty up what is otherwise a very pristine-sounding instrument.
There’s also an easy modulation matrix, if a simple one. And you can pop out envelopes and LFOs (modulation sources) when you want more real estate.
The deal is sealed for me by the Unison modes – that Shimmer is lovely – which thicken up the sound of each note by using multiple oscillators. And there’s a sub oscillator, making this an excellent bass synth.
With the use of the various wavetables, different filters with drive, and unison modes, you can very quickly get away from sounds that are too clean or too clinical, which for me was always missing on Operator.
On paper, the whole thing honestly looks boring. But those filter models, the fact that you can route the two oscillators together or in parallel, those filter models (which you may already know from Live 9’s revamped Simpler), and those unison modes… oh, those unison modes… (Just trust me on that.)
It’s fun to design sounds on-screen, but even more fun with Ableton Push, as all those visualizations now map perfectly to the displays, and the encoders are ready for hands-on control.
In the end, it’s exactly what you want a built-in Ableton Live synth to me. It’s easy, it’s consistent – but it’s got personality, and it isn’t limiting.
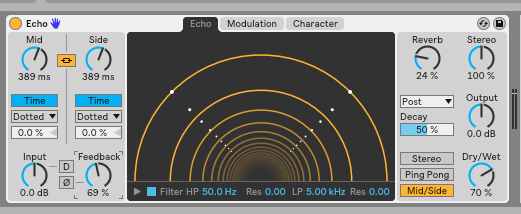
Echo: a single device bringing together a lot of the digital and tape delay sounds you’d want, all in one consistent interface.
Echo
Wavetable is great, but … might not sway you if you’ve already got a stable of synths you love. Echo, on the other hand, is irresistible.
Echo almost made me forget everything else I planned to work on on this review, because suddenly I had a bunch of tracks just based on Echo.
We’re spoiled for choice now when it comes to delay effects. Native Instruments’ Replika XT is exceptional, just to name one. Universal Audio and the like have beautiful models of analog classics. Eventide have brought their whole arsenal of delays. Surreal Machines have some especially brilliant models.
I happen to use all of these. And even I have use for Echo.
The genius of Echo is really that it seems to merge a lot of different kinds of delays and echo effects into a single unit, and then let you morph between them relatively seamlessly.
You get two delay lines, which can run free or synced. These then operate in stereo, ping pong left to right, or mid/side. There’s also a reverb you can add pre or post delay.
The Modulation section is here things get interesting. You can modulate both delay times and filter frequencies, for some pretty far-out effects, and even morph between an envelope follower and modulation.

Modulation – route this to the delay itself as well as the filter.
That would already be enough, but there’s more. Using the “Character” modules, you can add Noise and Wobble effects – simulating tape – as well as dynamic controls (Gate, Ducking).
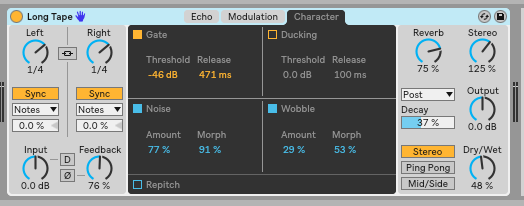
The “oh, maybe I’m a Space Echo, too” and “let’s change this around with dynamics” section. Or, uh, “Character.”
The upshot of all of this is, you get a uniquely Ableton-y delay with a character that ranges fully from subtle to out-the-starcraft-airlock, digital and clean to old and grimy. I happened to have some stems I’d made with a real Roland Space Echo, and I was able to produce some effects that were pretty close. This is … much lighter to carry around. But beyond that, I could morph the same sorts of effects back into software territory, and anywhere in between.
It’s terrific for any kind of sound design, as well as dubby and dance-y stuff. It’s about the most invaluable effect I could imagine them adding – and like Wavetable, it manages to root itself in classic gear without being overly nostalgic or overly complicated.
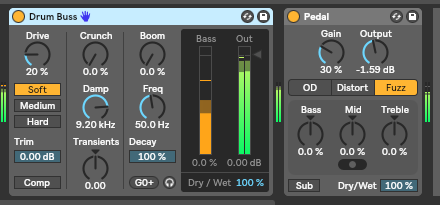
Don’t overlook the Drum Bass and Pedal effects. Pedal may not look like, well, anything – but it sounds amazing.
Drum Buss and Pedal
Echo isn’t the only effect – there are two more, Drum Buss (not a typo) and Pedal.
Drum Buss is a multi-effects processor with distortion, compressor, low-frequency “Boom,” transient shaping, and high frequency dampening. Now, the “Drum” part is meant to indicate that you can warm up, thicken, and compress/glue drum sounds together. But even though a lot of this was already available elsewhere in Live, the combination of these elements and new additions all in one device make it useful – and not just for drums.
Pedal is one you’ll probably overlook, but shouldn’t. It looks homely. It sounds… surprisingly amazing. That gnarly distortion, overdrive, and fuzz are actually more useful than all the previous Softube stuff combined, all with dangerous one-knob access. I’ve been destroying drum and synth sounds with them. Don’t be surprised if you start smearing on eyeshadow and sleeping in a coffin during the day. It’s worth it.
Oh yeah, and put Echo and Drum Buss and Pedal together… even with Wavetable? Indeed.
Visualizations now show up on Push. Image courtesy Ableton, because … I’m lazy and my desk is a mess?
What’s new for Push?
All these other changes should silence anyone who thinks Ableton are only making enhancements for their Push hardware customers.
But if you are an original Push hardware customer, you do get a lot, too. There are tons of little fixes and additions. Some standouts:
On Push 2, you can now visualize lots more stuff – EQ Eight filter bands, Compressor, envelopes, and more are all visible, plus notes in MIDI clips.
There’s now a note layout mode for Push, combining step sequencing and note access. On the top, you get a 32-step sequencer, on the bottom, 32 notes. This was a convenient feature on the (smaller) Novation Circuit; it works really beautifully on an 8×8 layout.
MIDI notes on Push 2. (Push 1 users get lots of little enhancements, too, though, so don’t feel left out.)
Max for Live refresh
Max for Live is still included only in the Suite edition of Ableton Live. In fact, it’s arguably the best justification for spending the extra money on the Suite version, as it gives you all of Max as part of your toolset, plus the ability to run what’s now an enormous library of Max for Live tools made by others. (Those of you staring at the upgrade price from Live 9 Standard, don’t forget that Max for Live is a big part of what you’re paying for. You can get synths and effects elsewhere, but there’s kind of only one Max.)
The change in Live 10 is, Max for Live is now bundled with Live. There’s one installer, and Max loads silently in the background when you start Live – no more waiting while that splash screen shows up.
Inside the Max for Live library, there’s been a whole lot of additional work cleaning up the devices themselves – new modules, new interfaces, and other enhancements. There are new modulation devices and drum synths built into the core library. There’s also the ability coming to “multi-map” Max for Live devices to up to eight parameters at once, visually. That means the new modulation Devices become very powerful.
The “DS” series of drum synths is a big leap over the ones already included in Max for Live – new sounds, new interfaces.

The new DS Drum Synth library.
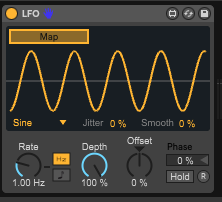
But don’t miss the three new modulation devices, too. The LFO builds on what you may have seen in the Max for Live library, but with a bit more flexibility and polish – and now it’s a core device:
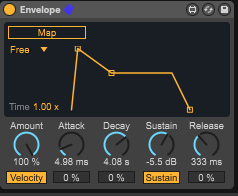
Envelope is a basic ADSR envelope that you can then route to anything:
Shaper is beautiful – capable of producing endless modulation shapes and then spitting them out, using either custom-drawn breakpoints or the shortcuts at the bottom:
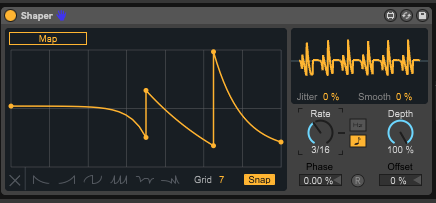
You’ll find the Shaper and LFO in Max for Live Audio Effects, Envelope in Max for Live MIDI Effects, and the drum synths as a series of Devices starting with “DS” under Max for Live Instruments. Now’s the time to use that “collection” feature to get quick and easy access.
And these should cure some Bitwig Studio (modulation) and Maschine (drum synth) envy. The approach and sound, respectively, are unique, though – I’m a big fan of Maschine’s drum synths, and I still like the new ones in Ableton. I don’t really believe in too much as far as drum synths go.
If you really want a top-to-bottom modular environment, you should consider something like Usine Hollyhock (or Bitwig Studio, if you’re willing to wait – they’ve promised to open up this environment for some time). But even saying that, there’s nothing quite like Max/MSP, its profoundly deep range of objects (including Jitter with 3D and video), its unique way of working, or its existing library of powerful tools.
Since some of this functionality is still in development and we’ve got some time until Live 10 drops, we’ll follow up more on this in detail.
Everything else in a nutshell
Groups inside groups for better organization. Image courtesy Ableton.
Nest Groups inside other Groups. Useful for drums in particular, this is apparently an oft-requested featured. I agree that it’s cool, so I will resist the urge to make an Xzibit meme.
Install Packs inside Live. No more trips to the Website for sound packs – you can do it in the Browser. (note that this only works for Ableton-provided Packs; others install as before)
Better Browser organization. Color-code entries. Make your own Collections (really nice if you’re doing a lot of sound design).
You can export more easily. WAV, AIFF, FLAC, WavPack export, MP3 export, and – finally – you can export MP3 and WAV at the same time.
Saving doesn’t clear the Undo history. Good.
It’s faster. Two examples: large Live sets now close 5-10 times faster, and samples load a lot faster. All around, it definitely feels snappier.
Double-click to reset knobs and sliders. Another “finally.”
Split stereo option for pan. This is a fairly simple feature, but allows for separate left and right controls, like so:

Split Stereo in the Mixer, accessed by context menu.
More flexible audio routing. Drum Rack pads can be routed to the return of the parent. You can also support multiple audio inputs and outputs inside Max for Live, which opens up lots of new possibilities (including multichannel/surround applications), and route to arbitrary tracks via the Live API.
Zoom and scroll! More vertical zooming of tracks, but also horizontal scrolling on Windows (not just Mac), using your trackpad or mousewheel in Simpler and Sampler and Detail View and Arrangement… and Detail View now zooms as you expect.
MIDI chase. MIDI patterns follow up
Set names for inputs and outputs. Good lord, at last!
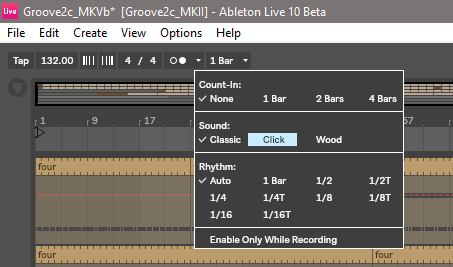
Updated metronome drop down.
Set metronome settings like sounds and interval and when to click, right from the context menu on the transport.
What isn’t in this update
Now, what isn’t happening.
Of course, for anyone who was predicting new hardware – perhaps some new controller, or Push 3 – that’s not happening. The focus is all about Ableton Live as software, and existing Push hardware.
Some “legacy” support is also dropped. The Bridge, the ambitious project to connect Live and Searto, is now gone. (Then again, Ableton Link replaces the most widely-used feature there, sync.) And 32-bit support has been dropped for Live 10, as previously reported.
There’s no new interface for comping, which is a shame – it would be a logical companion to Capture, being able to record multiple takes of the same bit once the transport is running. (Capture’s strength is quickly turning an idea into a clip without having to worry about recording, but once you are laying down tracks, comping is often useful.)
While I appreciate the focus on UI and Arrangement, there are areas Ableton could focus on in future. To me, Ableton Live still has two big weaknesses that could use addressing.
First Live just isn’t a terribly convenient scoring tool, because of a lack of convenient video display and management of markers. This might seem an odd thing to point out, but it’s something I hear with some frequency from users, and I find it’s a frequent reason people choose a different host. It’s also a major source of income for many producers. (Some features to do with markers and large project management are also relevant to gaming.)
Second, Ableton’s controller customization is still lacking. And whereas video or film/TV scoring aren’t necessarily a core Ableton Live use case, creative use of controller hardware has been something essential to the Live community since day one. Addressing those seems overdue, even if Push is really cool.
Even basic MIDI features implemented back in Live 1.5 haven’t gotten a look lately – it’s still really tough to edit MIDI CC assignments. (The inability to type in custom CC numbers, for instance, is … kind of weird.) And while the whole notion of unique controllers for Ableton Live came from DIY projects and the community, there’s still no open, accessible interface for making your own controller mappings. Ableton may point to Max for Live as the solution, but that’s actually even clunkier to use in practice than the Python API that predates it. A consistent API could greatly expand the range and imagination with which people use Live as an instrument – and “sequencing instrument,” the moniker used by Live 1.0, is somehow even more relevant today.
One good piece of MIDI news, though: Max for Live supports SysEx, at last, meaning much more powerful editor/librarian/controller devices in M4L. I’d view that as separate from my criticism above, but still welcome.
Ableton also continues to lag some industry trends. There’s no support for VST3. (I have many readers asking that, actually.) There’s also no support for MPE – again, meaning Ableton is failing to serve the very expressive performers who helped build it. MPE (aka “expressive” MIDI) is an edge case, used by devices like ROLI and Linnstrument. But it’s also a sign of things to come – and the edge case, people playing with expressive controllers, are often rabid fans of Ableton Live. It also seems the time is approaching soon when Live will want to be more agnostic about multichannel outputs and less stereo-centric.
But these are all worth mentioning as they’re areas for possible future growth. Focusing on particular areas has some real benefits, and the focus in Live 10 was clear. Also:
What isn’t changed doesn’t break. So far, all your existing controller scripts appear to work intact with the new version, from custom hacks to iPad controller tools to Max for Live. More in detail on this as it becomes available, particularly with anything to do with Link or Max for Live.
But it is worth noting that, while it doesn’t appear as a new feature, Max for Live bundling means that Max and Live releases are in sync, as we previously reported was in the works.
Conclusions
The real test of any upgrade is – once you’ve updated, would you be able to go back? I can say very precisely, no. Normally, I keep a beta running side-by-side with the stable release. With Live 10, for the first time, I just couldn’t bring myself to look backward, not once.
Plenty of DAW upgrades introduce splashy new features. Live 10 ought to be commended for focusing on the details of how you interact with the software, from recording and capturing ideas to arranging them, and all the visual feedback you get along the way – whether on Ableton’s own Push hardware or just on your screen. What’s really nice about a lot of this is, once you upgrade, you’ll stop noticing it’s there. You’ll just experience less resistance from the software as you work.
And the devices have a similar feel: Echo and Wavetable are two that you simply won’t want to give up. They feel totally native to Live and have a character all their own – a bit like you’ve added two nice pieces of hardware to your studio.
Live 10 isn’t likely to win over a lot of new converts, I think, but that isn’t the point. It’s an upgrade that should just make Live’s enormous user base happy. And if you’re behind in upgrading, now might be a great time.
I’ll say this: Live 10 on paper may look underwhelming. But all this refinement has made it my favorite Live upgrade in years – and I’ve used the program since Live 1.1. It’s simply more of a pleasure to work with the software than before, in the actual process of making and arranging your music. And that to me matters more than any big splashy feature.
Don’t change that channel. We’ll look more in detail in the coming days and weeks at how to make Live 10 as productive as possible in your music making. Let us know if you have any questions or interests.
Disclaimer: I’m working with a prerelease version of the software. This isn’t yet a comment on stability – though I didn’t have any issues with performance, reliability, or functionality. The only thing I found was, on Windows 10, I had to set the systemwide default scaling to 100% for some third-party plug-ins to work properly. Your mileage may vary; we’ll check in on the final release.
Availability, Requirements, Pricing
When can you get it? Early 2018. (First quarter, officially) No word on when a beta will be public; right now, it’s in the hands of early testers and certified trainers.
System requirements. Storage and the like depend on version, but here are the key requirements. Mac users are generally being required to upgrade more frequently across the industry; the PC is more gentle. (A lot of this is the result of how Apple is handling compatibility, not just its third parties.)
OS X 10.11.6 or later (Mac), 64-bit Windows 7, Windows 8 or Windows 10 (PC)
Intel® Core™2 Duo processor (Mac), 64-bit Intel® or AMD multi-core processor (PC). Intel® Core™ i5 processor or faster recommended.
4 GB RAM (8 GB or more recommended)
What about buying Live now? Live 9 is now 20% off until Live 10’s release, with a free upgrade to 10 when it becomes available.
How much it costs: During the lead-up to release, reduced pricing is US$79 Intro, $359 Standard, and $599 Suite. After that, it’s US$99 Intro, $359 Standard, $749 for the Suite with everything (including Max for Live).
Upgrade pricing depends on your current license, but Live 9 Suite owners are reporting they’re seeing US$199 “preorder” pricing, with $249 from launch. (That does seem a little on the steep side for upgraders.)
Different editions: Max for Live, and the best new Devices (Wavetable, Echo, Pedal) both require Suite, the flagship edition. Drum Buss is also available in Standard.
What’s that preorder business about? Okay, some customers have expressed confusion about this – but bear with us.
If you buy Live 9 now – any edition – you get the Live 10 version of the same for free.
Most of you reading this, of course, are probably upgraders. So the 20% discount is taken from upgrade pricing for Live 9 Suite, too. (Not Standard, only Suite. The Standard-to-Suite crossgrade is in fact expensive – but remember you get Max for Live in that deal, plus a lot of new instruments.)
20% off may not sound that great, but the important bit here is that you aren’t charged until beginning of 2018 when Live 10 actually ships. (A beta may be available to you before that, too.) So that could make this worth doing. I certainly find a couple hundred bucks worth of new functionality going from Live 9 to Live 10, and I’ve been using this software as my main tool in the studio for the past weeks. (I’ll do some more coverage explaining why that is) And then you don’t actually have to pay that until next year, which seems a reasonable deal. More:
Editions, comparison at the Live 10 Shop page
Tom Cosm special guest appearance
Tom Cosm, certified Ableton trainer, is broadcasting a livestream Q+A and feature walkthrough, so we’ve invited him to broadcast for us, too! “I’m going to systematically go through the list of new features and try them out, then do a Q&A where I’ll start writing an actual track,” Tom writes. And this is the same mad genius who’s managed to connect chat to control software and modulars before, so expect some surprises.
You can join us on our Facebook page – hit ‘like’ here:
https://www.facebook.com/musicmotionnoise/
Or via Tom’s YouTube channel:
We’re also pleased to share this quick reference to new features from Tom. Click through for the full version. [fixed]
