Get together in a space, and play as an ensemble, not just a soloist. Oh yeah, and we can probably even do better than just mashing play at the same time (though sometimes that works)! Sync, Link, Link Audio, let’s explain how to make it work so you can get to the jam.
Thanks to Ableton for helping support this series.
The strategy: Link as the hub
This is all about playing together in the same space. (Playing online is another topic.) Wired or wireless, our goal is to make it as easy as possible to set up an effective jam session — other copies of Ableton Live, Move, Push, MIDI gear, drum machines, iPhone and iPad apps, other DAWs, Eurorack rigs, vintage analog gear — the works.
The key to working with Live here will be using Ableton Link as the timing glue. Anyone who shows up with gear and software they want to sync can then join Link to establish a collective, shared timebase. And unlike traditional hierarchical timing (like MIDI clock), you get some immediate advantages:
- There’s no single timing reference that can cause everything to fail if it drops out.
- Anyone can enter and exit at any time. (You can sync start/stop if you want to, but it’s an option.)
- Anyone can establish a change in timing, and other connected gear and software will follow.
- Wireless connections can work along with wired ones (more on how to make that work effectively below).
Link is now widely supported — not just in Ableton Live, but also in other DAWs and some hardware, including Push, Move, and even Eurorack modules. All you really need, though, is for each player to have something like a laptop (or Push standalone, etc.), so they can connect. Then they can hard-wire any other MIDI gear or traditional clock sync the old-fashioned way on their gear setup.
It also works well for people bringing iPhones or iPads, as those often work really well in jam situations. But it’s more than just iOS apps. Check the ever-expanding guide:
Products supporting Ableton Link
MIDI and analog
For bridging to MIDI, Ableton’s guide has you covered. There are workarounds for SMPTE (LTC) and MIDI Timecode, but you’re far more likely to be using MIDI Clock in a jam situation. The trick is to set this up, then adjust the MIDI Clock Sync delay so that the sound output from your device and Ableton Live synchronize:
For Eurorack, I wrote a guide on integration, including clock and CV:
The best way to integrate Ableton Live and Eurorack modular – for any rig
It’s still relevant now, though increasingly native Link support on hardware means you’ll sync up over Link rather than MIDI. (I do still use MIDI-to-clock in a pinch, though, as it’s easy enough and odds are you have something that does both analog and MIDI, whether an Arturia BeatStep or MIDI module.)
The network
Ableton, being the cautious folks they are, will repeatedly tell you to use a wired network over a wireless network for reliability. That’s not bad advice, and there are various ways of running cabled Ethernet connections to different devices, most often these days via an inexpensive USB-C adapter. (Your USB hub might even have one on it already.)
Fortunately, though, I’m not Ableton, and I know that in reality, a wireless setup makes a jam session easier. So you just need to have a reliable wireless connection! Here’s what not to do: don’t use some random available wifi network, like the one in a hotel room, venue, or shared workplace, or whatever dodgy studio router you’ve got that’s hidden in a corner and you’ve even forgotten which one.
No, convenient as wireless is, the added step of using an inexpensive wireless router will make this completely solid! It’ll take up less space and weight than even your existing cables.

Open the pod bay doors. One reason not to use a random network is that you need to make sure there’s no firewall interfering with Link/Link Audio. Enable UDP multicasting on port 20808. (A dedicated router will make this easy!) And don’t forget to disable any VPN or other data-filtering software.
I’m using a GL-iNet Opal (AC1200), for instance. It runs about $40 (and yeah, available internationally). There’s a USB-A (USB 2.0) port on the back so that, in addition to accessing the internet from a WLAN (Ethernet) port to a hub, you can connect either a USB stick with a SIM card or a connection to your phone for its hotspot. (That can come in handy if you need to grab an update or, cough, authorize a plug-in.)
You get a couple of LAN ports if you do want wired connections (say to the other laptops), and a stable-enough WiFi connection for any nearby devices for Link and Link Audio. And I liked the browser configuration for this router, too; it’s really easy to use. There are a lot of others, though, and I’m not a networking device expert, so you can pick anything similar. These just remain one of the most useful non-music gadgets I use for production. (They’re also helpful for Open Sound Control applications like TouchOSC and Ableton Live controller apps like Imaginando’s LK.)
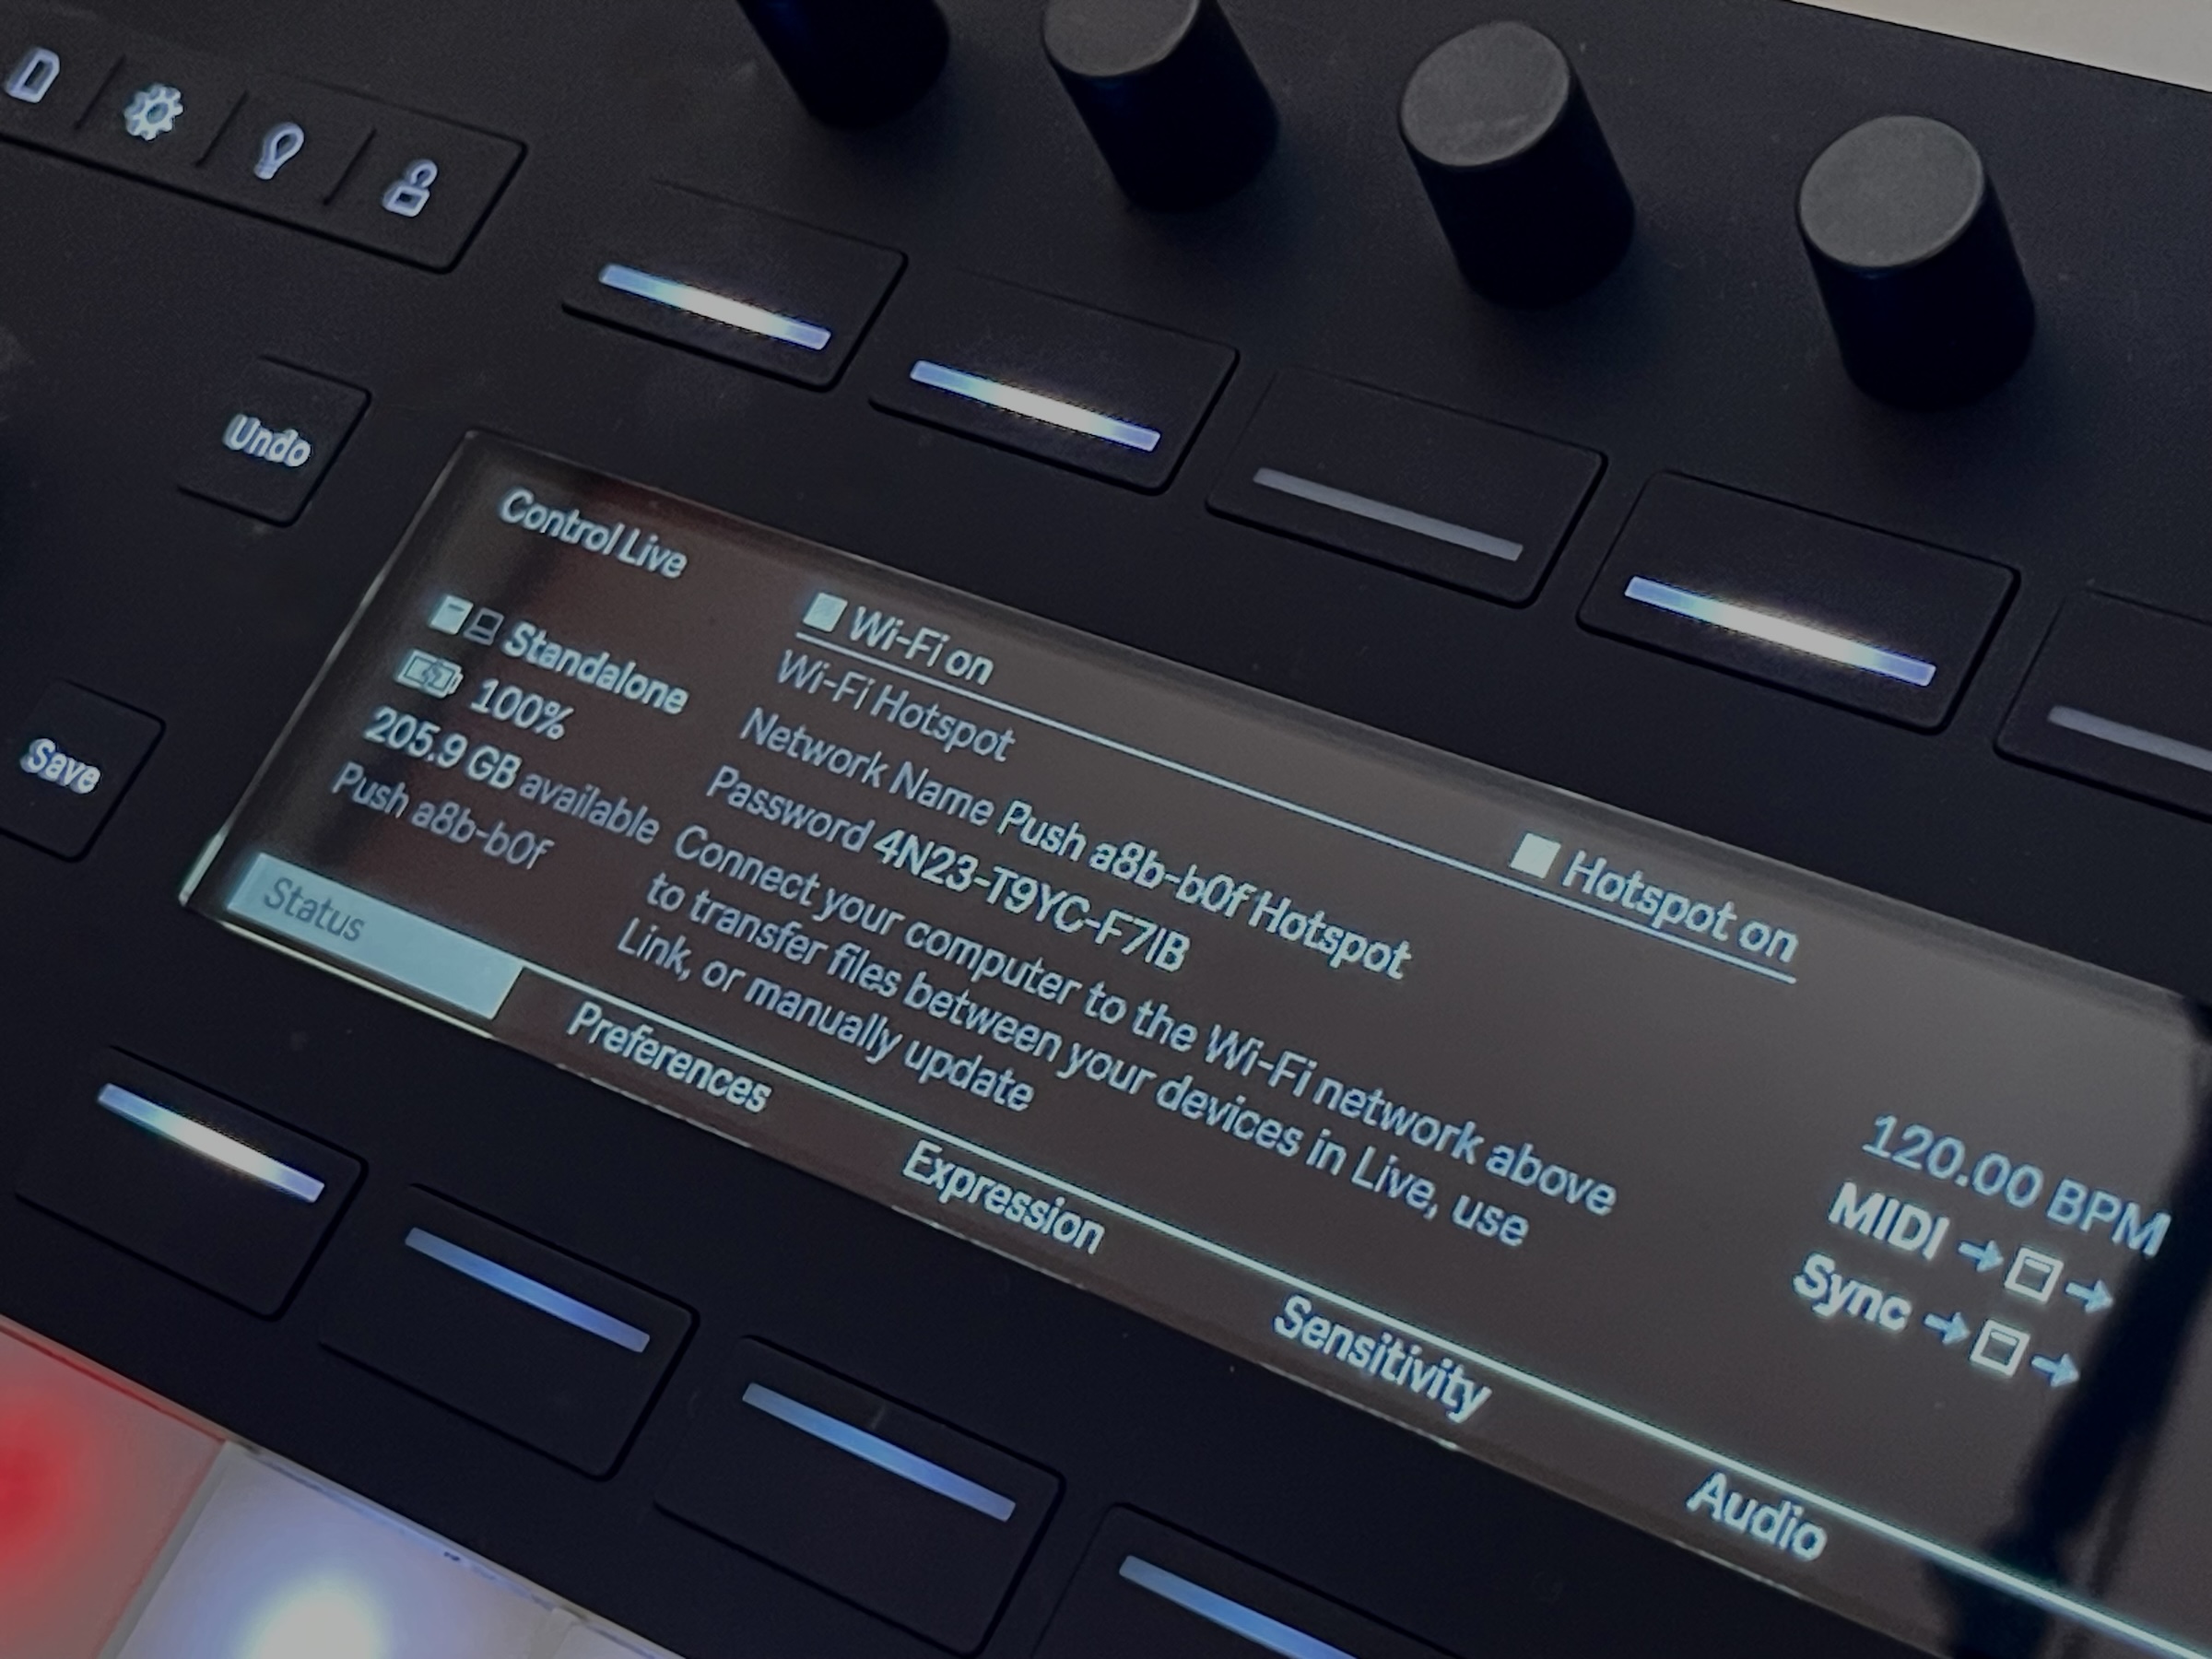
Use Push 3 standalone as a hotspot. Got a Push 3 standalone? You can use it as your networking source for Link! Hit Status, then enable the Hotspot. (If that option isn’t there, make sure you’re not running an older version of the Push firmware.)
Configuring Link
Turn on Link on any software or hardware you want to connect to a shared beat and (optionally) start/stop. Connected peers can follow the current tempo, and they can also nudge tempo faster or slower. If multiple connected peers try to change the tempo at the same time, Link will average the changes together. (Ever been in a choral or instrumental section where people were dragging and pushing the tempo with each other? It’s like that!)
If you’re used to a hierarchical clock like MIDI, you may expect to have a single time source that others are forced to follow, but Link doesn’t work like that — which is a good thing. You just switch Link on, and every connected DAW, instrument, or other device will sync up.
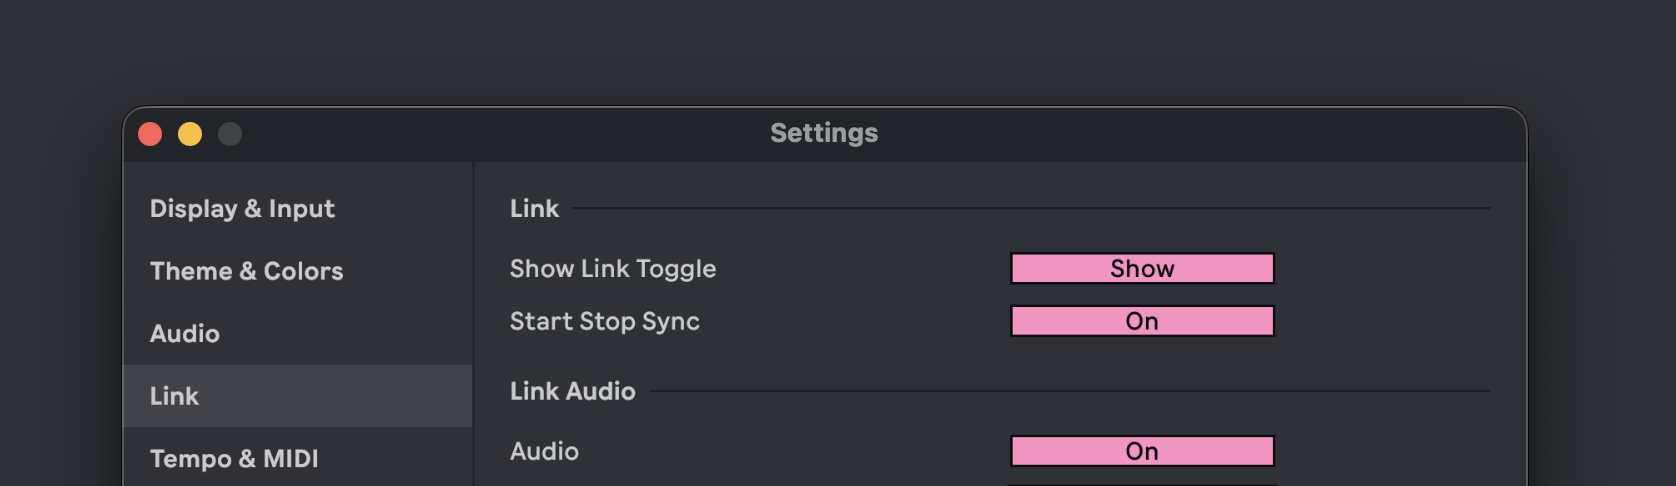
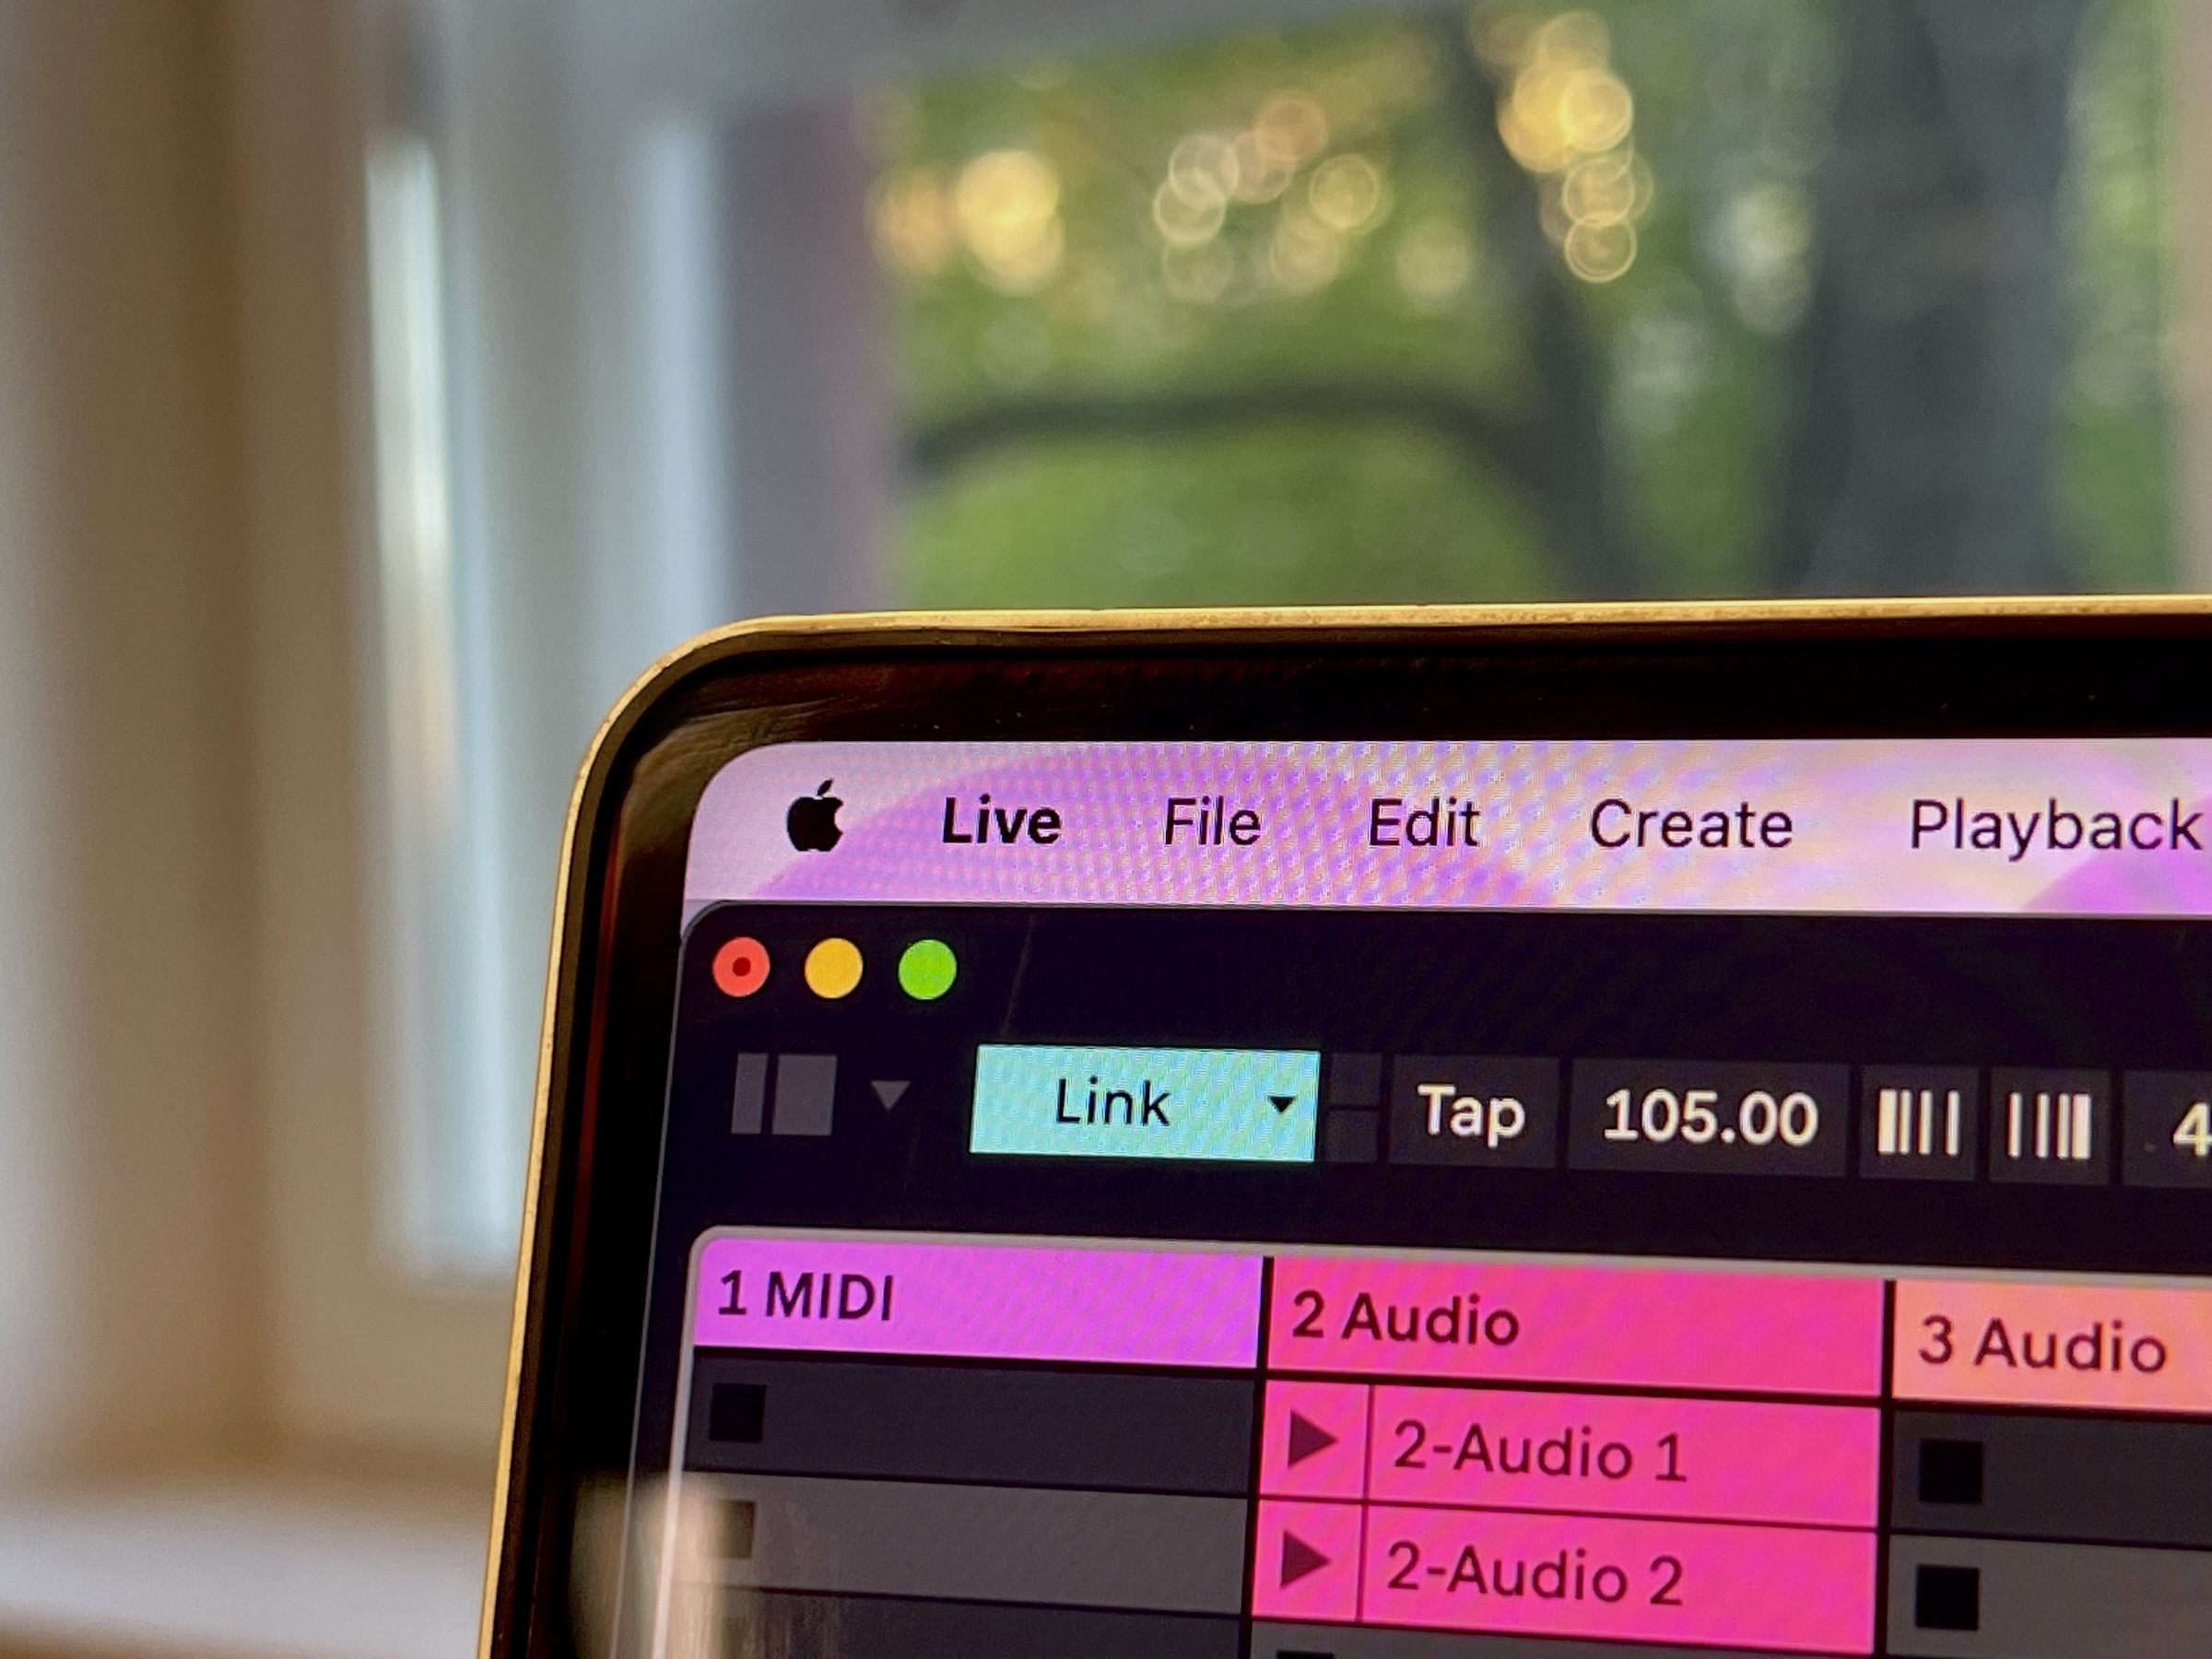
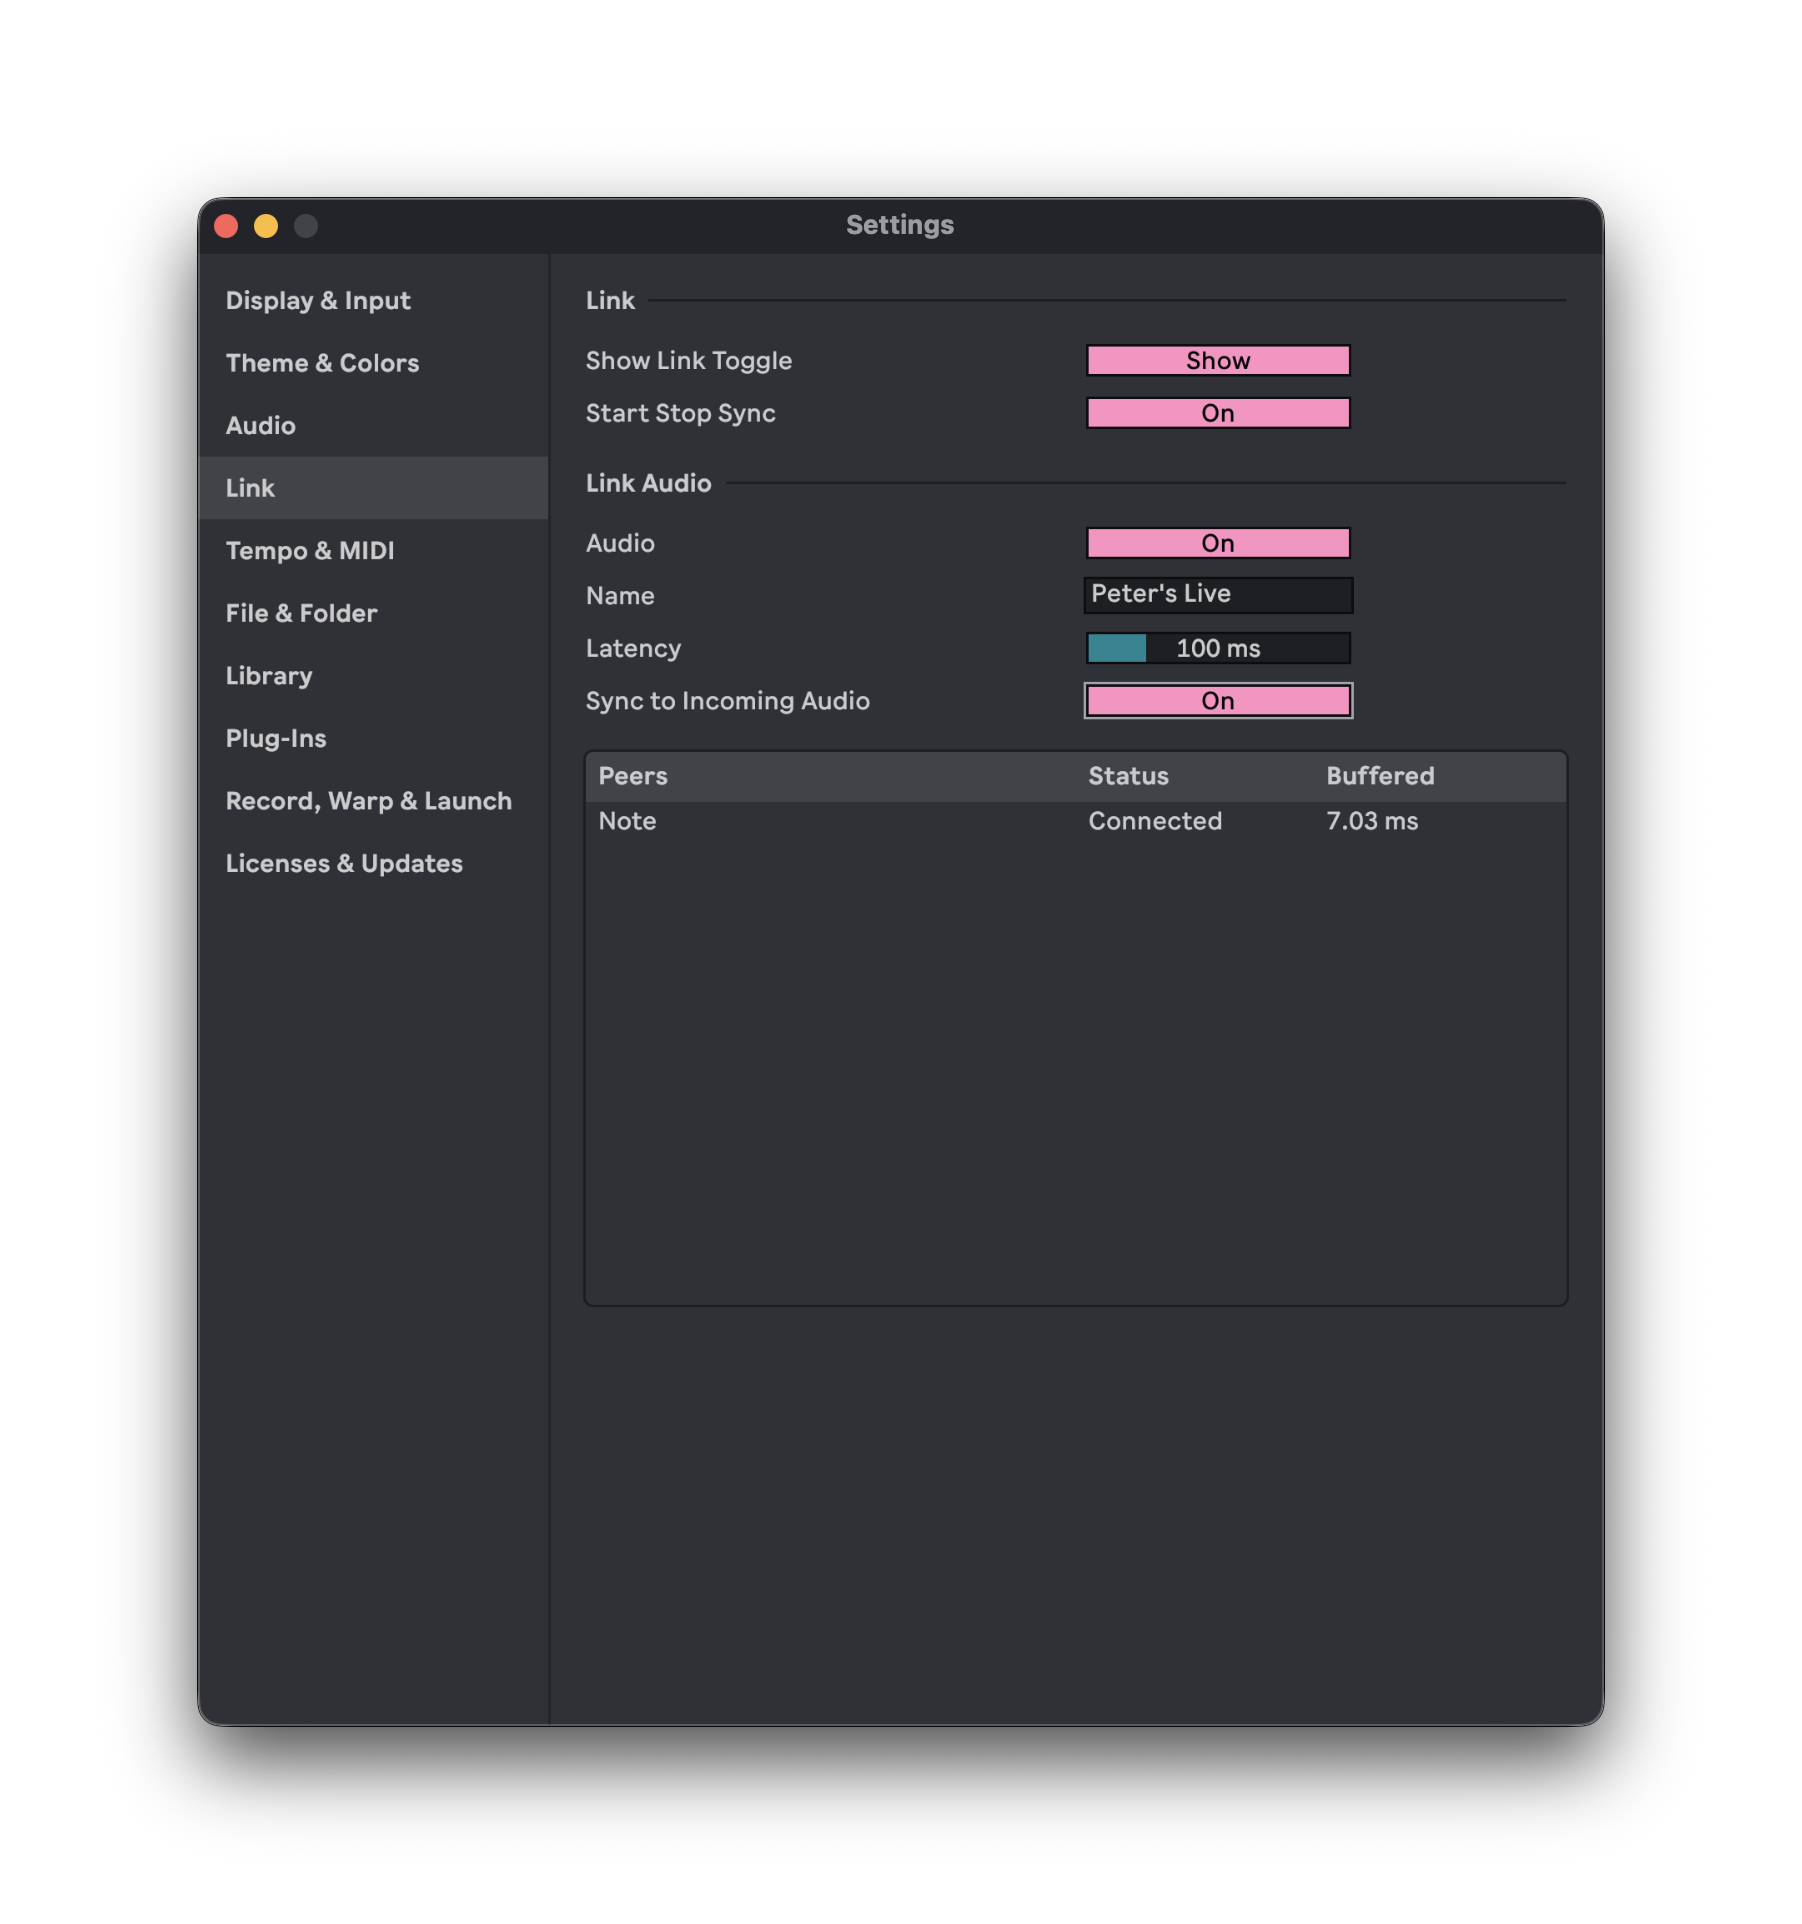
In Live, if you don’t see the Link button on the toolbar, enable Settings > Link > Show Link Toggle.
You can also choose whether Start Stop Sync occurs across connected Link peers. For those peers that support it, this will mean if there’s a start or stop with anything connected, the others will start/stop, too. Otherwise, you can freely start and stop as you like, which is perfect for jams — no one can bring the jam to a screeching halt, even if their computer crashes or they hit stop by mistake. (It happens.)
You’ll also want to enable Link on the Live transport. (Other software and hardware have some analogous functions for putting everything in Link-enabled mode.)
Eurorack, analog gear, and Link
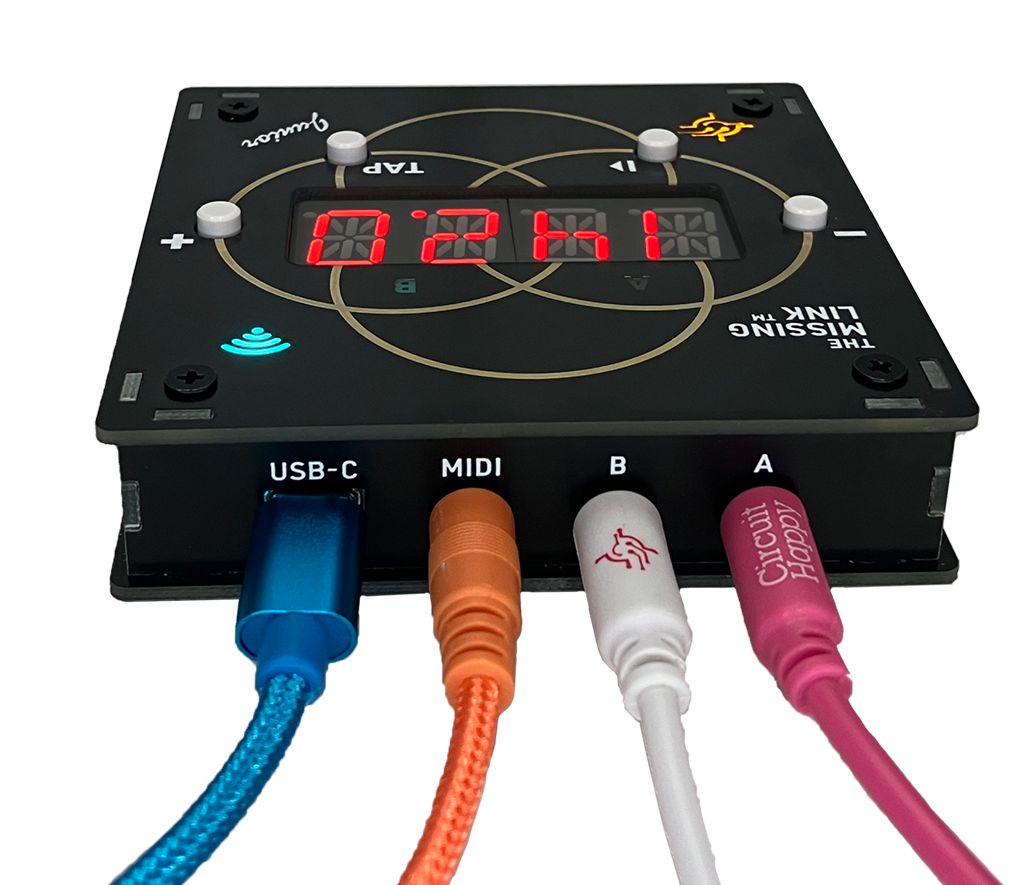
And now you can easily add a Eurorack rig or other analog gear to the Ableton Link fun. Circuit Happy, for instance, makes a product called The Missing Link (ML:2m, for Eurorack) and a standalone/desktop device called The Missing Link, Junior that lets you patch into wireless Link as easily as you would MIDI clock or analog clock signal.
The fun part of this is, once you have everything synced up, you can mess it up again — musically speaking! Circuit Happy recently added this update in their firmware:
Rhythm explorer mode allows you to disrupt your clocks with some maths and chaos, providing new rhythms into your music instantly. Instead of a regular steady clock, turn on Rhythm Explorer mode to introduce looping patterns as your clock with the ability to choose the number of Steps, Pulses and introduce Chance and Jitter! How about using a Euclidean rhythm as your clock pattern!? Well, you can and the results are super fun and can provide some exciting results.
And that’s not even including hardware that has Link support onboard, which is becoming more commonplace. Akai’s MPC line, monome norns, and the Torso T-1 all support Link natively, even before you start whipping up your own DIY solutions with Raspberry Pi or other chipsets.
Managing audio latency
Latency management is all about the “slowest common denominator.” That is, in order to keep everything in time, anything you incorporate into a set that adds timing lag requires everything else to slow down to compensate. Think of a group of friends, where you’re waiting for the slowest friend to finish up so you can move on. If you’re triggering patterns and so on, this isn’t such a big deal — your main goal is just to keep the audible timing together. If you’re playing live, though, you’ll want to be really careful about adding any latency — for instance, any plug-ins that add lag for processing.
Elisabeth Homeland actually just created a useful Max for Live device that can track down sources of latency in a set, called, appropriately enough, Latency Manager:
I spoke with Nándi at Elisabeth Homeland about tips for latency management, and he had a few ideas to share:
- Evaluate your sample rate and buffer size for the task — not just buffer size, but “many people aren’t aware that using a higher sample rate also reduces latency.”
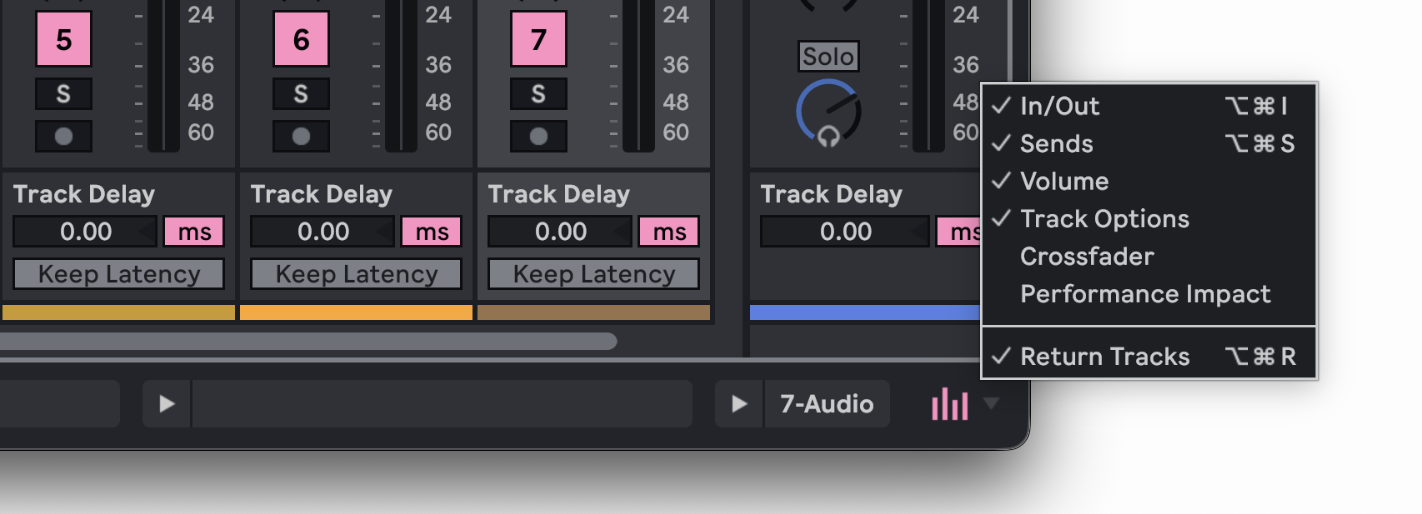
- Disable Keep Latency for all tracks. (You’ll find that with Track Options visible, on the bottom of each track, as pictured below.)
- Favor built-in Devices! That’s an easy way to make something live/jam-ready. You can save your favorite third-party plug-ins for the production session later!
- Freeze and Flatten. Freeze alone won’t reduce latency; you have to flatten the track, as well. (This has long been a habit for me, but I realize other folks may not know!)
Link audio
Link already lets connected devices “just work” in sync without much effort on your part. Link Audio brings that same idea to connecting and recording sound. With a conventional connected analog connection, you need to calculate for the appropriate latency when monitoring or recording. Link Audio does this for you — and it even works in wireless situations where you don’t have a cable handy.
Yes, yes, yes, wired may still be more reliable. But if you follow my advice on routers and the configuration for Link Audio I describe here, I think you’ll find it perfectly usable! That’s great if your buddy just comes over with an iPad and you want to grab some audio fast.
Link Audio is officially supported in Ableton Live 12.4, Note 2.0, Move 2.0, and Push 3 standalone (v2.4) and later. it’s also been added to the Link SDK, though, and I suspect by the time you read this, you’ll have a lot more options.
If you’ve got an iPhone, though, Note is the easiest way to test this.
First, make sure you’re connected to the same network. Disable any VPN.
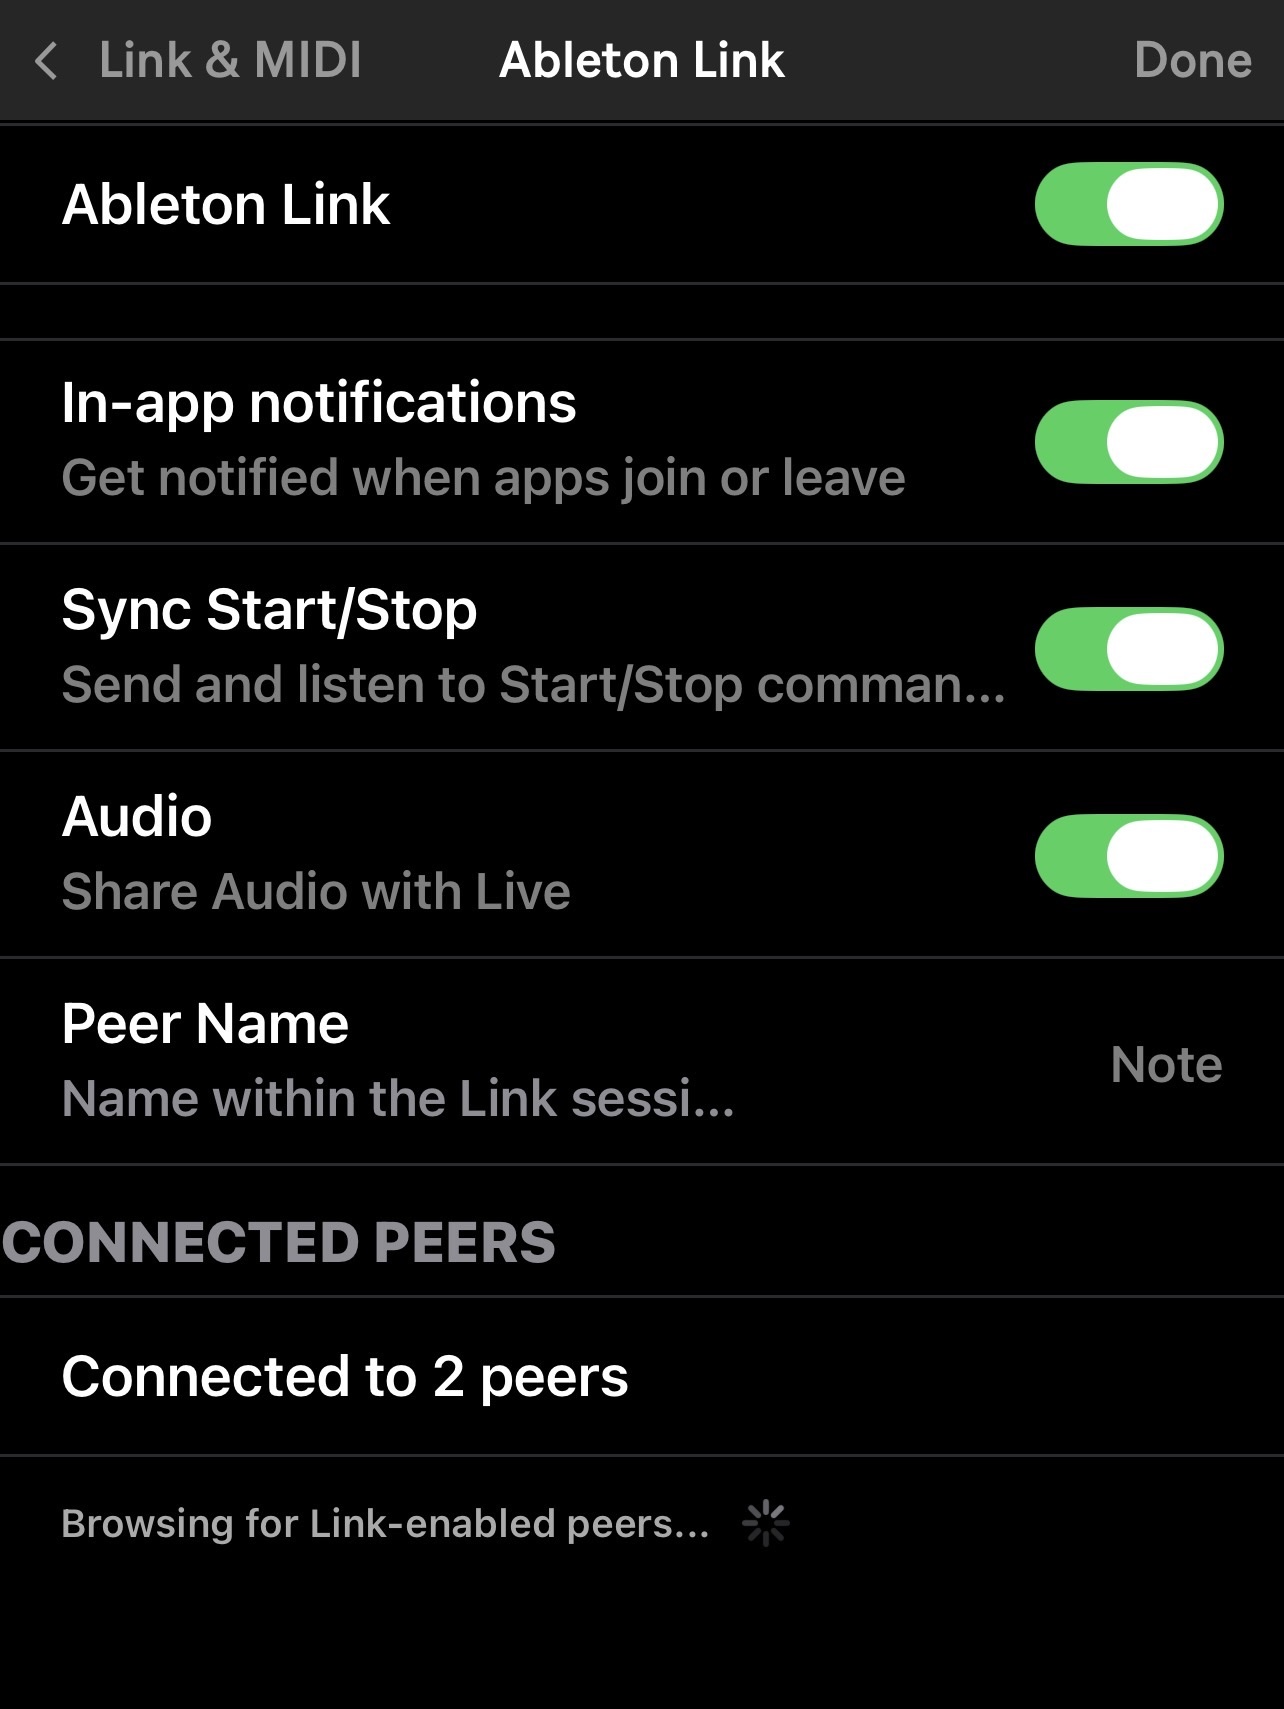
Enable Link Audio on Ableton Note. (Move and Push standalone also require you to enable Link and Link Audio; they’re not on by default.) From the main Note screen, tap the (…) menu at bottom left > Settings > Link & MIDI. Then, at a minimum, make sure Ableton Link and Audio are each toggled on:
You need to enable Link on the toolbar in Live, as you would for syncing with Link.
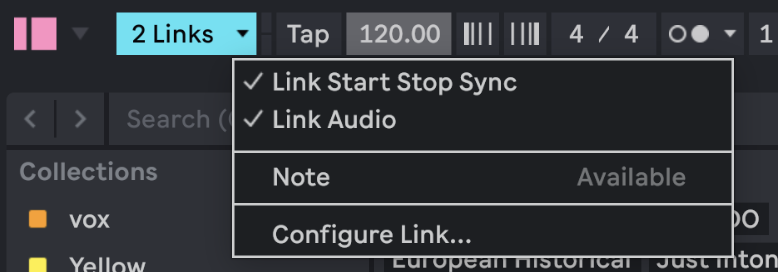
With Link enabled on the toolbar (and only if it’s enabled), you should see Note appear in Settings > Link > Link Audio > Peers.
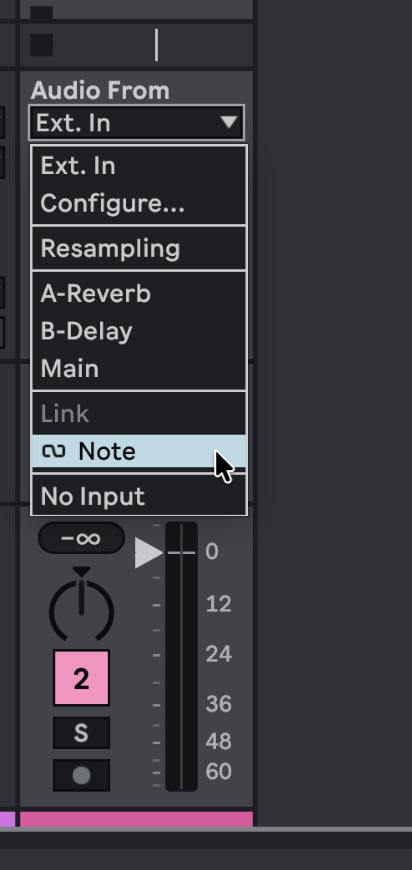
Now, you can select Note (or any other Link Audio-equipped device or app) as an input in Live.
Try playing something rhythmic in Note, and go ahead and monitor it through Live. (Actually, to hear the latency directly, while this will sound awful, you can also turn up the speaker on your iPhone or device!)
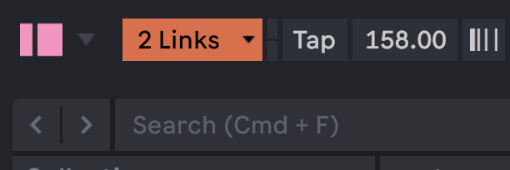
With the audio playing, you may want to go back and adjust two settings. First, you may notice some dropouts at the default 100 ms latency, especially on a wireless connection. (Hey, they did warn us!) When there are significant dropouts, the Link indicator on the toolbar will change color:
And in Settings, you may see a line of text warning you to increase latency.
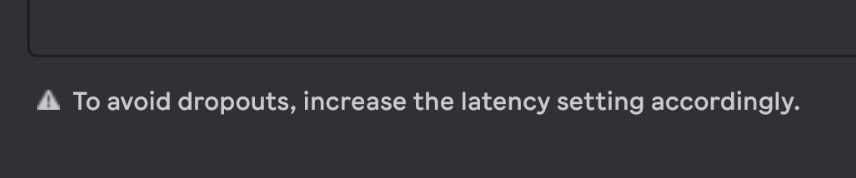
Let’s do just that! Just increase the latency setting — for instance, from 100 ms to 150 ms. Wait a few moments, and see if the audio stabilizes. The advantage here is, you only need to do this once. With ample latency for all connected peers, you can still be sure that everything will track reliably. (If you’ve ever had to go back and tweak a bunch of drum machine parts after the fact, you’ll appreciate the value of that!)
The other setting to observe is Sync to Incoming Audio. You want this setting on in one place and one place only — so that’s the software you’re using to monitor and record. This synchronizes your Live session to connected peers’ audio, so you can work with it as an input for audio tracks in Live, and it shares your audio-generating tracks (audio tracks, instrument tracks, Returns) with other peers.
It’s the future! Well, okay, one good part of the future anyway!
I wrote this guide based on late beta versions of Note, Push, and Live 12.4; I’ll update it if there are any changes at or after release.
Tune, time — what’s next?
Now you’ve got comprehensive guides to everything you might want to know about playing in time and playing in tune. For part 3, we’ll bring it together with some ideas for how to stay inspired playing live. If you’ve got suggestions, requests, or questions, be sure to let us know in comments or contact us.
Revisit part 1: