Live 12 is here – so now what? Here are twelve other ideas to try out, from timesavers to inspiration sources.
The ability to bring up the Mixer in Arrangement view you probably know by now, so here are some other tips. These have definitely been some go-to favorites of mine. There’s plenty more where this came from, but these are a few quick tricks and tips you can try out with that fresh, new install:
One by one:

#1. Change the color.
Live 12 has received a subtle but comprehensive refresh of the UI, and Themes go along with that. This also means we’ll need a new solution for third-party Theme creators – I’ve got my fingers crossed that they open this up. In the meantime, there are some new themes that I find much easier on the eyes (even as a glaucoma sufferer). And notice that if you select the Default theme, you get new options: High-Contrast mode on/off, Tone (Cool/Neutral/Warm), and Dark/Light. Choose Follow, and Live 12 will (finally!) follow the light/dark state of your OS.
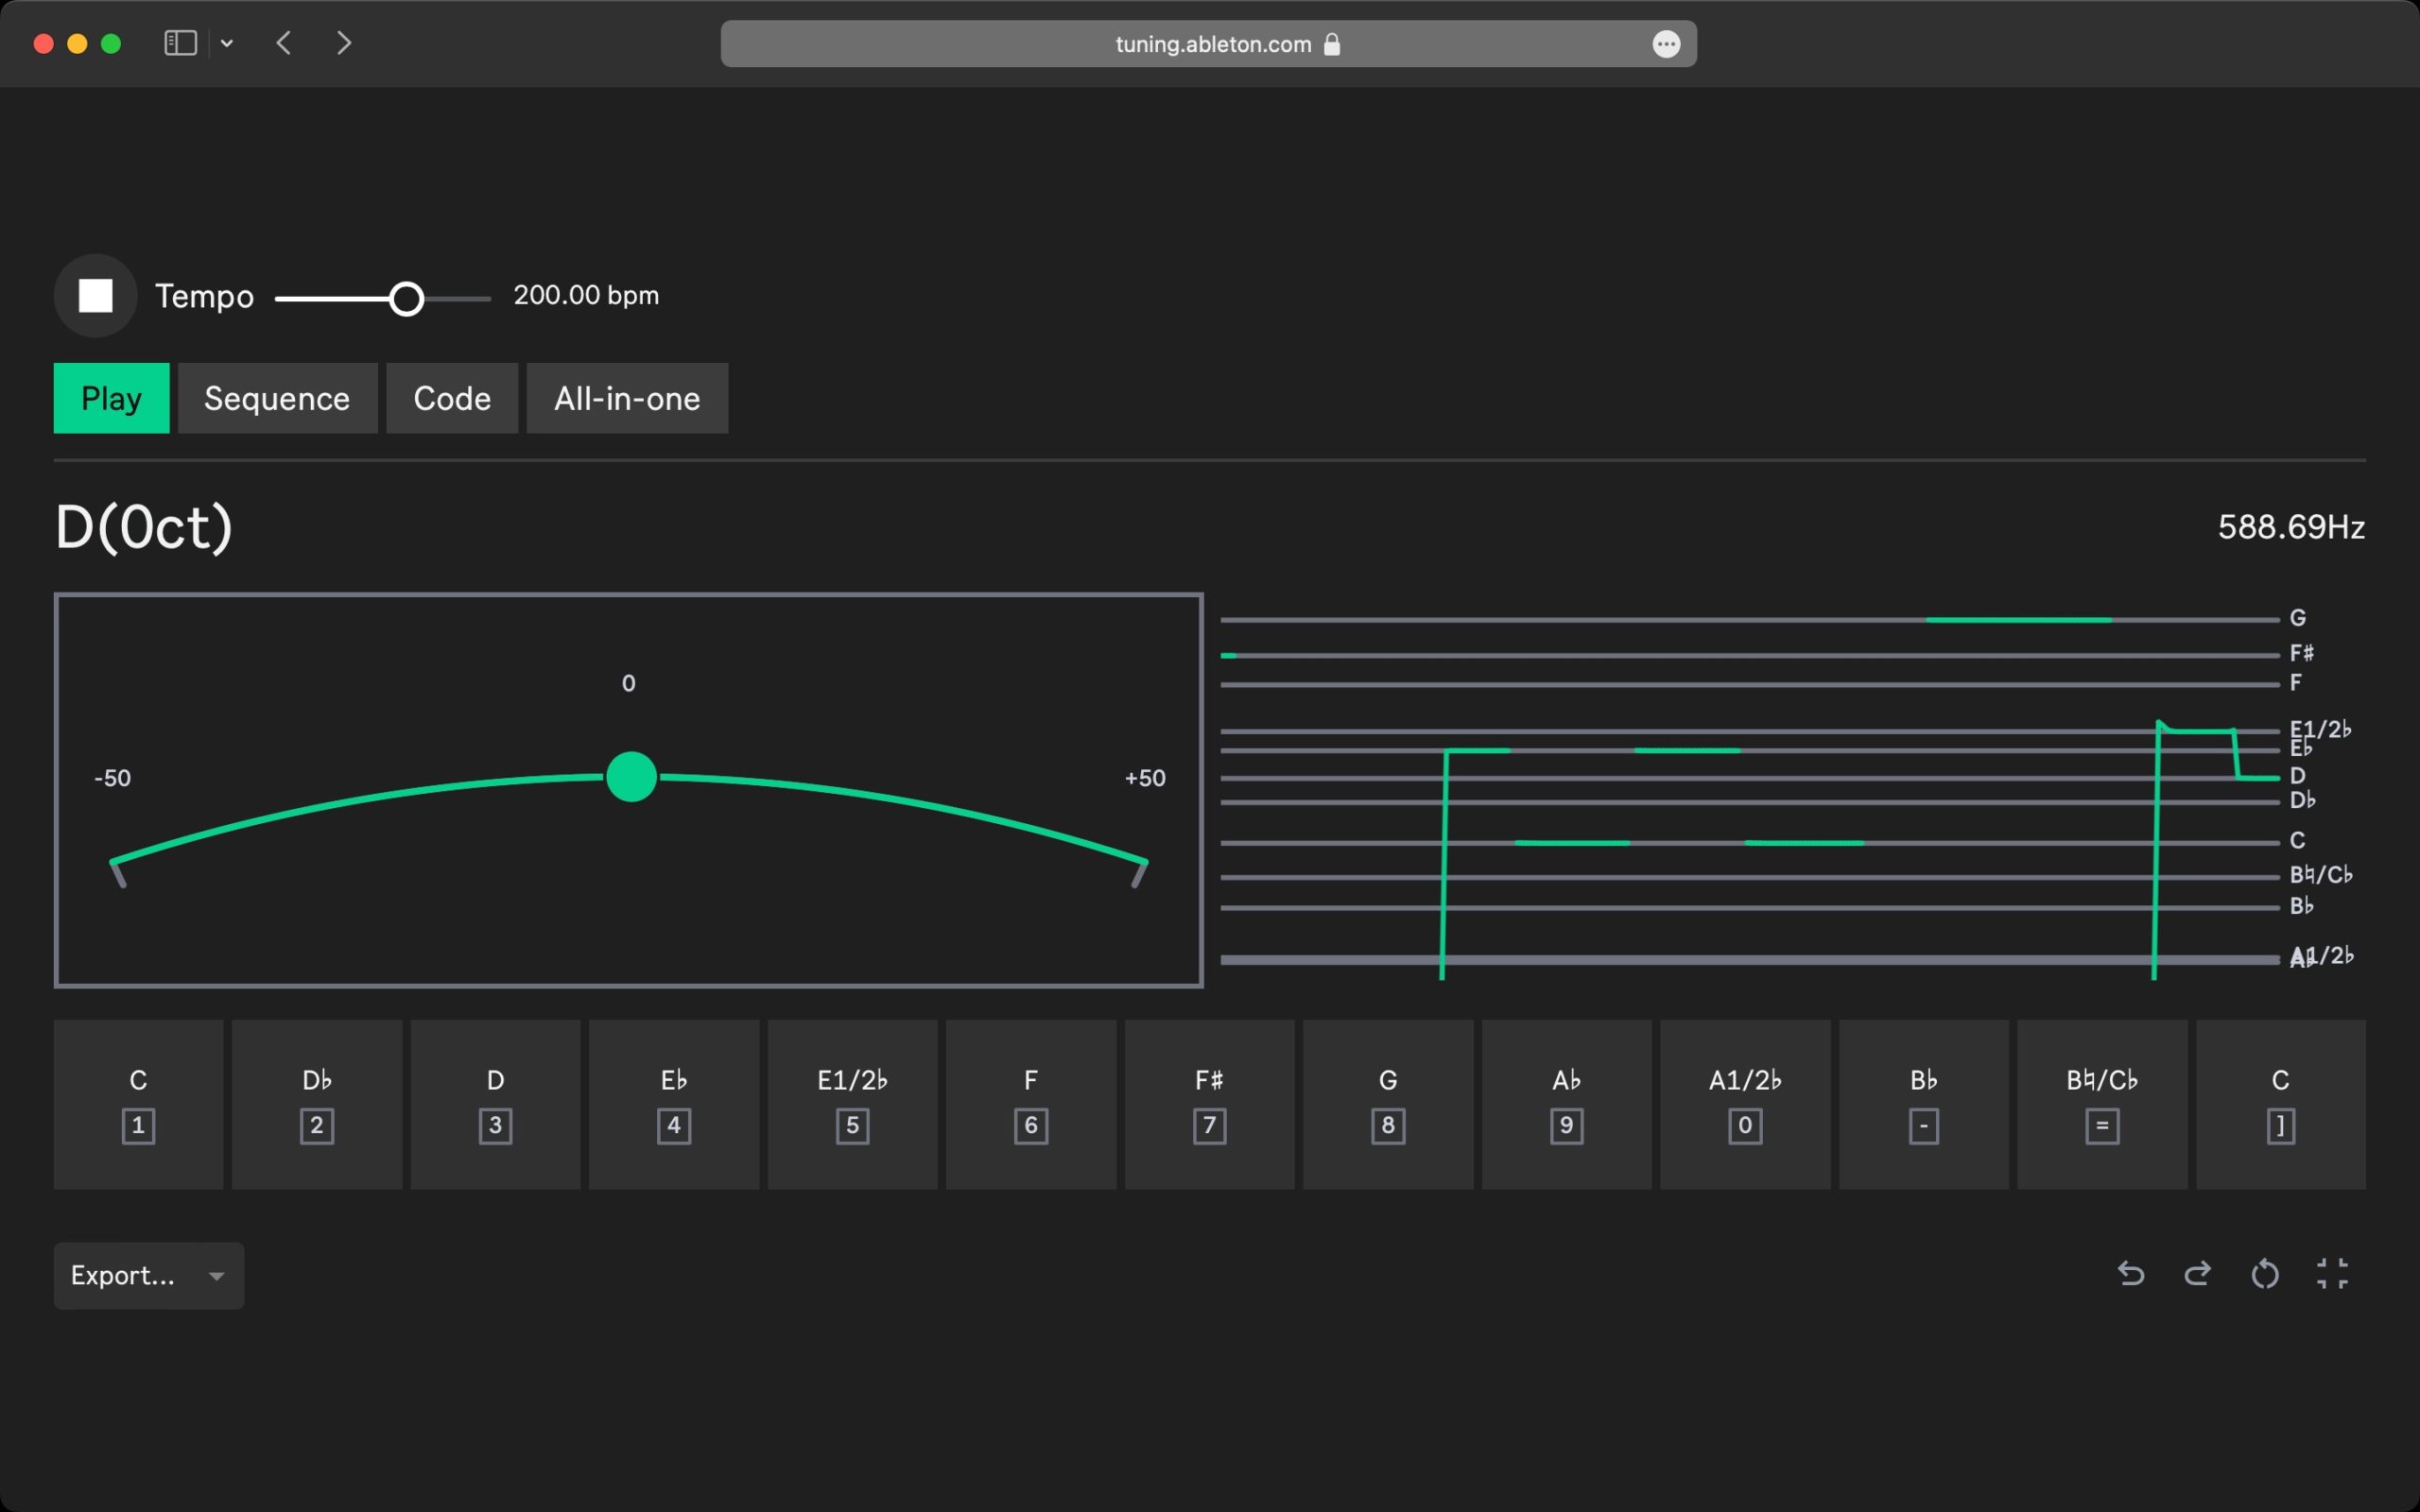
#2. Explore tuning.
Tuning support has expanded greatly since we first took a look. (In the video, when I saw you heard from me first, I mean the tuning website – but that to me is actually even more exciting than the host support, if you can believe it, because it works with any hardware or software that supports Scala.)
I can’t recommend checking out tuning.ableton.com enough. As regular readers know, we have the opportunity to support the full humanity of the people we work with, and understanding and decolonizing our approach to our musical vocabulary is one small but important part of that.
Also, you can sing into the website. Sami who worked on the Arabic portion – and other artists I’ve talked to – all talk about the importance of singing to really understand these systems.
Just how we use these hardware and software tools together (and MTS-ESP and Scala and Live Tuning Systems and so on) is something that warrants more investigation.
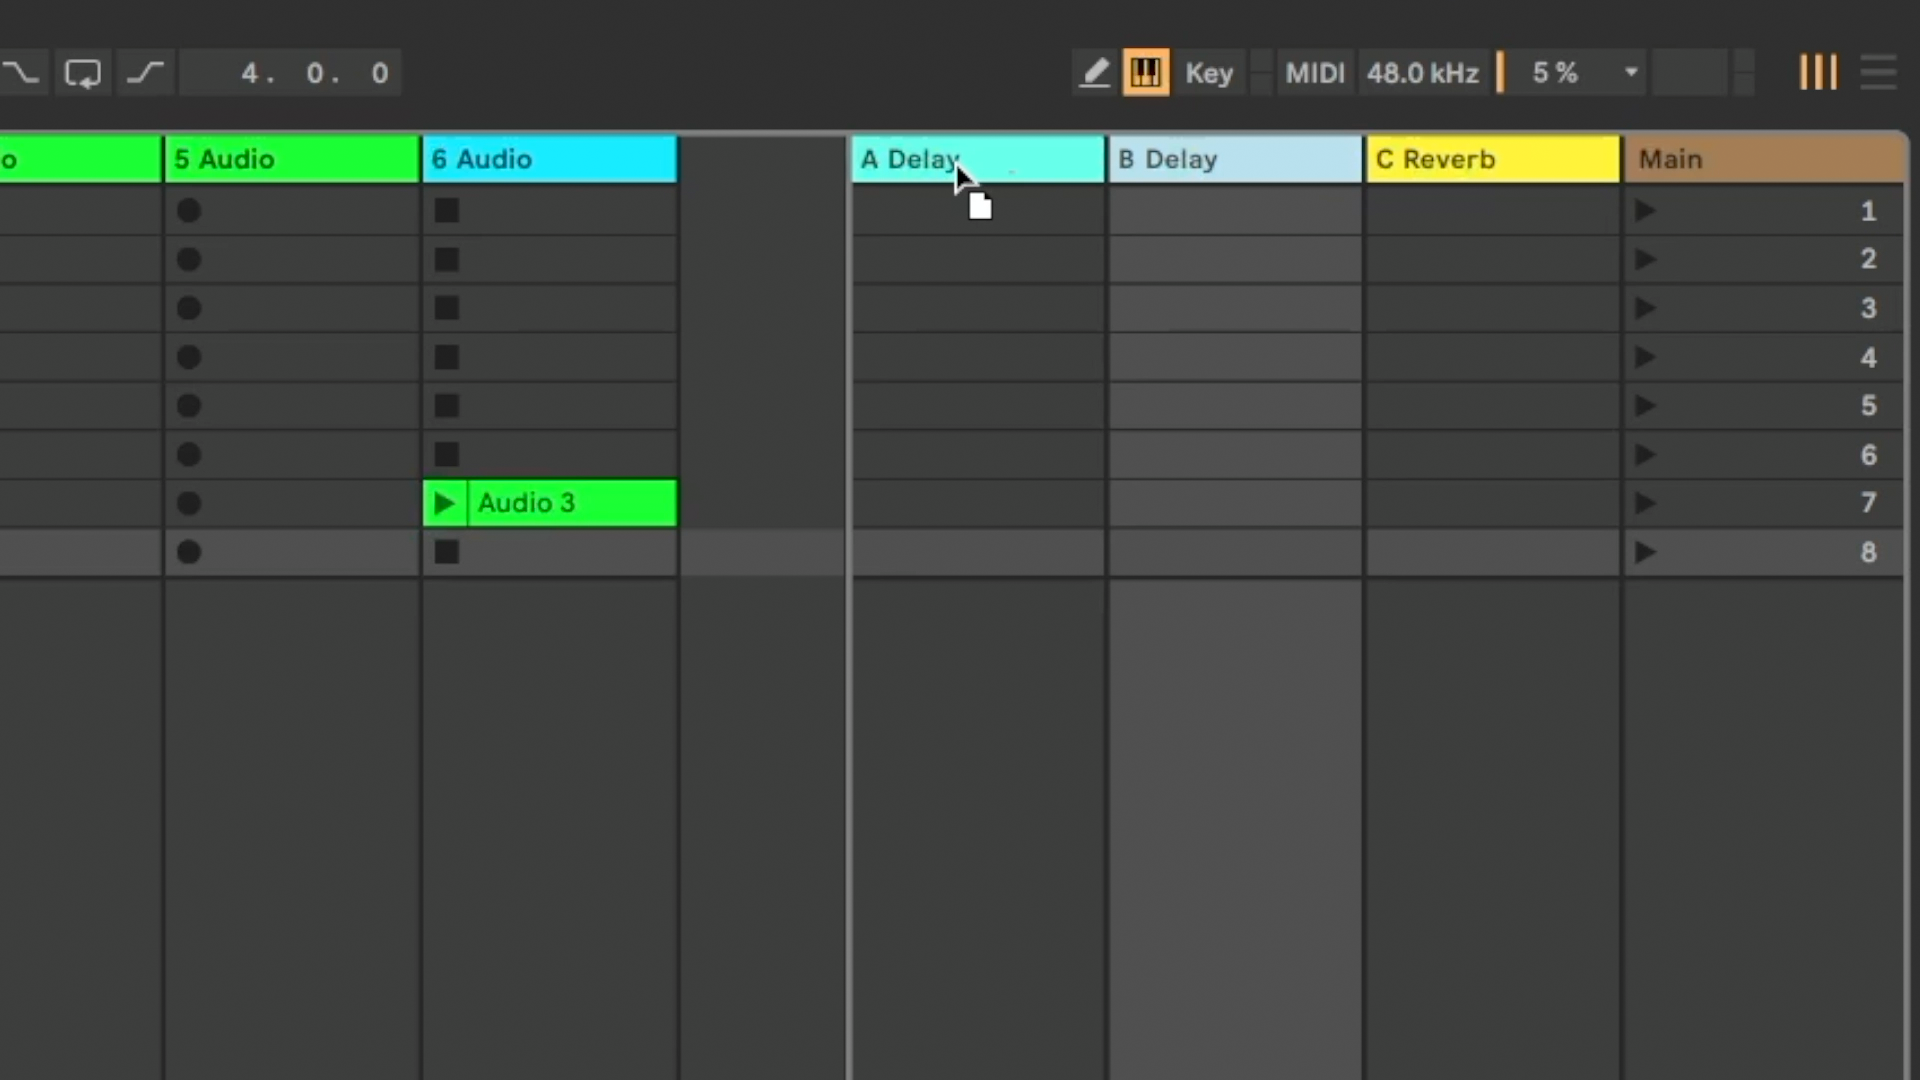
#3. Reorder and reorganize returns.
The great thing about this feature is, you’ll only notice it if you used past versions of Live and found it was missing. Now return tracks behave just like normal tracks – you can drag them to reorder them, and right-click to bring up a menu to duplicate them, etc.

#4. Find similar sounds.
I admit I forgot about this one – you can right-click to Show Similar Files in the browser, and can even substitute files from inside devices like Simpler (and Simpler instances in Drum Racks), etc. Live uses pre-trained machine learning to analyze sound similarity on your local Library. In Simpler/Sampler, you can choose Next/Previous Simpler. It’s a really fun way to inject some inspiration into your samples, and it even works with presets, not just sound clips – it’s really wild. I find it’s actually the most fun when you throw the algorithm something odd and get unexpected results.
(That’s all local, so Ableton isn’t secretly training Live to replace us. Probably for the best – they could create a monster AI that could never decide what the snare should sound like.)
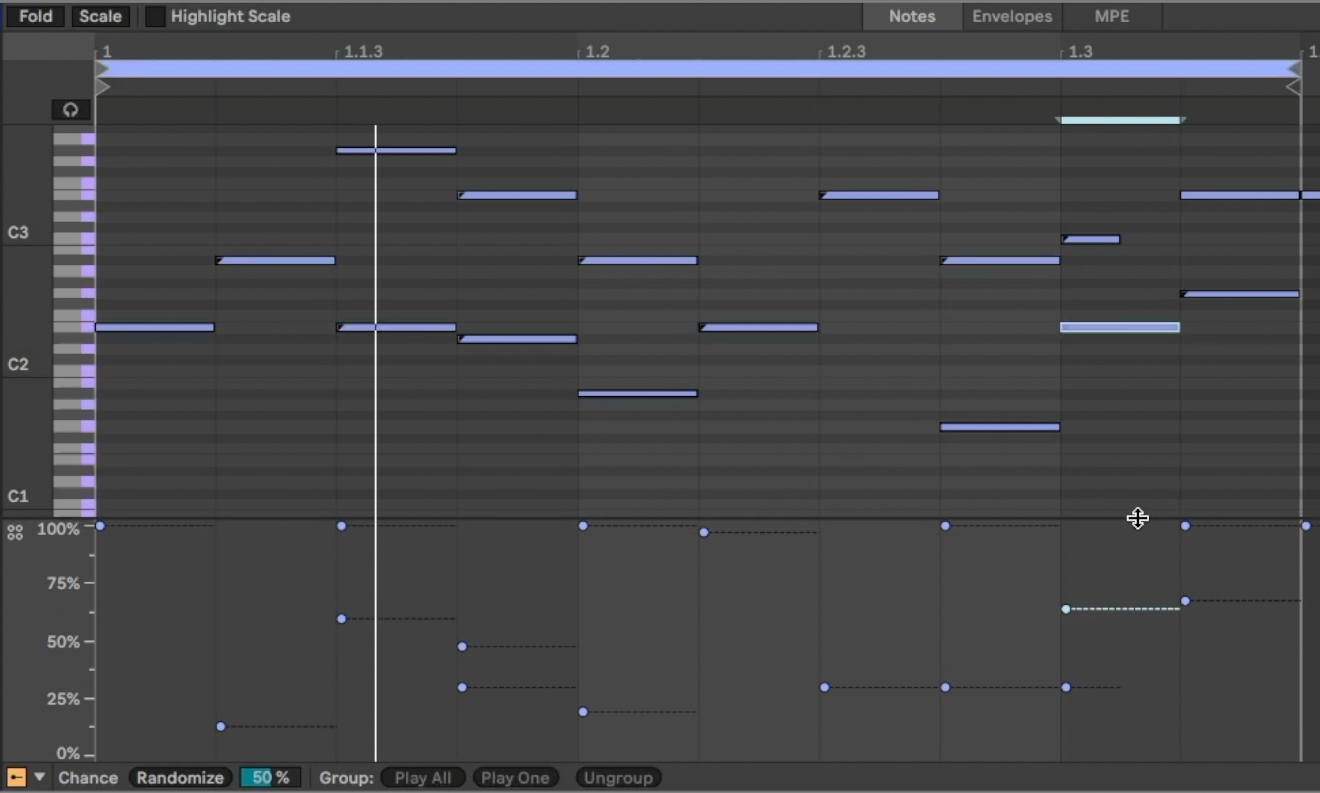
5. Apply chance to grouped selections.
There are a lot of MIDI editing improvements, but here’s an easy one – now if you group a selection of notes, you can apply probability (Chance) to just that group, all at once. This is also an easy way to quickly thin out a drum arrangement, for instance, and make it a little more organic.
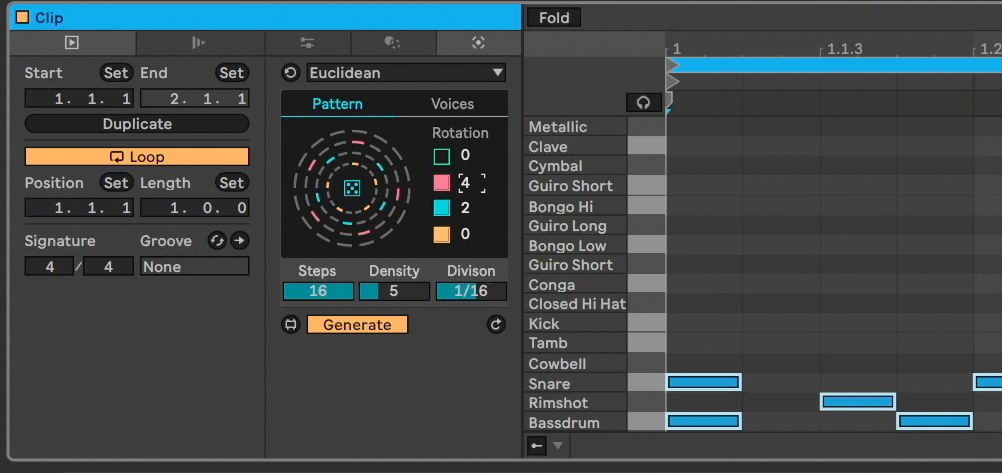
6. Try the Euclidean Generator.
Kids today and their Euclidean generators. Here’s another one – but note the Voices and Rotation controls, in particular. Oh, by the way, there’s no saying you have to use this on just drums; it’s also fun on melodic parts.
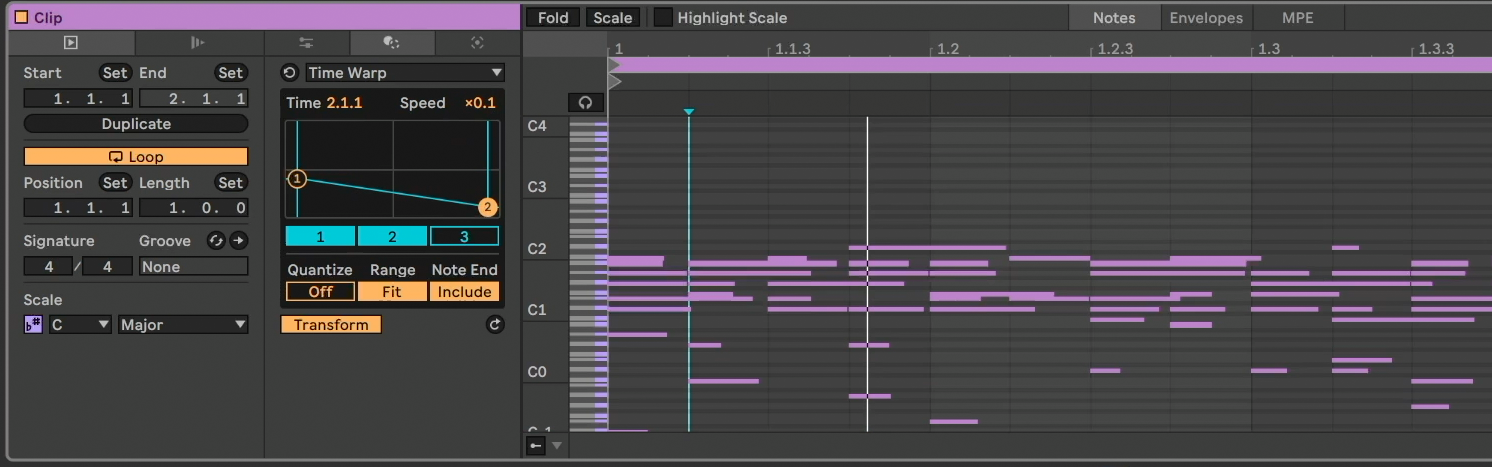
7. Accel. and deccel. with the Time Warp Transformation.
I enjoy all the Transformations, but Time Warp is an easy favorite. Plus note that you can apply different warps to different selections for some serious temporal distortion.
And this is a good time to say that there’s Max for Live support for both Transformations and Generators:
Just like building a Eurorack module is easier than building an entire polysynth, Max tinkerers are already finding this is a manageable way to dip your toes into Max, even with rudimentary skills. And so you can expect there will be a lot of action in this space – plus a chance to mess around yourself.
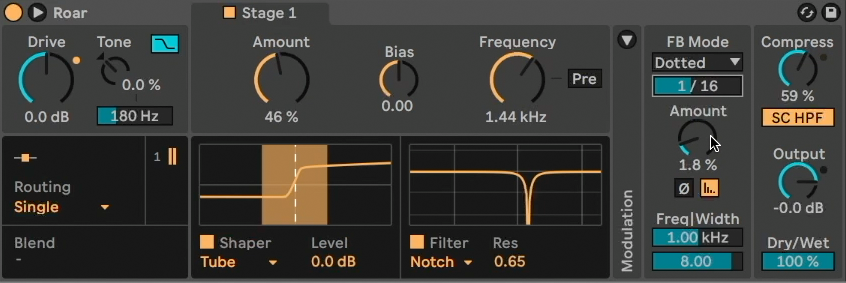
8. Add feedback in Roar.
Roar is another of those Ableton Live effects that does way more than you think at first. But Feedback is especially fun to play with – especially as you can sync up the FB Mode to different musical time divisions. Combine that with different shapers, etc., and then expect even more fun as you add different stages, mid/side processing, and whatnot.
Roar looks like another instant classic – something people will use to do really subtle stuff (like nuanced bus coloration) as well as out-there creative destruction.
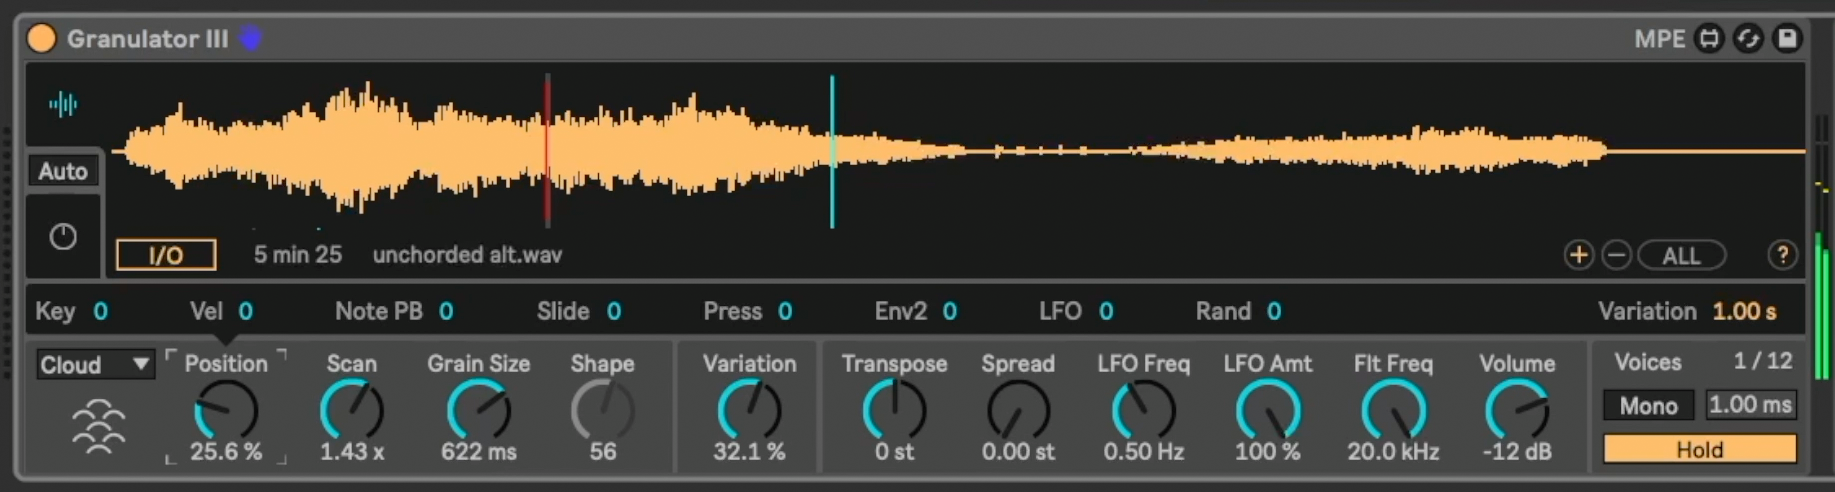
9. Try the new Granulator III modes.
Robert Henke’s Granulator isn’t your only choice in granulators – and it still doesn’t do real-time processing, though it’s easier to grab audio than before. But it is a really great place to start, and a must for any granular synthesis fans. The new Cloud and Loop modes are wonderful additions.

10. Use Variations in the Performance Pack to actually finish some music.
As advertised, the new Performance Pack is all about, uh, performance. But anything that lets you take control of something live is also automatically a great way to get spontaneous and actually finish your music. Variations is doubly so – it captures not just the state of one Device or even one Track, but Clips and Devices across your session. That means you can take all of the tweaking you’re doing and create some different states, then trigger them to form a song structure later (or at least get a rough one going).
There are other ways to use the Performance Pack this way – both as a way to set up live gigs and a way to improvise your way into finding happily finished music. More on that soon.
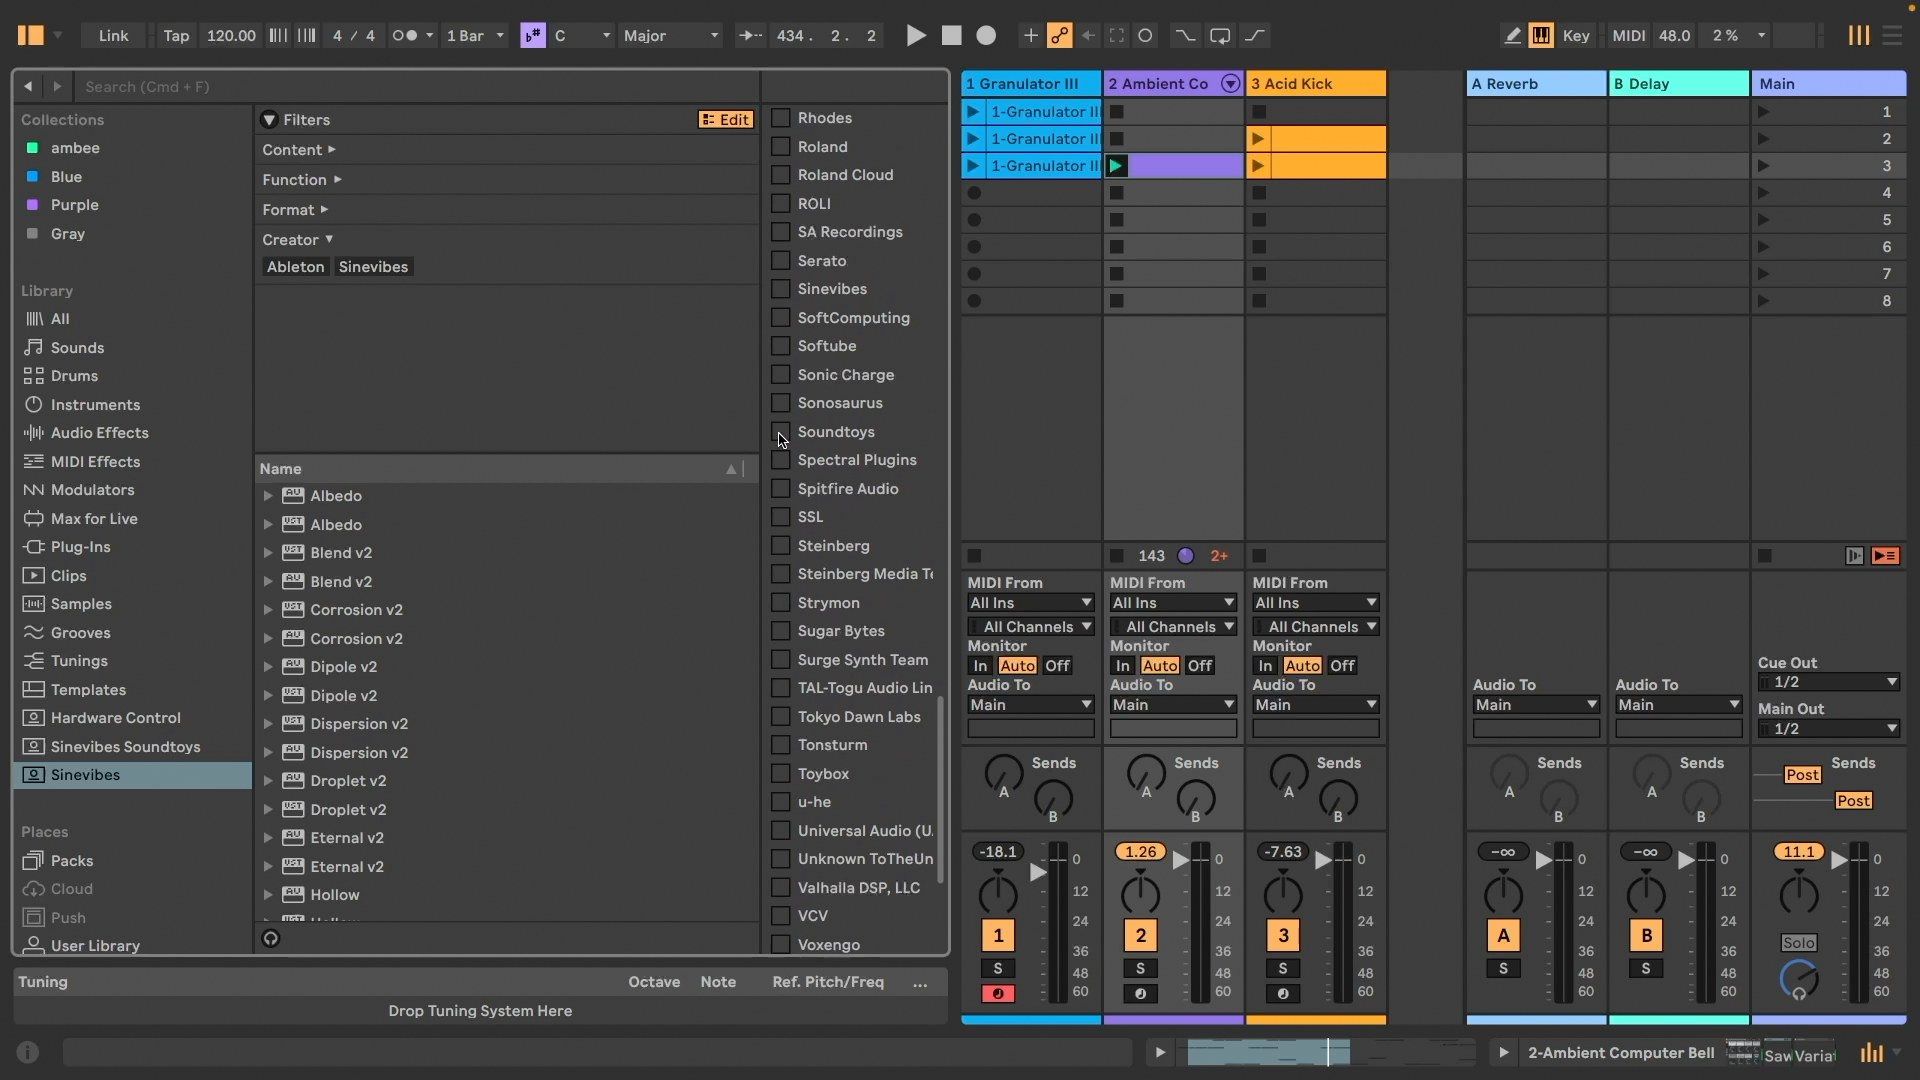
11. Save custom Browser views.
One of the first things you’ll notice in Live 12 is the reworked Browser, with expandable categories, free use of tags, and details like clickable plug-in vendor names. Where this starts to get really useful is when you save yourself all that clicking by saving a custom view – use the (+) icon to save, in conjunction with Edit to choose what filters you want applied.
After all, you want your music making to be relaxed and to stay in the flow.

12. Check Meld’s unique resonators.
Meld is full of delicious toys – it feels a bit like opening up some recent modular or wavetable/granular synth hardware. But pay special attention to the Filter section, which includes both a Membrane and Plate resonator. The little sharp/flat icon next to them means they’ll even follow Scales and Tuning Tables for tuning. I hope we see more of that pitch integration in future updates throughout Live, plus of course that that integration migrates to Max for Live, too. These are already great, and to my ear sound a bit different than Corpus or AAS’ own Objeq Delay, though the basic idea is related. (I never get enough of these resonators!)
More to come!
Expect some more in-depth looks at tuning and the tuning learning resources, the incredible Performance Pack and its creative possibilities, and of course, Max development tools. And Push standalone support arrives officially next week. But that’s a full seven days to just mess around with Roar… enjoy! And shout if you have questions or more favorites that didn’t make the list.