Ableton Live 12.4 enters public beta today. New features include continued refinement of Live’s audio effects and the ability to merge stems and separate stems for just a selected portion of time. And there’s one unexpected twist: Ableton Link can now do audio. Here’s a deep dive into what’s new, based on beta builds leading up to the public beta.
This story is based on non-final builds, so it’s intended to give you a guide to stuff to play around with in the public beta. Functionality may change by the final release.
Ableton Live Shop and Upgrades
If you buy something from a CDM link, we may earn a commission.
Link Audio
Since the start, Link has been exclusively about getting different connected tools — DAWs, iPad apps, hardware — together in time. But that always prompted the question from users: What if I want to send audio? Once you’ve got that jam session together, wouldn’t it be great to get sound?
Previously, that meant using some other technology. But now Ableton has added Link Audio alongside the existing “plain” Link for timing. You’ll find it on a separate page in Live Settings in 12.4.
Advantages of doing this:
- An additional solution with devices you have on-hand
- Automatic latency compensation (this is a big advantage, obviously)
- Quickly record, sample, and process sound from across devices (solo or with others)
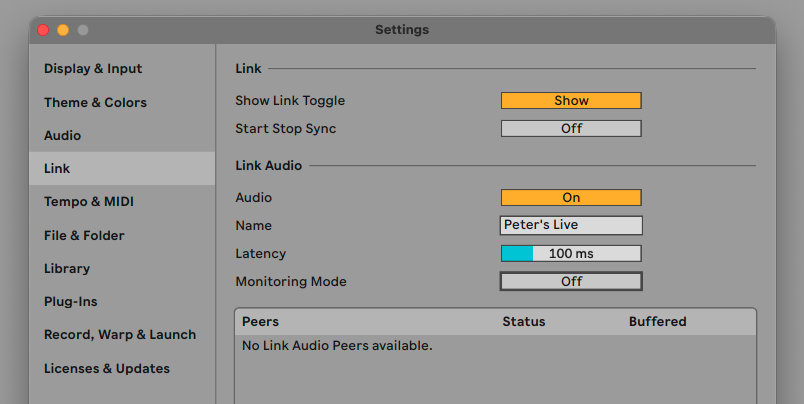
You give yourself a name and set latency. Now, monitoring is a tricky subject: whichever device monitors the feed will delay its audio engine to account for latency of the Link Audio inputs. That means only one Live client should choose to monitor, and the rest will send, since otherwise there’s no way to calculate the delay. The concept is that you’d have one machine connected to speakers and can send audio from the rest over Ethernet cable(s) or a WiFi connection. Until someone else is connected on the same network, you won’t see any Peers — just like in my screenshot.
For now, this comes with some caveats. Ableton recommends a wired network for stability — and once you have an audio interface and a wire, you may just decide to use a conventional analog jack or digital audio connection. Wireless should work, though — just like with wireless control over OSC, here’s a great chance to use a portable WiFi hub or dedicated network rather than things like “shaky hotel WiFi.” (My screenshot is blank above partly because my first attempt to use WiFi failed, but I’ll follow up on this! I’m curious about phone hotspots, too, which — may sound weird, but can actually work well under certain conditions.)
Also, this does not work with audio from another location over the Internet — Link Audio depends on a local network. (For remote audio, there are other solutions — I wrote about our experience doing a distance hacklab during the pandemic for 2021’s CTM Festival, and all those tools remain relevant.)
But this seems like a great additional way to route sound in jam sessions and the like, especially as more developers get their hands on this new feature of the SDK. Or think of producers — then, latency isn’t such a big deal, but now it’s easier to show up at a friend’s home or studio and work collaboratively without having to futz around with cables and whatnot.
Where you’ll find Link Audio … soon:
Ableton will release a beta version of the Link SDK alongside the Live public beta, allowing any Link developer to add audio support. That means for end users, you should see other implementations soon — greatly increasing the usefulness of this feature. That brings Link Audio not just to Ableton’s ecosystem, but any software for macOS, Windows, Linux, iOS, and Android, including hardware based on those OSes.
Ableton Note on iOS and Ableton Move hardware will also get send capability, and both let you select individual tracks for Link Audio as well as the main mix. On Ableton Push, you get both send and receive capability. And this is interesting — Ableton Move will work as a live processing device, so you can run audio into an Audio Track on Move and use internal Move effects for processing while monitoring the device.
Since Link Audio will work over localhost (on the same device), it can also become a solution for routing audio between local applications. (See Syphon and Spout for video users as an equivalent!) I expect this means we’ll see people eager for support in software like VCV Rack, or even video/VJ apps for live reactive visuals.
Erosion, revisited
Erosion is an original Live v1 effect, and I believe its interface and sound haven’t changed noticeably since that first release — until now. An updated interface helps you to discover more about its unique processing capabilities, and there are some new features, as well, like continuously-adjustable stereo width.
First, it’s worth mentioning what Erosion is actually doing: it’s a very short delay that’s modulated with either a sine wave or filtered noise. It’s going to sound a lot like a digital “degrader,” in that you get some crunchy digital artifacts (especially adding noise). But Erosion is not a downsampler or bitcrusher the way Ableton’s Redux is, for instance. It’s rather that the noisy components of the effect are a pleasing outcome of the way it processes sound.
Erosion’s sound is unique enough that people have tried remaking it in FL Studio and as a plug-in. Erosion debuted alongside Vinyl Distortion, and both effects have a special digital character rather than any sort of analog emulation. That’s what’s beautiful about them, really: it’s retro Ableton chic. (Loraine James made great use of this aesthetic with Redux and Vinyl Distortion’s “Crackle” in Whatever the Weather II and talked to us about it.)
The full suite of the original Live devices — Auto Filter, Chorus, Compressor, EQ Four, Erosion, Grain Delay, Ping Pong Delay, Simple Delay, and Vinyl Distortion — I understand were all Robert Henke concepts. (The engine inside Clips with Warping was developed from Gerhard Behles’ work.) So it’s great to see a development that retains everything about the original idea, but expands on it, a new take on an iconic effect, a little over a quarter century later.
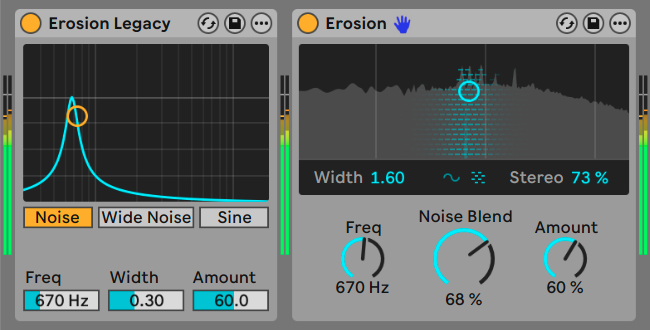
Erosion in Live 12.4 gets some subtle but significant changes, and they’re more than just skin-deep. You can compare the UIs. The improved layout includes real-time visualization of the sound (plus that cute animation of the width). It also gets rid of fixed choices for Sine / Noise and Noise / Wide Noise, replacing each of those with a continuously-variable controls for Noise Blend and Stereo, respectively.
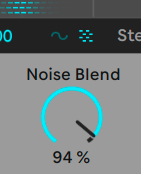
Sine and noise sources can be continuously blended. Okay, this just instantly makes Erosion worth using. You can now dial in exactly as much noise as you want with Noise Blend, instead of the fixed switch between noise/filtered noise and sine. (The blue sine and checkered “noise” icons above that knob are only visualizations; you can’t click them.)
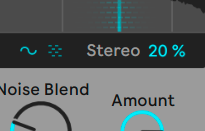
Stereo width. The original Erosion had a choice for “Noise” and “Wide Noise,” and I expect a lot of people didn’t even know that “Wide” meant stereo modulation. Now, you have a much more useful Stereo parameter, it’s continuous, and it works with both sine and noise sources.
(“Width” in the new Erosion, now located at the left, functions as before. But it refers to the bandwidth of the noise, not its stereo field.)
“Lo-fi but with a digital character — it’s retro Ableton chic.”
Under the hood, they’ve also reduced algorithmic latency from around 5 ms to 2 ms, another indication that this code went mostly untouched since Live’s very first release.
(“Erosion Legacy” will appear only if you open a pre-12.4 Session. So if you want to preserve it, save an instance in any older version of Live.)
You can absolutely get crunchy, noisy effects on drums — or tune both the noise (by reducing Width) and sinusoidal modulation components to particular frequencies. Now you also get this stereo effect. Here’s a quick-and-dirty example, though you can get more precise than this:
More Effects on Move and Note
Auto Shift and Erosion (as in this excellent new Erosion) are both coming to Note on iOS and Move hardware with the 2.0 beta, also out today.
Updated effects: Chorus-Ensemble, Delay
Chorus-Ensemble
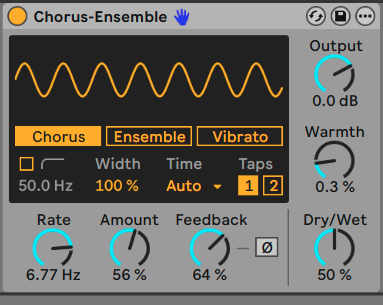
Chorus-Ensemble’s chorus mode is now called Chorus. (After the update to Chorus-Ensemble, Ableton labeled this “classic,” but that was just weird.)
Chorus-Ensemble also has two new features:
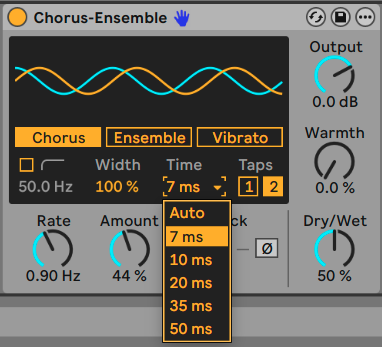
- Time lets you choose a fixed delay time. This sets the base delay time in the chorus — longer values are closer to certain hardware delays and just sound better on certain sources. But there’s a lot to this; I love the ability to experiment with these units, which used to require delving into Max for Live. (though… again, prototyping here may tempt you to do just that, it did for me!)
- Taps now has a one-tap delay option in addition to the two taps in previous versions. (notice for added visual feedback, it has just one wavy line — see above, top)
Basically, set a high delay time and one tap instead of two, and you have something that sounds more like classic hardware. Or, even without thinking about that hardware, just experiment with different combinations — a lot of new nuance opens up.
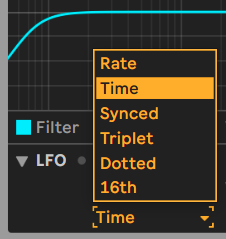
Delay LFO section
Delay is a terrific, versatile tool — often a lot more useful musically than getting distracted in big, overdesigned delay plug-ins (and don’t get me wrong, I do love those sometimes)!
But crucially, you now get an expanded LFO section, because combining delay with modulation is fun!
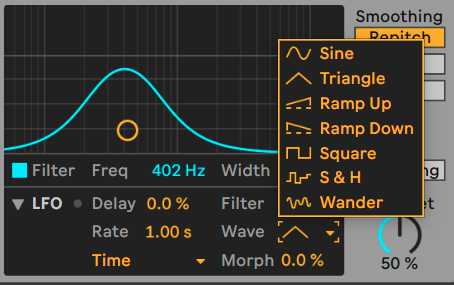
- LFO waveforms (as elsewhere in Live, see above)
- Synced LFO time modes (below)
- Morph (for waveform)
And remember, you can route this (with continuous control) into both the delay time and filter as a percentage.
That does a great job of covering your delay bases, because recall that Echo already has its own dedicated Modulation page with many of the same features. (Maybe we’ll see that expanded a bit in a future release, too.)
Effects example
Here’s what it sounds like as you put the effects together — an expanded Erosion, Delay modulation, and new effects possibilities with the 1-tap option and new time controls in Chorus-Ensemble.
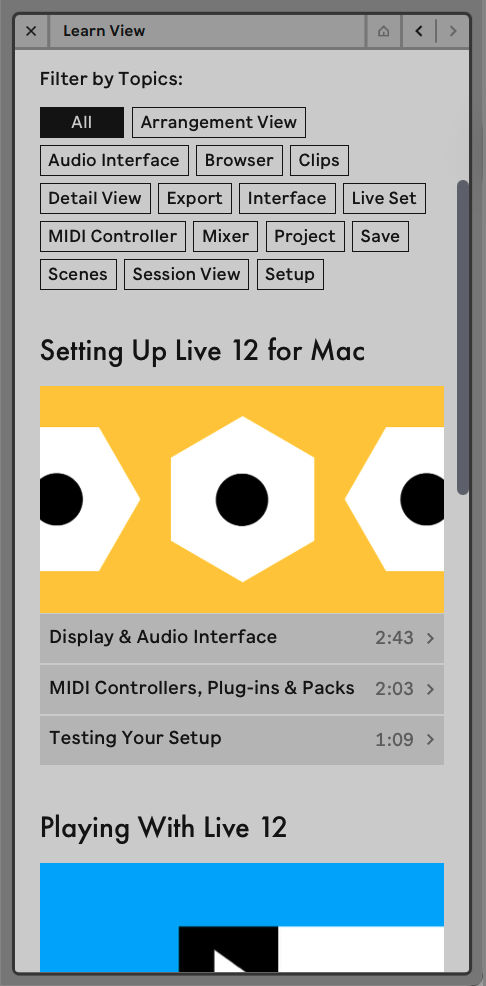
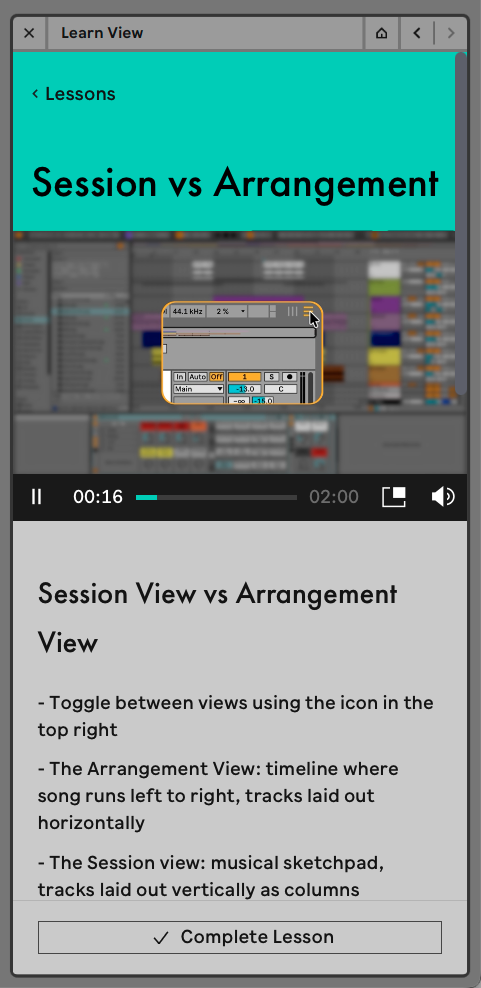
Learn View
Live’s built-in help was pretty useful, but after years and years in action, it was time for an update! Learn View includes both reworked content and an improved interface and layout. There are some new features, too, both in the technical implementation here and how you explore content:
- Embedded videos (with a detachable Picture-in-Picture window)
- Improved layout and navigation
- Filter by topics (which seems like it can be expanded as lessons are expanded)
- Track progress
For now, it sounds like Pack manuals and so on are unchanged, but I’ll be curious if we see authoring options. Given the terrific work Ableton did on learning materials on the Web (including for Tuning Systems), it’s great to see a little bit of progress back in the DAW itself.
New Stem features: merge, separate by range
Stems get two big features in this release. One is a simple one: you can separate stems for just a portion of time by selection, rather than the whole track. That means if you want to pull out the vocal or a particular drum pattern from a 30-second passage, for instance, you just select that and separate only that section.
In the other direction, you can now merge stems back into a single track — like if you just want to separate vocals and instrumentals.

Max for Live
As is now the norm, a new Live build means an updated version of the bundled Max for Live — this time, it’s 9.1.3 (at least in the most recent beta build). That includes various features:
- @freezein for Hybrid Reverb abl.* objects
- A bunch of fixes (including BEAP, abl.dsp and abl.device, and more)
- Set parameters in Max for Live devices to be non-automatable or non-undoable (useful if you have parameters that you use internally but clutter up those features!).
Max 9.1 is a terrific update, so if you’re curious to review everything that comes in 9.1, here’s a start:
I feel seen: Max for Live and Push
Finally, you can control more of your Max for Live devices on Push. From Ableton’s announcement: “A new Visible option allows Max for Live devices to add more parameters directly to the device view on Push 2 and 3. This expands the range of parameters that can be controlled on Push to features like modulation mapping in LFO or calibration in CV Instrument.”
And stuff you might miss
Other goodies, among others:
- Wavetable has 16 voices
- Arrangement Esc shortcut: with no time selected, hit
Escand you move over to the selected lane’s current header. (Try it!) - Stem Separation shows total progress when you’re in High Quality mode — so it’s easier to see how long you have to wait (previously it showed each stem separately)
- Quick Tags now let you make new tags, parents, and groups, not just assign existing tags — so this is way more useful
- New Drum Racks by KUČKA
- Better behaving windows with macOS Spaces
I’m sure you’ll find some other details. This is another “big little” update — after the obvious stuff, you’ll invariably discover more tweaks and shortcuts. Stay tuned.
Live 12.4 is coming – with Link Audio, updated devices and more
Move and Push
Move (2.0) and Push (2.4) each get updates to go along with Live 12.4.
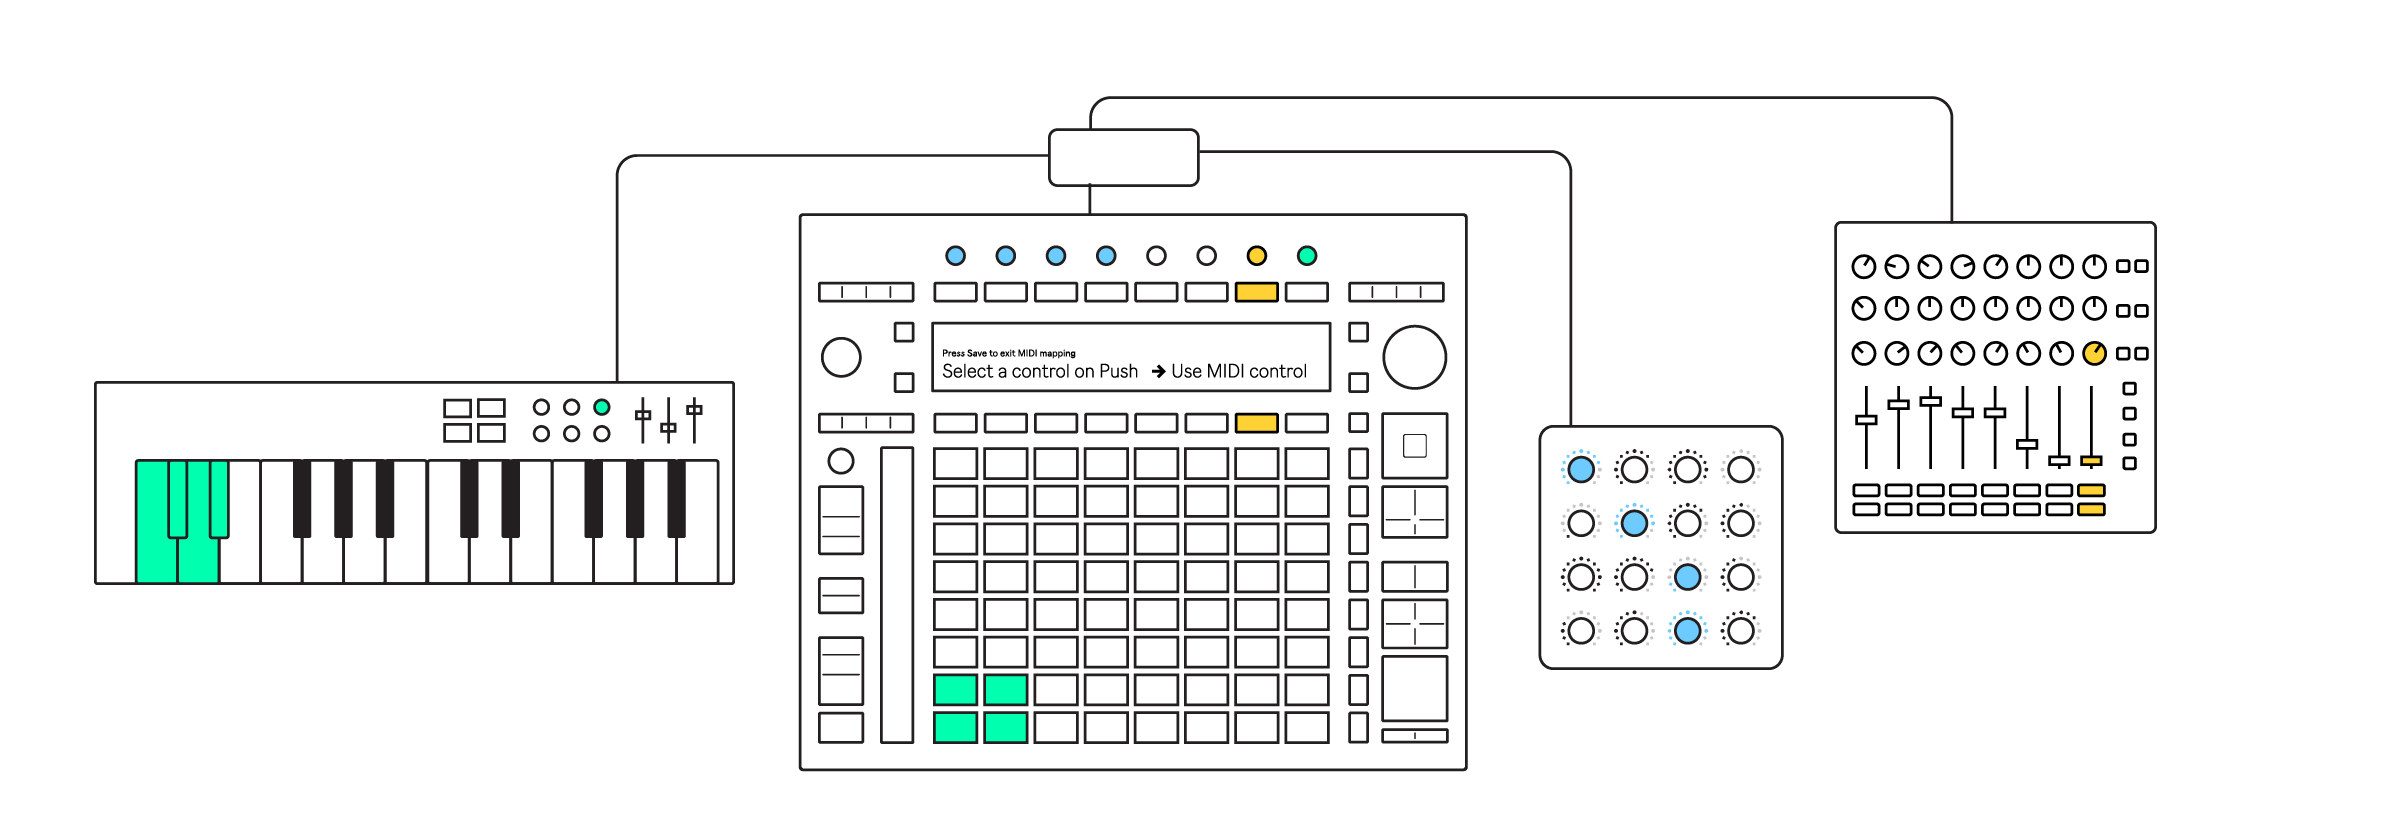
Push with Live 12 – Beta Release Notes
Push gets MIDI Mapping! That also includes access to Control Surface menu that’s in Live — so the standalone Push even gets compatibility with devices and scripts that work in Live.
Erosion and Chorus-Ensemble are synced up with the new Live versions, and that means on Push’s larger display (as opposed to Move), you get the nice new visuals for Erosion.
And there’s a lot more.
Move 2.0 is enough of a milestone that it deserves its own little news story:
Ableton Live Shop and Upgrades
If you buy something from a CDM link, we may earn a commission.