Ableton has announced Live 12 today, with new tools for creating sounds, exploring musical ideas, and playing with the software as an instrument.
Live 12’s public beta will be available soon, but I’ve toured the software with Ableton and spent some time with a prerelease build. What’s unique in this update is how much is there to play with. It’s not just about a random selection of features, or some handful of new devices. The focus on Transformations, Generators, Keys, Scales, Tuning Systems, and then tools like the new Performance Pack means you can explore composing and performing with Live in new ways.
Let’s take a look, as not everything is in the Live press release:
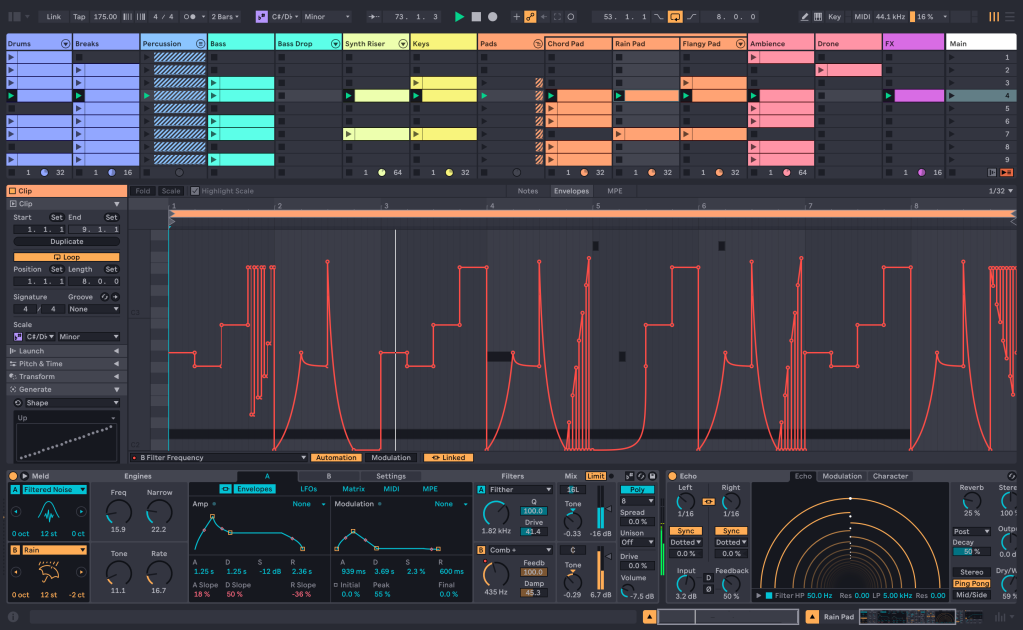
Refined UI and accessibility
You’ll naturally first notice the new UI. If you look back at Live 1 and 2, you’ll see the software’s interface has gradually evolved a lot over the years. But this is probably the biggest single-version change to the host itself. It’s still subtle enough that you’ll adapt more or less immediately, but they’ve done a lot of work.
View Styling aka “all that extra crap is cleaned up.” Sorry, Ableton has a long and very elegant way of saying what they’ve done, but this is the easier way to put it. Ableton has managed to clean house in the entire UI, so that scrollbars, view controls, and all that outlining – corner radius – padding – spacing business is completely reworked and tidied up. Anyone who’s ever tried to take a screenshot in Live knows exactly what this is about; there were just a lot of extraneous elements that often didn’t really align with one another. If you look at a lot of recent theme work, you’ll see many themes even try to hide those elements by manipulating color values.
Now everything has far less visual clutter and distraction. (Note that the menu bar is also now integrated.)
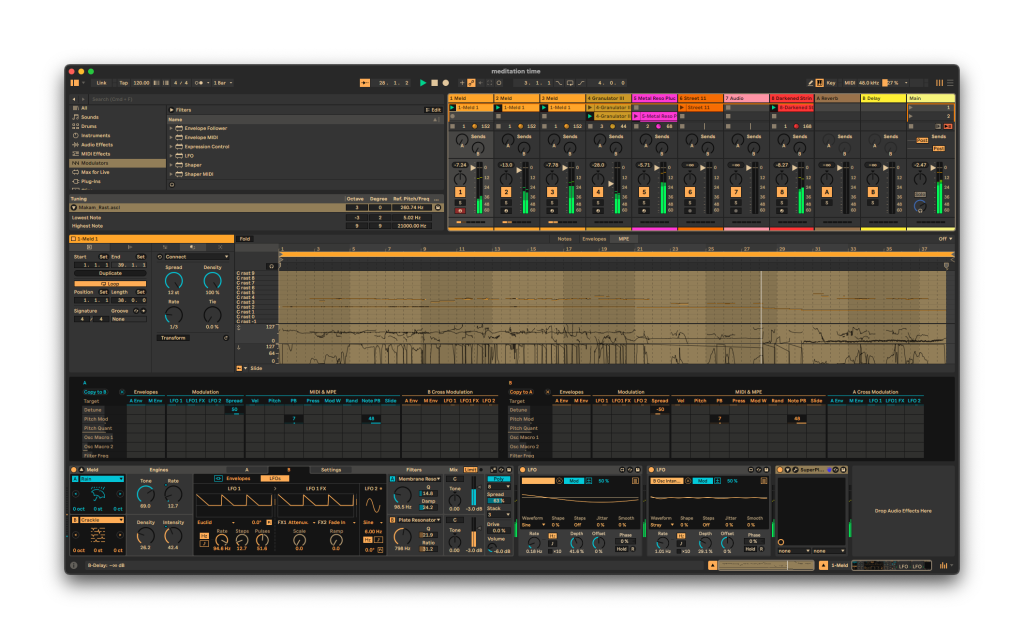
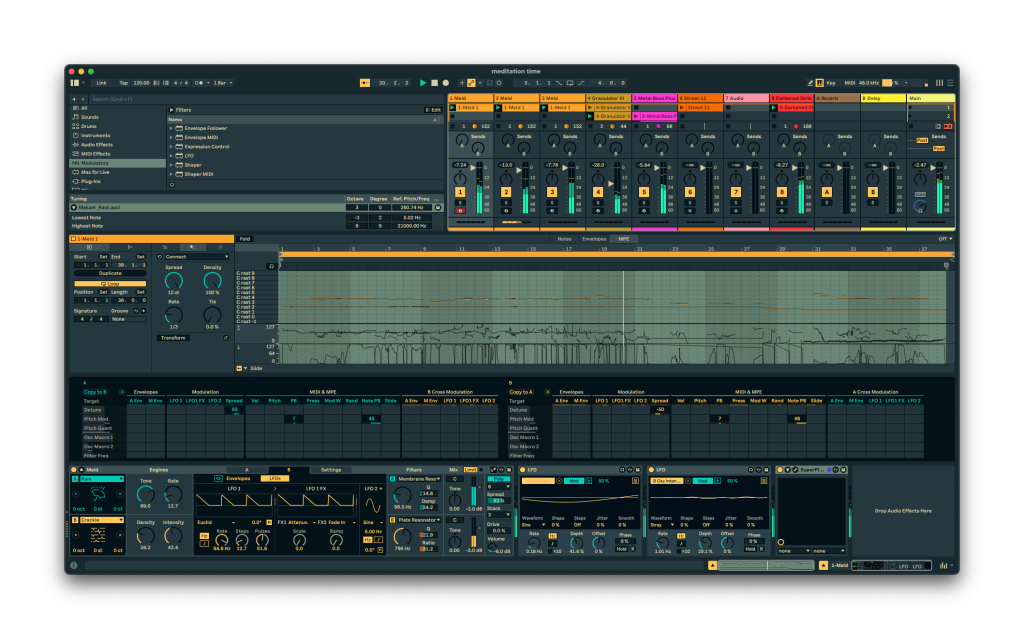
New Themes. Along with the UI rework, we get entirely new Themes, with a new approach to contrast and complimentary color that’s easier on the eyes. The default theme can now follow the system when swapping light and dark themes for day and night, too. (Couple of my favorites above, in a mix session!)
Custom Theme builders will need to target Live 12 separately, and I don’t yet have an answer on how that will work; stay tuned.
Stacked Detail Views. Finally, you can see the Clip Editor, Device View, automation, and device parameters all at once, without switching.
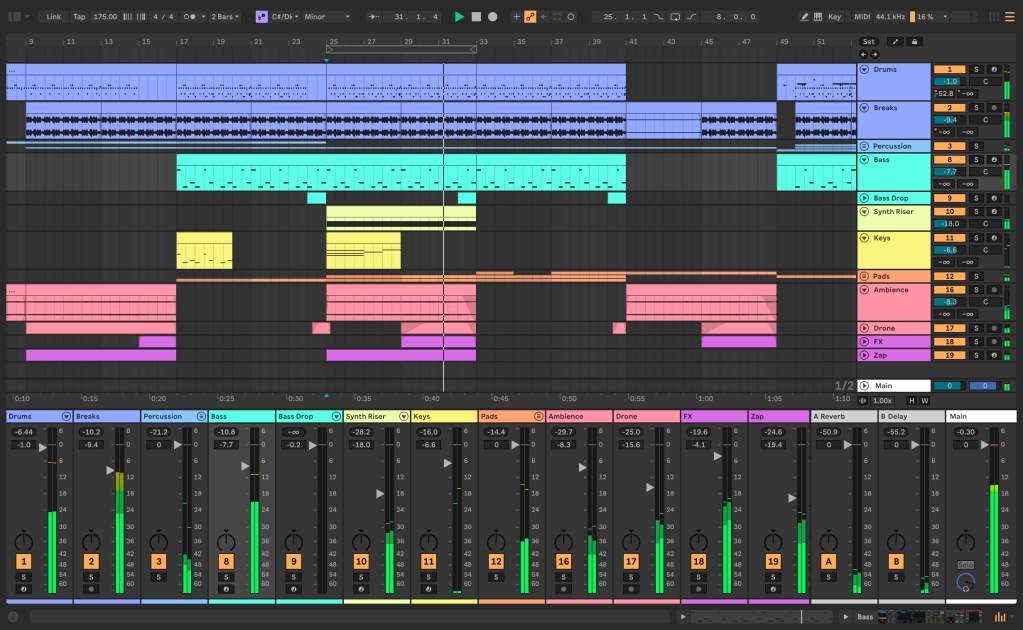
Mixer in Arrangement. You can also, at last, toggle the Mixer from Arrangement, not just Session. Also, they’ve kept the view configuration for Arrangement and Session independent, so you can tweak each to show just what you want to see.
Returns can be duplicated, reordered, copied, and pasted. Yeah, this is also a big help to reorganization.
Mixer with improved controls and metering. The Mixer has various refinements – a small color stripe on the bottom, a bigger volume handle, and dB readout on the right. (The mixer handles look more like the original Star Trek sick bay displays than ever!)
For reference – yeah, I’m sure someone at Ableton watched Trek and that show was ahead of its time. (Max for Live UI inspiration):
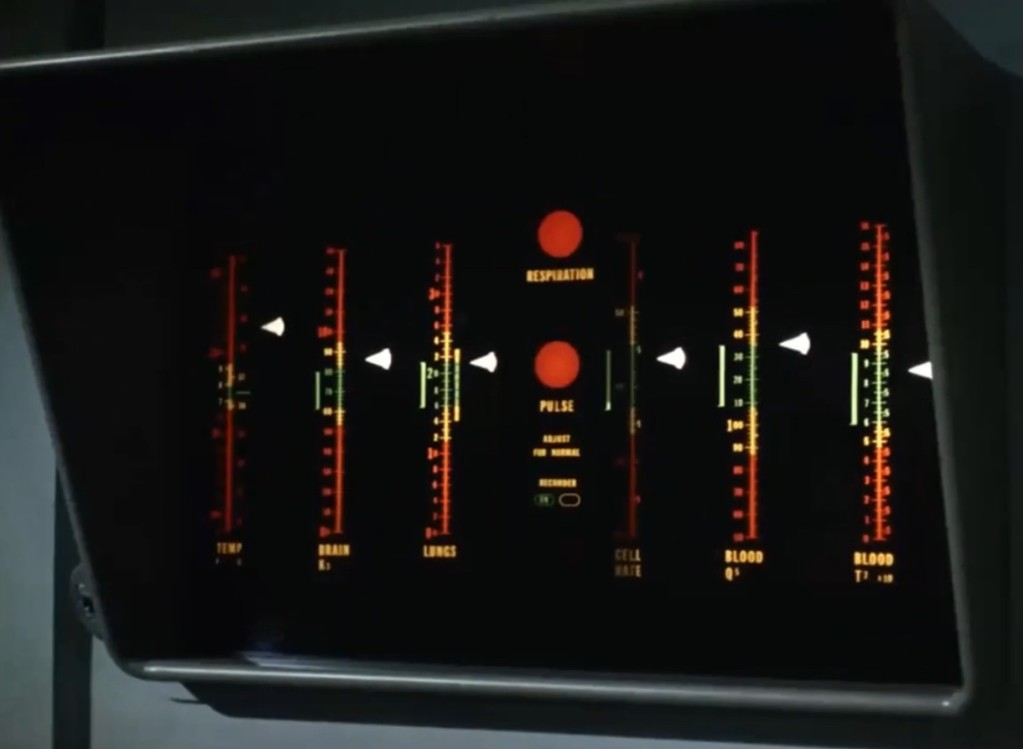
Those are much easier to see, but the big improvement is the way the metering works. It’s easier to see the meters visually thanks to some adjustments to the gradient, and the metering is far more responsive so it’s easier to see level changes, especially transients. That extra visual feedback can assist in mixing; DAW “mix engines” all work the same way, so it’s really down to catching any mix issues with metering that can make the difference.
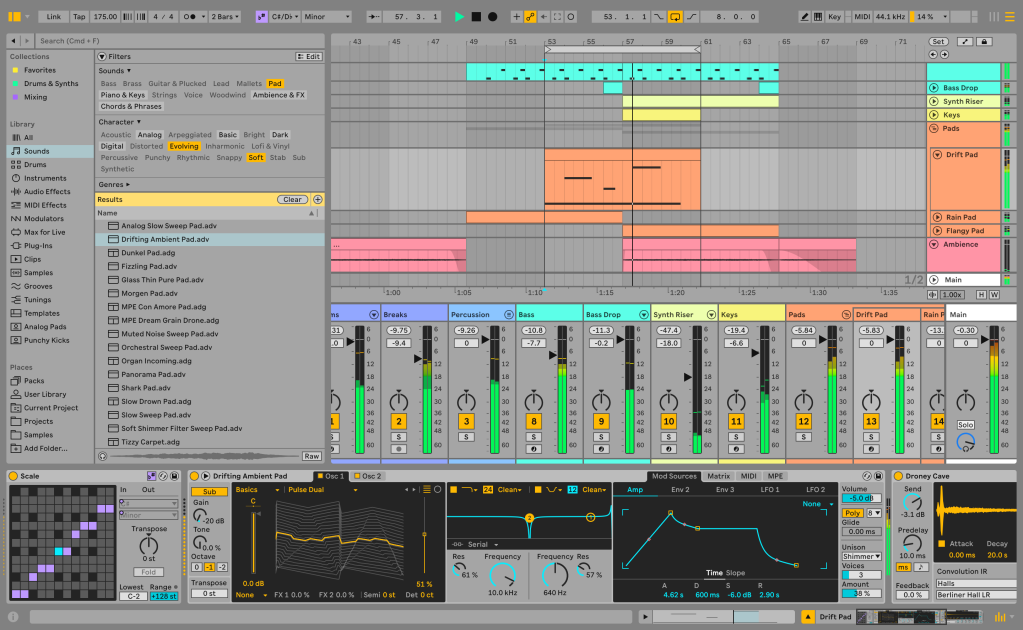
Reworked Browser. There are a lot of small refinements here, basically meaning it’s “more better,” but also including —
Browser tagging. You can now use tags in addition to categories. The Ableton content team it seems have done a huge amount of work to tag their own content and create some defaults, but you can also use this facility for your own custom tags.
Save Browser views. Also a big boon to customization.
Sound Similarity Search in Browser. Yep, it’s machine learning! You can now pick any sample and search for sounds and presets based on that sample. And as usual, this feature is fun when it works predictably, and fun when it comes up with something you didn’t expect.
Accessibility – and keyboard shortcuts. Live 12 now widely expands core workflows to screen readers on both macOS and Windows. Interestingly, this impacts both users with different visual abilities and anyone wanting to use keyboard shortcuts. Removing barriers to screen readers meant also expanding keyboard navigation in Live. (You can toggle whether to use the tab key to swap views or to move between elements, for instance.)
This is a major feature, so one I hope to follow up separately with folks using those tools.
You can finally tweak parameters mapped for modulation. Okay, this one feature alone might make me never go back to 11. Previously, if you mapped a parameter for modulation, it locked that control and you couldn’t tweak it. Now you can still adjust the parameter while it’s modulating to take over from that modulation source temporarily.
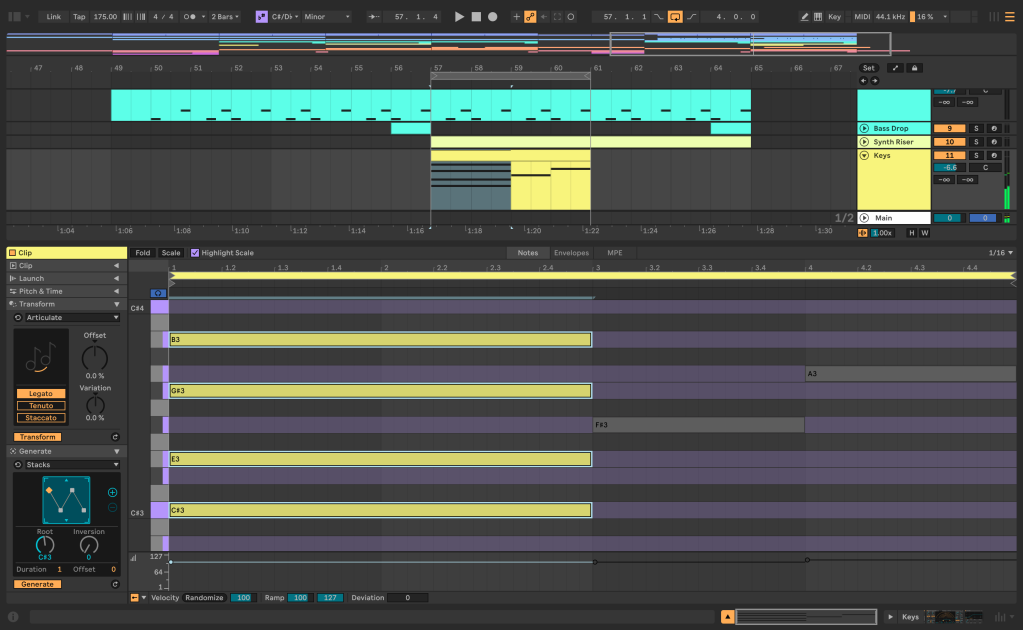
Play with musical ideas
Live introduces two new facilities for working with MIDI – Generators and Transformations. These are both accessible in the Clip View, so they at last answer those moments when you were drawing horrible random MIDI patterns with the pencil tool and having them loop ad infinitum.
What makes these features feel especially at home in Ableton Live is they focus on device-style knobs and tweaks. They work on the current Clip as you dial in different settings, nondestructive – then just hit Generate or Transform when you want to apply what you’ve got. In a nice twist, too, they’re built in Max for Live – meaning as much as there is already, this will likely inspire lots of new ideas from the Max for Live community.
These are not quite set up to use live as you play – there’s no MIDI mapping, for one. But I suspect one strategy for Max for Live developers will be to ship tools both as Generators/Transformations and as separate Devices, with some adjustments for each context. Hopefully we also see some support in Push (it wasn’t available in the build I tested).
These are not even all in the current build, so expect more details later.
Generators
Ooh, I think people will like this especially – you can quickly generate MIDI materials with various tools:
Chord. Scale-aware (see below) chords by degree.
Euclidean Generator. Revenge of the clave: these tools for generating rhythms will eventually be everywhere.
Rhythm. Not a Euclidean Generator; this tool uses a set of its own heuristics for generating different patterns and extending them over a selection. (A common usage would be to use Rhythm for hats and the Euclidean Generator for elements like toms, kick, or, yeah, claves.)
Seed. Set pitch, duration, and velocity ranges, and spawn a pattern.
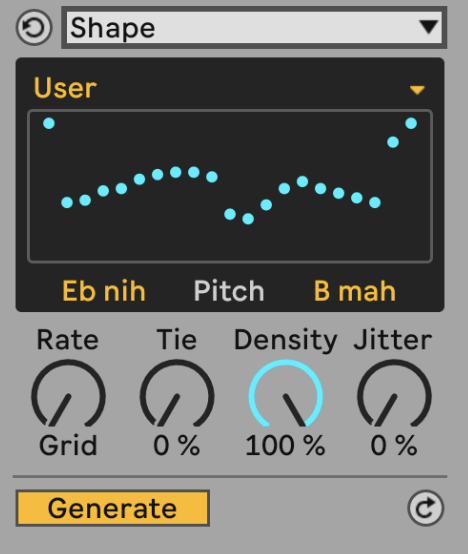
Shape. So this is based on the way a lot of us would mouse in patterns. Select a pre-defined shape or draw one in, but have Live generate the pattern based on constraints of rate, tie, density, and jitter.
Transformations
Transformations are essentially MIDI filters, processing patterns with different operations. What’s in there – more details on these later:
Arpeggiate.
Articulate. Legato / length etc.
Connect. This adds notes between input notes, so it means connect as in melodically – with spread, density, variable tie, and whichever grid you want.
Ornament. Think flams and grace notes, also obviously useful with drum patterns.
Quantize.
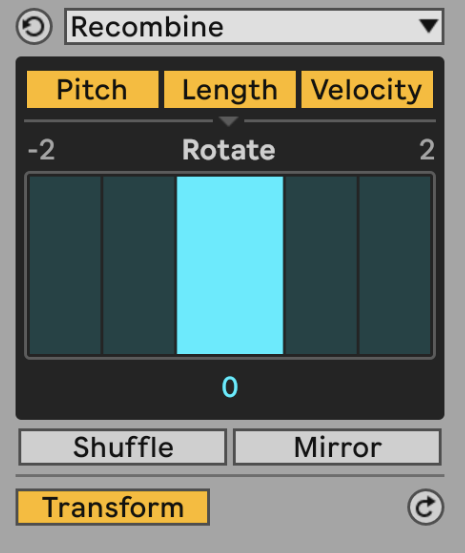
Recombine. Rotate the order of selected parameters inside a musical selection.
Strum.
Time Warp. Speed and tempo curves – accel., rit., and other shapes.
Velocity Shaper.
Expanded editing and probability
There are a bunch of improvements to the MIDI Editor – almost enough to warrant a separate small guide. There are new ways to select, cut, chop, and join notes, and it’s all now got keypad shortcuts.
Probability has also been expanded: group notes together, and give the group its own probability. Or work the other way: randomly fire a note or notes from a chord.
Keys, scales, and tuning
Keys and Scales now work throughout Live, so that staying “in key” can work across your sets and devices much as tempo and rhythmic quantization do. You’ll see Key and Scale both on the Control Bar – the Scales are the same set as you may know from Ableton Push. (No word yet on whether we’ll get editable scale sets.)

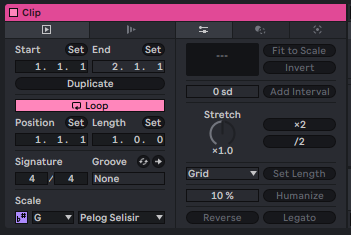
Key and scale information is also stored in Clips. Triggering a Clip then aligns the Push grid to the key/scale (unless you’ve got Push set to chromatic), and it sets that key/scale for the rest of your Session. That means the short answer to “how do I do key changes is” – “you stick them in Clips.” See the addition in the Clip Detail View:
But the real work here is how much of the rest of the software is now Key- and Scale-aware. Make a swap there, and not only do your patterns (and Generators and Transformations) take into account the change, but lots of other pitch-aware parameters across devices do, as well. You can also lock or unlock those tools to determine what follows the Key and Scale and what doesn’t.
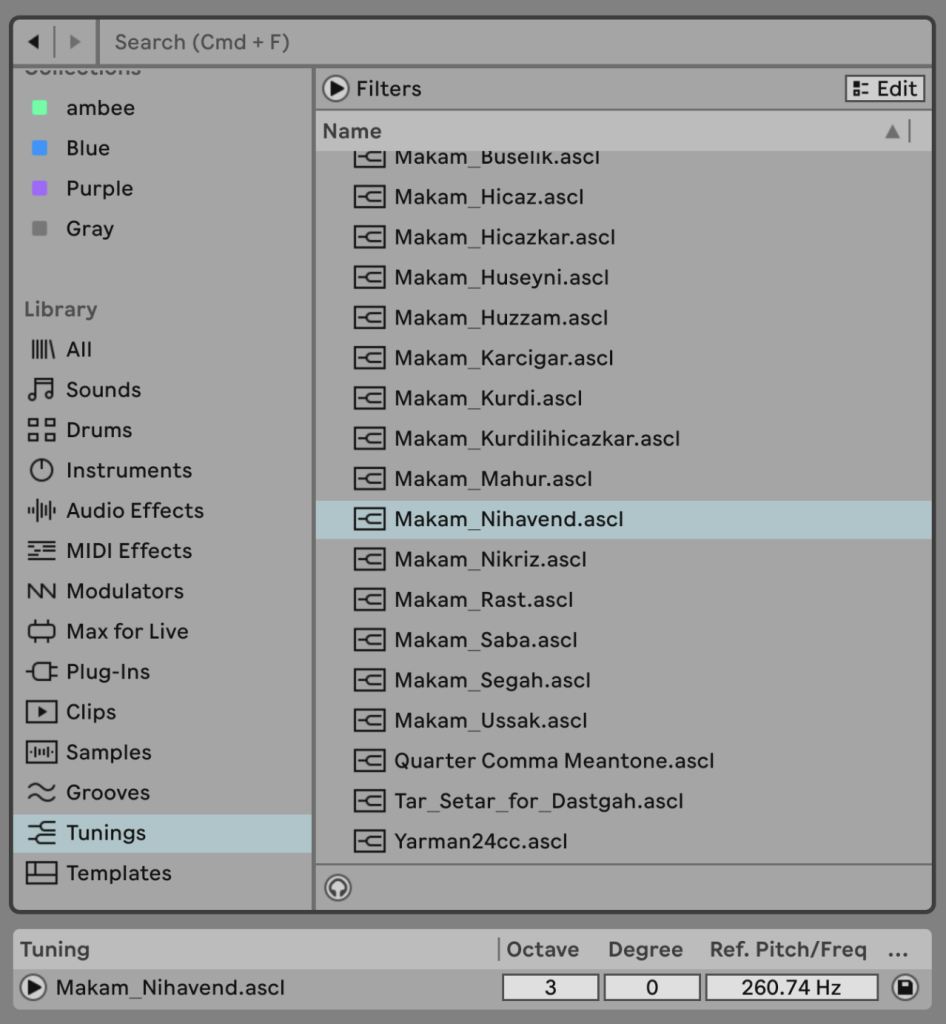
More exciting for a lot of us is proper Tuning System support built directly into Ableton Live. You can import tunings in the Scala format, or use one of a curated selection Ableton ships with the tool. Set a reference for octave, pitch scale degree, and base frequency, and you can apply any tunings across your set with all of Live’s devices and any MPE-capable plug-in responding. And yes, this effectively eliminates the need for a third-party plug-in like MTS-ESP, though if you need that for specific support, you should be able to sync its tuning via MPE with Live (I need to look into exactly how that would work). Here’s their short video, though expect more of a deep dive than this provides (as context of tuning matters, too):
Ableton has its own extended file format here which includes those additional pitch references, and could also enable some additional notes to go with each tuning. But hold the questions for now, as we’ll look more in detail at this very soon. And yes, there are ways to use this interoperably with the tuning tools by Khyam Allami and Counterpoint.
I’m really hopeful that eventually you’ll be able to override key/scale with the tuning settings somehow but – I think we’ll also have questions for the Max for Live community in how to make use of this functionality.
New instruments and effects
Meld
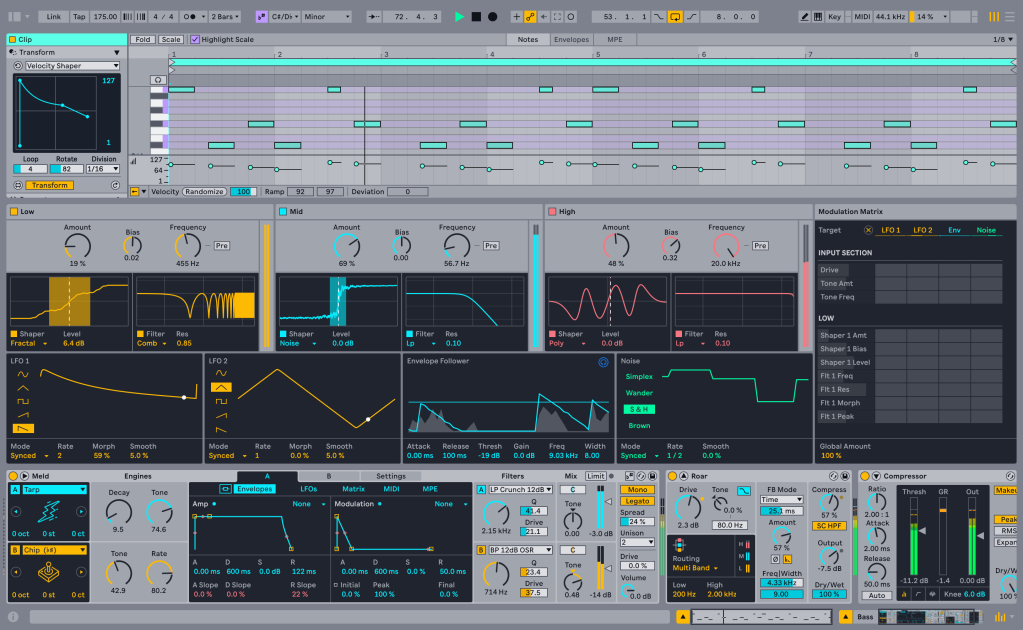
Meld is a bi-timbral, MPE-capable instrument that’s clearly inspired by recent synths and Eurorack modules. You get two Macro Oscillators with a bunch of different engines and parameters, dual multimode filters (with extras like “vowel”), poly and mono modes, stacking, and a big modulation matrix. It’s all very Ableton-like in design, and the sound is unique – so while you see the inspiration of Mutable Instruments and Arturia, the sound and workflow are all Ableton.
Engines available:
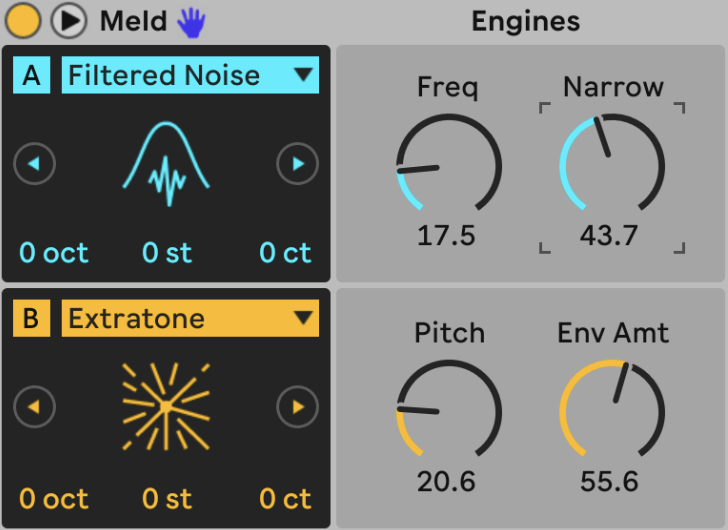
- Basic Shapes
- Dual Basic Shapes
- Noisy Shapes
- Square Sync, 5th
- Sub
- Swarm Sine, Triangle, Saw, Square
- Harmonic, Fold, Simple FM
- Squelch
- Chip
- Shepard’s Pi
- Tarp
- Extratone
- Noise Loop
- Filtered Noise
- Bitgrunge
- Crackle
- Rain
- Bubble
And note many of those engines are also key/scale aware.
It all fits in well with Ableton’s recent Wavetable and Drift. Meld is interesting on its own, but it pairs well with the new effect, which I think may be the even bigger draw:

Roar
Roar is a three-stage coloring and distortion effect, with series, parallel, multi-band, mid/side, and feedback configurations. You get a ton of different shaper options, plus multimode filter, plus modulation and mod matrix. The feedback modes open this up even more, with various synced options in addition to free. It’s a subtle coloring/mastering effect when you want, or out-there, tempo-synced distortion mayhem.
And check those Shaper modes:
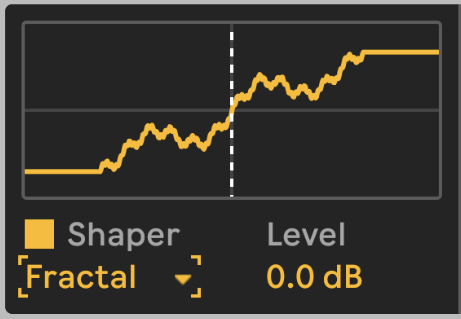
- Soft Sine
- Digital Clip
- Bit Crusher
- Diode Clipper
- Tube Preamp
- Half Wave Rectifier
- Full Wave Rectifier
- Polynomial
- Fractal
- Tri Fold
- Noise Injection
- Shards
Granulator III
Robert Henke’s granular instrument gets a big update, too, with MPE for expressive control (with MPE legato in mono mode) and the ability to grab audio on the fly. (It’s still not an effect, but you can capture audio into the instrument’s buffer.) There’s also a stereo LFO, new combo filters, and three different playback modes (Classic, Loop, and Cloud).

New packs, including Performance Pack
The Performance Pack by our friends Iftah Gabbai and Matt Jackson might just be the sleeper hit of Live 12. It’s a selection of four really deep Max for Live inventions centered on live performance. I got an early tour from Iftah and have started playing with it in the last couple of days.
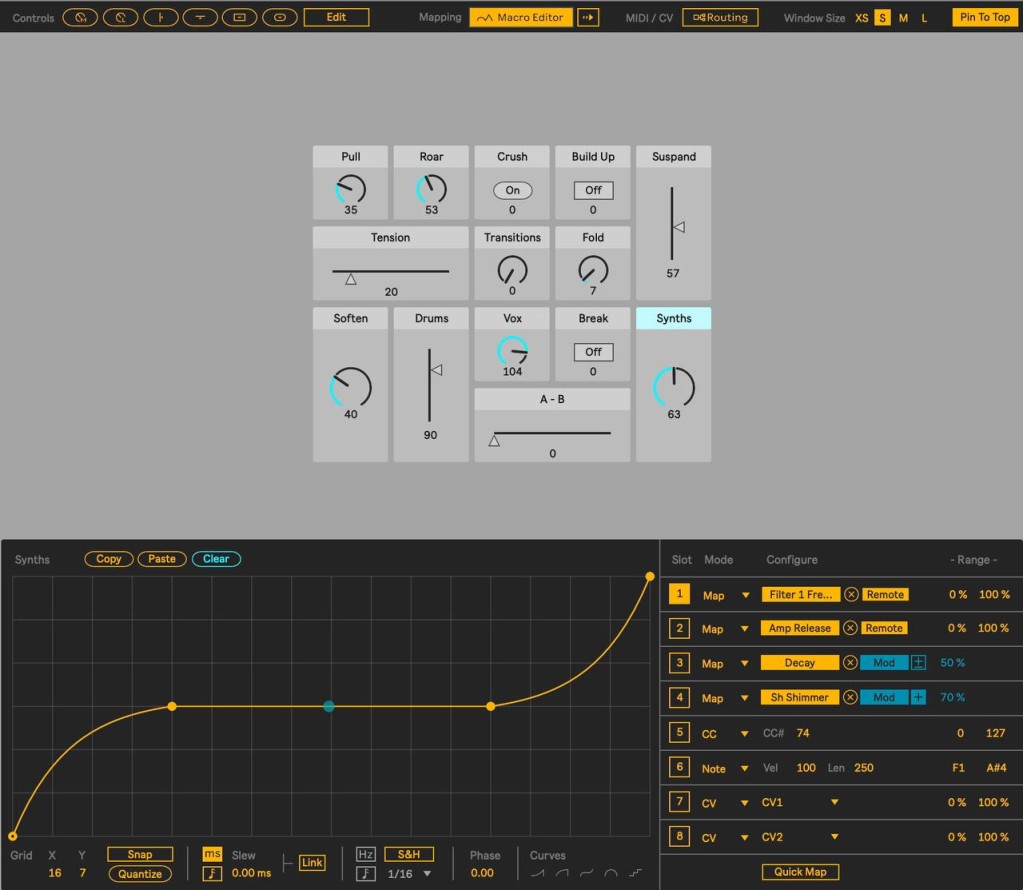
Performer. Performer is a floating window of UI widgets you can customize. Each widget has its own deep set of modulation macros and curves, so you can set up custom behaviors that then determine the control data it sends out. Then map to any parameters you want and go nuts. You could use it with just a mouse if you wanted, especially with all those curves. Or you could make a map based on your performance controller – and then augment all those controls with customized behaviors. It’s a uniquely powerful way of setting up a live set, because you could build an entire improvisation around just a single set of faders, for instance, mapped to a handful of interesting parameters.
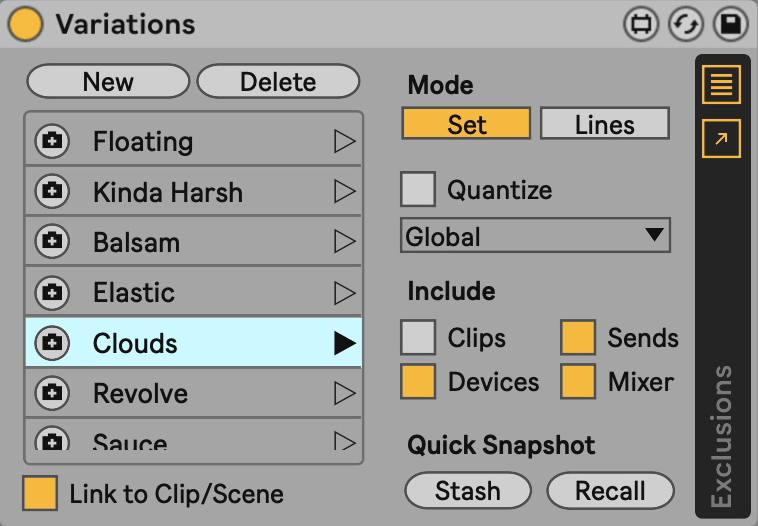
Variations. Okay, think of Snapshots in a Device Rack. Now apply that to your entire Live session. Yeah.. whoa. Store and recall quickly, to use as a way of grabbing particular states of your set as you compose or as you play live. And you can save presets to Clips and recall with those.
It gets even more advanced, with a pop-out window for choosing Devices and Parameters you want to control / exclude.
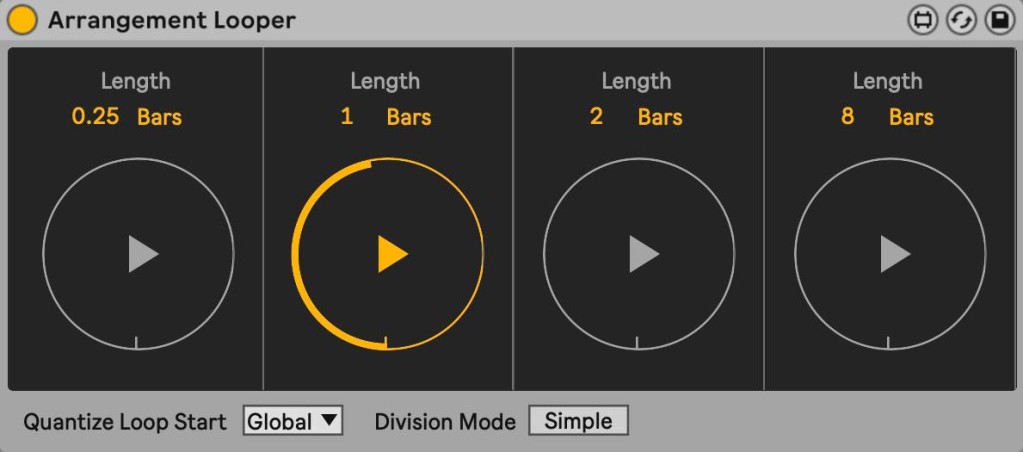
Arrangement Looper. So, you say you use Arrangement instead of Session, and you want to loop easily there. This does that. It’s got a really nice, BOSS-like set of four simple loop controls, and then it just loops the Arrangement – ideal for folks who perform in that mode, or as a what-if/live jamming tool when you’re recording into the arrangement.
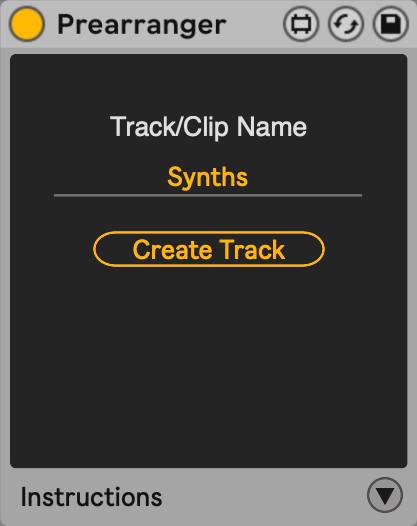
Prearranger. This one is also centered around Arrangement users. You can record into a single clip, then have that same clip spawned any number of times across the Arrangement and across different tracks. So let’s say you’re a vocalist performing live – you record into the source clip, and then that clip can play back looped, or play back on a different track with effects, or play again in the next verse/chorus, or any combination, all hands-free.
Performance Pack is just one of two packs. Lost and Found is a new pack based on foley recordings and percussive sounds and layers. That also looks like a nice basis for other sound design work.
Availability and versions
Live 12 will be in public beta soon, with a release in early 2024.
The Standard version has gotten a lot more included in its version, but you’ll want Suite for Roar, Meld, Granulator III, and some of the advanced features listed here, plus of course Max for Live. I’ll do a breakdown separately if anyone is interested.
The usual system applies: Live 11 is now on 20% discount, with a free upgrade to Live 12 when it’s released. Push 3 standalone is also 20% off.
I expect we’ll also have more of an update about Max for Live and Push for the new version as we get closer to public beta and release.
So, what in that list sounded interesting? What would you like to see more? Let us know in the comments; more detailed coverage to come.