For the final episode in this trilogy on learning Max for Live and Ableton DSP Objects, we’re going to keep the focus on working fast. We’ll learn how to use Ableton DSP to prototype instruments quickly and hack them with some tricks and mods beyond what the stock Live Instruments provide, all while learning Max instrument patching. Double, double, toil and trouble / fire burn and abl.dsp.bubble~.
All of this makes making Max far more fun, because you don’t have to start with just a plain sine wave. Ableton has packed a ton of cool and unusual oscillator types, filters, envelopes, and more in the package. That has more of the feeling of working with a Eurorack system, where you can start with a pretty wacky oscillation source and start from there.
Part 3 of a series… Part 1 | Part 2
No Max for Live/Suite? Ableton has you covered via upgrades or rent-to-own.
Hello, instrument: source, notes
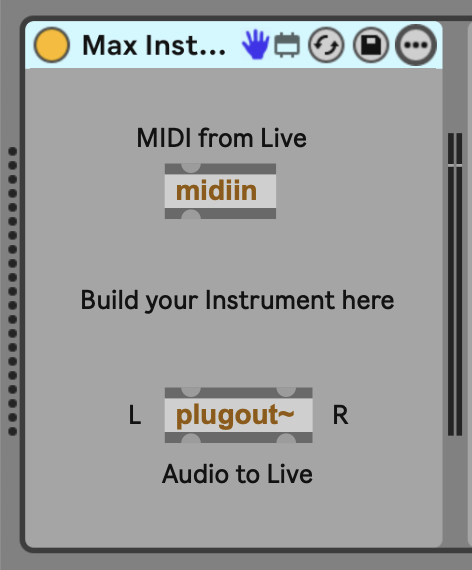
Select Max for Live > Max Instrument from the Browser. You’ll notice you get plugout~ as with the Max Audio Effects, but instead of an audio input, there’s a MIDI input (midiin).
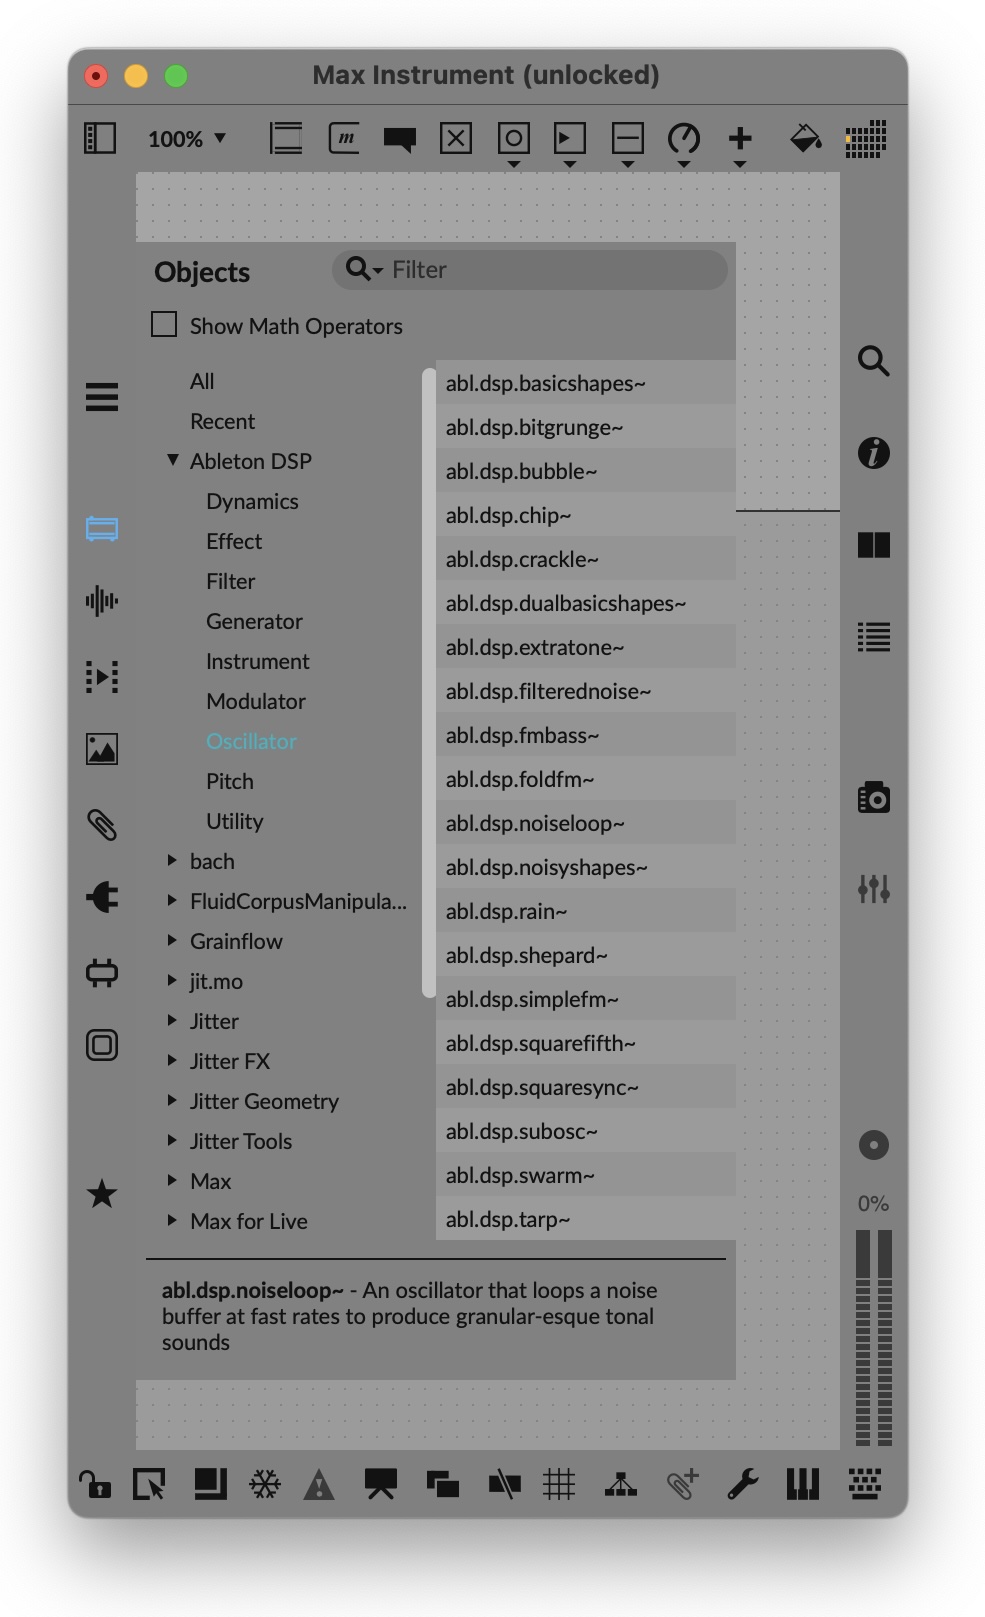
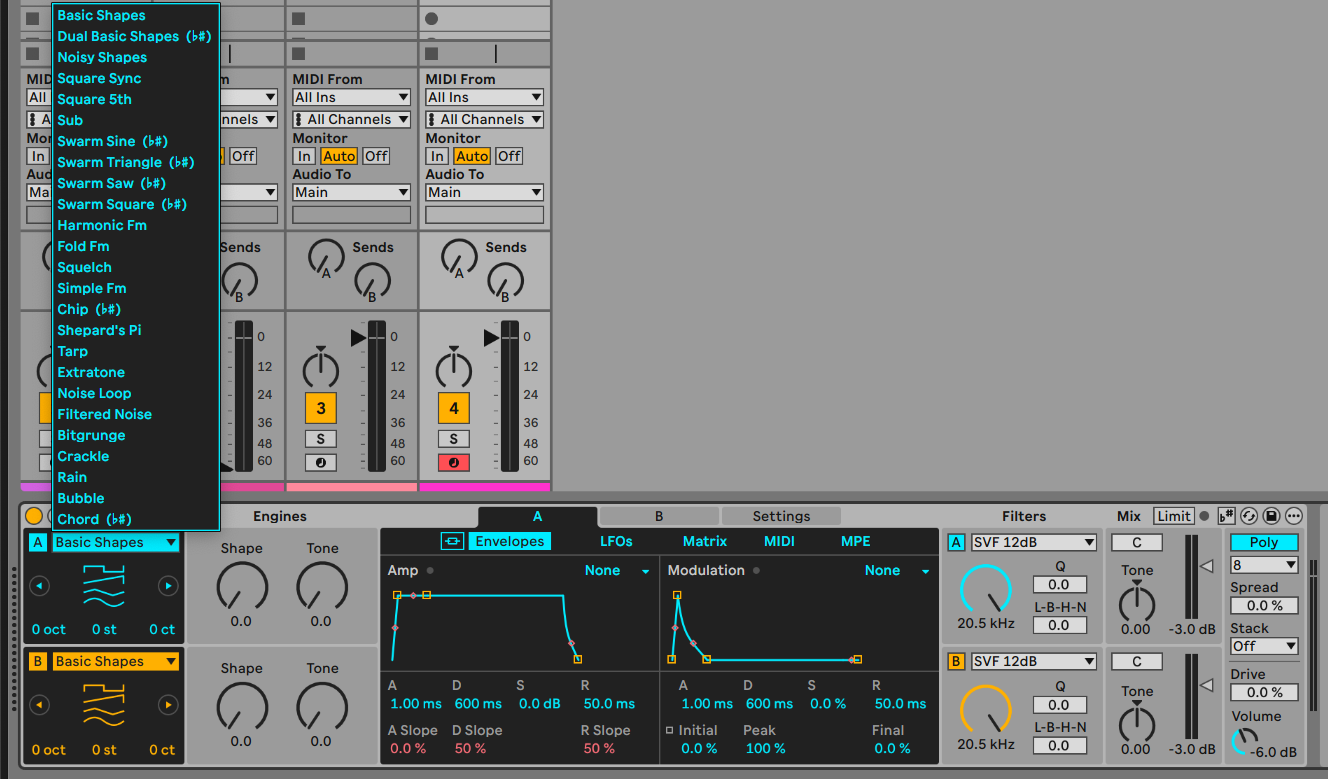
Now’s a good time to browse in the toybox. If you select Objects on the left-hand side of the Max patcher window, you can see your options in Ableton DSP > Oscillator. This is far more than just some vanilla oscillators: you have a lot of unusual sound sources, many of them from Ableton’s Meld instrument.
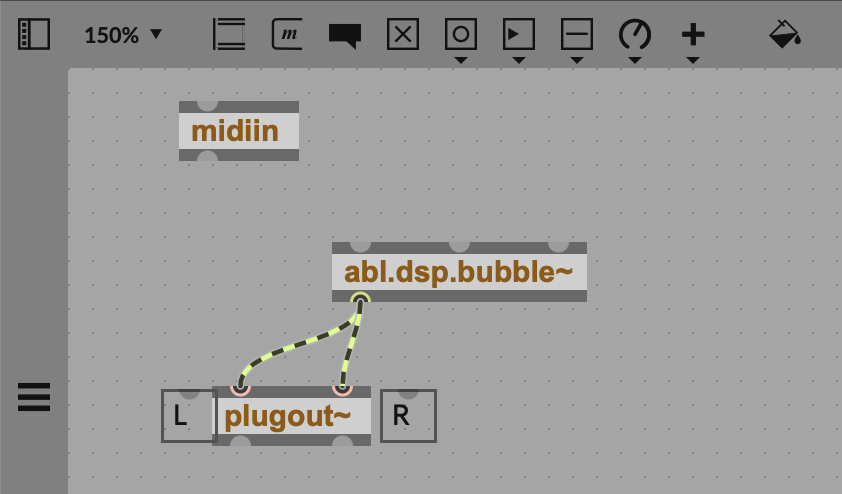
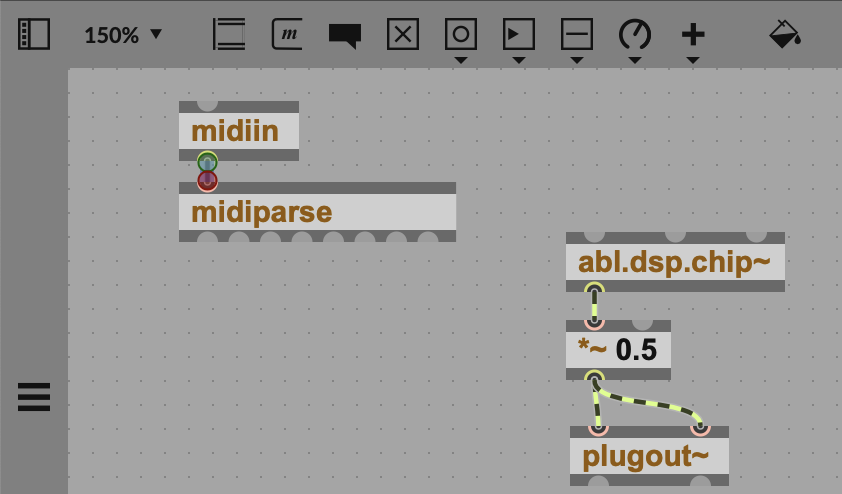
We can quickly wire one up to the output to test sound. Try abl.dsp.bubble~, for instance, connecting its outlets to both left and right inlets of plugout~. (Remember the ‘n’ key, for “new,” adds a new object.) Take a listen — soothing!
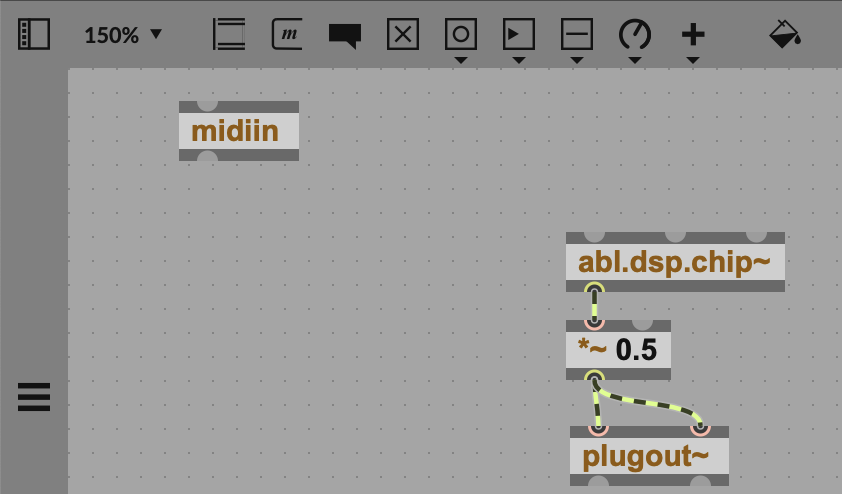
We’ll come back to bubbling in a bit; for now, let’s select an oscillator that makes it a little easier to hear pitch so we can wire up MIDI. Let’s try abl.dsp.chip~. Feeding the raw oscillator into Live will give you a signal that’s a bit hot, so insert a [ *~ 0.5 ] object in the signal path.
We’ll want control over both pitch and amplitude; we can start with pitch. midiin feeds MIDI signals from Live into your patch, but see how there’s just one outlet at the bottom — if you hover over that, it’ll confirm that this is “raw” MIDI data. We need to separate out the messages we want.
midiin has a companion object called midiparse, which gives you a whole mess o’ MIDI outlets. Hover over them to see — it’s useful stuff like polyphonic pressure in addition to the basics:
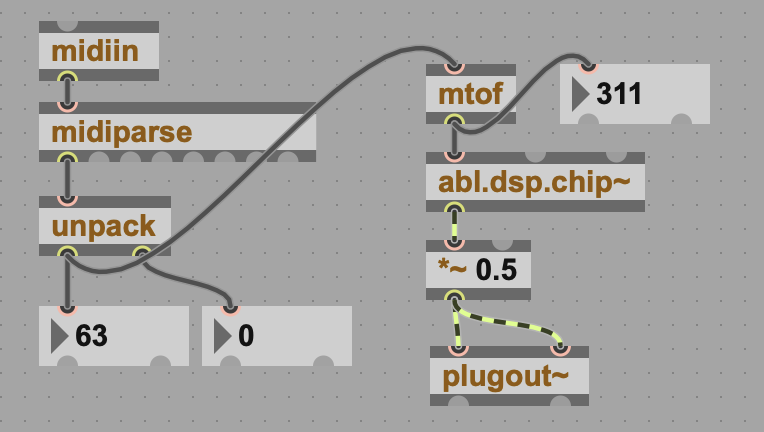
The leftmost outlet gives you the note events: note on, note off, and velocity. That’s another (shorter) list, so we’ll divide it into its elements to extra pitch. Add unpack 0 0 and connect a couple of number objects so you can see what’s happening. (Unpack takes lists and splits them into individual components. You can also try connecting a print object to any part of this stream and observing what happens in the Max Console, which you can toggle from the right-hand side of your patcher window.)
Enter some MIDI via Live (by triggering a clip or playing an input). Those are MIDI note numbers on the left, and velocity on the right, with note off events represented as velocity 0. Connect the note outlet to abl.dsp.chip~, and you’ll hear — very low frequencies.

Sounds kind of cool, but it’s basically a sub oscillator. Here’s why: MIDI values are integers mapped from 0 to 127. The oscillator objects all take in frequency in Hz, so instead of middle C for value 60, we get 60 Hz (around B1).
For equal tempered frequency, we can convert with the mtof object — short for MIDI to Frequency. (You will do the math yourself if you want a different pitch system! This is fine for now, though.) I added a number box again just so we can see the result.
So we’ve got pitch, but our notes are always on, so let’s add an envelope to control amplitude as notes are played and released.
Essential Max MIDI objects
Long-time Max users could do this in their sleep. Max has a few objects that get rinsed in daily use with MIDI. Here’s your cheat sheet:
midiin, midiout: raw MIDI messages, to be interpreted by midiparse, xnotein, more…
pack, unpack: put individual items into a list (pack), or separate them from a list into individual items (unpack)
mtof, ftom: MIDI to frequency; frequency to MIDI
midiparse, midiformat: interprets raw data into separate outputs (parse) or back into raw form for use by midiout (format); see also sysexin, sxformat objects for System Exclusive or rtin for realtime
stripnote: filter out note off events
notein, noteout, bendin, bendout, touchin, touchout, cltin, cltout: these give you direct access to specific MIDI messages, though you may want to check using midiparse first. (touch = aftertouch or channel pressure)
X Factor: xbendin and xbendout give you high-precision pitch bend messages. xnotein and xnoteout add release velocity with compatible devices.
MPE objects: mpeconfig, mpeformat, and mpeparse are younger objects that deal with MIDI Polyphonic Expression.
Add an envelope
I know one of the things that throws absolute beginners to modular synthesis is the idea that you have to take your raw tone and manually shape it and trigger it on and off. But learn this once, and you can use it pretty much anywhere. In Max for Live, our basic amplitude envelope (ADSR Envelope Generator) + amplifier (VCA) pattern translates to the following:
*~to control the oscillator’s signal level (VCA)live.adsr~for the envelope generator (EG)live.adsruito create a user interface for the envelope- velocity from our note event (including zero velocity when the note is released)
Let’s go ahead and do that. First, we can add the envelope generator. live.adsr~ is one of the Max for Live objects that expanded on the capabilities of Max’s internal objects (adsr~). It comes with a companion user interface objects that replicates Ableton’s user envelope UIs, as seen in instruments like Operator and Simpler.
Add live.adsr~. You’ll see a bunch of inlets. Above it, type in live.adsrui; when you click out of the Object box, it’ll expand into the envelope UI, and it has a bunch of outlets.
Leaving the leftmost input on live.adsr~ free, connect each outlet of the UI to each inlet of live.adsr~. (As you hover over, you’ll see what each does and why there are so many of them.
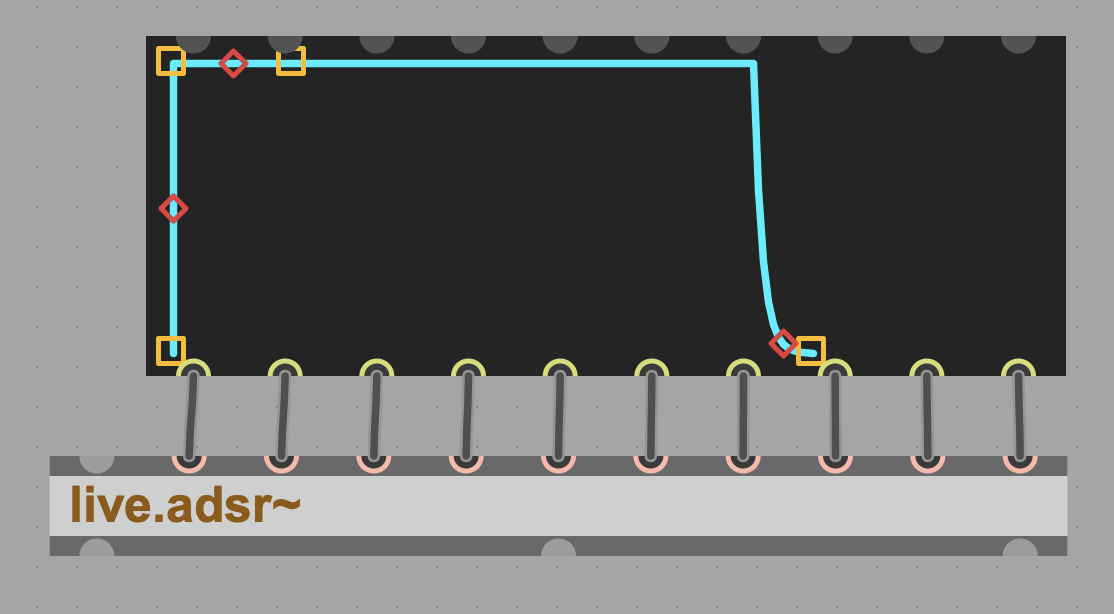
We’re going to use that leftmost inlet as the trigger. Any nonzero value triggers the envelope, and the value from 0 to 1 determines the maximum level of the envelope.
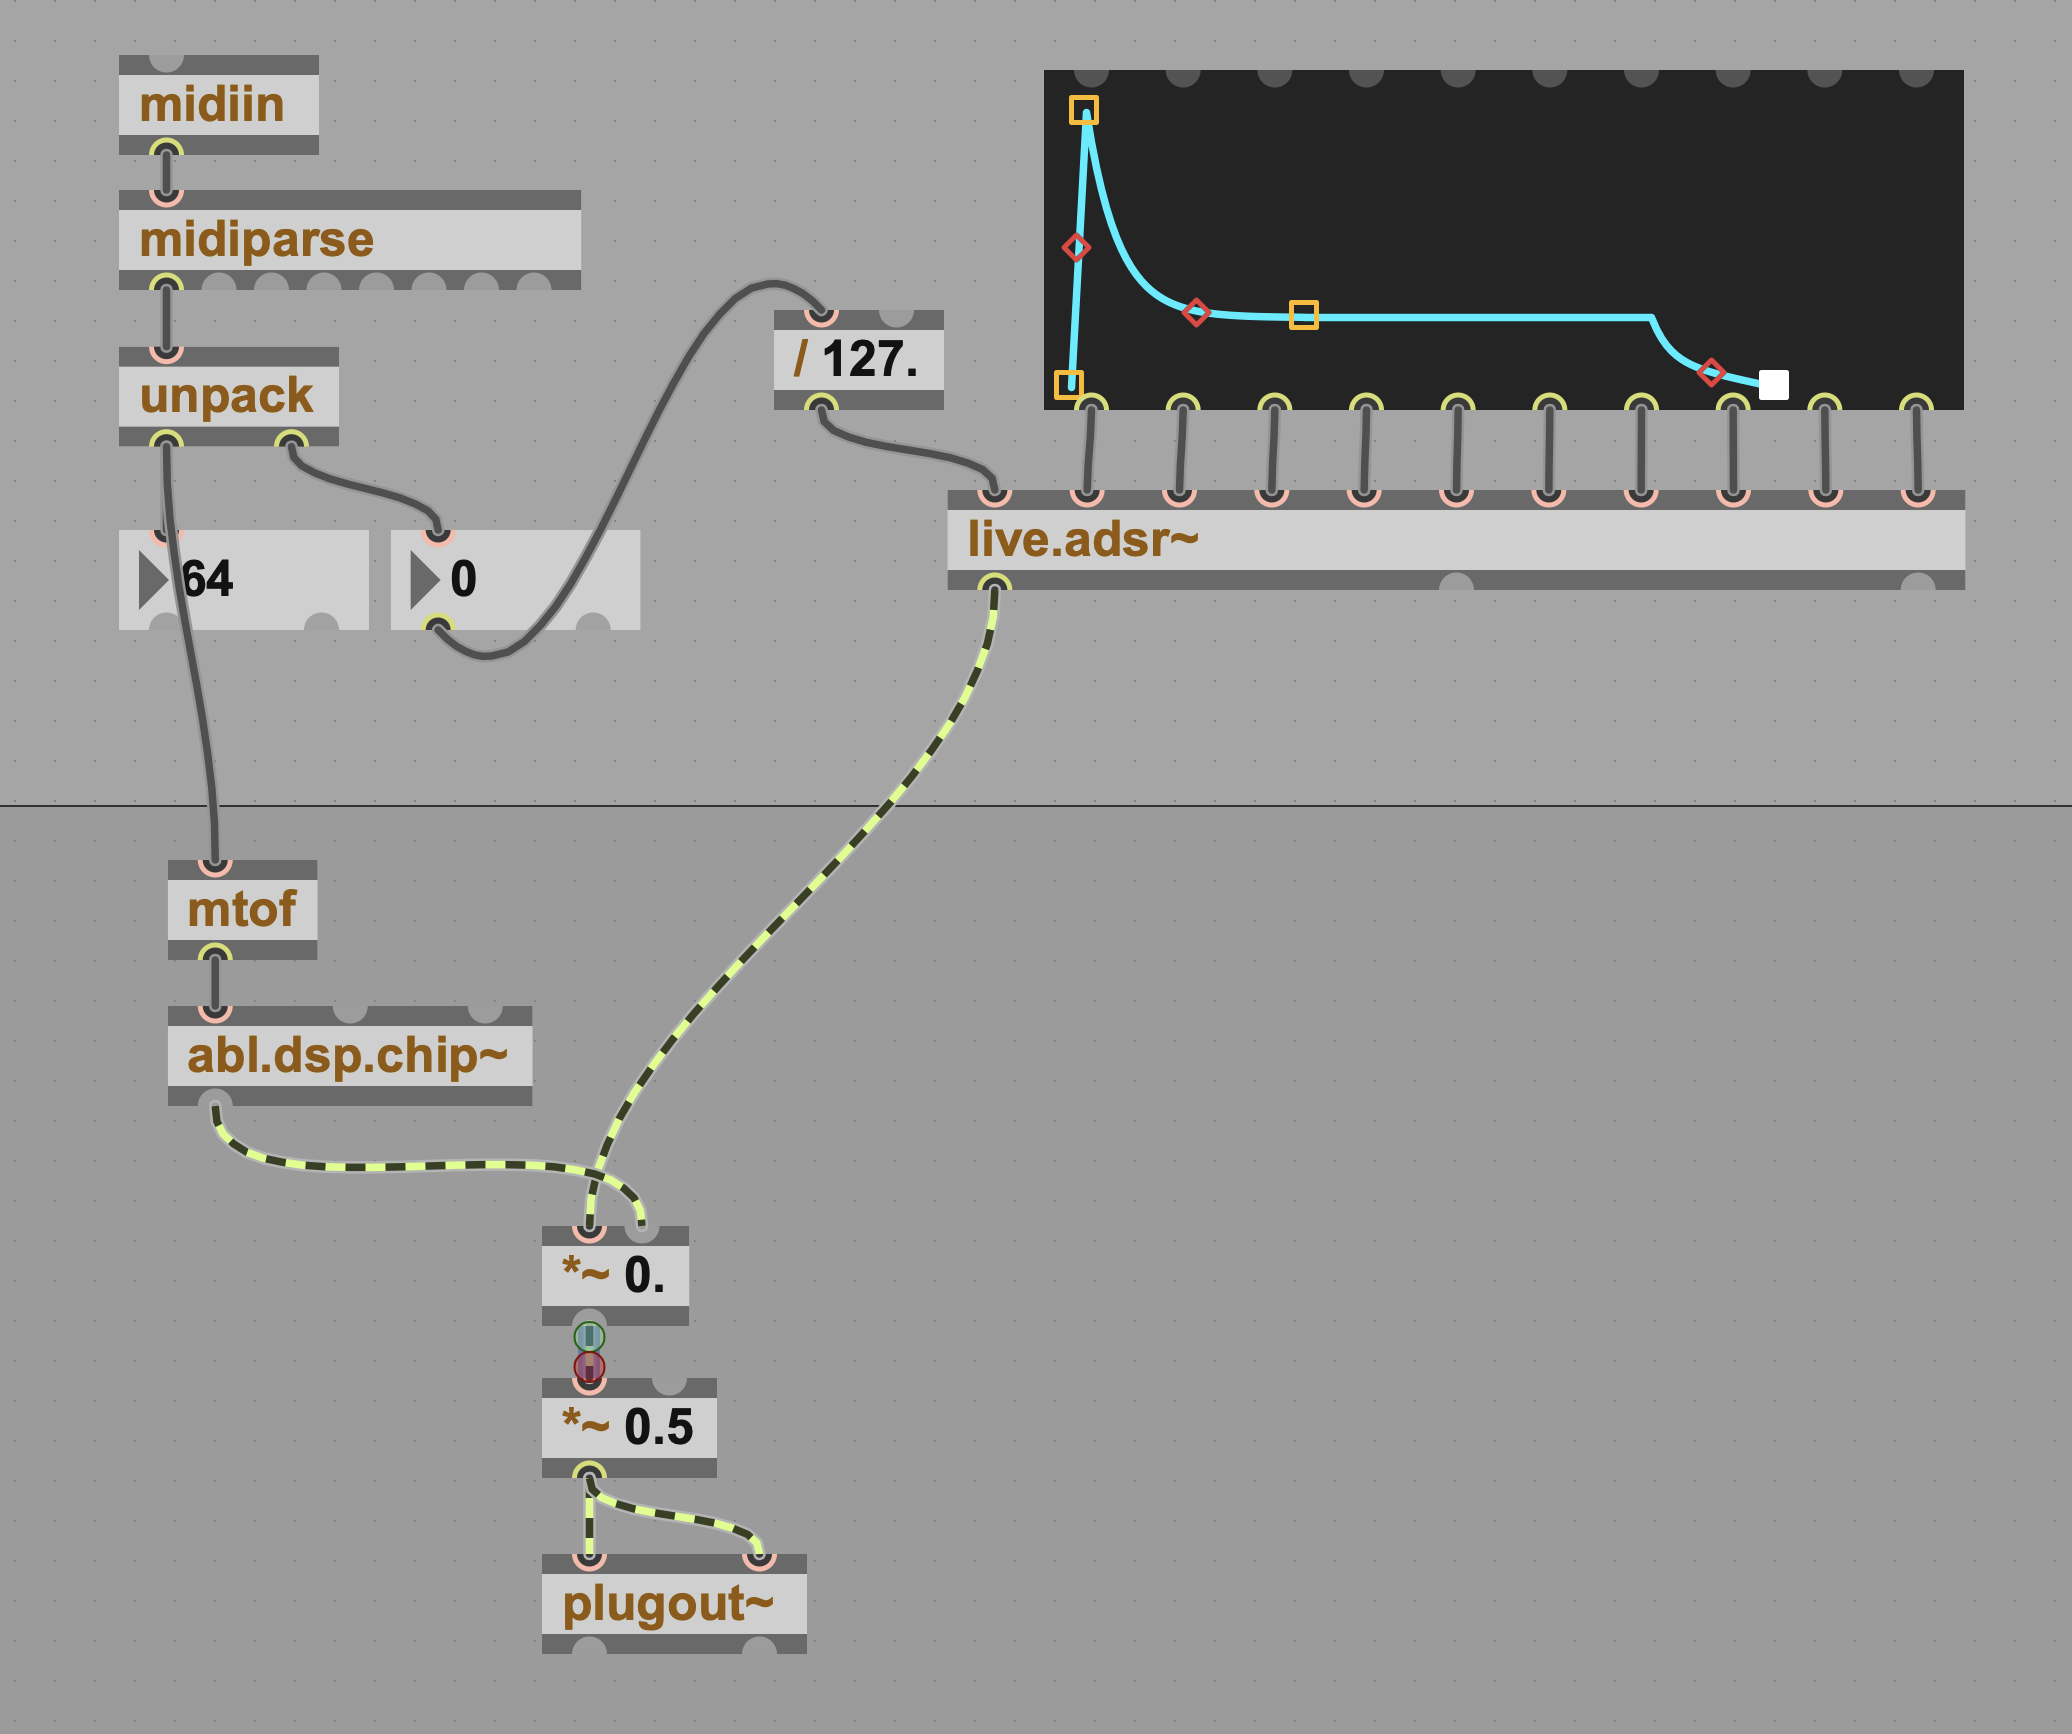
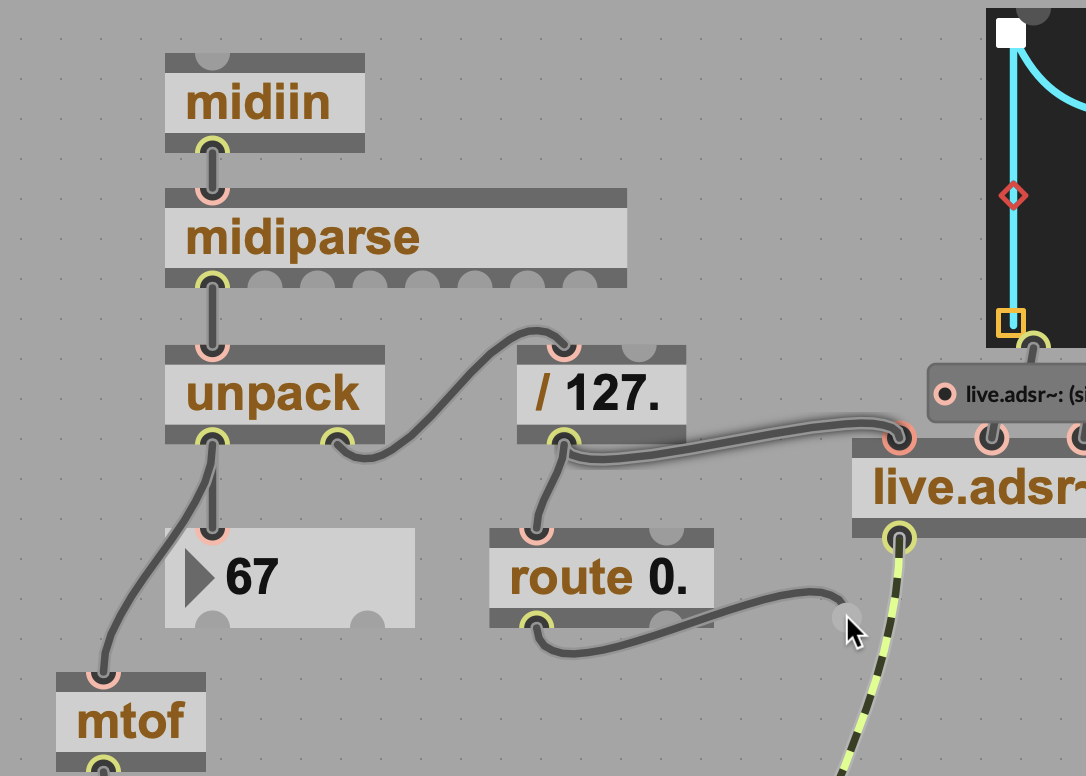
To make our patch velocity sensitive and use MIDI note on and off to trigger and release the envelope, we’ll take that second velocity value that we unpacked and route it into live.adsr~. We have to scale, just as before — instead of 0 to 127, we want to normalize to floating-point values from 0 to 1, so we just divide the input by 127. (Don’t care about velocity? Just use a [ > 0 ] object here and take the right outlet, as you’ll see in some of the examples.)

Now put it together.
Before our *~ 0.5 object, add a *~ 0. object to modulate the level of ht signal from the oscillator. Until it receives a signal, this will adjust the oscillator’s output amplitude to zero. (Again, note the position of the decimal place. It’s just shorthand for 0.0, and indicates to Max that we intend to use floating-point precision with a decimal point, not only rounding off to integers.)
Connect the envelope and oscillator signals to the *~ 0. object.
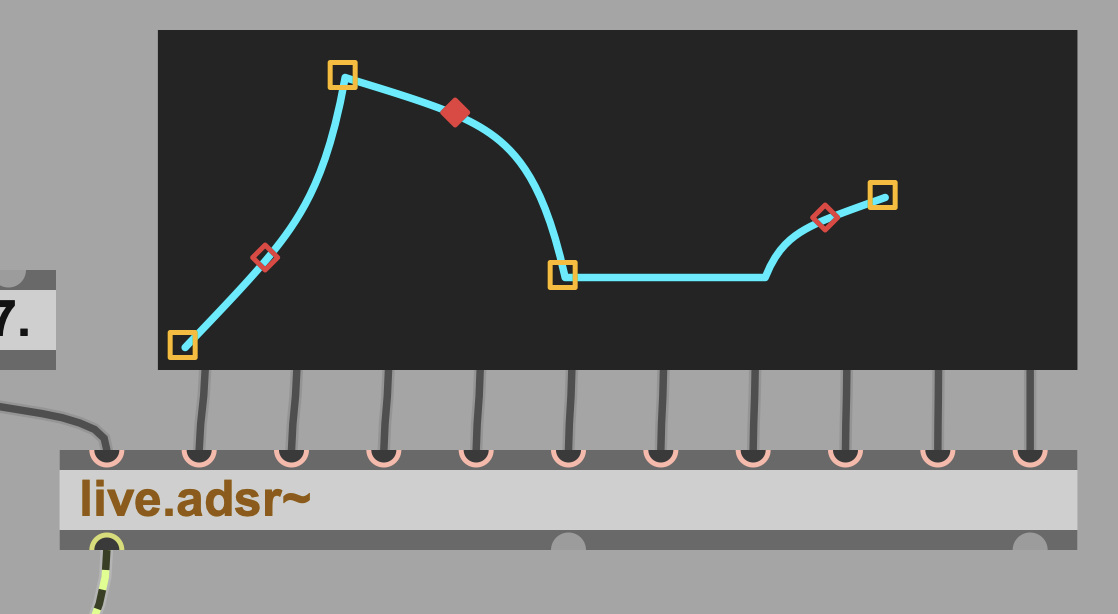
Lock the patch and move the handles on the envelope’s UI around to test it. There are some handy features a lot of envelope controls lack. The red diamonds at the center of each envelope segment lets you adjust that segment’s curve. The release can also be set to a positive signal level, allowing the sound to “bounce back” after you release a note. (Note: You can make this fancier and initialize values; see, for instance, the “2 Mono FM mod” example patch. You don’t really need to connect all the wires, but for our purposes, it’s useful for now. Try resizing the live.adsr~ object to make this easier — drag on the handles on the object.)
Save, close, and try this in Live. Keep the envelope UI above the visible line so that you can also use it from the Live Device and not only in Max.
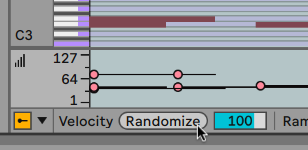
Don’t forget to test velocity; if you don’t have a controller handy, try randomizing the velocity values in the Clip View.
Filters, LFO, and the fixins
Ableton DSP filters
These are unique-sounding filters that are just now made available to Max.
abl.dsp.dfm~ is your goto lowpass filter with resonance, modeling the behavior of analog filters.
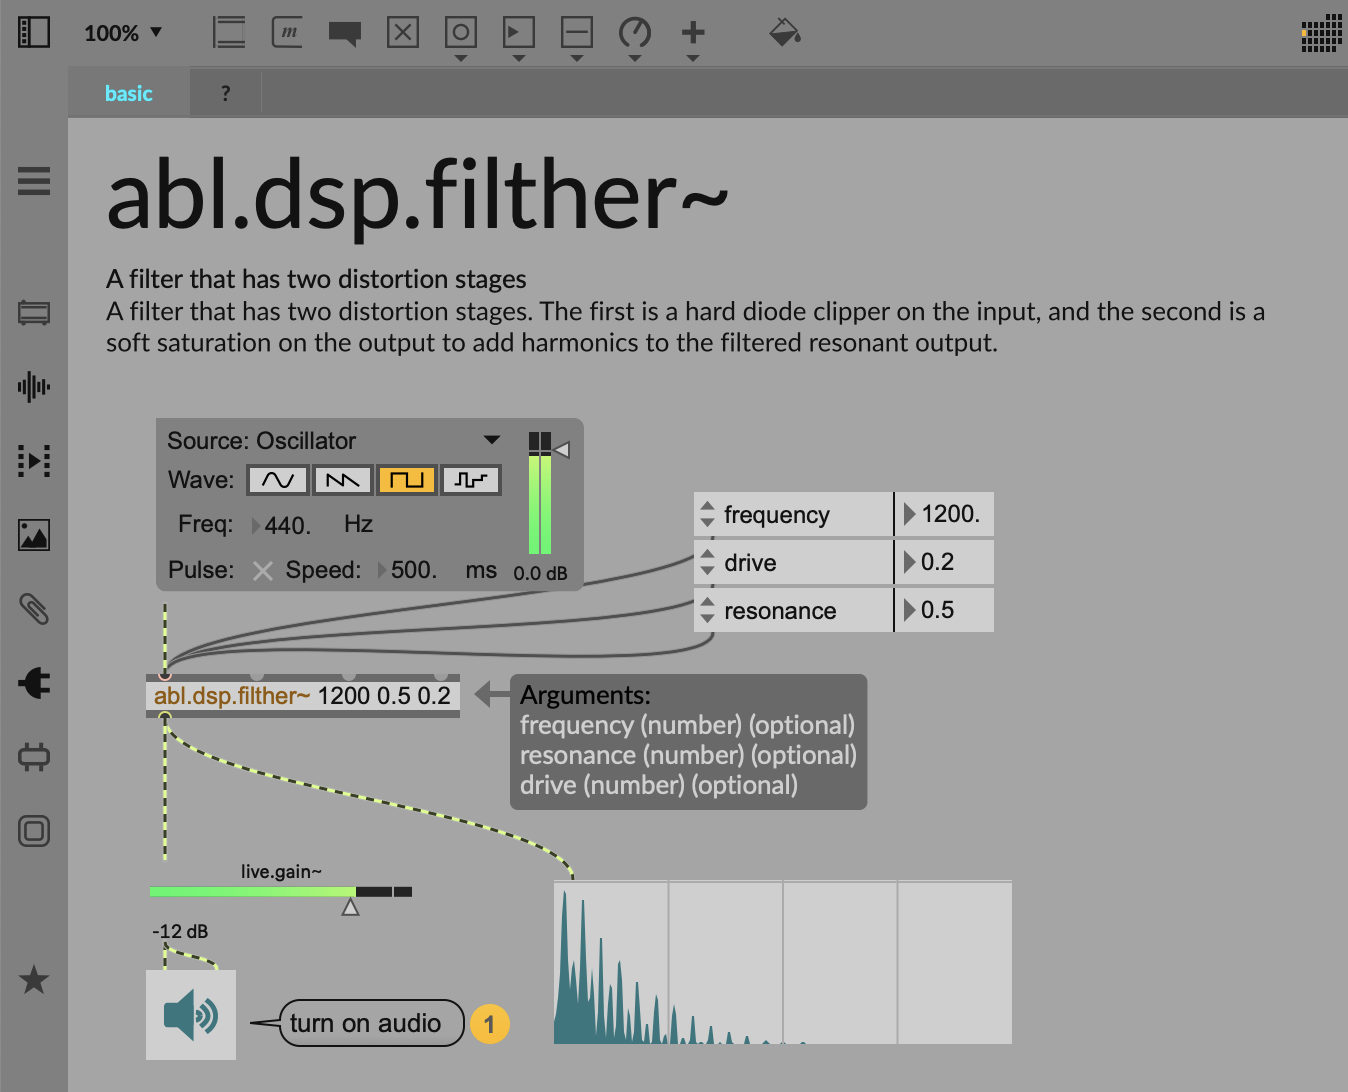
abl.dsp.filther~ — as in “filthy” — adds two distortion stages to the resonance filter, with drive control.
abl.dsp.vowel~ is five bandpass filters morphing between the vowels AEIOU. That gives you some really unique, punchy sounds, so don’t just assume this is for when you want vowel/vocal sounds.
Check the references for each of these for more, or check what they can do by inspecting their inlets or attaching attrui.
Now you can have some fun and start adding to this. Here are some things to try:
Tighten up note timing. Max events process right to left. We can add one additional object right after unpack to make sure that we send the envelope trigger just after adjusting the frequency. It might not be strictly noticeable, even, but it could make a difference with certain more extreme envelope settings.
Swap just takes the right inlet and sends it to the left outlet and visa versa, like so:

(You’ll see this in many patch examples with notein immediately followed by swap. It’s a Max/Pd thing.)
Add a filter. As of Live 12.3/Max 9, three filter types are already available in Ableton DSP (above). More are likely coming soon to Max for Live (see Max 9.1’s addition of Meld), meaning by the time you read this, there may be more. There are also some handy Max filters to try mixing and matching (see below) — something you can’t do with the native Ableton devices.

Inspection! Remember from part 2 of this series that we can dig into what these objects do with the powerful attrui. Connect it to the inlet of your filter and oscillator and see what you can control usig the dropdown. (Pulse width on the abl.dsp.chip~ is an obvious place to start!)
Instrument reference
This grab bag of oscillators all comes from Meld, so if you want to know more than the Ableton DSP manual provides, a good idea is to consult the Live Instrument Reference. There you’ll learn that the mysterious Modulation Rate adjusts the speed of the chip interval being used.
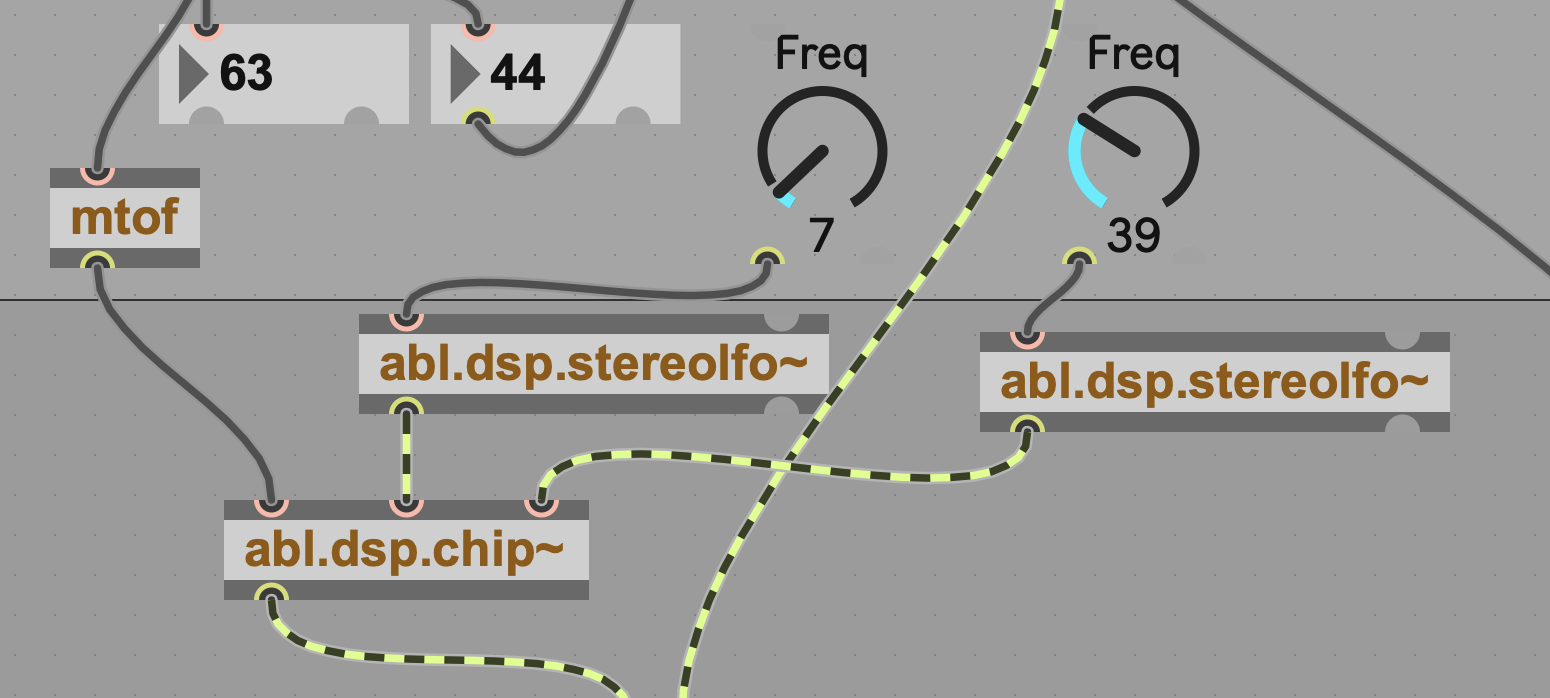
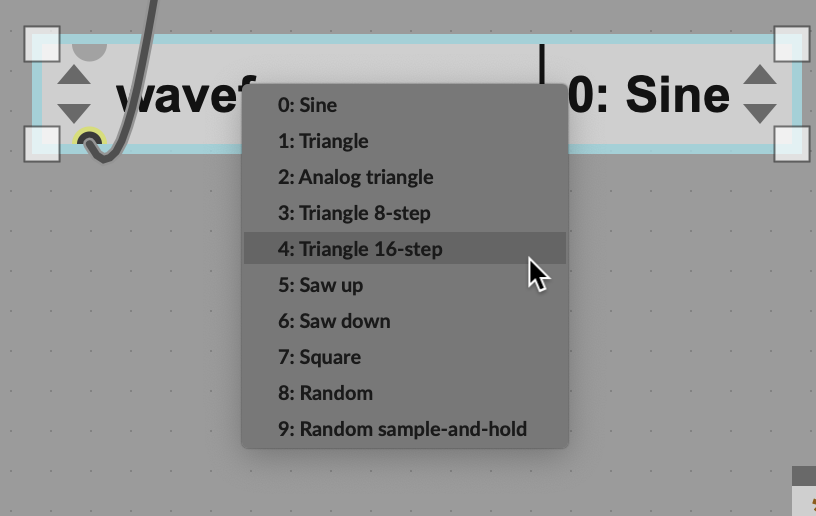
Add modulation. Modulating parameters is always fun. You can get a lot out of Ableton’s own LFO source, abl.dsp.stereolfo~. Use attrui and you’ll see you can set it to various waveforms. Above, I’ve tried routing it to chip~’s pulse width and modulation frequency (both of which scale from 0 to 1). That’ll give you some great tremolo and modulation sounds, making it all even more chippy (especially as you mess with the LFO waveforms). Actually, for abl.dsp.chip~ it would make sense to leave out the filter and just go with raw chippy sounds.
Don’t be thrown by the fact that this is a “stereo” LFO. Yes, it’s occasionally useful having left and right outlets, but you can also just use the left outlet like any other LFO.
Route MIDI pitch and velocity to another parameter. You’re already routing in both note number and velocity information, so why only route those to pitch and amplitude? You can try scaling these and inputting them to other parameters, too.
One note on velocity: don’t forget that there are those zeros in that data. You have two ways to filter them out. One is to use stripnote to remove noteoff values. The brute-force solution is even simpler: route 0. outputs the zero to the left outlet and all other values to the right outlet, so connect the right outlet for all nonzero values.
Max’s filters: a sampling
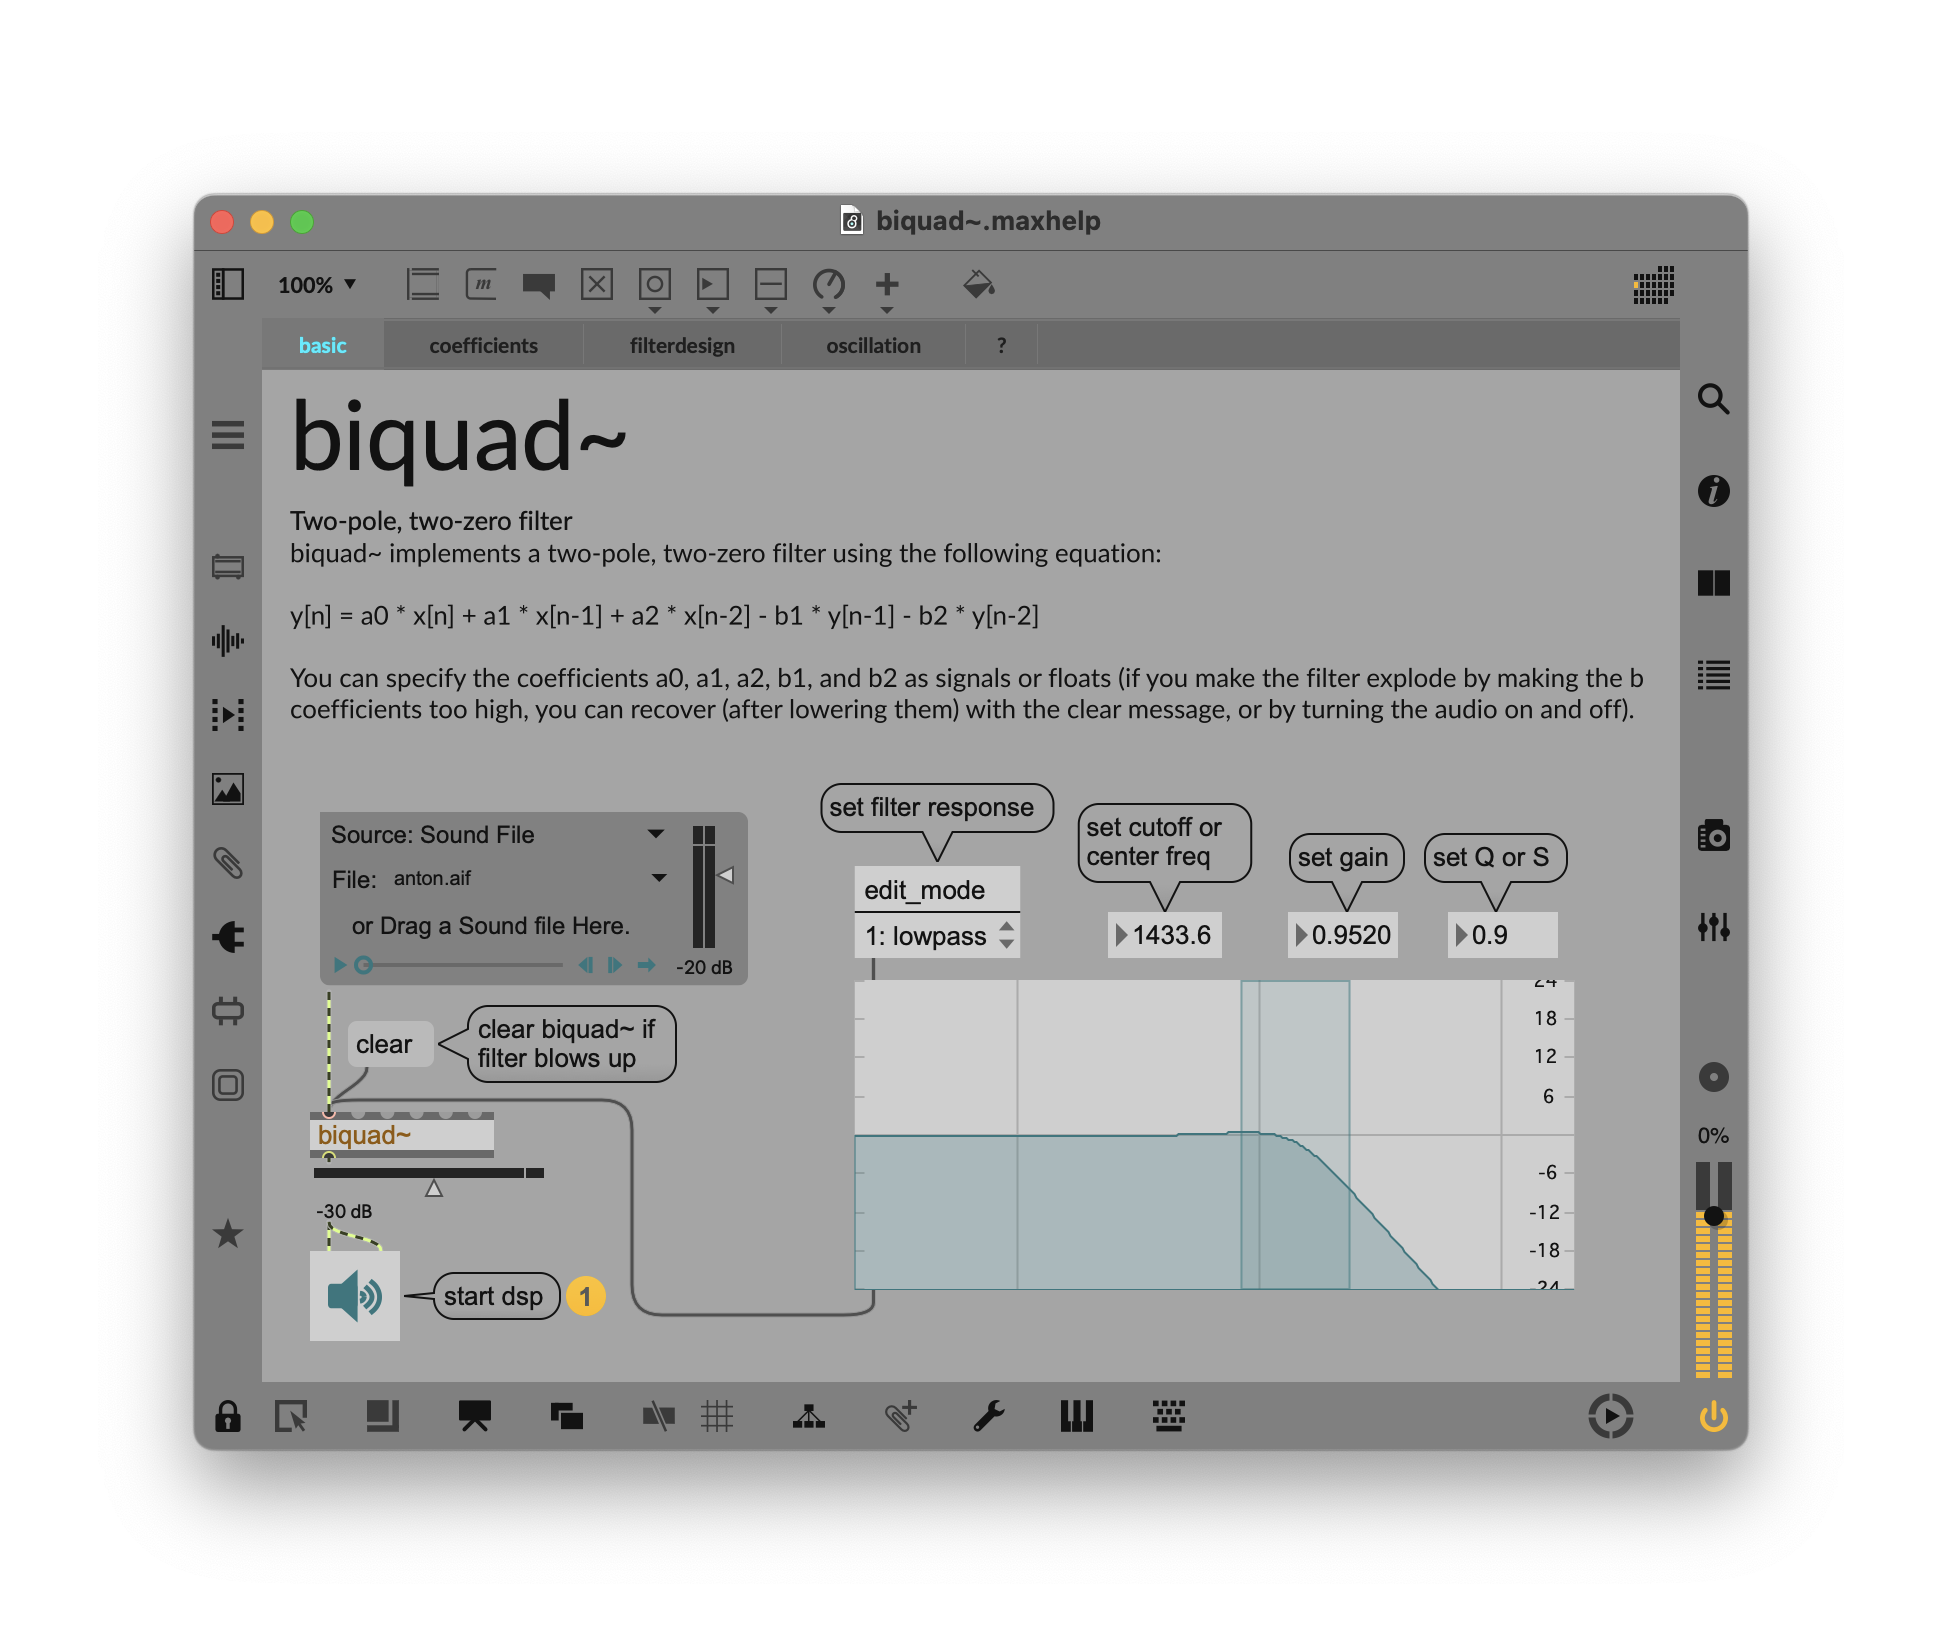
Max has a bunch of cool filters, too, but the names can be confusing. Try some of these for variety (in addition to cross~ as we saw in pt. 2):biquad~ (two-pole multimode filter with all varieties)lores~ (lowpass, cheaper variety)comb~ reson~ (bandpass)svf~ (state-variable filter which simultaneously outputs lowpass, highpass, bandpass, and notch outputs)
For synth applications, biquad~ and svf~ (plus maybe lores~) will cover your needs most of the time — biquad~ especially. It’s worth giving these a try, as they don’t sound exactly like the Ableton filters and visa versa. You’ll find still more options in filterdesign.
Frequency modulation
Max for Live and Ableton DSP Objects offer a chance to create direct, audio-rate modulation between components in a way that isn’t possible at the DAW level.
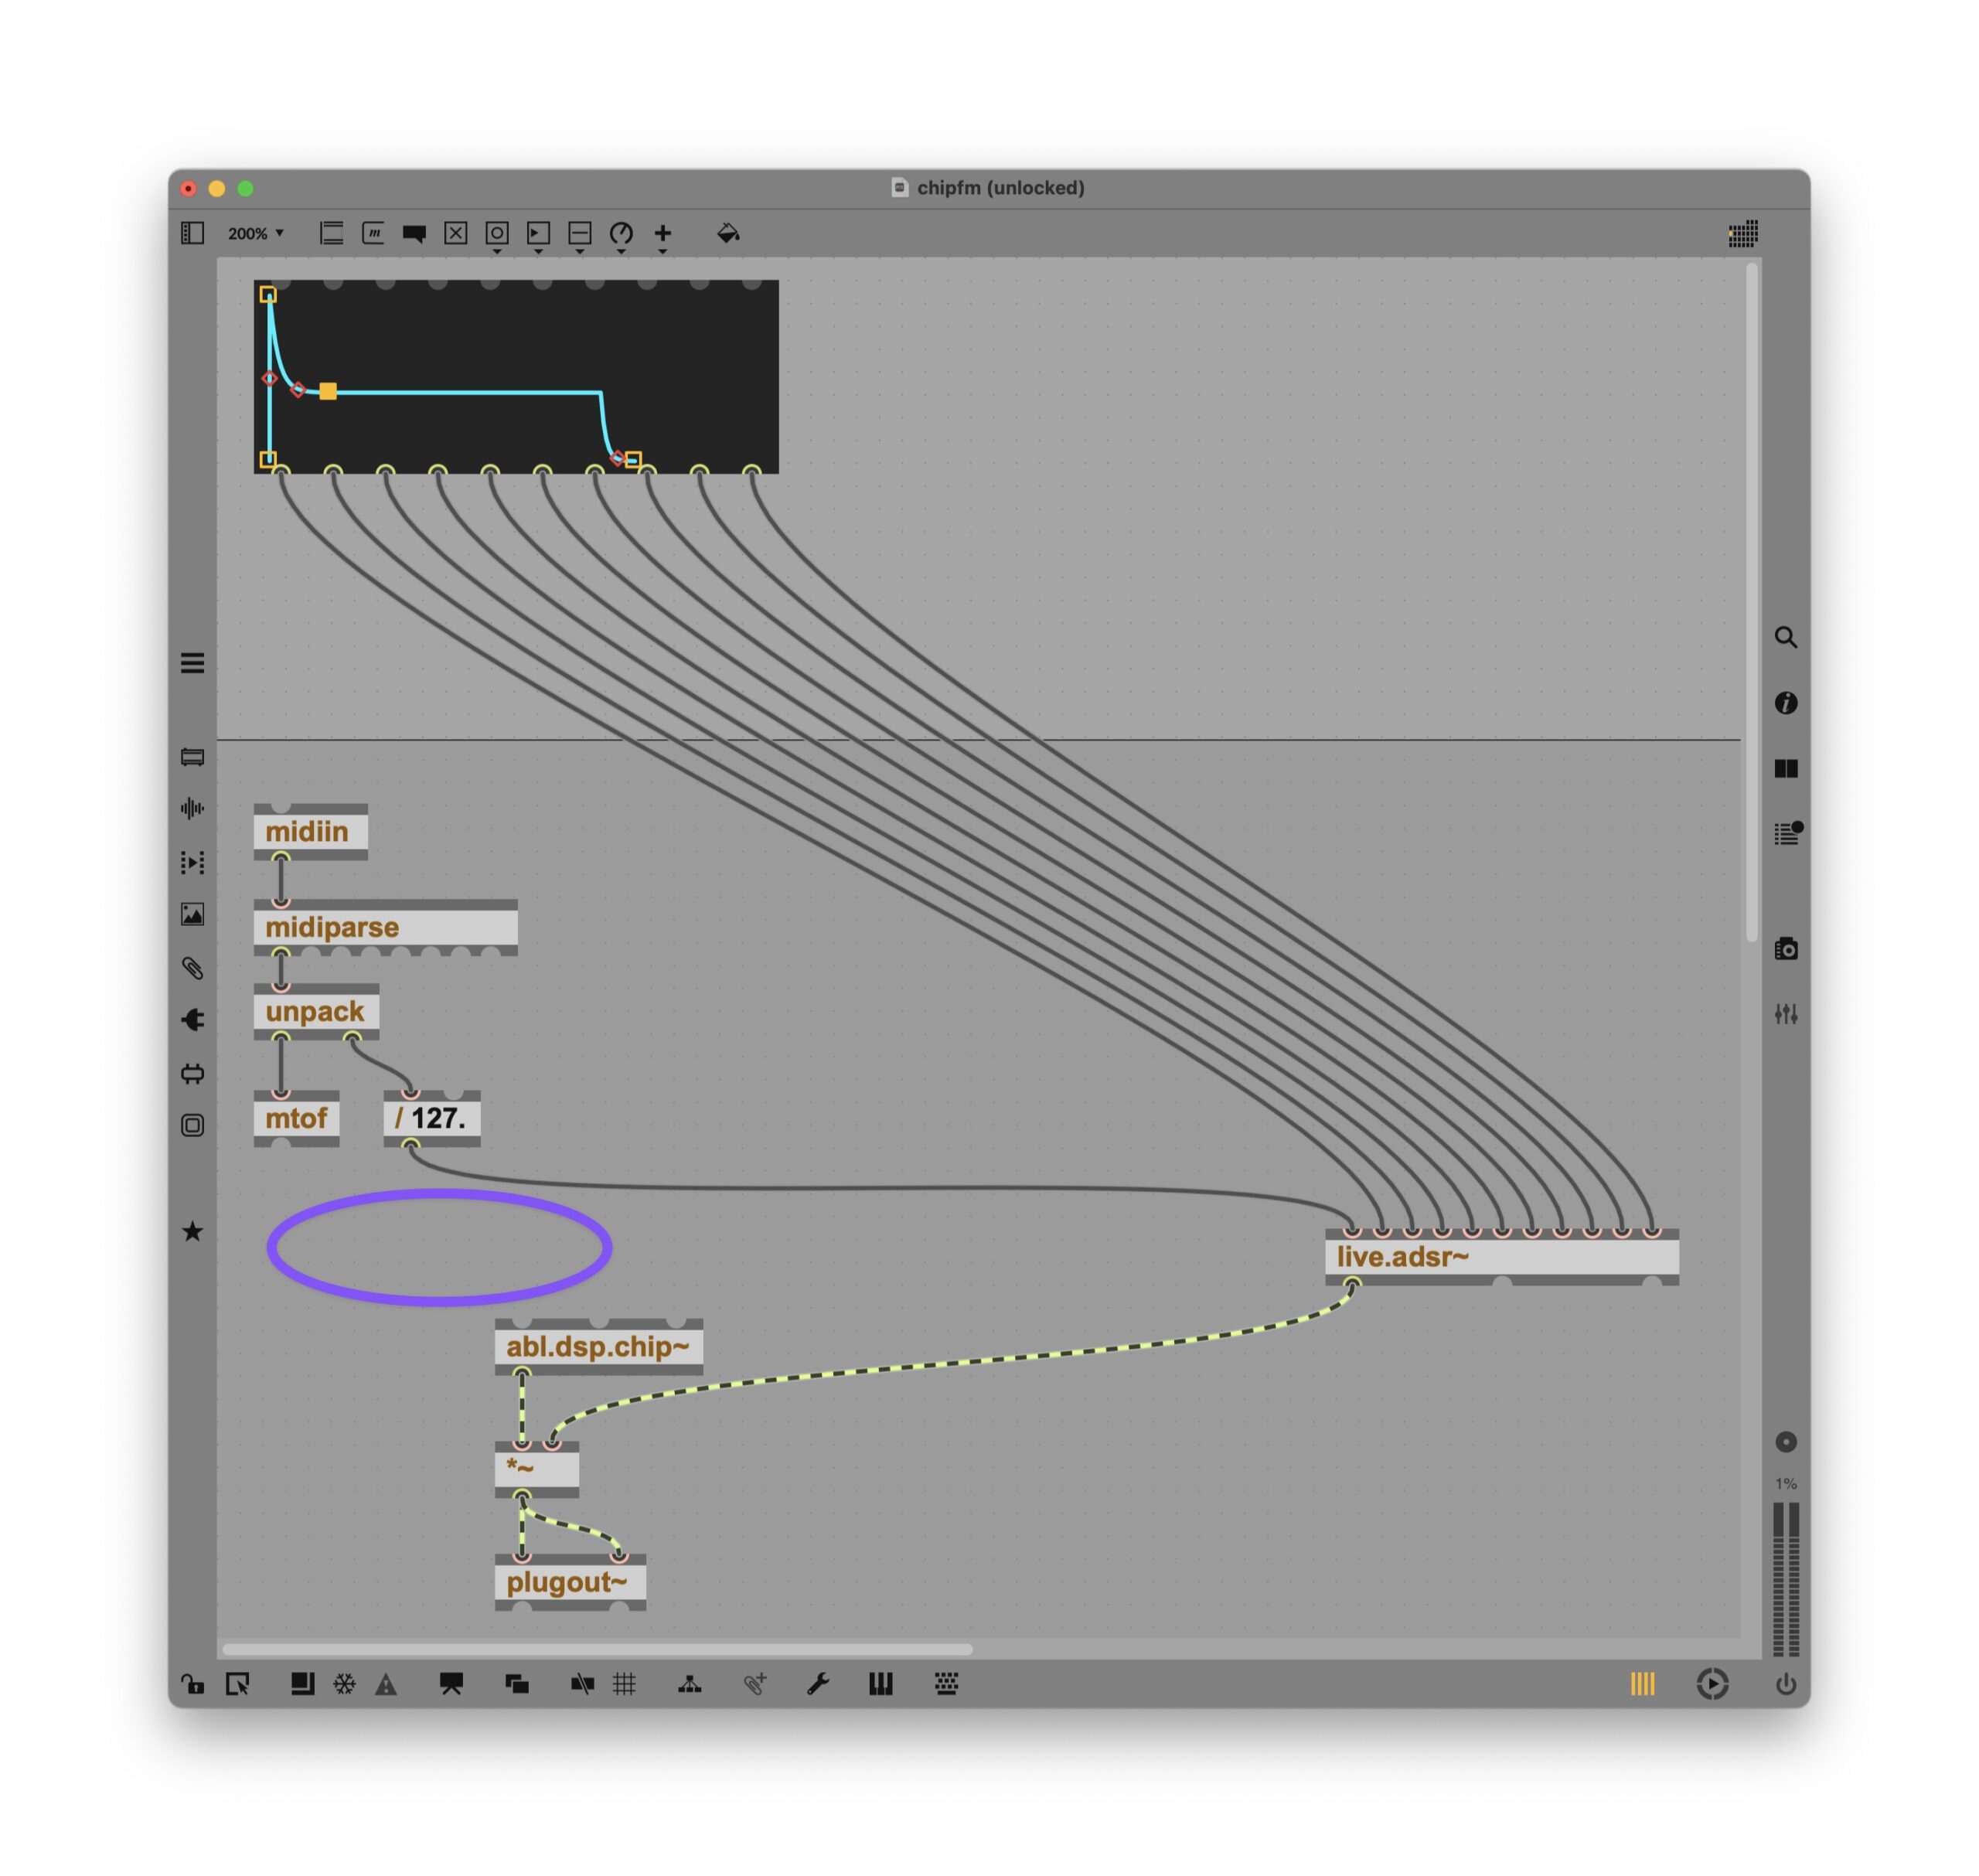
Let’s add this to the existing chip patch. First, I’ll make some room here. I’m going to keep my current patch as basically my carrier oscillator, and add the modulator to that, for some simple chip-style 2-op FM. Spot the little hole I’ve made. (I cleared out the modulation and other experiments for now; I can add them back later.)
Here’s the idea: we’re going to feed an audio rate signal into the frequency inlet on abl.dsp.chip~. The trick is, we want to still tune the carrier oscillator to our MIDI input, so it still sounds like the notes we’re playing or triggering. To do that, connect +~ to the frequency inlet on the oscillator, and connect its rightmost inlet to the output of mtof — the MIDI pitch input.
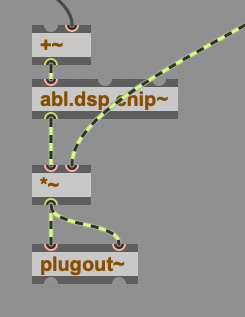
Now add the second oscillator. Here there’s a little bit of signal math, but let’s talk it through.
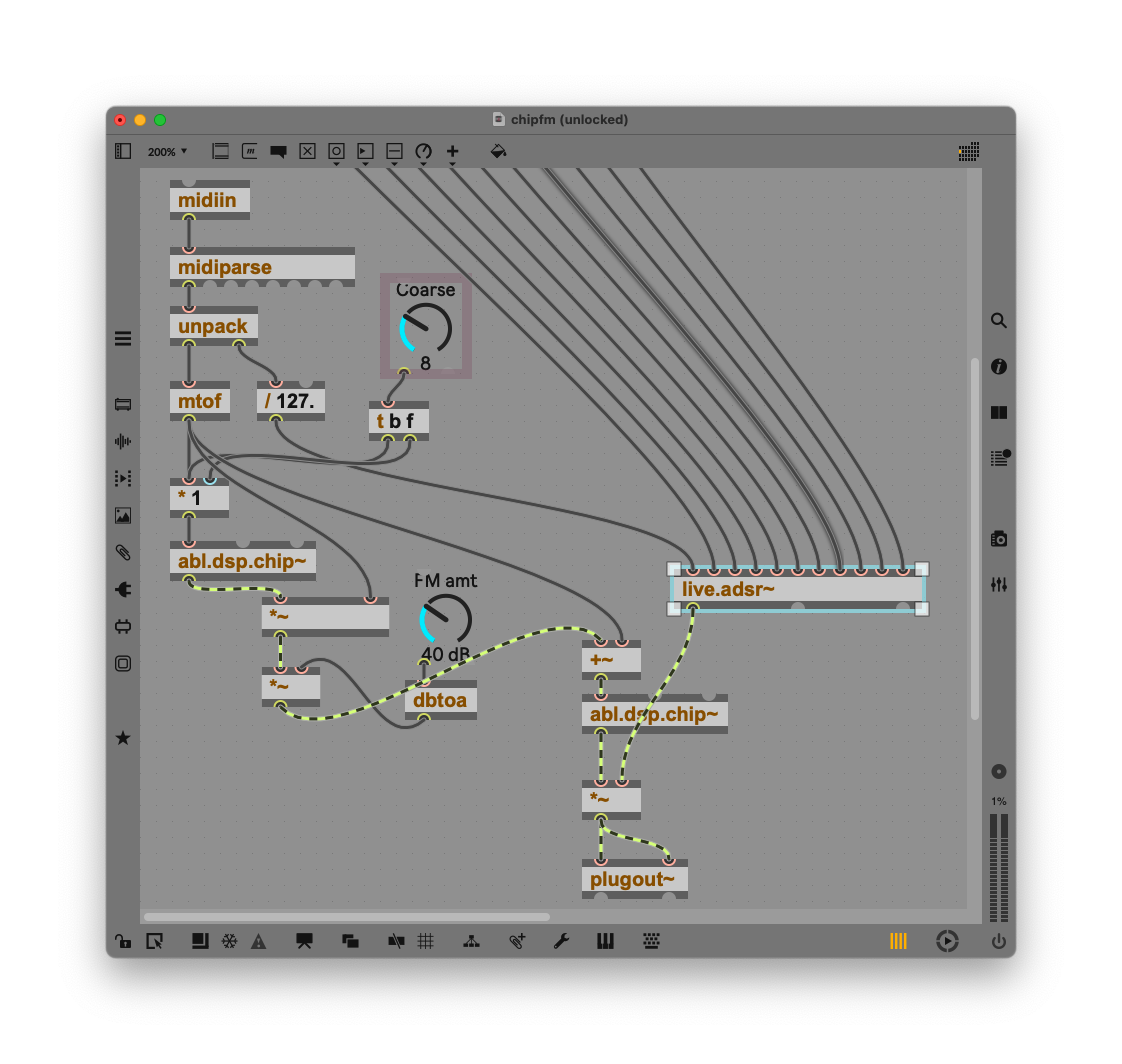
You start with the input frequency. We’re going to multiply that by a coarse FM ratio — create a live.dial, and in its Inspector, set the Range/Enum to “1. 24.” (I just liked that range, so feel free to experiment.) It’s also a good idea to change the scripting, long, and short names so you can identify it in the interface and when mapping the controls.
That’s all this first portion does. The [ t b f ] object is just short for “trigger bang float.” It outputs a trigger each time you change the knob, so that the frequency is updated in the oscillator in the * object — check separate tutorials on how message processing works in Max, but this is a little like giving the object a gentle kick to make it update.

Now we want to feed modulator operator into our carrier operator (the primary oscillator). We again scale the output by the frequency, then again to adjust the amount — the second *~ object.
Add a live.dial and connect it to the right inlet. You can actually connect it directly and it sounds convincing at just 0 to 127, but to scale that value a little more convincingly, we can configure the live.dial to make adjustments based on amplitude in dB. Set the live.dial Unit Style to Loudness (dB) and then connect it to a dbtoa (dB to linear amplitude) object.
Put it together and mess with the knobs. You’ve earned this: raunchy, chippy fun!
Bonus: if you want to go even weirder, try modulating the pulse width of the first oscillator (modulator) with a stereo LFO.

Last steps for this patch would be to move the Coarse and FM amt knobs up to the visible area, switch to presentation mode, and clean up the UI.

Don’t forget — I always forget — right-click a blank area of your patcher, choose Inspector Window, and check “Open in Presentation.” That way, you’ll see exactly the same view in Ableton Live that you do when you click the Presentation button in your patcher in Max.
Here’s how it sounds:
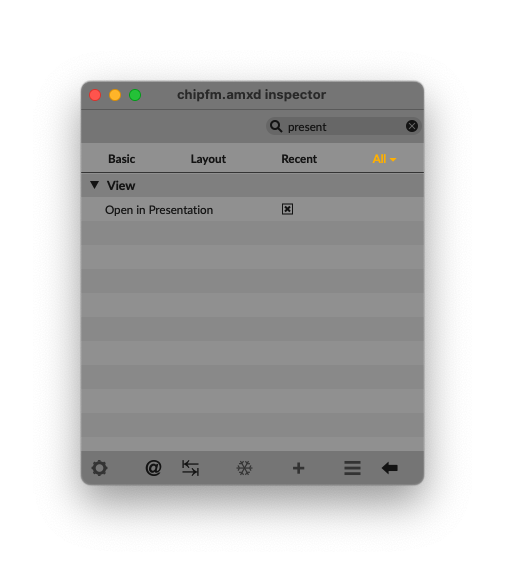
Inspector Gadget:
Getting lost in those Inspector windows? They’re overwhelming sometimes! Remember, there’s a search box at the top that lets you filter only by what you want. (This works in tools like Unreal Engine, too, but I digress!)
Unique sound sources: crackle, bubble, resonate
Meld has some out-there stuff that feels like it came from a module, but you couldn’t really patch it freely — until now.
Let’s try something leftfield, and use abl.dsp.crackle~ and abl.dsp.bubble~ as exciters for abl.dsp.modalresonator~.
We’ll use the same pattern as before for envelope generator (live.adsr~) and MIDI processing.
bubble and crackle are fairly chaotic sounding, but they still have some pitched element in them, so feed them frequency. (Don’t forget mtof!) We want to reduce the amplitude by a significant amount for each — say *~ 0.3 — so this doesn’t get out of control. (I wound up wanting a 3:2 crackle to bubbles ratio, for my taste, so set them to 0.3 and 0.2, respectively. Season as desired.)
You’ll wind up with something like this:

That already sounds rather nice in a glitchy sort of way, but let’s add the resonator and adjust the two oscillators.
You’ll want to match the frequency of the modal resonator to the input frequency so the results are pitched, making this playable as a melodic instrument of sorts. Route from the mtof outlet into the frequency of abl.dsp.modalresonator~.
Here I’ve added some attrui objects so I can dig into the modal resonator’s parameters, and abl.dsp.shimmer~ blends really nicely with the resonator.
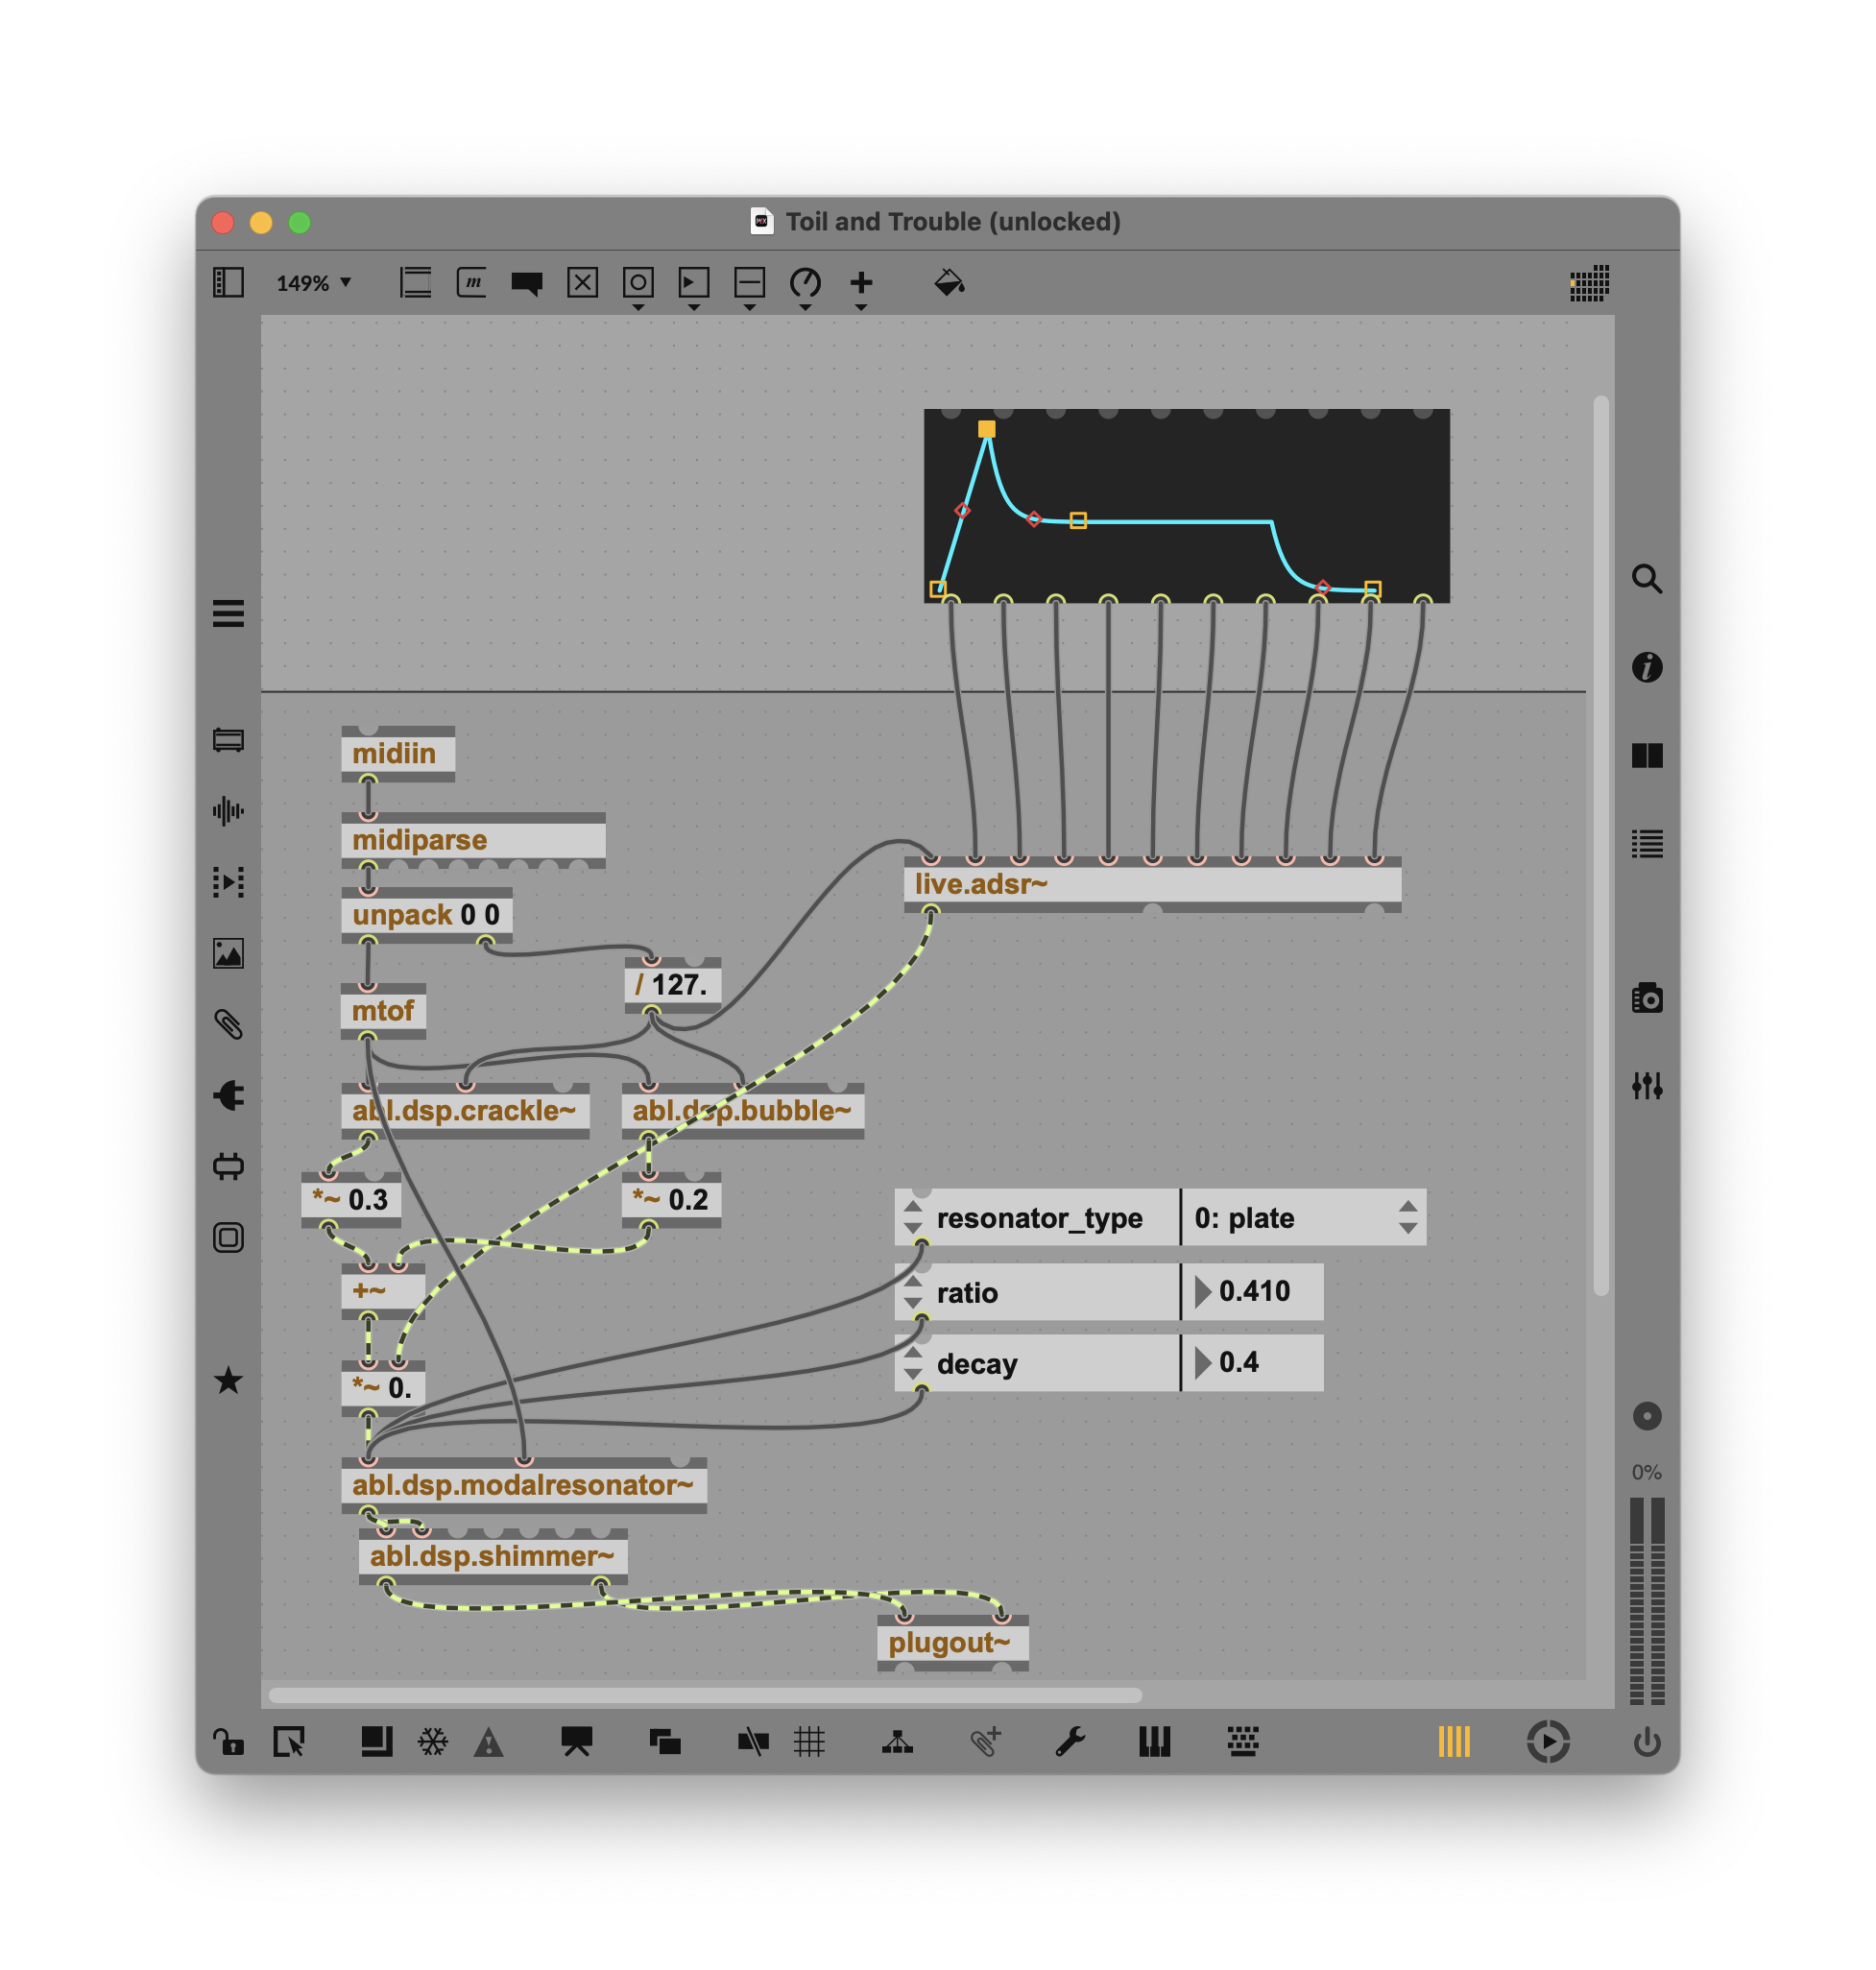
You can pull out those attributes as always with attrui. There are two models, plate and membrane. The ratio parameter works only with plate, and shifts the spectrum of its response.
The most important value here is the decay for the resonator. The default won’t sound like much, but as you increase it above 0.3, you’ll start to hear this like a big, mysterious metal instrument.
Also, try feeding the normalized velocity to crackle’s density and bubble’s rate. (Use the value ranging 0 to 1, after you divide by 127, just like you used with the envelope.) This will let you get a little more action out of your exciter.
Here’s another trick for adding parameters to live.dial: instead of connecting a bunch of wires, you can select attributes directly from a pop-up. Select the live.dial you want, open the Inspector, and go to Behavior > Connect to Parameter.

Put this all together, and you can get some beautiful, organic results:
Go wilder: add aftertouch
This patch would be a natural fit for going polyphonic and adding polyphonic aftertouch. As an experiment, I tried simply routing poly key pressure to decay. That way, I can use MIDI keyboards with aftertouch or Push and Move and get expressive after I press each key.
To do this, take the second outlet (poly key pressure) from midiparse, add an [ unpack 0 0 ] object just as you did with the note, and then for our monophonic patch we can just read the value directly, scaling with [ / 127. ].
Hands-on control
If you’ve followed along with the tutorials, you may have noticed that you don’t automatically see knobs and parameters on your Push or Move (or other third-party controllers that display these parameters). Here’s how we add that.
Add a live.banks object to your patch. Double-click it, and you get this handy editor:
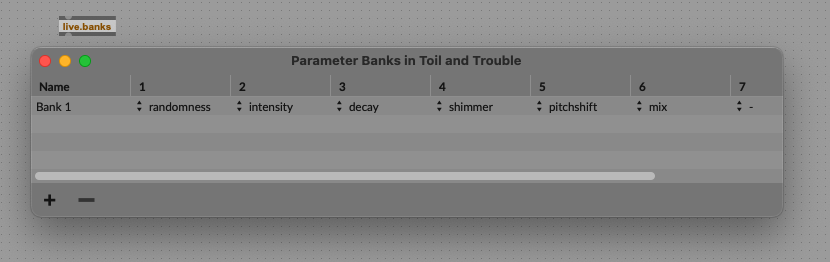
Just select the parameters you want, and they’ll appear in that order from left to right on your device.
(If you want to go further, you could add additional parameter controls for the envelope and put those on a second bank, for instance.)
Adding polyphony, extras
Here’s where I’d go with this next, and there are some nice tutorials on this already.
Polyphony. Once you have a working patch, making it polyphonic is now reasonably easy thanks to poly~. In Ableton Live’s Browser > Max for Live, pull up tutorial 3 Polyphony. You’ll even spot some details you can reuse in your chip synth (or via whatever oscillator types you choose), except yours will sound a lot better than just two generic Max cycle~ oscillators!
The basic workflow is this: you’ll make a subpatcher out of the portion of your patch you want to apply to multiple polyphonic voices, then use poly~ to instantiate as many voices of that patch you want.
It’s a really powerful scheme, and by the way, works really well for working with techniques like granular synthesis, since you can create an arbitrary number of voices quickly.
Once you have polyphony, you can easily add MPE support for Ableton Push 3 and polyphonic pressure for earlier Push and Ableton Move.
Spread. You probably noticed we’re still just duplicating left and right audio signals. There are lots of ways to add stereo spread — you could just slightly delay one of the channels, for instance, a la Haas Effect. But if you’re thinking of duplicating those voices with unison spread, you’ll again want to use poly, even if you make this unison/mono. Check the Max for Live tutorial 7 Spread (which includes some other nice extras.)
This stuff is probably worth a follow-up, so if there’s demand, I’ll write it!

And where to go next
Once you’ve gotten to this stage, you have a decent understanding of how Max works. So sure, what you have here you could (mostly) recreate with the devices — but now you have a template you can modify. Build in your own unique arpeggiator inside the patch. Mod the filter. Build a custom UI. Add AI-powered gesture control. It’s up to you.
It’s fun to look back at the Ableton stock instruments and then think about how you might combine these elements in different ways. Ever wanted a three-oscillator Meld? Or to insert an effect in the middle of the signal chain? You’ll notice some familiar oscillator types, too.
Now that you know your way around Ableton DSP, your next stop is probably Ableton’s own pack/guide, which includes the other tutorials I’ve referenced. Think of these examples like design patterns, and they really come alive with the addition of the Ableton DSP tools.
Plus see the other two parts of this guide for help building effects and more of the beginner guide to Max.
And when you’re ready to make this integrate nicely with hardware (standalone is in the headline, but really all Push and Move owners benefit):
Got requests? Let us know. And absolutely shout if you build anything after reading this!
Now I knew those audio cables in Max were reminding me of something: